


Suppose you use Linux as your daily driver, then your work or school prescribed a program that only runs on Windows. What a bummer. But before you think about spinning up a virtual machine, which would hog your computer resources, why not consider a better alternative—Wine for Ubuntu.
Stay tuned and learn to install and configure Wine for Ubuntu and run Windows applications seamlessly in no time!
Prerequisites
This tutorial will be a hands-on demonstration. If you’d like to follow along, you’ll need a computer running on at least Ubuntu 18.04 and a desktop environment. This guide uses Ubuntu 20.04.
Enabling Multiarch Support On Your Ubuntu Computer
Wine comes in 64-bit and 32-bit binaries. If you have a 64-bit capable CPU, you should install both to ensure support for programs for both architectures. But before you can install the 32-bit required binaries, you must enable the multiarch support on your Ubuntu computer.
1. First, open a terminal window on your Ubuntu desktop or log in via SSH if remote.
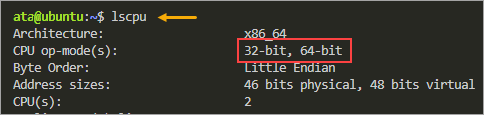
2. Next, run the below command to determine your computer’s CPU architecture.
lscpuLook for the CPU op-mode(s) value in the result. The result determines whether your computer can run programs that are 32-bit only or both 64-bit and 32-bit. As you can see below, this computer can run both 64-bit and 32-bit programs.
If your CPU architecture is 32-bit only, skip the remaining steps in this section as they do not apply to your computer.
3. Now, enable the multiarch support on your Ubuntu computer by running the below command.
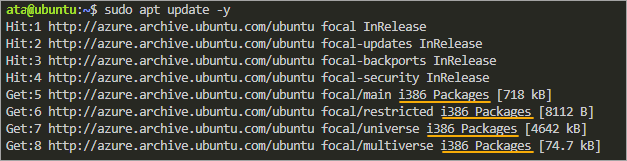
sudo dpkg --add-architecture i3864. Finally, update the package cache by running the below command.
sudo apt update -yAs you can see, your local package cache now includes 32-bit (i386) packages.
Installing Wine for Ubuntu from the Ubuntu Repository
The quickest and most convenient way to install Wine for Ubuntu is from the Ubuntu repository. How so? If you know how to run the apt command, then you’re already halfway there.
The official Ubuntu repository may not always have the latest version of Wine. If you prefer installing the latest stable Wine for Ubuntu, you may skip this section.
To install Wine from the Ubuntu repository via APT, follow these steps.
Depending on the CPU capability, run one of the commands below to install the appropriate version of Wine for Ubuntu. This tutorial installs both win64 and win32. Since you’re installing with apt, the process automatically installs the additional dependencies.
# Install Wine multiarch
sudo apt install wine64 wine32 -y

# Install 32-bit Wine for 32-bit only systems
sudo apt install wine32 -y
Now, confirm that the installation was successful by checking the Wine for Ubuntu version.
wine --version
You will see the version number of Wine that you have installed. At the time of writing, the latest stable version is Wine 5.0.3. Your version number may be different.

Installing Wine for Ubuntu from the WineHQ Repository
If you don’t want to second-guess the Wine version and make sure you’re installing the latest, installing from the WineHQ repository is your best bet.
Note: If you’ve already installed Wine for Ubuntu previously, uninstall them before performing the steps in this section.
The WineHQ official repository is a PPA (Personal Package Archive) containing the latest stable Wine version.
To install Wine from the WineHQ repositories, run these steps.
1. First, download and add the GPG key from WineHQ by running the below command. This step ensures the packages you install are from a trusted source.
wget -qO- https://dl.winehq.org/wine-builds/winehq.key | sudo apt-key add -
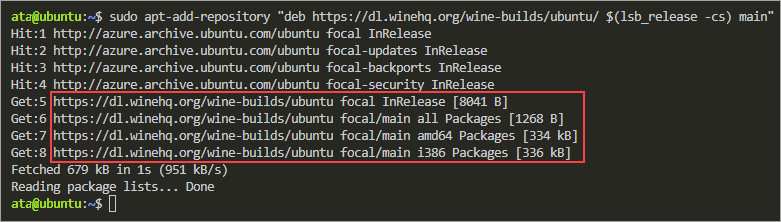
2. Next, run the below command to add the WineHQ repository to your sources.list file.
sudo apt-add-repository "deb https://dl.winehq.org/wine-builds/ubuntu/ $(lsb_release -cs) main"As a result, your package source list now includes the WineHQ repository URLs.
3. Now, install Wine for Ubuntu by running the below command. This command installs the latest stable version using the winehq-stable package. The –install-recommends ensures that apt install the recommended packages along with Wine.
If you wish to test the development version instead of the stable version for some reason, the package name should be winehq-devel.
sudo apt install --install-recommends winehq-stable -y4. Finally, run the following command to check the Wine version you installed.
wine --versionAt the time of writing, the latest stable version from the WineHQ repository is Wine 7.0. Your version number may be different.

Initializing The Wine Environment
You can now run Windows executable programs on your Ubuntu computer after installing Wine. But to avoid unnecessary interruptions when running an application in Wine for the first time, initializing the Wine environment is advisable.
In a nutshell, initializing the Wine environment creates the ~/.wine directory where Wine stores all of its configuration files. And if there are missing supporting packages, Wine will prompt you to install them during the initialization.
The ~/.wine folder is also called the WINEPREFIX folder. You may encounter other variations, such as Wine Prefix and Wine Bottle.
1. Login to your Ubuntu Desktop and open a new terminal window.
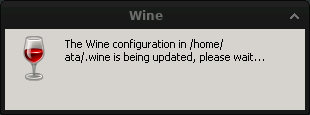
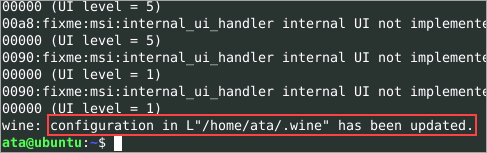
2. Run the below command to initialize your Wine environment. The wineboot command is Wine’s implementation of a Windows computer’s startup and shutdown sequence.
winebootYou will see a pop-up window similar to the screenshot below, showing the Wine environment directory.
3. When you get the prompt to install Wine Mono, click Install. Mono is a cross-platform implementation of the .NET Framework that Wine needs to run .NET applications.
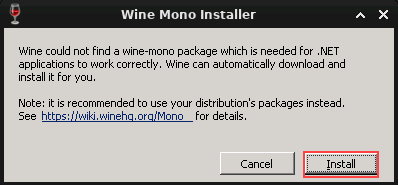
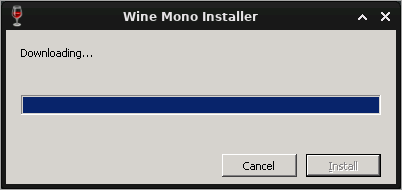
Wait for the Wine Mono installation to finish in a few seconds.
Back on the terminal, you should see a similar confirmation message to the screenshot below indicating that the initial configuration was successful.
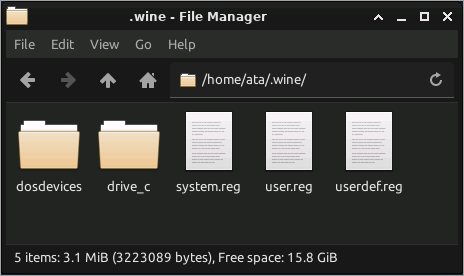
4. Open your computer’s file manager and explore the ~/.wine directory. You should see similar objects to the screenshot below. This folder contains the registry files and Wine’s drive C as a sub-folder.
Running Windows Applications with Wine
Now you’ve installed Wine for Ubuntu, what are the Windows applications you can run with it? Like a Windows computer that comes with out-of-the-box programs, Wine also has built-in programs you can run right away.
There are two ways to start a Windows program in Wine—via the command line or the file manager.
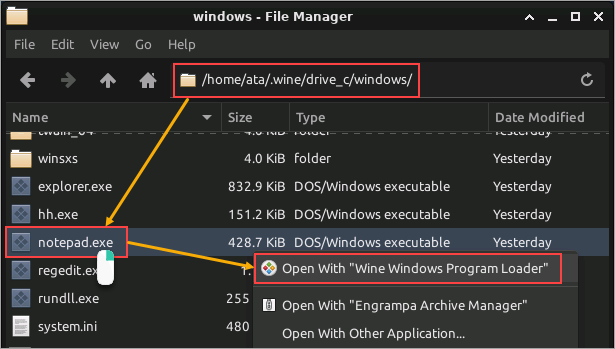
Opening a Windows Program from the File Manager
For example, one of the built-in programs in Wine is notepad.exe. To open this program, navigate to the ~/.wine/drive_c/windows/ folder. Right click the notepad.exe file and click Open With “Wine Windows Program Loader”.
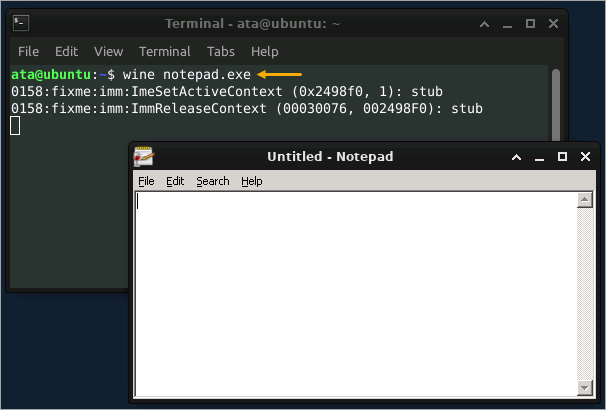
Opening a Windows Program from the Terminal
Running a Windows program in the terminal requires running the wine command followed by the program name. This example still uses notepad.exe as the program to run.
On the terminal, run the following command.
wine notepad.exe
Notice that the terminal prompt is not available while the Windows program is open. You’ll only get back the terminal control when you close the Windows program. Consequently, if you need to run another Windows program, you’ll have to open another terminal window.
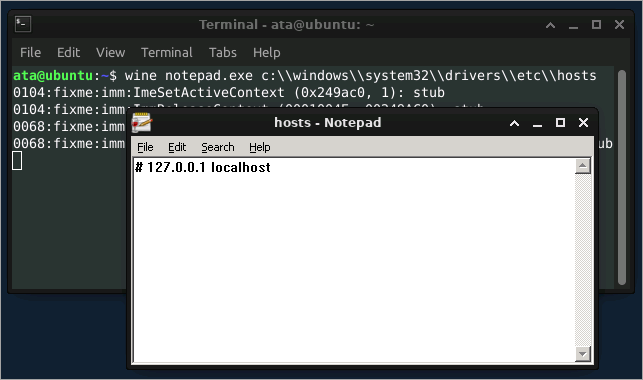
One advantage of starting a Windows program with wine is that the command accepts arguments. For example, to launch notepad.exe and automatically open a text file, append the file path as the argument. The command below opens the Windows hosts file.
wine notepad.exe c:\\\\windows\\\\system32\\\\drivers\\\\etc\\\\hosts
Installing Windows Applications in Wine
Wine does not restrict you to only the built-in programs, which means you can install other Windows applications. But not all Windows applications are compatible to run with Wine.
Visit the WineHQ – Wine Application Database (AppDB) for the list of verified compatible Windows applications.
To install a new application, you must download the EXE or MSI installer file and run it the same way you’d run an already installed program.
Perhaps you prefer Notepad++ instead of the Windows Notepad. To install, follow these steps.
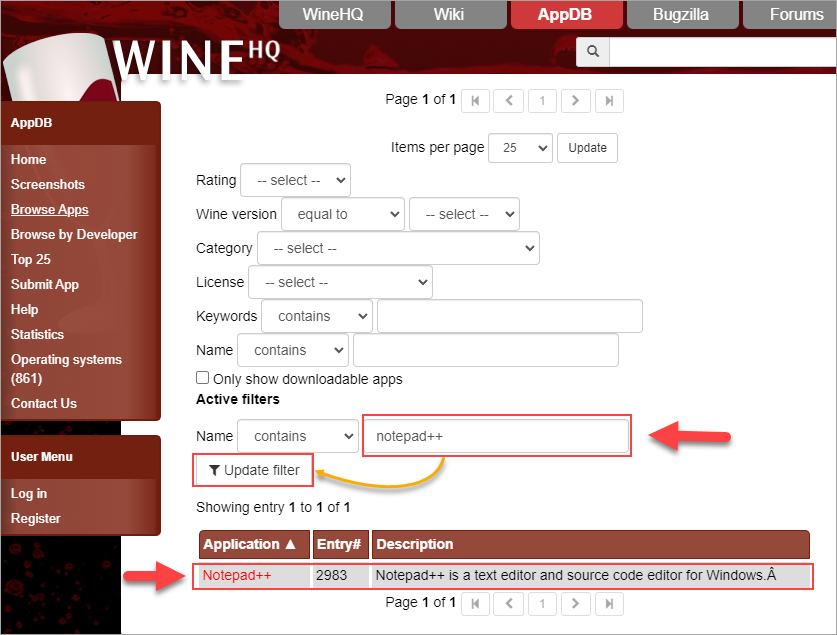
1. First, confirm that Notepad++ is compatible with Wine by running a search in AppDB. As you can see below, Notepad++ appears in the results, confirming that Notepad++ is a compatible program.
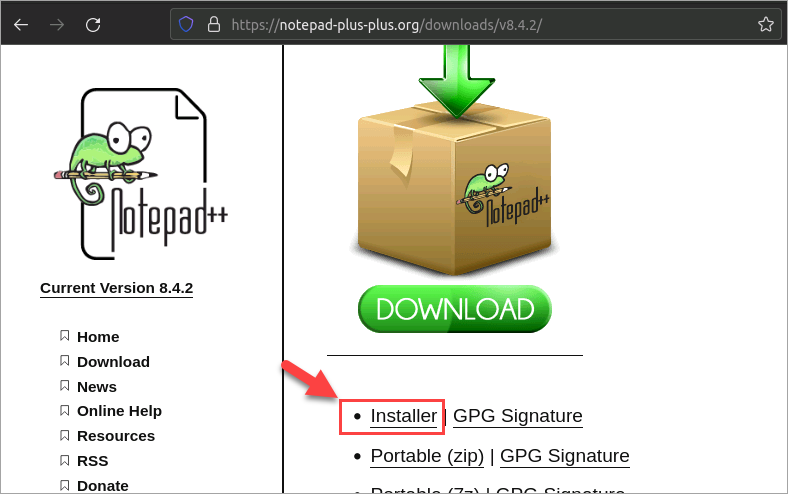
2. Once you’ve confirmed the application compatibility, download the latest Notepad++ installer from this link.
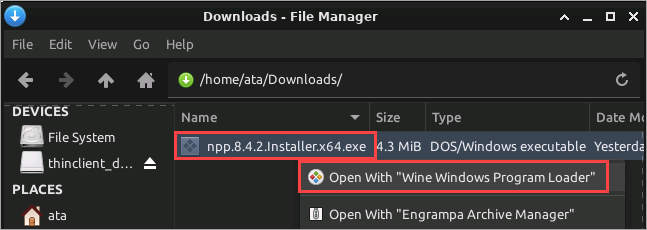
3. After downloading, locate the installer in your file manager. Right click the installer and click Open With “Wine Windows Program Loader”.
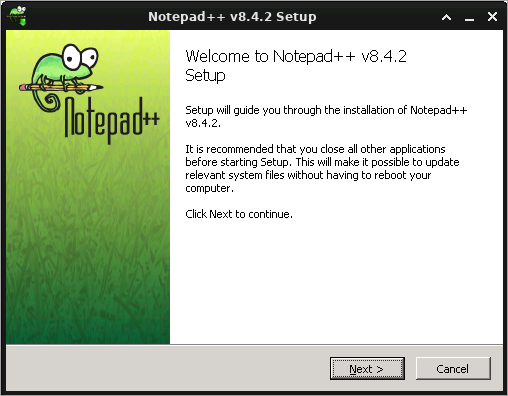
Complete the Notepad++ installation as if you’re installing it on a Windows computer.
4. Open Notepad++ by double-clicking its icon on your Ubuntu desktop or running the below command in the terminal.
wine notepad++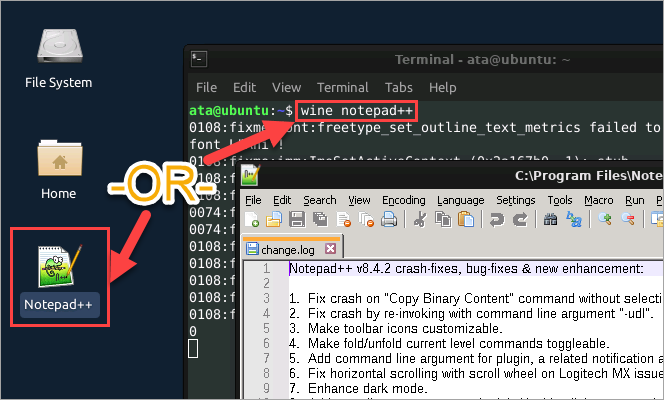
Installing Additional Packages with Winetricks
Some Windows applications may require additional packages to work correctly. For example, a Windows-based game might break if it cannot find a specific font in the system or the if the Visual C++ 2013 libraries are not installed.
You can install these additional packages with the help of Winetricks. Winetricks is a helper script that aids in downloading and installing packages in Wine.
1. Run the below commands in your terminal to download the Winetricks script.
# Change the working directory to ~/Downloads
cd ~/Downloads
# Download the Winetricks script
wget https://raw.githubusercontent.com/Winetricks/winetricks/master/src/winetricks
# Make the Winetricks script an executable file
chmod +x winetricks
# List files in the directory with attributes
ls -l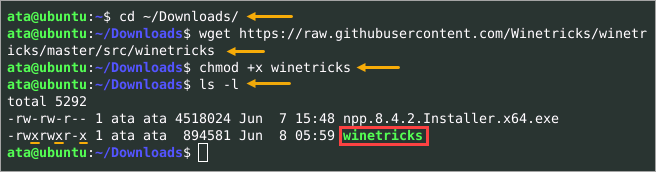
2. Now, invoke the winetricks script followed by the package names to install. The command below installs the Visual C++ 2013 libraries (vcrun2013) and the core Microsoft fonts (corefonts), including Arial, Courier, and Times New Roman.
./winetricks corefonts vcrun2013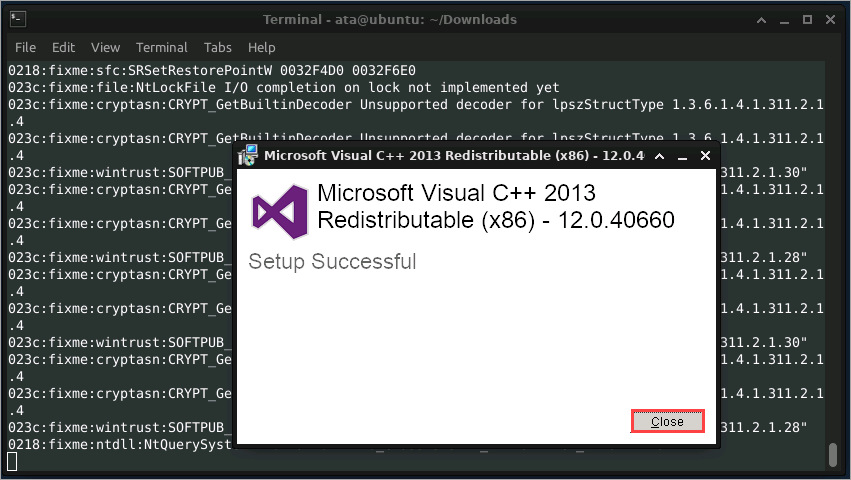
3. Lastly, run the below command to list all the installed packages and confirm that the core fonts and VC++ 2013 are present.
Note: Running ./winetricks without parameters will open a GUI interface instead.
./winetricks list-all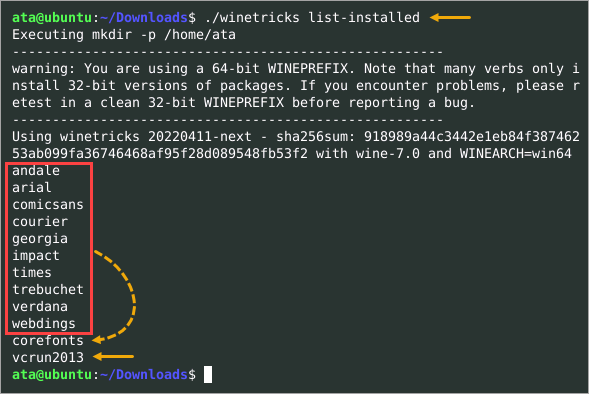
Winetricks divides packages into the apps, benchmarks, dlls, fonts, and games categories. Another category exists called settings, which contains the editable Wine settings.
To list available (installed or not) Winetricks packages, run the following script. If you specify the settings category, you will be listing the Wine settings instead.
./winetricks <category name> list
To know more about the Winetricks script, run ./winetricks –help to view the built-in help documentation.
Configuring Wine for Ubuntu Application Settings
At this point, you have a fully functional Wine setup. You may start using Wine as it is, and in most cases, you wouldn’t need to configure anything else. But whenever you need to make changes to Wine’s configuration, the winecfg tool is your weapon.
Wine’s version of the Windows operating system is Windows 7 by default. Some Windows programs may require a specific version of Windows to run. In which case, you may change the default Windows version or set the version per application.
1. Open the Wine Configuration tool by running the below command in the terminal.
wine winecfg2. The Wine Configuration tool has six tabs for different groups of settings. In this example, click the Applications tab, and you’ll see the Default Settings in the list, which is the global application settings. Do not change the default Windows version yet.
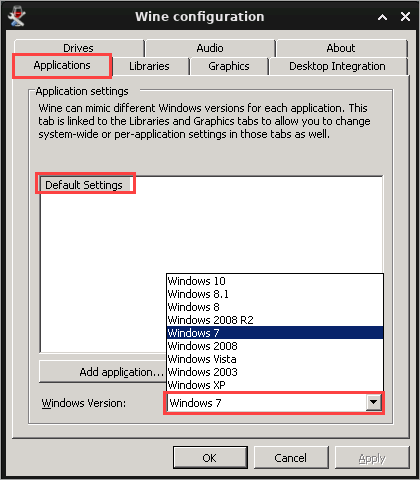
3. Suppose Notepad++ is most compatible with Windows 10, then you should create an explicit setting for that application. To do so, click Add application, locate and select the notepad++.exe file, and click Open.

4. Click the new notepad++.exe setting on the list, click the Windows Version dropdown box, and select Windows 10. Once you’ve set the Windows version, click OK to save the application setting and exit the Wine Configuration tool.
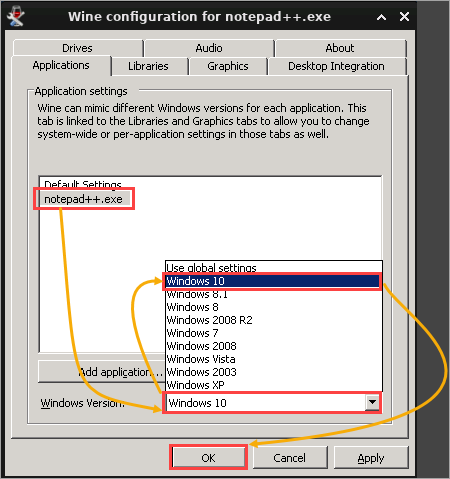
From this point forward, notepad++.exe runs on your computer as if it’s running natively on a Windows 10 PC.
Conclusion
In this tutorial, you learned how to get started with Wine for Ubuntu. You learned how to install Wine and how to launch a Windows application. You also learned how to configure Wine to get the best experience for the application you want to run.
Wine has come a long way since its inception and continues to improve with every new version. This solution is an excellent way to use your favorite Windows applications on Linux without dual booting your system.
If you feel like you’re cheating on Linux by using Wine (in a good way), you’re not wrong. If Wine allows you to accomplish what you need in Linux, use it!


