


Protecting your server from brute force attacks is a must. The question is, how exactly? Lucky for you, Fail2Ban is just around the corner to protect your server, but Fail2Ban’s default configuration needs some tweaking for optimal security. Worry not though, this tutorial has got you covered.
In this tutorial, you’ll learn how to set up Fail2Ban and ward off brute force attacks by securing your SSH server.
Ready? Read on to optimize security for your SSH server!
Prerequisites
This tutorial comprises step-by-step instructions. If you’d like to follow along, be sure you have the following in place:
- An Ubuntu and Debian servers – This tutorial uses a server running Ubuntu 18.04 LTS to set up Fail2Ban and a Debian 10 server to test Fail2Ban banning configurations.
- Root access or sudo privileges on the server to execute commands as a superuser.
- Fail2Ban installed in an Ubuntu or Debian server.
Setting up a Base Firewall
Fail2Ban protects your server by monitoring the logs and banning IP addresses that make too many login attempts within a certain time frame. But first, you’ll set up a base firewall where you can add rules to block malicious acts on your server.
1. First, run the service command below to stop Fail2Ban (fail2ban stop) from running. Stop Fail2Ban when you make changes to your configuration files so that you can test the changes and make sure they work as expected.
sudo service fail2ban stop
2. Run the apt install command to install Sendmail and IPTables-persistent. Sendmail is a program that Fail2Ban uses to notify you when it bans an IP address. While IPTables-persistent is a program that saves your changed configuration settings in the /etc/sysconfig/iptables file.
Having these programs installed keeps your firewall settings intact even if something unexpected happens, like a power outage.
sudo apt install sendmail iptables-persistent -yNow run each iptables command below to set up your firewall. These commands will not generate any output but add four rules to your firewall. These rules either allow or block connections to your server.
## First Rule - Accepts all traffic generated by the server (lo interface)
sudo iptables -A INPUT -i lo -j ACCEPT
## Second Rule - Accepts all traffic that are part
## of an established o related connection
sudo iptables -A INPUT -m conntrack --ctstate ESTABLISHED,RELATED -j ACCEPT
## Third Rule - Allows SSH traffic on port 22
sudo iptables -A INPUT -p tcp --dport 22 -j ACCEPT
## Fourth Rule - Arops all other traffic
sudo iptables -A INPUT -j DROP
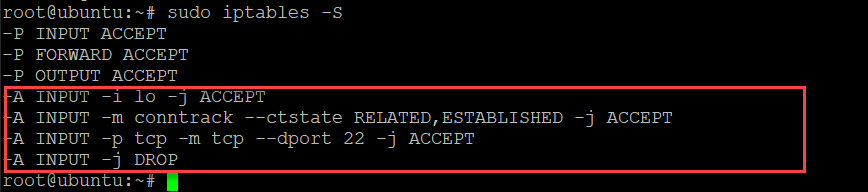
4. Run the iptables command below to view a summary of what you have set up in your firewall.
sudo iptables -SBelow, highlighted are the rules that you have added on your firewall.
5. Next, run the following commands to save your rules in the /etc/sysconfig/iptables-config file and start the Fail2Ban service. The iptables-config file holds all your permanent firewall rules.
Fail2Ban will automatically add a few rules to your firewall to protect your server.
sudo dpkg-reconfigure iptables-persistent
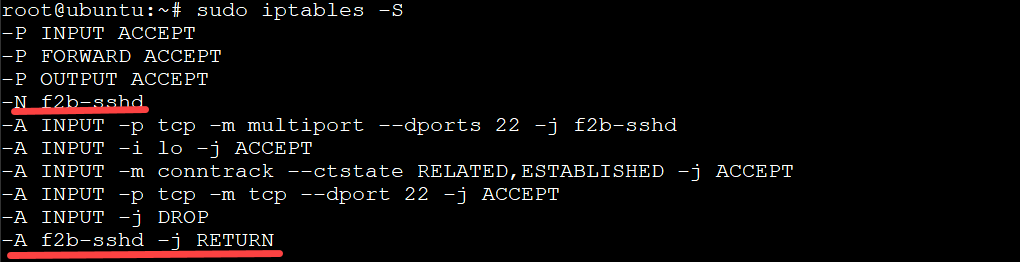
sudo service fail2ban start6. Finally, rerun the iptables command below to view your firewall rules.
sudo iptables -SA shown below, highlighted in red are the new rules that Fail2Ban has added to your firewall.
Adjusting your Local Fail2Ban Configuration
Now that you have a basic firewall running, it’s time to adjust your local Fail2Ban configuration file to add more control on securing your server. This tutorial uses the /etc/fail2ban/jail.conf configuration file as it contains all necessary options to configure global settings for the Fail2Ban application.
Perhaps, you want to create custom rules for your SSH server. If so, you’ll create a new jail.local file (based on the jail.conf file) and put the SSH-specific rules in the jail.local file. Doing so lets you override settings in jail.conf file for your server.
1. Run the awk command below to perform the following:
- Print the content (
'{ printf "# "; print; }') of the/etc/fail2ban/jail.conffile. - Create a file named jail.local (based on the jail.conf file), which can use to override the default settings in the jail.conf file.
- Pipe the content of the
/etc/fail2ban/jail.conffile to theteecommand. Doing so will write thejail.conffile’s content to your local filesystem (/etc/fail2ban/jail.local).
awk '{ printf "# "; print; }' /etc/fail2ban/jail.conf | sudo tee /etc/fail2ban/jail.local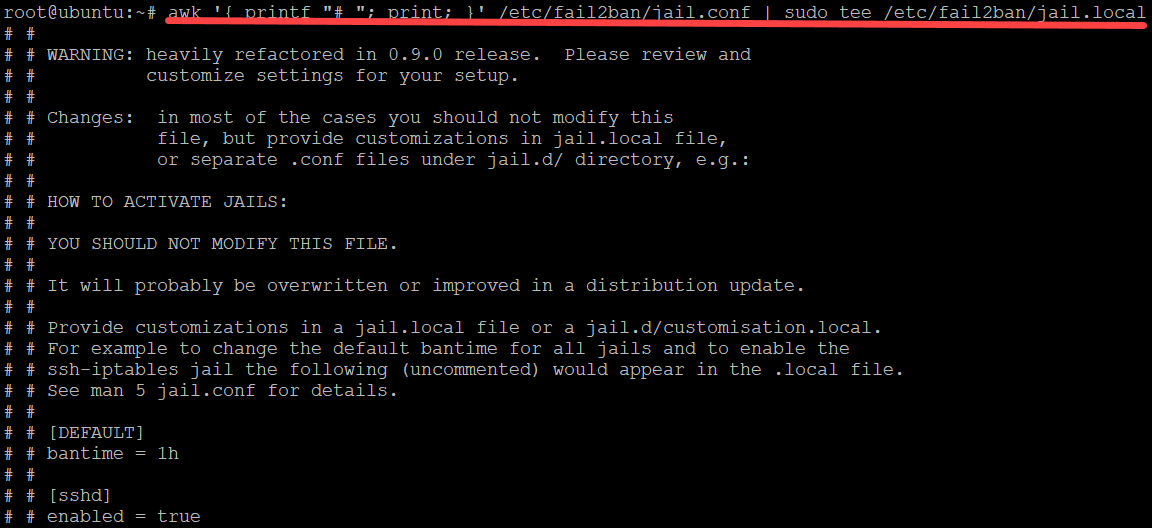
2. Once you’ve created the jail.local file, run the ls command below. The command lists the contents of your server’s Fail2Ban directory (/etc/fail2ban) to verify that your jail.local file is generated correctly.
ls /etc/fail2banIf you see the new jail.local file, as shown below, then your local file was generated correctly.

3. Open the /etc/fail2ban/jail.local file in your preferred text editor and navigate to the [ssh] section.
Uncomment the [sshd] and enabled options by deleting the # symbol in front of the options, as shown below to enable SSH.
From this point through the rest of the tutorial, remove the # symbol in front of either sections or options to enable them.
![Enabling the [ssh] section](https://adamtheautomator.com/wp-content/uploads/2021/12/image-277.png)
4. Scroll down, and uncomment the [DEFAULT] section shown below. This section is where you configure the default settings for Fail2Ban. Any settings in this section will be applied to all jails that Fail2Ban manages.
![Uncommenting the [DEFAULT] option](https://adamtheautomator.com/wp-content/uploads/2021/12/image-278.png)
5. Next, scroll down to the bantime section, and set a bantime for 60 minutes. The bantime option sets the amount of time, in minutes, that an IP address is banned after a failed login attempt.
The default bantime setting is 600 seconds (10 minutes). You can adjust this setting to your liking, but it’s important to note that the lower the bantime setting, the more load your server will experience.

6. Navigate to the findtime and maxretry options. Keep the findtime as is (10m) and lower the maxretry to 3.
The findtime option sets the amount of time, in minutes, that an IP address can fail to log in before it gets banned. While the maxretry option sets the number of failed login attempts before an IP address is banned.
The default findtime setting is 10 minutes, and maxretry is 5 minutes. As a result, an IP address that fails to log in 5 times within a 10 minute period will be banned.

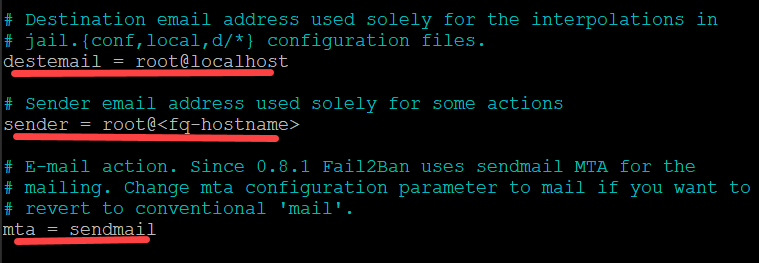
7. Scroll down, uncomment and configure the destemail, sender, and mta options:
- destemail – Enter an email address where Fail2Ban sends notifications.
- sender – Set the “From” field in the email that Fail2Ban sends to destemail.
- mta – Keep the default (sendmail) as is. The mta option sets the email delivery agent that Fail2Ban uses to send notifications.
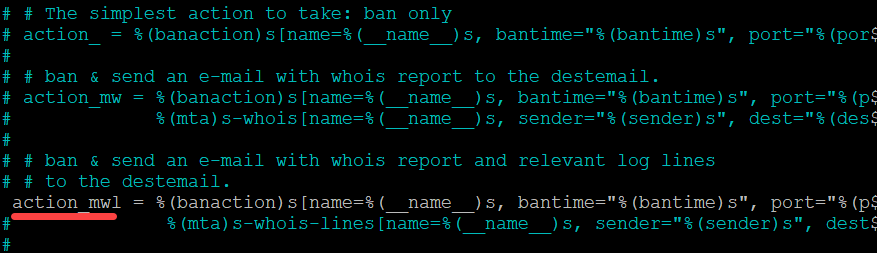
8. Navigate to the action options, as shown below, and uncomment the action_mwl option. Doing so lets Fail2Ban send logwatch emails to you. You can review logwatch emails to further investigate any potential security issues on your server.
Save the changes and exit from the text editor.
9. Now run the commands below to restart your fail2ban service.
sudo service fail2ban stop
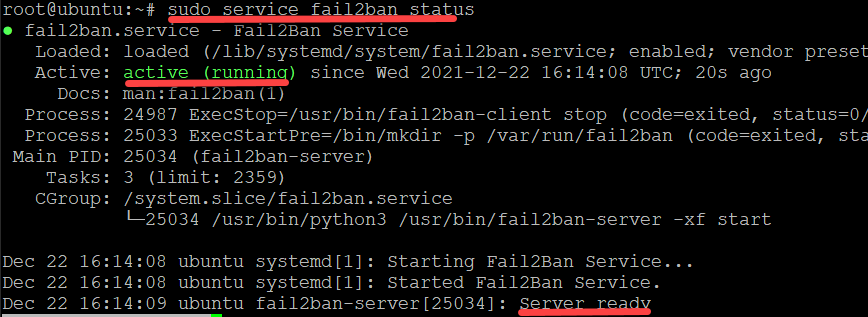
sudo service fail2ban start10. Finally, run the below command to check your fail2ban service status. sudo service fail2ban status If the Fail2Ban service is working, you’ll get an output like the one below.
sudo service fail2ban statusIf the Fail2Ban service is working, you’ll get an output like the one below.
Testing your Banning Configurations
You’ve just configured Fail2Ban, so now it’s time to test if the banning configurations actually work. Attempt multiple failed SSH logins to your Fail2Ban server from a secondary server and see if that secondary server gets banned.
1. Log in to your secondary server (Debian), and run the below command to SSH into your Fail2Ban server.
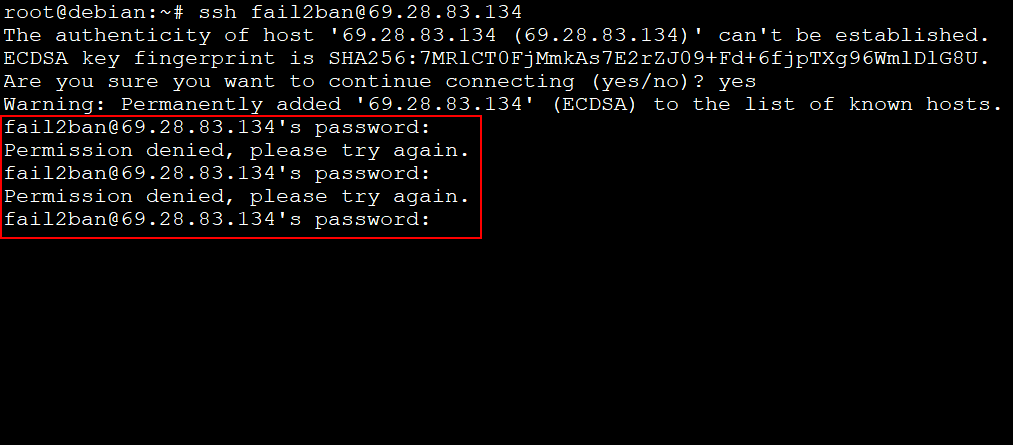
This demo uses a Debian 10 server with an IP of 134.122.20.103 to ssh to the fail2ban server that has an IP of 69.28.83.134.
2. Enter a random password when prompted and press Enter.
On the first try, the Fail2Ban server will stop the SSH login attempt and print the Permission denied message, as shown below. Repeat the SSH login attempt about two to three times more, and the Fail2Ban server will eventually stop responding to your SSH login attempt.
At this point, you won’t get a Permission denied message anymore but a blank screen. Getting a blank screen indicates that your second server (Debian) has been banned from the Fail2Ban server.
But perhaps you already have a list of IP address to block from your Fail2Ban server. If so, open the jail.local file and navigate to the [DEFAULT] section. Uncomment the ignoreip option and set the IP addresses to block, as shown below.
The address can be either multiple separate IPv4 or IPv6 entries, or else separated by commas.

3. On your Fail2Ban server (Ubuntu), rerun the iptables command below to view your firewall rules.
sudo iptables -SNotice below that there is a new rule that rejects SSH login attempts from the 134.122.20.103 IP address.
You’ll also receive an email from Fail2Ban, upon a successful ban, with a log file attached if you have sendmail set up on your Fail2Ban server. The email notification indicates that Fail2Ban has successfully stopped a brute-force attack and saved your server from potential damages.

Conclusion
Throughout this tutorial, you’ve learned how to configure Fail2Ban on an Ubuntu server. At this point, you should be well-equipped with the knowledge to protect your SSH server from brute-force attacks.
Now, why not take this newfound knowledge up a notch? Perhaps begin with blocking IPs on all ports with Fail2Ban on a docker host?


