


Terraform configuration management, in any environment, has its share of difficulties. But worry not. This tutorial has got you covered with some Terraform best practices to ensure successful deployments.
In this tutorial, you will launch an AWS EC2 instance while learning some of the best practices that allow you to securely and successfully manage your large infrastructure.
Sounds promising? Stay tuned and up your deployment skills with Terraform!
Prerequisites
If you’d like to follow along in this tutorial, ensure you have the following in place:
An Amazon Web Service account (AWS).
- An IAM user with an access key ID and secret key set up on your local machine.
- Terraform installed – This tutorial uses Terraform v1.36.
- An Ubuntu machine – This tutorial uses Ubuntu 22.04.5 LTS, but other operating systems with Terraform will work.
- A code editor – You can use any text editor to work with Terraform configuration files. But one that understands the HCL Terraform language, like Visual Studio (VS) Code, would be great.
Launching an AWS EC2 Instance with Terraform Best Practices
The AWS cloud has dozens of services, from computing, storage, networking, and more. Each of these services can communicate like an on-prem data center’s services. But, one of the most important services is the AWS EC2 instance.
In this tutorial, you will configure the Terraform files with best practices, such as using Lifecycle, workspace, variables, etc.
Using Comments to Save Time Later
Regardless of your familiarity with your Terraform configurations, using comments undoubtedly comes in handy. Besides making your configuration more comprehensive, comments also let you save time.
For example, you can comment out a line of command, which you can uncomment after testing the rest of the configuration.
To see how comments work, you will build a Terraform configuration file with the following:
Open your terminal and run the commands below, which do not provide output. Create a directory (mkdir) in your home directory and switch (cd) to that directory. This directory stores your Terraform configuration files. In this tutorial, the directory is called ~/terraform-count-demo but can be named differently.
mkdir ~/terraform-count-demo
cd ~/terraform-count-demo
Next, open your favorite code editor, populate the configuration below, and save it as main.tf inside the ~/terraform-count-demo directory. The main.tf file contains the main set of your Terraform configuration, along with descriptive comments.
There are three different comment styles in a Terraform configuration file, as follows:
| Comment Style | Function |
|---|---|
| # | Single-line comment style is the default and should be used in most cases. |
| // | An alternative to the # character, which also makes a single-line comment. |
| /* and */ | Start and end delimiters, which allow you to make multiple-line comments. |
💡 Note that double-forward slashes (
//) comment styles may automatically be transformed by configuration formatting tools to default single comment style (#). This behavior transpires since the double-forward slashes style is not idiomatic.
Below, the three comment styles are used to make the configuration more comprehensive.
resource "aws_instance" "my-machine" {
  # count and for_each cannot be used together
  count = 4 // Allows creation of four similar EC2 instances.

  # Set the virtual image to create a VM within an EC2 instance.
  ami = "ami-0742a572c2ce45ebf"

  /* Set the instance type of the workspace, either t2.medium or t2.micro,
  a separate instance of state data inside the Terraform directory */
  instance_type = terraform.workspace == "prod" ? "t2.medium": "t2.micro"
  # Set the availability zone
  availability_zones = var.availability_zones
}
Controlling Terraform Operations with Lifecycle Arguments
Terraform works great in defining cloud and on-prem resources (human-readable), but you still need a way to control Terraform operations. How? Lifecycle arguments let you create custom rules for resource creation and destruction.
Declaring lifecycle arguments is a game-changer when you want to minimize potential downtime and protect resources from change or impacting infrastructure.
Add the following configuration inside the resource code block in your main.tf file, which declares the lifecycle arguments. Terraform lifecycle defines the behavior of resources of how they should be treated, such as ignoring changes to tags and preventing destroying the infrastructure.
Below are three main arguments declared within the Terraform lifecycle.
| Lifecycle Argument | Function |
|---|---|
| create_before_destroy | Allows you to create the resource first before destroying a resource. This is the default option. |
| prevent_destroy | Terraform skips the destruction of the existing resource. |
| ignores-changes | Tells Terraform to ignore the changes. This is a list of attribute names, such as tags. |
| replace_triggered_by | Replaces the resource when any of the options change. This is a list of attribute names such as aws_instance, which when replaced trigger the resource to be replaced as well. |
But as you can see below, two of the three arguments are single-line comments.
  # Declare lifecycle arguments
  lifecycle {
      create_before_destroy = true
    # prevent_destroy = true
    # ignore_changes = [ tags, ]
    # replace_triggered_by = [ aws_instance.id, ]
  }
Tagging a Terraform Workspace
If you are building a huge infrastructure with Terraform, considering multiple Terraform Workspace is crucial. A Terraform workspace provides a separate virtual space to store your persistent data. Before building rock-solid resources, Terraform developers need multiple workspaces to test the same scripts and code.
💡 By default, Terraform has one workspace named default that you cannot delete. Also note that not all backends support workspaces.
Add the configuration of the following tag right below the lifecycle block in your main.tf file. This configuration tags the instance according to the workspace you wish to launch in.
  tags = {
    # Tags the instance according to the workspace to launch in.
    Name = "my-machine - ${terraform.workspace}-${count.index}"
  }
Once added, your full main.tf configuration should look like the one below.
resource "aws_instance" "my-machine" {
  # count and for_each cannot be used together.
  count = 4 // Allows creation of four similar EC2 instances.

  ami = "ami-0742a572c2ce45ebf"

  /* Set the instance type of the workspace, either t2.medium or t2.micro,
  a separate instance of state data inside the Terraform directory */
  instance_type = terraform.workspace == "prod" ? "t2.medium": "t2.micro"
  availability_zones = var.availability_zones

  # Declare lifecycle arguments.
  lifecycle {
		create_before_destroy = true
		# prevent_destroy = true
    # ignore_changes = [ tags, ]
    # replace_triggered_by = [ aws_instance.id, ]
  }

  # Tags the instance according to the workspace to launch in.
  tags = {
    Name = "my-machine - ${terraform.workspace}-${count.index}"
  }
}
Building a Variable and Provider Configuration
Variables in Terraform are also known as input variables or function arguments. You can set the values of these variables using CLI or environment variables.
Create a new file inside the ~/terraform-count-demo directory, name it vars.tf, and add the code below. The vars.tf file is a Terraform variables file containing all the variables the configuration file references.
In the below code, the variable named availability_zones is of type list(string), and the us-east-1a and us-east-1a are the default values.
variable "availability_zones" {
    type = list(string)
    default = ["us-east-1a","us-east-1b"]
}
💡 You can also run the following
exportcommand to declare the environment variables before running theterraform planandterraform applycommands:export TF_VAR_availability_zones=["us-east-1a","us-east-1b"]
💡 Another way to consume variables is by using the below command:
terraform plan -var 'availability_zones=["us-east-1a","us-east-1b"]'
Now, create one more file called provider.tf, and populate the following code, which defines the AWS provider (aws) with the region set to us-east-1.
The provider.tf file contains the Terraform backend where the Terraform state file will reside. The Terraform state file contains all resource details and tracking, which were or will be provisioned with Terraform.
There are two types of Terraform backend, as follows:
- Local backend – Resides where you run Terraform, a Linux machine, a Windows machine, or wherever you run Terraform from.
- Remote backend – A SAAS-based URL or storage location, such as an AWS S3 bucket.
The source within the Terraform provider contains the following components:
- Hostname – The hostname of the Terraform registry that distributes the provider. The default hostname is
registry.terraform.io. - Namespace – An organizational namespace within the specified registry, like Hashicorp or partner.
- Type – A type is a short name you provide for the platform or system the provider manages, which must be unique.
terraform {
   # Declare the source parameter in Terraform 0.13 and later versions.
   required_providers {
     aws = {
        # Sets the source address where Terraform can download plugins
        source = "hashicorp/aws"  # The syntax is <hostname>/<namespace>/<type>
                                  # hostname like registery.terraform.io
                                  # registery.terraform.io/hashicorp/aws commonly known as hashicorp/aws

        # Declaring the version of AWS provider as 4.35.0
        # Installs the relevant dependencies and plugins
        version = "4.35.0"
     }
   }
}

provider "aws" {
    region = "us-east-1"
}

# Local Backend
# Whenever a statefile is created or updated, it is stored in the local machine.

terraform {
  backend "local" {
    path = "relative/path/to/terraform.tfstate"
  }
}

# Configuring Terraform to use the remote terraform backend s3.
# Whenever a statefile is created or updated, it is stored in the AWS S3 bucket.

terraform {
  backend "s3" {
    bucket = "mybucket"
    key    = "path/to/my/key"
    region = "us-east-2"
  }
}
Running Terraform to Create an AWS EC2 instance
With your Terraform configuration and variables files ready, it is time to initiate Terraform and create the EC2 instances.
To provision, a Terraform configuration, Terraform typically uses a three-stage approach terraform init → terraform plan → terraform apply.
1. Run the below command to change the working directory to the ~\terraform-count-demo directory.
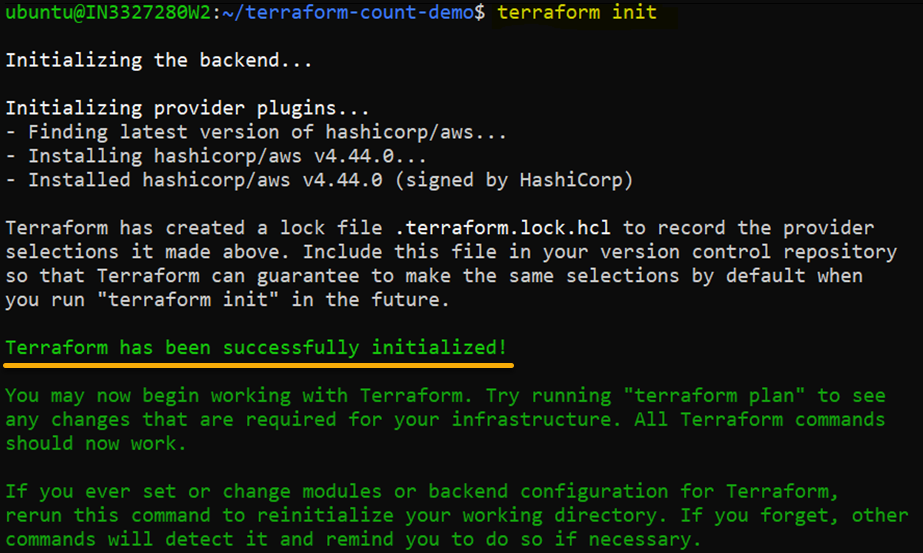
~\terraform-count-demo2. Run the terraform init command in the ~\terraform-count-demo directory to initialize the plugins and providers required to work with resources.
terraform initIf all goes well, you should see the message Terraform has been successfully initialized in the output, as shown below.
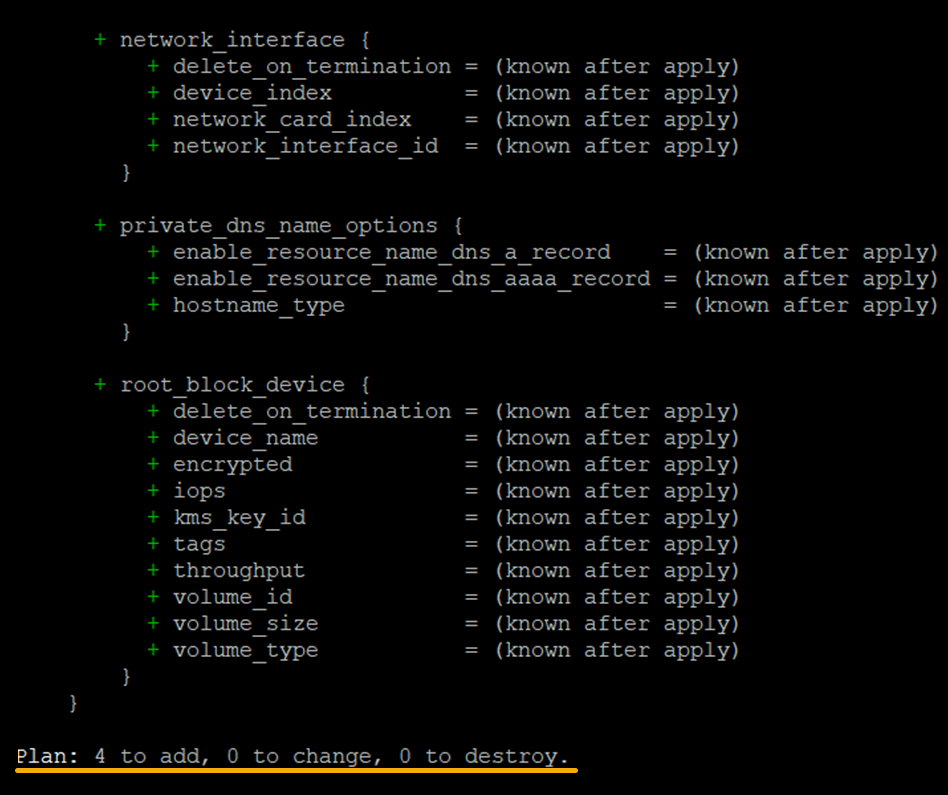
3. Once initiated, run the below terraform plan command, an optional yet recommended action to ensure your configuration’s syntax is correct. This command gives you an overview of which resources will be provisioned in your infrastructure.
terraform planIf successful, you will see a message like the one below, which summarizes the plan of which resources will be provisioned.
4. Run the following terraform apply command to tell Terraform to provision the AWS EC2 instances. Terraform reads the configuration (main.tf) and the other files to compile a configuration.
terraform apply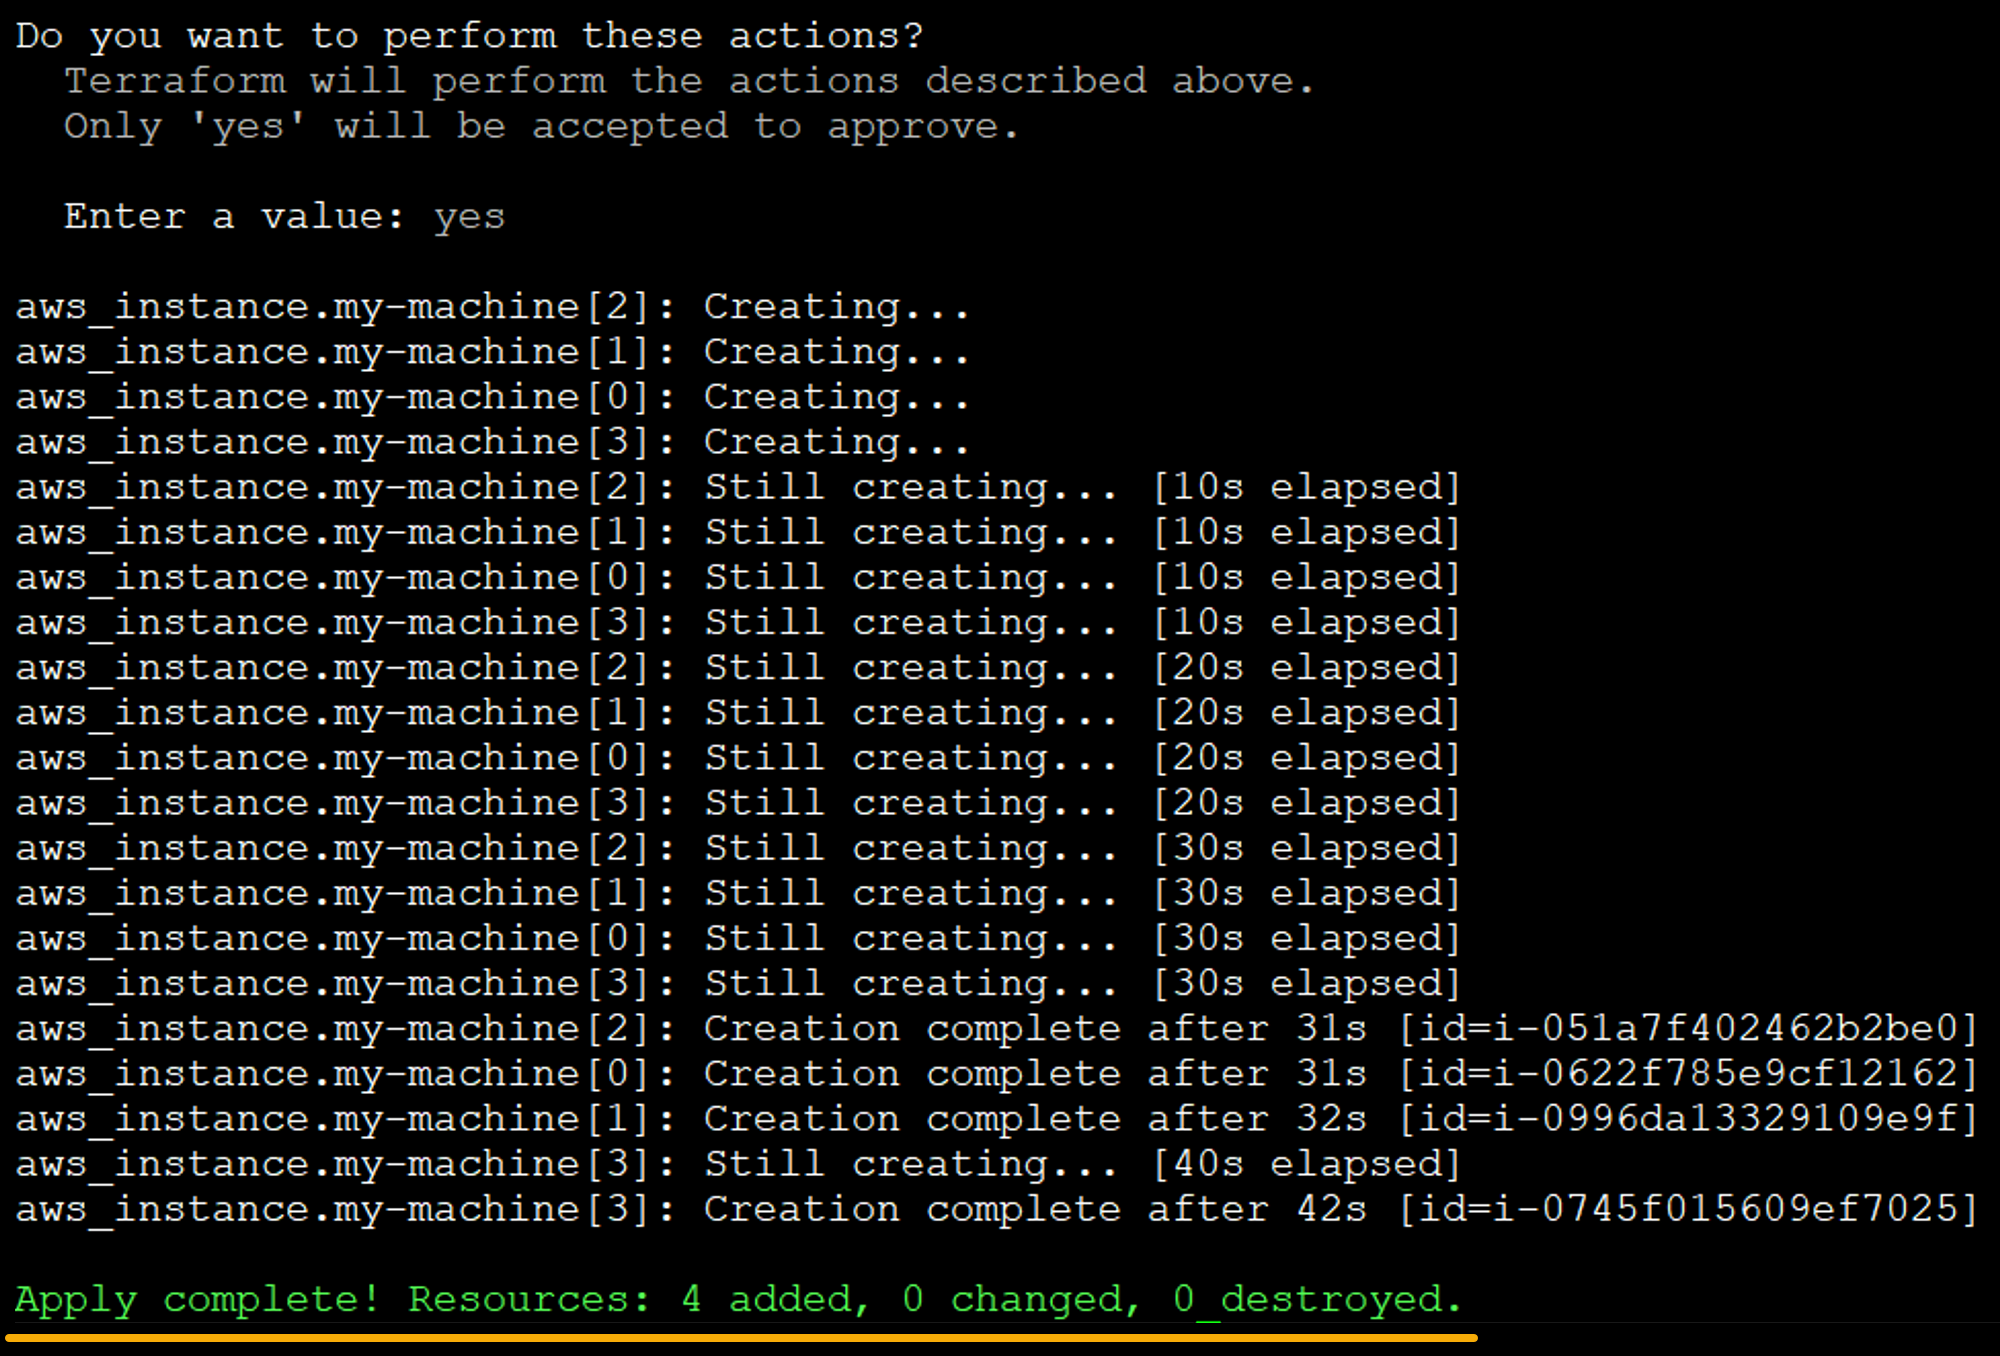
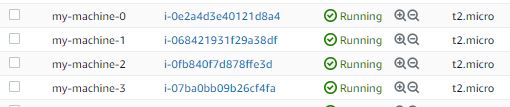
5. Finally, open your favorite web browser, and log on to the AWS Management Console to verify the machines. On the EC2 page, you will see all four newly-created EC2 instances, as shown below.
Conclusion
Terraform offers consistent workflow, letting you provision and manage infrastructures throughout its lifecycle. And in this tutorial, you have learned to ensure success with your workflow in Terraform with best practices.
You can confidently secure your Terraform state with Terraform backends, local, and remote backends (AWS S3).
With this newfound knowledge, why not try storing the states of other AWS services with Terraform backends? Or perhaps migrate the state from S3 to Terraform Cloud?


