


Backup is one of the most critical things in every industry, and you may be looking for which backup solution is most reliable. Why not try Restic backup on Linux?
Restic is a secure, fast, and reliable backup solution. And in this tutorial, you’ll learn to set up Restic backup system on a Linux server.
Read on and never lose any of your data anymore!
Prerequisites
This tutorial will be a hands-on demonstration. To follow along, be sure you have the following:
- Two Linux Servers – This tutorial uses two Debian 11 servers named server1 and backup-server.
- A non-root user with sudo privileges.
Installing Restic on Linux
Restic stores data in the encrypted repository, and whenever you add data to the repository, Restic automatically creates a new snapshot. But before taking advantage of the Restic backup utility, you’ll first have to install Restic on your machine.
1. Open your terminal and log in to the server1 machine.
2. Next, run the wget command below to download the Restic binary file. As of this writing, the latest version of Restic is v0.12.1.
wget https://github.com/restic/restic/releases/download/v0.12.1/restic_0.12.1_linux_amd64.bz23. Run the following commands to extract the restic_0.12.1_linux_amd64.bz2 file, and verify the restic_0.12.1_linux_amd64 binary file exists.
# Extract restic_0.12.1_linux_amd64.bz2
bzip2 -dv restic_0.12.1_linux_amd64.bz2
# List the files to verify restic_0.12.1_linux_amd64 exists
ls
4. Now, run the chmod command to make the restic_0.12.1_linux_amd64 file executable, then rename and move the file to the /usr/bin/restic directory.
At this point, you can now run the restic command on your server.
# Make Restic file executable
chmod +x restic_0.12.1_linux_amd64

# Installing Restic
mv restic_0.12.1_linux_amd64 /usr/bin/restic5. Run the restic command below to generate the bash completion for Restic. Doing so makes it easy for users to run the restic command.
restic generate --bash-completion /etc/bash_completion.d/restic6. Lastly, run the below command to reload the bash completion on your current terminal session, then run the restic command and press TAB to show available options for the restic command.
Lastly, run the following commands to reload the bash completion on your current terminal session. Type restic, and press the TAB key to show available options for the restic command.
# reload bash completion
source /etc/profile.d/bash_completion.sh

# verify restic command
restic
You should see all available options of the restic command, as shown below.

Setting up a Backup Server
Now that you’ve installed Restic on the server1 machine, the next step is to set up the backup-server, so you can start backing your data through the SFTP protocol.
By default, Restic allows you to backup data to the local directory, remote server, and SFTP protocol. Restic also lets you backup data to third-party cloud backup services such as Amazon S3, Azure Blog Storage, Backblaze B2, and Google Cloud Storage.
1. Open a new terminal and log in to the backup-server machine.
2. Next, run the below command to create a new user named johndoe and set up a password.
# create new user
useradd -m -s /bin/bash johndoe

# setup the password
passwd johndoe
3. Run each command below to create a new backup directory (/srv/backup) for Restic and change the ownership (chown) to the johndoe user and group. This directory will store all backup data from the server1 machine.
# create new backup directory
mkdir -p /srv/backup
# change ownership of the backup directory
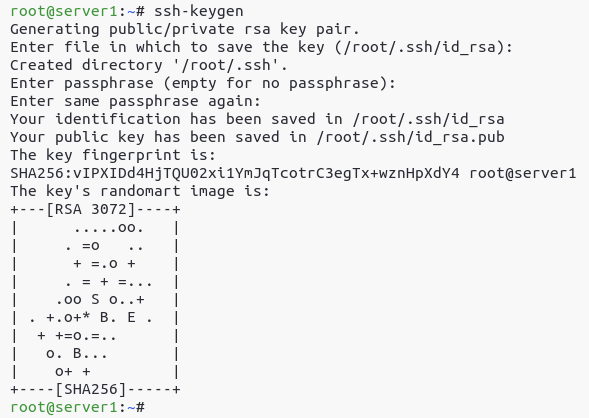
sudo chown -R johndoe:johndoe /srv/backup4. Now, switch to the server1 machine, and run the below command to generate an SSH key.
Instead of using password-based authentication, you’ll go for key-based authentication. An SSH key is essential, especially when setting up an automatic backup with a shell script or using Cron jobs.
ssh-keygenPress ENTER to the following prompts, as shown below. Doing so sets the save location of your SSH key to the default directory (~/.ssh) and disables the password for your SSH private key.
At this point, in the ~/.ssh directory, you’ll have the id_rsa (SSH private key) and the id_rsa.pub (your public key) files.
5. Run the ls command below to verify that the id_rsa and id_rsa.pub files exist in the ~/.ssh directory.
ls ~/.ssh/
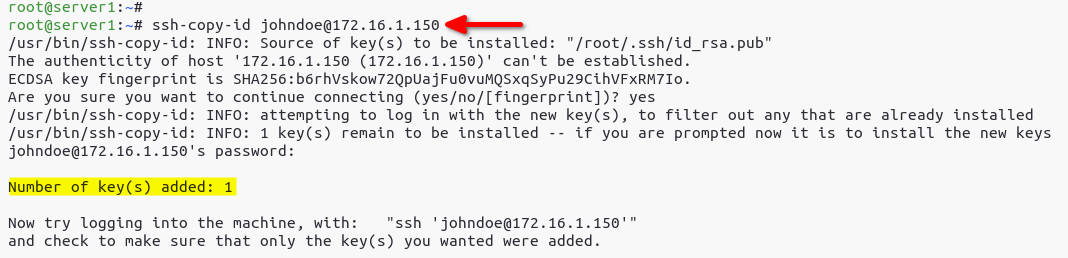
6. Next, run the ssh-copy-id command below to upload the SSH public key to the backup-server. In this demo, the backup-server uses the username johndoe and the IP address 172.16.1.150.
ssh-copy-id [email protected]When the upload completes, you’ll receive the message saying Number of key(s) added: 1 on your terminal.
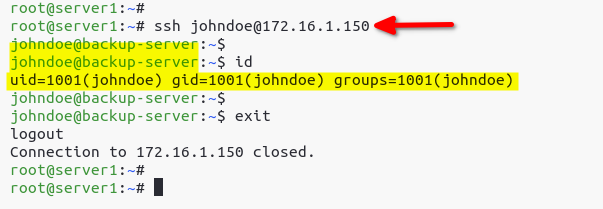
7. Lastly, run the ssh command below to verify and connect to the backup-server.
Notice that you automatically logged in to the backup-server without password authentication.
Initializing a New Repository
You’ve now configured the Restic backup server, so the next step is to initialize a new repository. Restic will store backup data in a repository, and each backup action creates a new snapshot inside that repository.
1. Run the restic command below to initialize (init) a repository (-r <sftp:[email protected]>:/srv/backup) using the SFTP protocol.
restic -r sftp:[email protected]:/srv/backup init2. Input a strong password for the repository and confirm the password. Remember the password, as you’ll use it to decrypt your backup data.
As shown below, the new repository (a9073b62d0) is created on the SFTP server (sftp:[email protected]:/srv/backup).

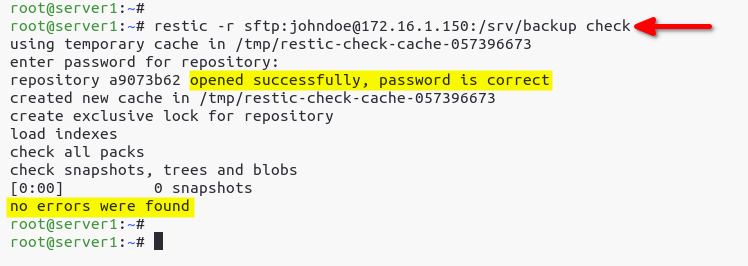
3. Lastly, run the restic command below to verify the repository. You’ll be prompted to input the password you previously noted for the repository (step two).
restic -r sftp:[email protected]:/srv/backup checkIf there’s no error, you’ll get the no errors were found message, shown below.
Backing up Data to a Repository
You’ve now initialized the repository using the SFTP server on the backup-server. But how do you backup data with Restic? You’ll back up data from server1 to the repository in the backup-server.
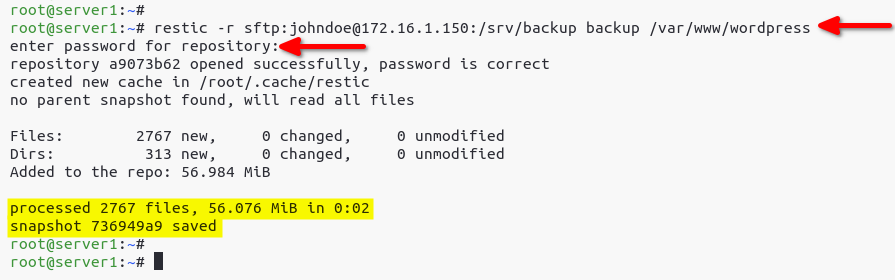
1. Run the restic command below to back up the data from the /var/www/wordpress directory to the repository.
restic -r sftp:[email protected]:/srv/backup backup /var/www/wordpressInput the password for the repository, and when the backup process is complete, Restic creates the snapshot (736949a9), as shown below.
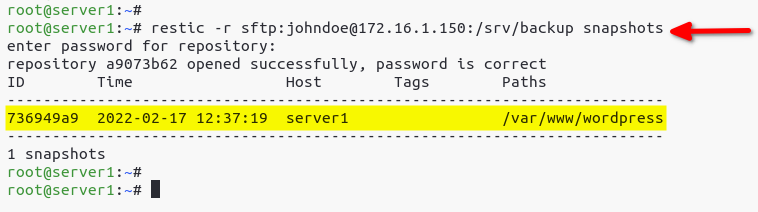
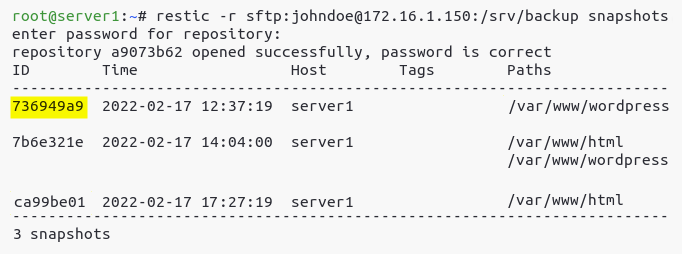
2. Next, run the below command to list all snapshots.
restic -r sftp:[email protected]:/srv/backup snapshotsEnsure the snapshot (736949a9) is available on the list, as shown below
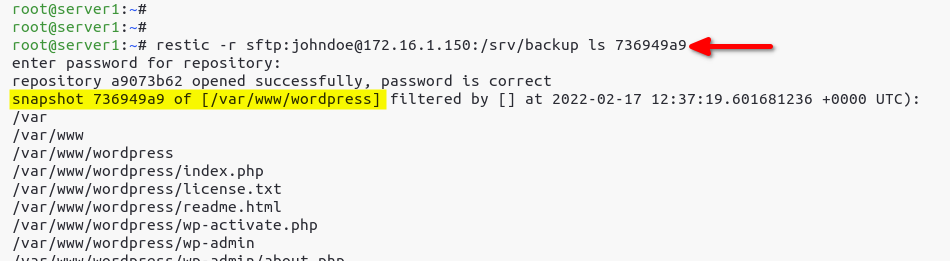
3. Run the below command to list all files (ls) on the snapshot (736949a9).
restic -r sftp:[email protected]:/srv/backup ls 736949a9You’ll see the list of files on the snapshot (736949a9), which is the backup data from the /var/www/wordpress/ directory.
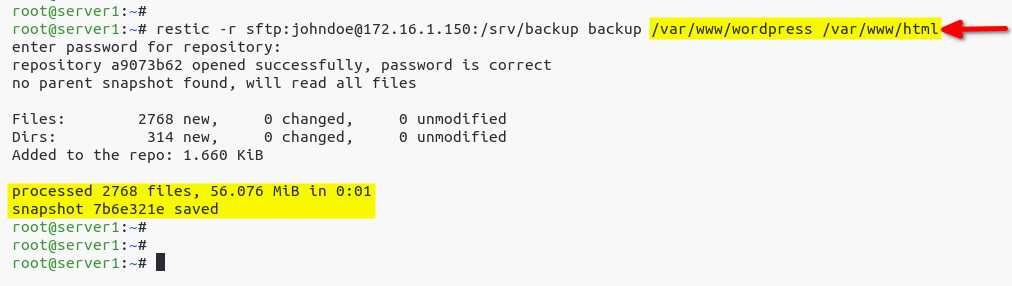
Additionally, you can run the below command to backup multiple directories (/var/www/wordpress and /var/www/html) to the same repository.
restic -r sftp:[email protected]:/srv/backup backup /var/www/wordpress /var/www/htmlNotice below that Restic created a new snapshot (7b6e321e).
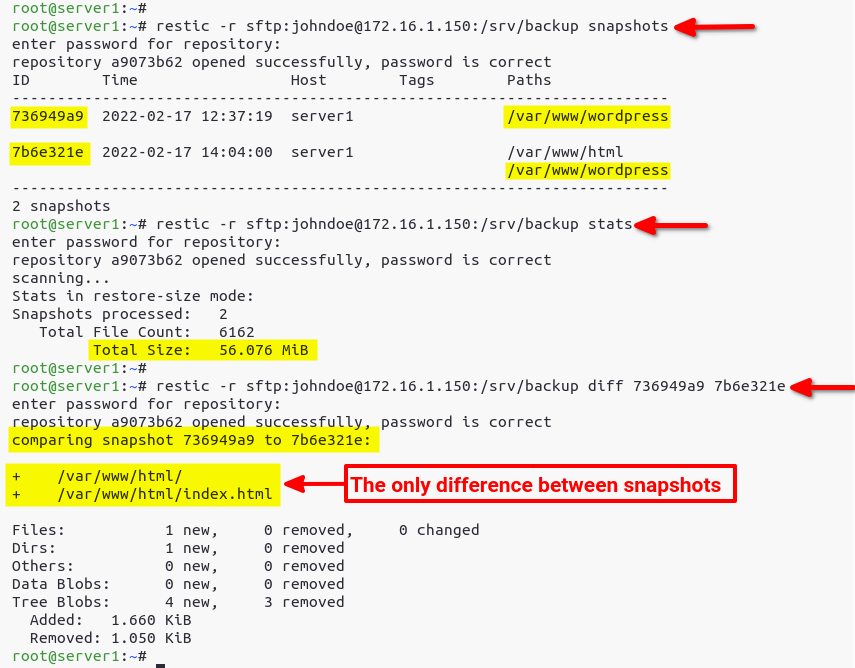
4. Now, run each command below to list all snapshots, stats of backup files, and the difference between two snapshots (736949a9 and 7b6e321e).
# checking list snapshots
restic -r sftp:[email protected]:/srv/backup snapshots

# show stats of repository
restic -r sftp:[email protected]:/srv/backup stats

# checking different between two snapshots
restic -r sftp:[email protected]:/srv/backup diff 736949a9 7b6e321e
Below, the snapshots 736949a9 and 7b6e321e have the same backup data (/var/www/wordpress). Notice that their file sizes on the repository are also the same since Restic only backs up file changes, making Restic fast and efficient.
Excluding Files in Backup Processes
Backing up data comes in handy, but how do you exclude unnecessary data? Restic lets you exclude files/directories with the --exclude-file option during the backup process.
The --exclude-file option can exclude junk files, such as log files, making the backup process faster and cleaner.
1. Run the below command to create a new directory called /opt/backup to store the backed-up files.
mkdir -p /opt/backup2. Next, create a new file (/opt/backup/excludes.txt) using your preferred text editor and populate the following configuration.
The configuration below tells Restic to exclude files with different file types.
# excludes files .zip
*.tar.gz
# excludes directory logs
logs
# exclude .txt files on the directory data
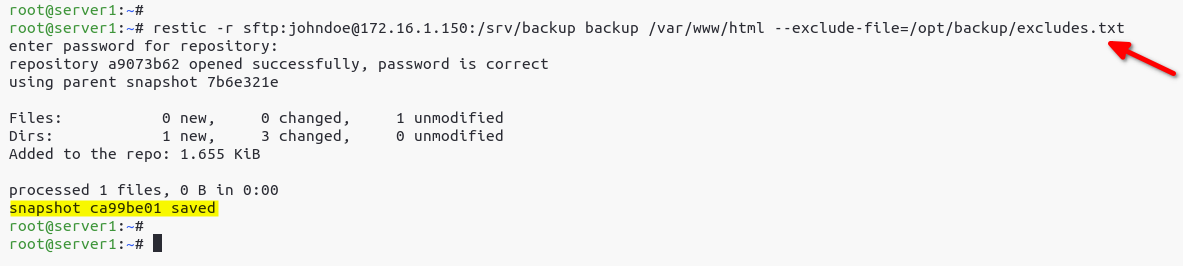
data/*.txt3. Run the below command to backup data from the /var/www/html directory to the repository (-r <sftp:[email protected]>:/srv/backup). The --exclude-files option tells Restic to exclude files and directories listed in the exludes.txt file.
restic -r sftp:[email protected]:/srv/backup backup /var/www/html --exclude-file=/opt/backup/excludes.txtBelow, the new backup snapshot ca99be01 is created by Restic, excluding files, you specified in the excludes.txt file.
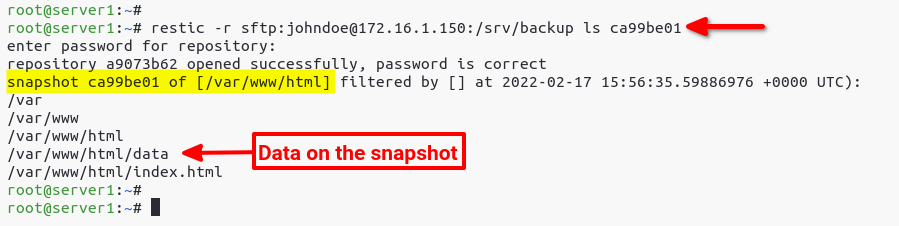
4. Now, run the below command to verify the list of files (ls) on the snapshot ca99be01.
restic -r sftp:[email protected]:/srv/backup ls ca99be01You’ll see all backed-up files except those you defined in the configuration file (excludes.txt).
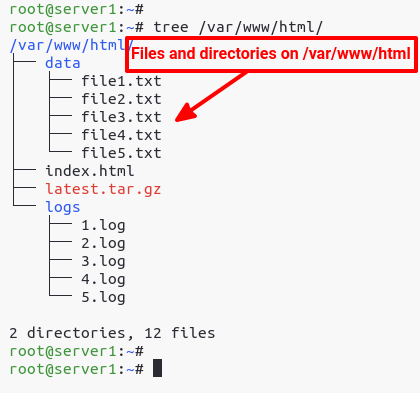
5. Finally, run the tree command below to verify excluding data works with Restic.
tree /var/www/html/As you see below, the /var/www/html directory contains text files inside, but Restic didn’t exclude them from the backup.
Removing Snapshots from Repository
In most cases, you may only need two or three versions of snapshots at the latest. So why not remove the older snapshots? Removing snapshots require that you know the snapshot’s ID, so check the list of snapshots first.
1. Run the below command to list all snapshots in the repository.
restic -r sftp:[email protected]:/srv/backup snapshotsPick one ID of the snapshot to remove (736949a9).
2. Next, run the following commands to remove (forget) specific snapshot (736949a9), and its remaining data from the repository.
# Removes snapshot only
restic -r sftp:[email protected]:/srv/backup forget 736949a9
# Removes remaining data from repository
restic -r sftp:[email protected]:/srv/backup prune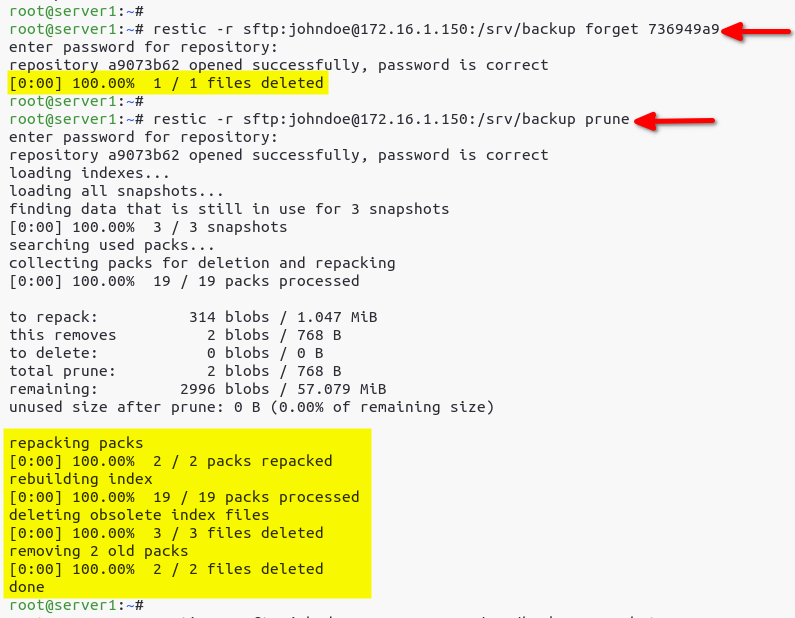
3. Run the below command to perform a --dry-run and see which snapshots will be removed (forget) and which two snapshot versions will be kept (--keep-last 2).
Before deleting snapshots, a dry run is always recommended to avoid losing important snapshots.
restic -r sftp:[email protected]:/srv/backup forget --keep-last 2 --prune --dry-run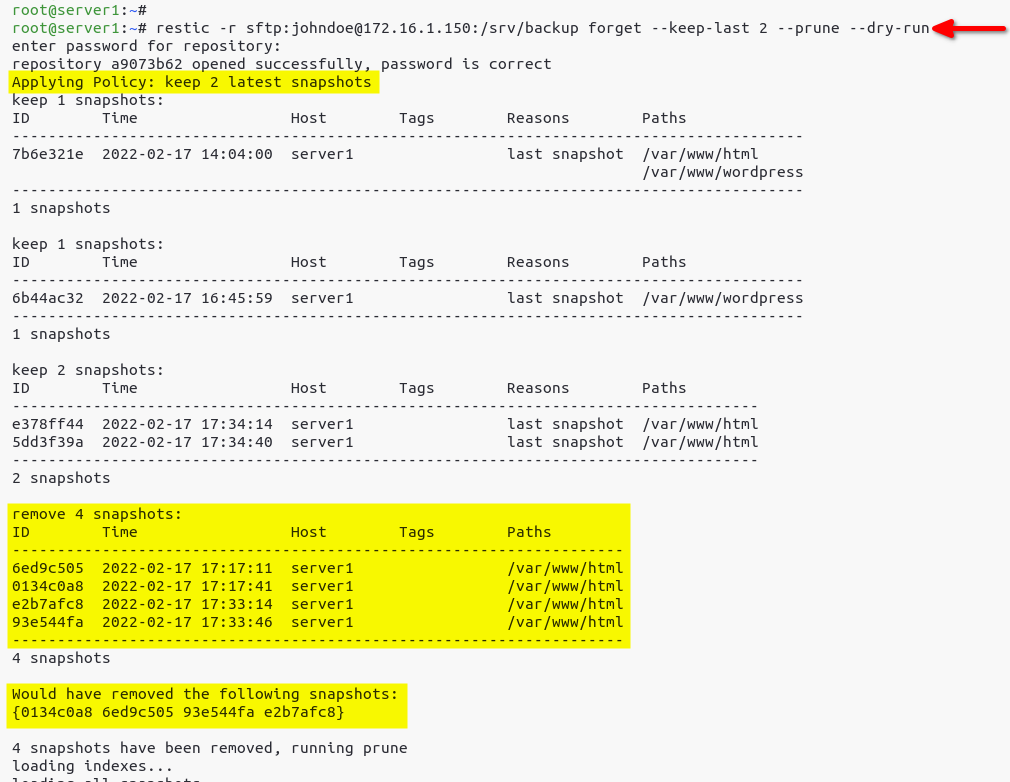
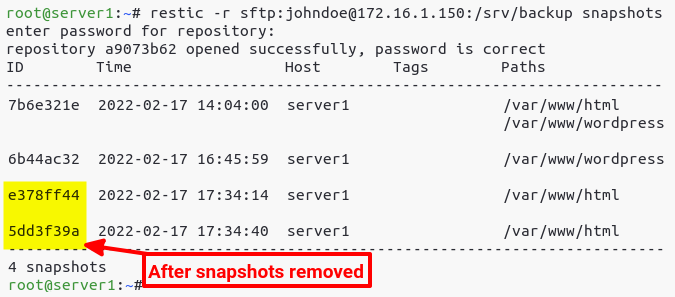
4. Run the below command to remove (forget) old snapshot versions and keep the last two (--keep-last 2) from the repository.
restic -r sftp:[email protected]:/srv/backup forget --keep-last 2 --prune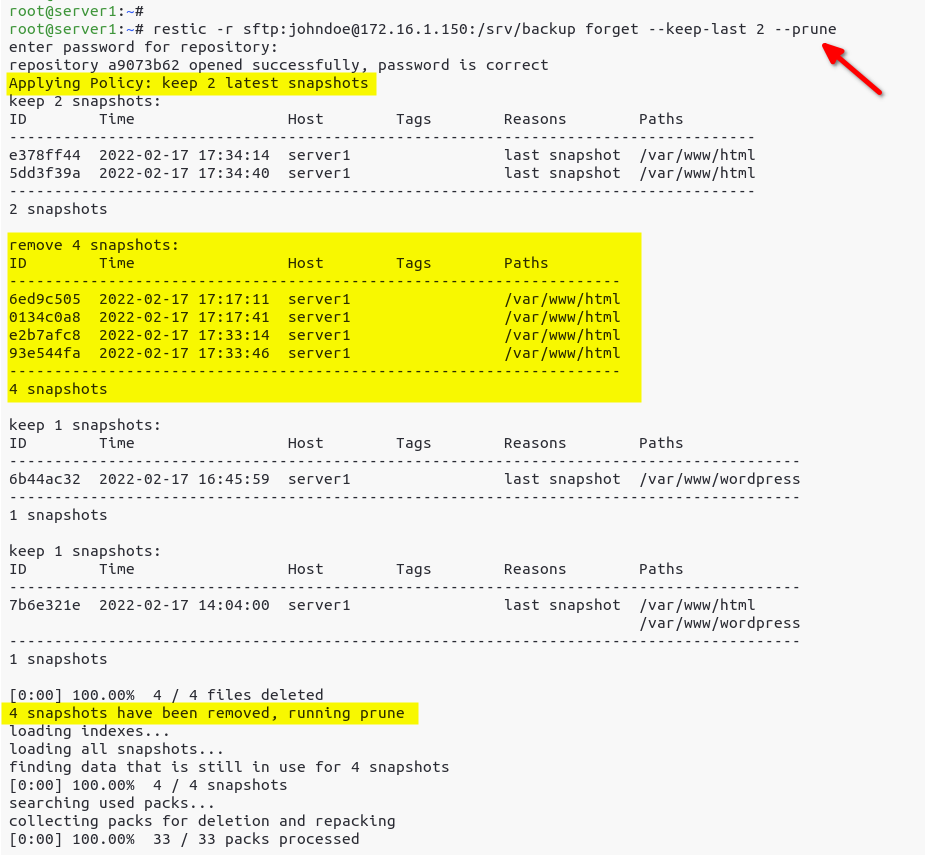
5. Finally, run the below command to list all existing snapshots.
restic -r sftp:[email protected]:/srv/backup snapshotsYou can see below that only the last two snapshot versions remain.
Restoring Data on Repository
Perhaps you accidentally removed crucial data from the repository. If so, how do you get them back? Luckily, Restic lets you decrypt and restore backup data so long as you know the snapshot ID of the backup.
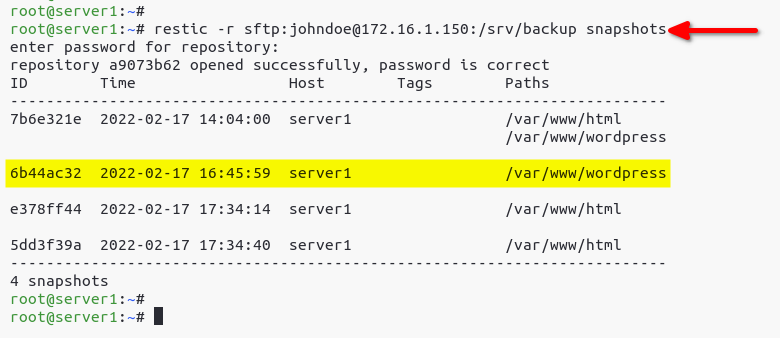
1. Run the restic command below to check available snapshots on the repository.
restic -r sftp:[email protected]:/srv/backup snapshotsBelow is an example of snapshots available on the repository. Note the snapshot ID of the backup data to restore.
2. Next, run the following commands to create a restore directory (/opt/restore) and restore your target snapshot (6b44ac32) to that restore directory.
# Create a restore directory
mkdir -p /opt/restore
# Restore snapshot data to the /opt/restore directory
restic -r sftp:[email protected]:/srv/backup restore 6b44ac32 --target /opt/restore
3. Finally, run the ls command below to verify the restored data.
ls /opt/restore/var/www/wordpressAs shown below, you’ll see the list of files restored from the snapshot (6b44ac32).

Restoring Specific Files
You’ve just restored lost data, but what if you only need to restore a specific file? With Restic, you can target a specific file by appending the --include option in the restic command.
1. Run the below command to create a directory to hold the specific file to restore from a snapshot.
mkdir -p /opt/restore/specific2. Next, run the restic commands below to restore a specific directory (/var/www/wordpress/wp-content) and a specific file (wp-config.php) from the snapshot (6b44ac32). Each command sets the target restore directory to the /opt/restore/specific directory.
# restore specific directory wp-config
restic -r sftp:[email protected]:/srv/backup restore 6b44ac32 --target /opt/restore/specific --include /var/www/wordpress/wp-content

# restore specific file wp-config.php
restic -r sftp:[email protected]:/srv/backup restore 6b44ac32 --target /opt/restore/specific --include /var/www/wordpress/wp-config.php
3. Lastly, run the ls command below to verify the restored file and directory in the directory (/opt/restore/specific).
ls /opt/restore/specific/var/www/wordpressIf the restoration worked correctly, you’d see the directory (wp-content) and file (wp-config.php) restored from the snapshot (6b44ac32).

Backing up Data Automatically with Restic and Cron
At this point, you’ve already learned all the basic usage of the Restic backup tool. But since manually backing up data can be a pain, why automatically backup data on your Linux system? Restic, together with Cron, can do wonders, such as automating the process of data backup.
1. Create a new file (/opt/backup/.secret) using your preferred editor and input the password of your repository. This demo uses the password ResticRepositoryPassword for the Restic repository.
2. Next, run the below command to change the permission of the /opt/backup/.secret file to 600. The permission code 600 gives read and write permission only to the/opt/backup/.secret file owner.
chmod 600 /opt/backup/.secret3. Run the crontab command below to create a new Cron job. The -u root option indicates the Cron job will be running as the root user.
crontab -u root -e4. Select your preferred editor, and the Cron configuration file opens in that editor. But this demo uses the nano editor.
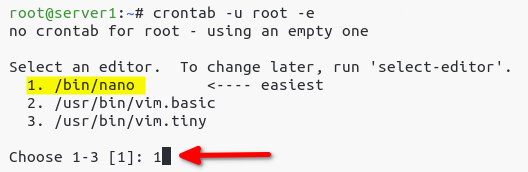
5. Finally, populate the Cron configuration with the following configuration to set up automatic backup and save the changes.
The below script performs the following:
- Run the
resticcommand every1.AMto backup directories (/var/www/wordpressand/var/www/html) to the repository SFTP server (sftp:[email protected]:/srv/backup).
- Automatically delete old snapshot at
2.AMand keep the last two versions of snapshots.
- Specifies (
--password-file) the file (/opt/backup/.secret) that contains your password for the Restic repository, so you don’t have to hard code your password in the Cron configuration.
# Runs daily backup at 1.AM
0 1 * * * restic --password-file /opt/backup/.secret -r sftp:[email protected]:/srv/backup backup --verbose /var/www/{wordpress,html}

# Runs every 2.AM, and always keeps the last 2 backup snapshots
0 2 * * * restic --password-file /opt/backup/.secret -r sftp:[email protected]:/srv/backup forget --keep-last 2 --prune
Conclusion
In this tutorial, you’ve learned how to install Restic on Linux and different ways to backup your data, from directories to specific files with snapshots. Apart from data backup, you’ve discovered that you can restore unexpectedly lost data. Automation plays a big part in backing up your data, so keep the Cron jobs running to secure your data.
At this point, you’re ready to backup more data using Restic. And why not leverage your backup by using tags, filtering policy, and backup cloud services?


