


If you’re managing web or mail servers, you know how heavily these servers rely on adequately configured DNS records. Missing DNS records can cause all sorts of problems, including users not being able to find your website or the non-delivery of emails. It is a good thing that the PowerShell Resolve-DnsName cmdlet exists, and with it, monitoring DNS records can be automated through scripting.
Not a reader? Watch this related video tutorial!An admin’s day is already full enough, and manually checking whether DNS records can be appropriately resolved means more manual effort.
In this article, you will learn what and how to use the Resolve-DnsName cmdlet to query DNS records with PowerShell. By the end of this article, you will have also learned how to create a basic script to make a report of your nominated DNS records to monitor.
Prerequisites
This article is a walk-through, and if you plan to follow along with the examples, you will need:
- A computer running Windows 10 or above.
- Windows PowerShell 5.1 or PowerShell 7.0
- A script editor such as Visual Studio Code, Atom, or Notepad++.
Resolve-DnsName: The PowerShell DNS Resolver
There is more than one way to perform a DNS query. The Resolve-DnsName cmdlet is similar to the nslookup command-line tool that comes with Windows, or the dig command if you’re more of a Linux admin.
Some websites offer DNS record monitoring/reporting services. But, these third party services mostly come with a cost, of course. There’s a free alternative, which also allows you to show off your scripting skills!
The Resolve-DnsName cmdlet, as its name implies, resolves DNS names to IP addresses and vice versa. This cmdlet is part of the dnsclient PowerShell module that, as of this writing, shipping with Windows 10, Windows Server 2012/R2, Windows Server 2016, and Windows Server 2019.
Because Resolve-DnsName is a PowerShell cmdlet, it returns its results as objects that can be stored, manipulated, and exported. For example, looking up the DNS record of google.com using the command Resolve-DnsName google.com give you the output shown below.

The result was returned as an object that allows you to export the results to a CSV file, or manipulate the format to produce HTML reports.
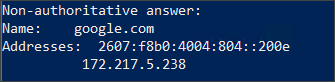
The Resolve-DnsName cmdlet is different than the old school nslookup utility. nslookup returns a simple string. You can see an example in the following screenshot. If you need to parse out any of this information, it’s going to be a struggle.
Querying Different Types of DNS Records
By default, Resolve-DnsName queries the A and AAAA types of DNS records. For example, if you look up the DNS record for gmail.com using the command below:
Resolve-DnsName -Name gmail.comAs you can see below, only the AAAA and A records are returned. That’s because the DNS record type to look up was not specified.

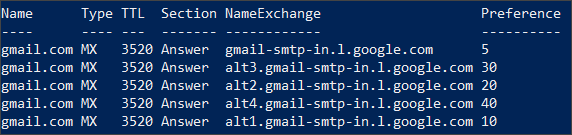
Now, given that we all know that gmail.com is an email domain used by Google’s email service, there must be an MX record associated with it, right? Well, there’s no need to assume when you can confirm by using this command:
Resolve-DnsName -Name gmail.com -Type MXThe output shown in the screenshot below shows the MX record list for gmail.com.
To know more about the different record types that can be used with
Resolve-DnsName, visit this link and look for the table for the-Typeparameter. Or you can just refer to the Resolve-DnsName help using the commandget-help Resolve-DnsName.
Using Specific Servers for DNS Lookup
Resolve-DnsName uses the DNS server addresses configured on your computer by default. But, you can also make Resolve-DnsName use a specific DNS server when performing lookups.
For example, if you want to use Google Public DNS to lookup records, you can do so by adding the -Server parameter in your command similar to the example below.
# Google Public DNS Server IPs
$dnsServer = @('8.8.8.8','8.8.4.4')
Resolve-DnsName adamtheautomator.com -Server $dnsServer
The result of the command above would be similar to the one shown in the screenshot below.

At this point, you might be asking, “why would I need to use a different DNS server?”. That is a valid question. If you try looking up the same record using the default DNS server of your machine, or another DNS server, you might probably get the same result.
There could be many reasons to use different DNS servers with Resolve-DnsName. Some of these reasons may include:
- Speed – Some DNS servers may perform faster than others.
- Security – Some DNS servers may have more security measures than others that prevent hijacks and attacks.
- Records availability – In most scenarios, organizations have their own internal DNS servers that contain the zones and records for names that are only resolved internally. In this case, looking up an internal name using a public DNS server will fail.

- DNS servers are not forwarding requests – Some organizations do not allow DNS forwarding. Using them for DNS lookup of public DNS records will fail.
- Troubleshooting and Testing – When your favorite DNS servers are acting up, you may want to test your lookups using a different DNS server.
Reporting DNS Records using PowerShell Script
Now that you’ve learned the basics of how to use the Resolve-DnsName cmdlet, in this section, you’ll learn to create a PowerShell script to monitor and report DNS records. You should be able to apply the knowledge you’ve gained in the previous sections so far in building this script.
Fire up your script editor of choice and create a new file named GetDnsRecord.ps1.
Defining the Variables
First, determine variables to use. These variables will include the following:
$NameList– This variable will hold the names of the DNS records you want your script to query$Serverlist– Use this variable to indicate the DNS servers that will be used by the script for lookups.
Copy the code below and paste it at the beginning of your script.
$NameList = @('adamtheautomator.com','powershell.org','xyz.local')
$ServerList = @('8.8.8.8','8.8.4.4')
Performing DNS Lookups
Next, the code must be able to look up the DNS record of each of the names specified. In this case, the foreach loop will be used to iterate the list of records and look up each name using Resolve-DnsName.
The line $FinalResult = @() creates an empty array where the final result will be stored. Then, using the foreach loop, PowerShell passes each item in the $NameList variable to a variable named $Name.
In every iteration, the line $tempObj = "" | Select-Object Name,IPAddress,Status,ErrorMessage creates a temporary object with four properties is created to hold the result of succeeding DNS lookup.
Next, the try{} statement is used to run the Resolve-DnsName command to lookup DNS A records and populate the $tempObj values. If in case the DNS lookup fails, the catch{} statement catches the error, and the error will be included in the $tempObj object.
At the end of each iteration, the value of the $tempObj object will be appended to the $FinalResult. And once the last item in the $NameList array is processed, the loop will exit. Then, the value of the $FinalResult will be displayed.
Copy the code below and paste it at the end of your script. There is no need to change any values.
$FinalResult = @()
foreach ($Name in $NameList) {
    $tempObj = "" | Select-Object Name, IPAddress, Status, ErrorMessage
    try {
        $dnsRecord = Resolve-DnsName $Name -Server $ServerList -ErrorAction Stop | Where-Object { $_.Type -eq 'A' }
        $tempObj.Name = $Name
        $tempObj.IPAddress = ($dnsRecord.IPAddress -join ',')
        $tempObj.Status = 'OK'
        $tempObj.ErrorMessage = ''
    }
    catch {
        $tempObj.Name = $Name
        $tempObj.IPAddress = ''
        $tempObj.Status = 'NOT_OK'
        $tempObj.ErrorMessage = $_.Exception.Message
    }
    $FinalResult += $tempObj
}
return $FinalResult
After saving the script, run it in PowerShell by calling its name GetDnsRecord.ps1. The demonstration below shows the output.

As you can see from the result above, the output is an object which is useful if you want to export the results to file like CSV using the command below.
.\GetDnsRecord.ps1 | Export-Csv DnsRecord.csv -NoTypeInformationThe CSV output would look similar to the one below.

Conclusion
In this article, you’ve learned the basics of how to use the Resolve-DnsName cmdlet to perform DSN records lookup in PowerShell. You’ve also learned how Resolve-DnsName is different from other tools like the nslookup utility.
You’ve seen how Resolve-DnsName can be used in a script to automate the DNS record lookup. This would be useful as a monitoring tool to ensure that you are aware of the current status of the DNS records that you look after.
Using your PowerShell scripting skills, the reporting script can be further enhanced by adding code to automatically send the report by email to specified recipients. It can also be modified to create a visually pleasing HTML output.
In the end, Resolve-DnsName is an excellent tool for DNS lookup whether you use it manually or for automation in scripts. Now you have the knowledge about how it works, and it is up to you to find ways to use it as part of your administration tasks.


