


In every scripter’s journey, a script is never fast enough. To remedy this, let’s cover some ways on how to get the your Powershell speed to the highest it can be.
Not a reader? Watch this related video tutorial!We won’t be covering multi-threading PowerShell scripts in this article. You can read all about that in the article PowerShell Multithreading: A Deep Dive. In this article, we’re going to focus on measuring performance, speeding up loops, using arrays for speed, and more!
Measuring PowerShell Speed
It is crucial that when doing performance testing that you can reliably test and re-test your code and get similar performance numbers between tests. PowerShell includes the Measure-Command cmdlet which allows you to run a script block and measure how long it took to run.
In most cases, you can just run Measure-Command with your code inside the Expression parameter scriptblock and get what you are looking for. But in cases where your code may already be quick to run, and you measure the difference in tens of milliseconds or less, you may need to loop your code like the code below.
In this example, you would expect the Get-ChildItem command to complete quickly, but if you put the code in a loop and run the same thing multiple times you can more easily judge the milliseconds differences.
foreach ($i in 1..1000) {
	Get-ChildItem
}
You may be measuring performance this precisely if your code will be used repeatedly, like in a loop with millions of items. In this case, the difference of 10ms per loop could mean hours of execution time.
As an example of this kind of variance you may see, you can use the script block below that creates a file and gets the file hash of the file 3 times. Since the performance of getting the hash of a file depends on many variables, it is easy to show the kind of small variances you may see when running the same command multiple times.
New-Item .\test.txt
Measure-Command {Get-FileHash .\test.txt}
Measure-Command {Get-FileHash .\test.txt}
Measure-Command {Get-FileHash .\test.txt}
You would expect this code to complete in about the same time each time it ran since it is doing the same thing. Here are the results of running the test.
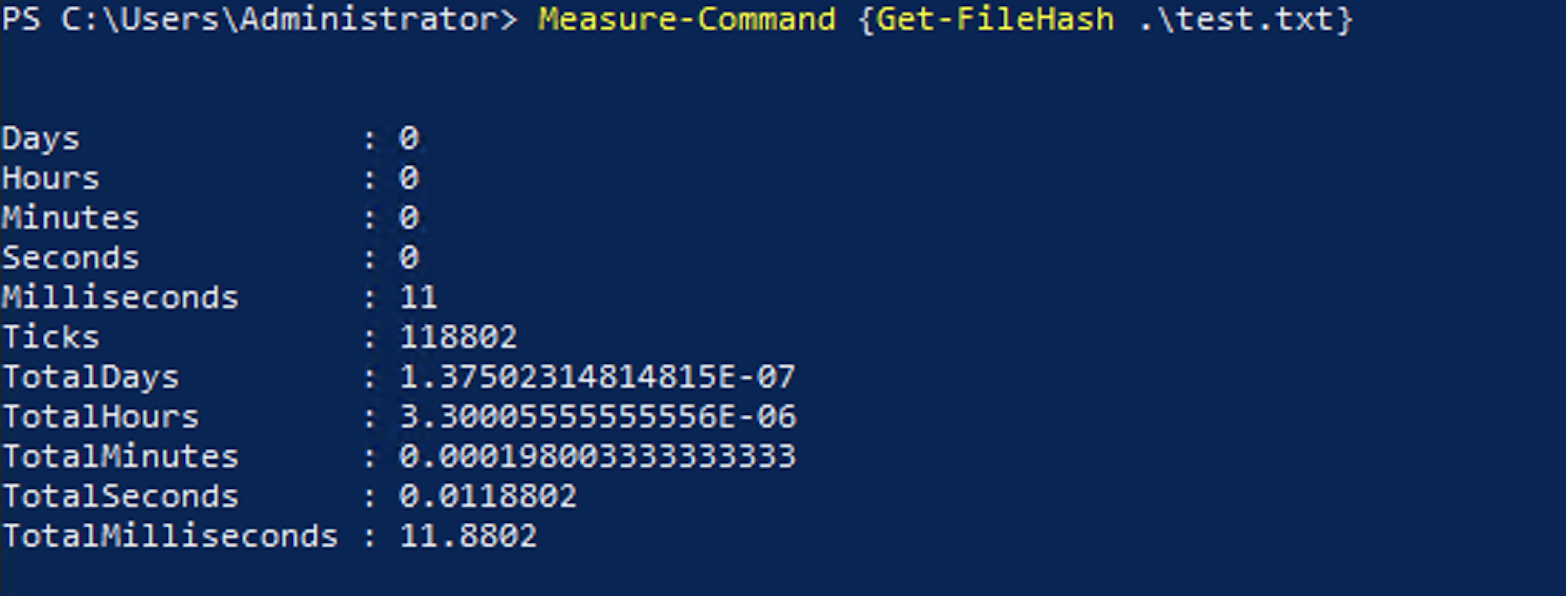
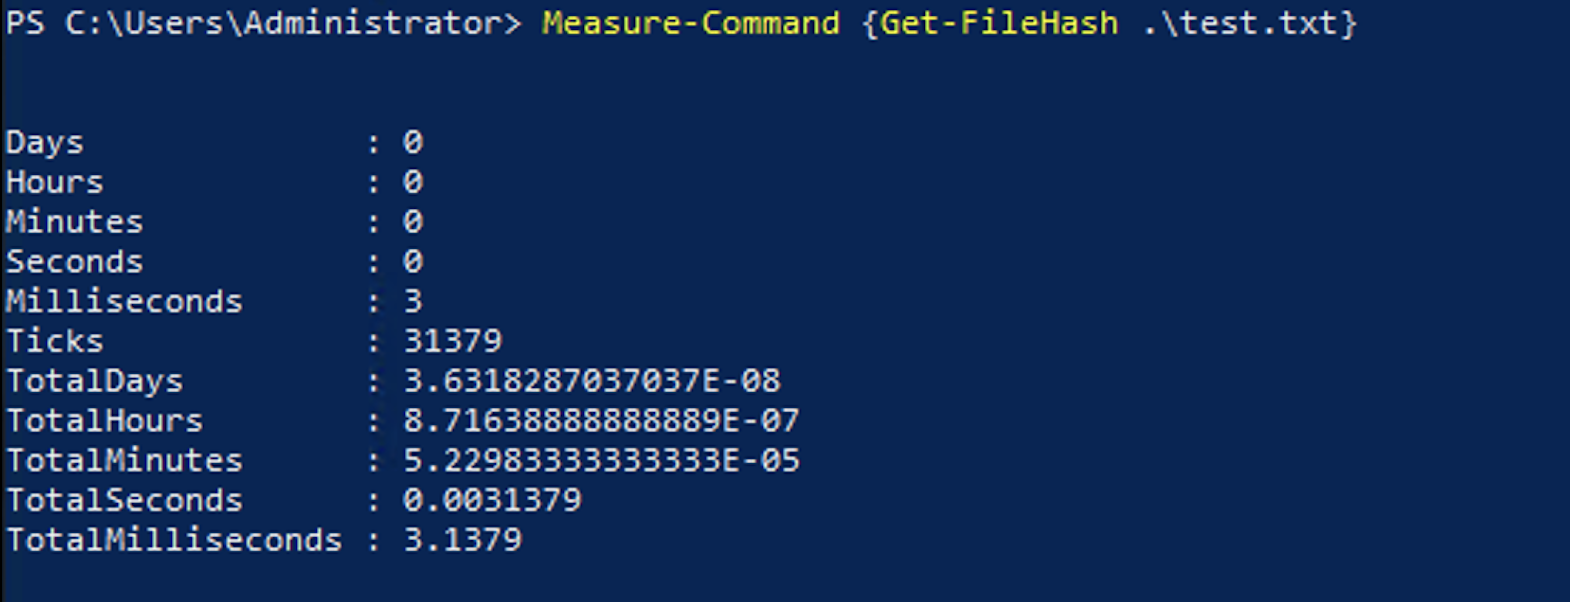
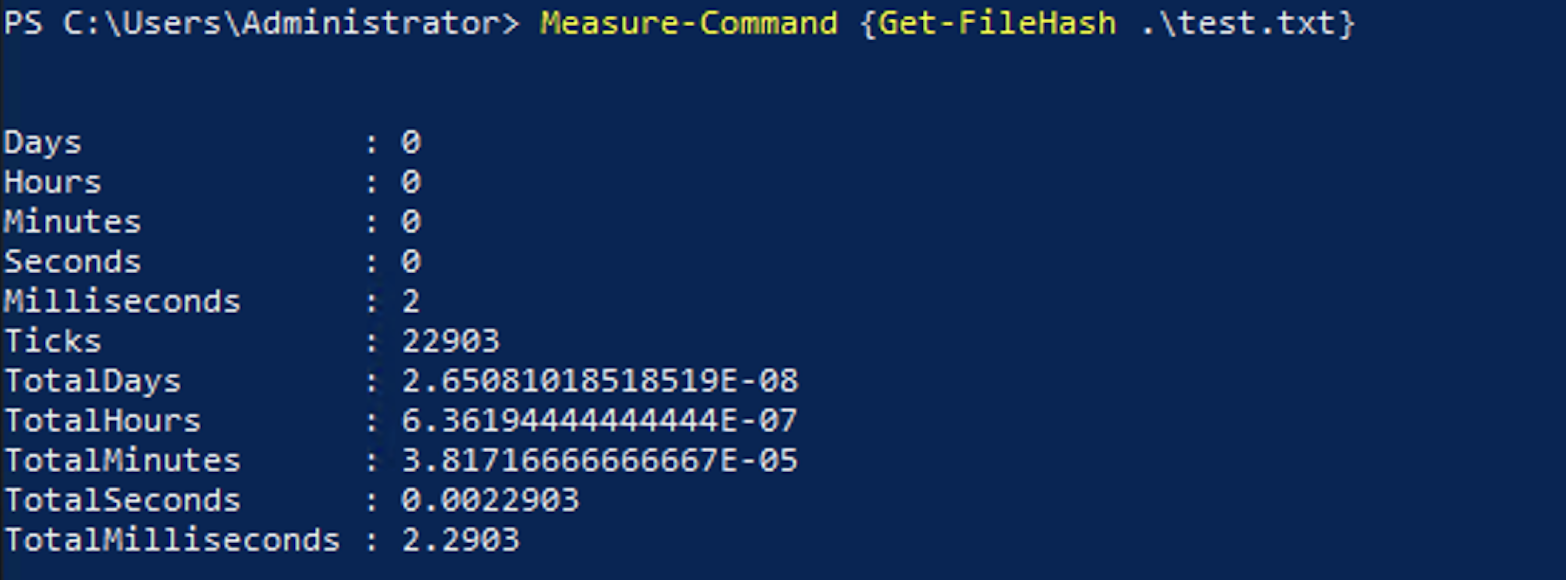
This speed difference could be due to many reasons including the load on the device you are running the code on, caching of results, load on the storage the device is using, memory or paging file usage, or any other any other running tasks on the device.
This case would have benefited from running the code in a loop to get a better idea of how it would perform on average instead of picking a single instance.
Foreach-Object vs. Foreach Loops Speed
While loops are frequently used to process through many items, they can be the smoking gun when performance problems arise.
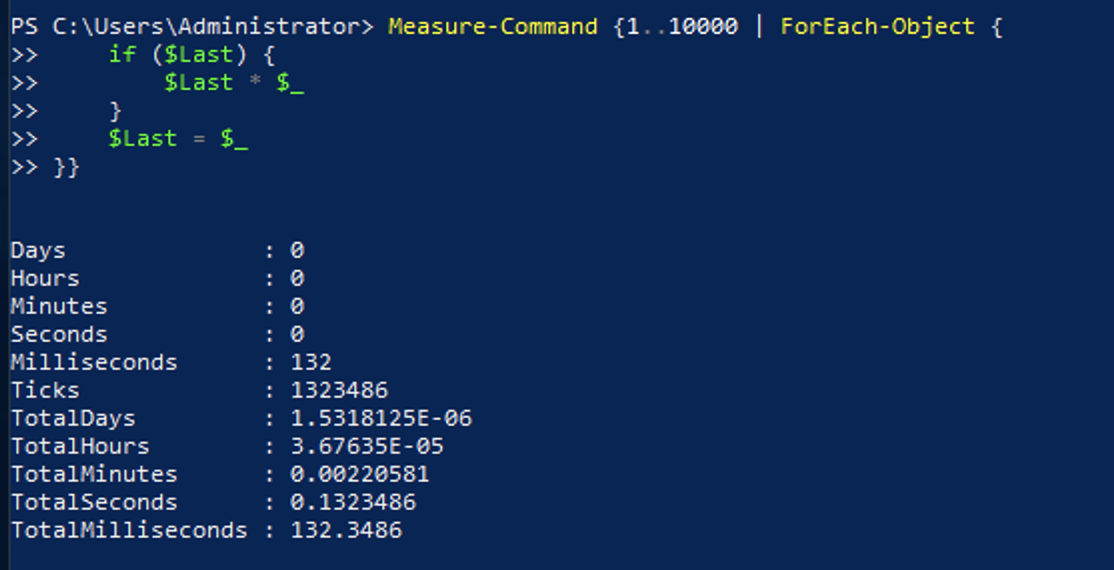
Take this script block as an example. It loops through 10,000 times and outputs the previous number’s product and the current number from the input. This example is easily repeatable on any machine and can be scaled quickly by changing the times the commands are being looped.
1..10000 | ForEach-Object {
	if ($Last) { $Last * $_ }
	$Last = $_
}
And here is the output from the code above:
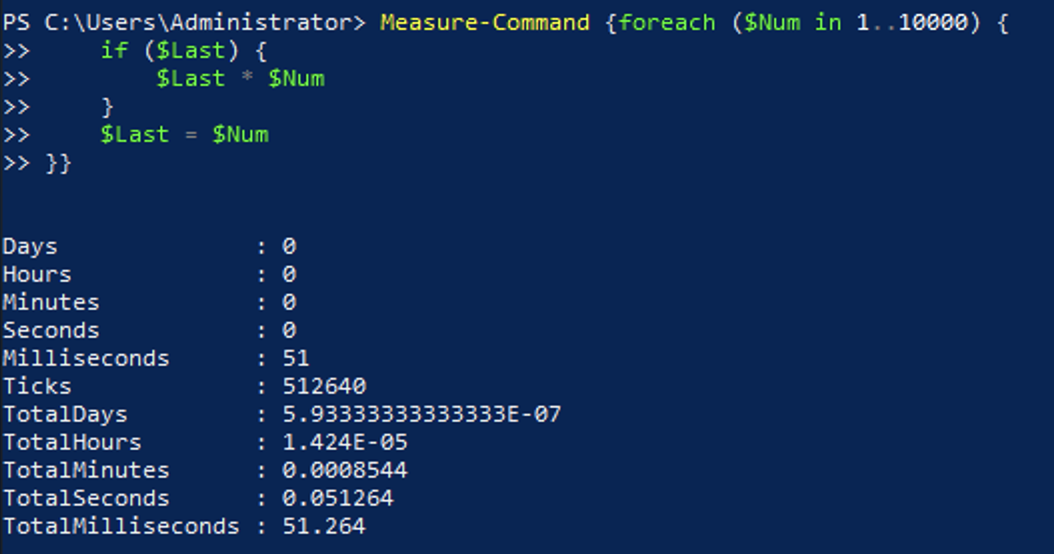
While this will be fast enough in many cases, if the same code is run hundreds of thousands or millions of times, it could cause a significant delay. You could instead use the foreach statement like this:
foreach ($Num in 1..10000) {
	if ($Last) { $Last * $Num }
	$Last = $Num
}
This code provides the same output but due to the use of the foreach statement instead of the ForEach-Object.
Your results in the performance differences will vary based on exactly what code is in the loop, but you should give it a try and see for yourself.
For even faster execution, there are times where you can completely omit the loop and instead just rely on the pipeline for the entire set of commands. Below is some code that will loop through all of the files in a directory and get the file hash for each one using a foreach statement.
When the Get-ChildItem command is run, it outputs information about the files, including the path to the file. This can be used directly through the pipeline by the Get-FileHash command.
foreach ($File in Get-ChildItem) {
	Get-FileHash $File
}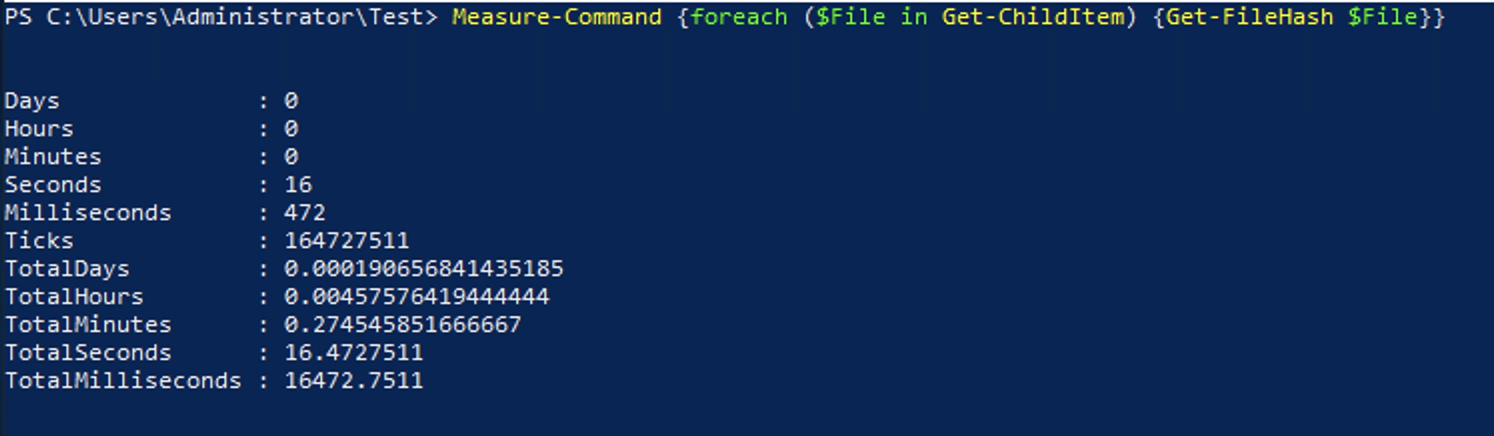
The better way to write this code would be in a single pipeline without the loop as:
Get-ChildItem | Get-FileHashThese sets of code would output the same thing, but the latter shows a huge performance increase.
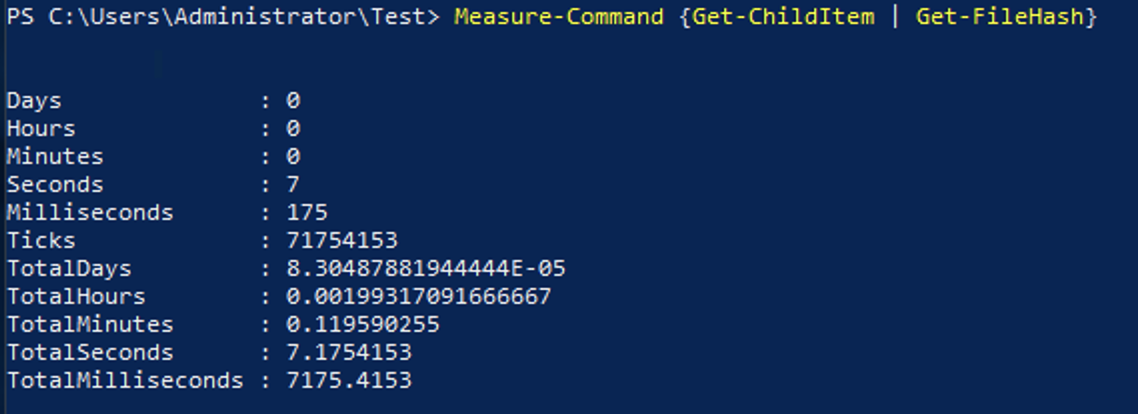
This example with Get-ChildItem and Get-FileHash shows that you should remove loops from your code where you can and replace them use utilizing the pipeline.
Managing loops in PowerShell for speed will greatly help performance.
Arrays vs. Lists: PowerShell Speed++
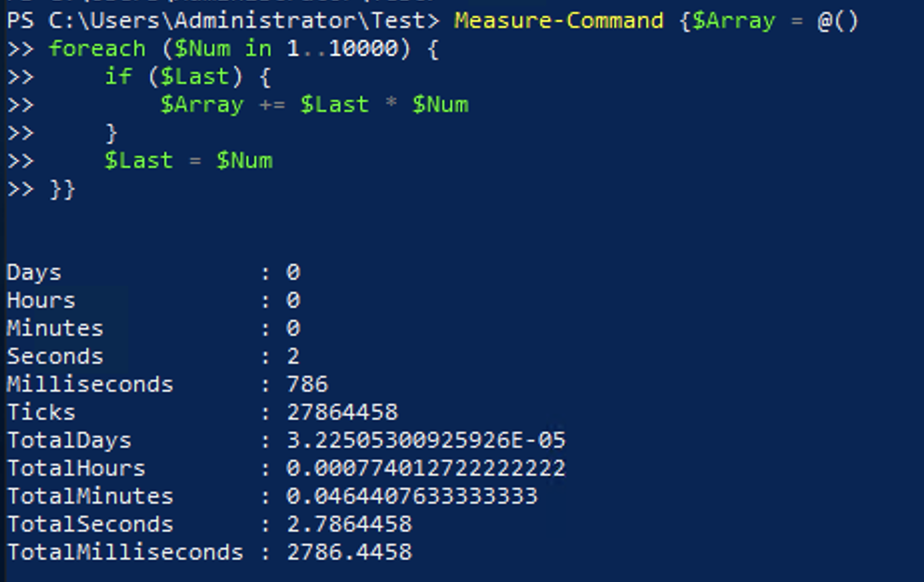
It is very common to collect the results from some code to use it later. Something like what is shown below is used frequently across many pieces of code floating around the internet. It runs through the same code we had in an earlier section to output the product on the current and previous numbers. In this case, the code will also add the output to $Array.
$Array = @()
foreach ($Num in 1..10000) {
	if ($Last) { $Array += $Last * $Num }
	$Last = $Num
}
In this example the output would be saved to $Array to be used later or to output all of the results.
Instead of using an array, you should use an ArrayList object . The syntax used is a little different. First, you need to define the ArrayList specifically with New-Object System.Collections.ArrayList. You’ll also need to use the .Add()method instead of += like you can with an array. Here is the updated code block to use an ArrayList instead of a normal array:
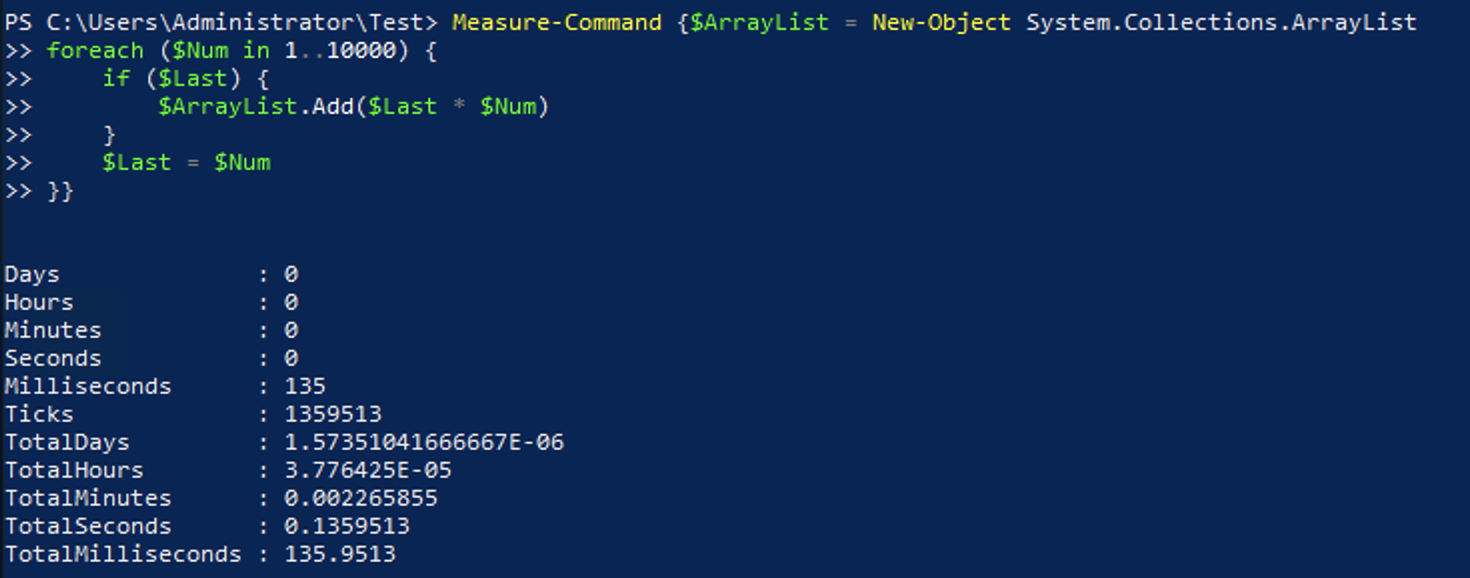
$ArrayList = New-Object System.Collections.ArrayList
foreach ($Num in 1..10000) {
	if ($Last) { $ArrayList.Add($Last * $Num) }
	$Last = $Num
}
Here are the results from the above code.
A standard array cannot expand the amount of objects within it. By using += PowerShell creates a new array that is larger and copies the old and new data into it. Doing this only a few times is a quick way to add to an array, but in a case like this where it occurs thousands of times, it greatly impacts performance.
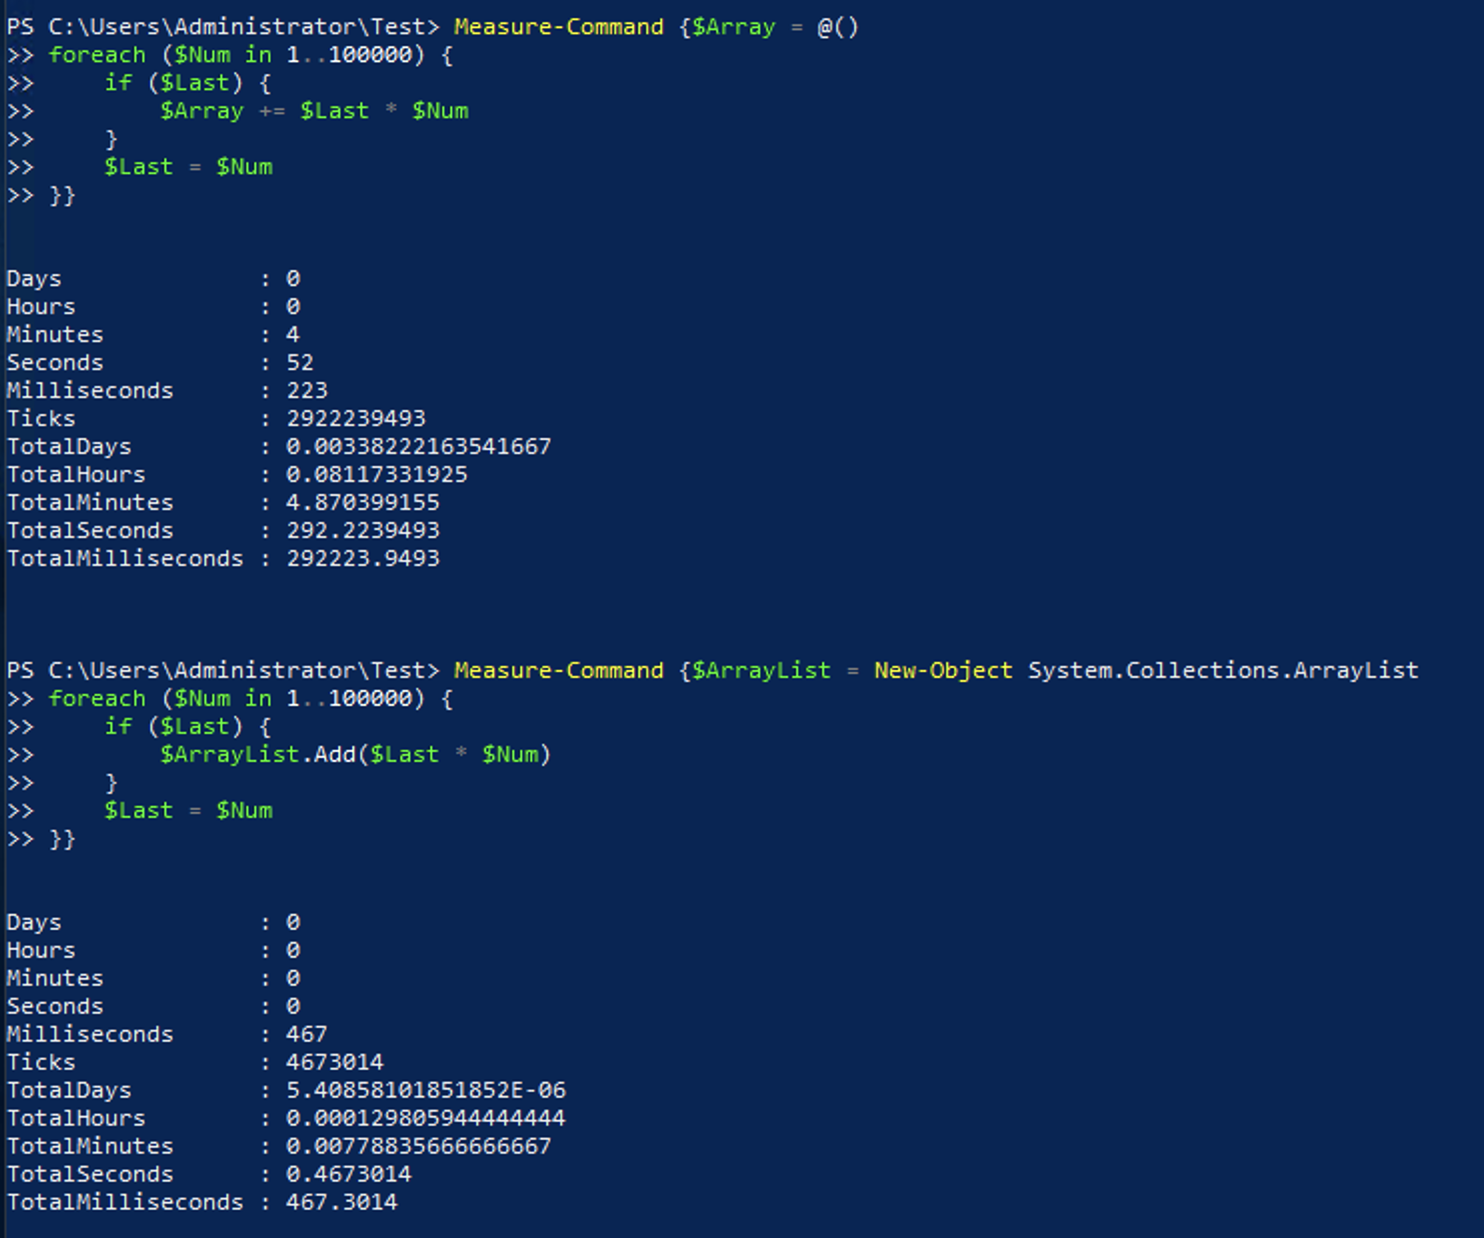
This performance difference continues to grow as you use more substantial and larger amounts of data. With 100,000 items instead of 10,000 the execution time difference is almost 5 minutes vs half a second. This performance difference also goes the other way, though, where if you are only dealing with a few items, there is very little difference.
In both of the examples above, you are saving the output from the commands to a variable. Using variables to save the output is common but, in most cases, is not required. By skipping saving the output to a variable, you can see another a small benefit over saving to an ArrayList.

By skipping the step to save the output to a variable the output is sent as it is calculated instead of being output.
Pay attention to how you create lists and arrays. If you do, you’ll greatly increase the speed of PowerShell scripts.
Filtering Left
One of the most common commands in PowerShell is Where-Object which is used for filtering the output of another command. While it is very powerful, it should only be used where it is required. Ensure you “filter left” where at all possible to increase the speed of PowerShell scripts.
While the other options listed above have trade-offs where you lose some convenience for speed, filtering left is commonly recommended to improve performance. No matter what you are doing in PowerShell you should always look to filter down the amount of data as soon as possible.
For example, here is a code block to get the items in a folder and then filter to the items that start with the number 1.
Get-ChildItem | Where-Object {$_.Name -like '1*'}The above code completes quickly in only 422ms, but it can still be better. Instead of filtering after the command has run, you can filter within the command using the below command instead:
Get-ChildItem -Filter 1*You’ll receive the same output, but it will reduce the amount of data that is handled via the pipeline, so it completes in 30ms. This large difference is due to the way the filter is executed. In the first example, every directory file was passed to the Where-Object command to figure out if it should continue. In the second example, Get-ChildItem filters the results prior to any results that are sent along the pipeline.
Starting with PowerShell 3 you can use Where-Object without a script block. Depending on the script block you are using, it could increase slightly increase the speed of the execution. In the below code, it only saves an average of 10ms. Going back to the original example, the non-script block format would look like this:
Get-ChildItem | Where-Object Name -like '1*'With the small gains you get from using the non-script block syntax probably is not worth losing backward-compatibility with PowerShell 2 due to how many of your systems still run it. Then again, in PowerShell 4, there is yet another option by using the .Where() method. This can only be used on collections, so the syntax differs much more than the other options. Below is what the same example would look like using the .Where() method:
(Get-ChildItem).Where({$_.Name -like '1*'})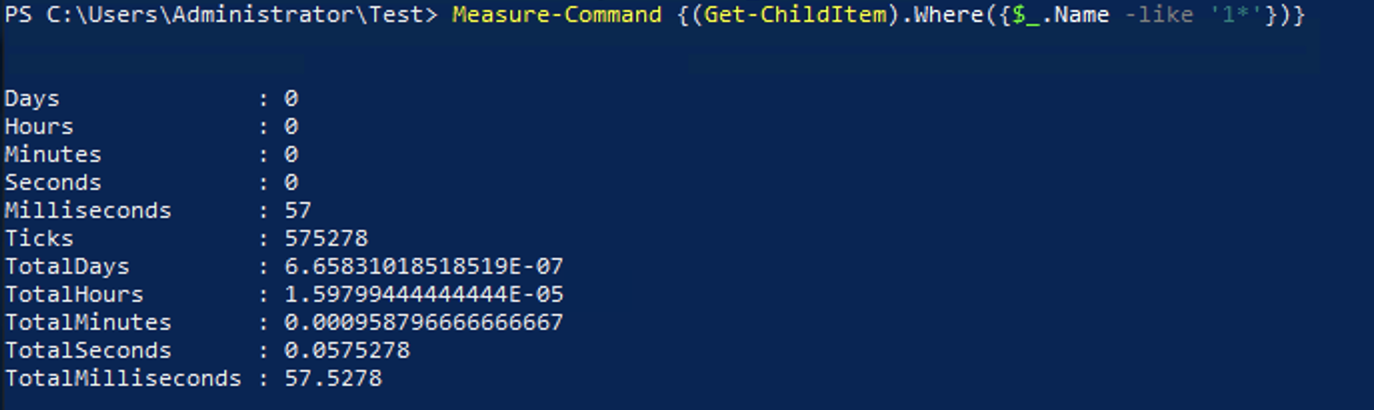
This option completes much faster than the others mentioned earlier. This performance difference shows that in cases where the cmdlet you are using doesn’t support a filter parameter, and you do not need to support older versions of PowerShell that using the .Where() method is probably the best option for speed.
With that said, the .Where() method is arguably a little harder to read, so you may opt for the more standard Where-Object {} format for better readability depending on how much of a difference it makes in your case.
Error Checking Before You Do
You may want to do some action regardless if the system you are accessing is available or now. If you check for errors ahead of time, you’ll increase your PowerShell script speed just because of the efficiency gains alone.
For example, you want to delete a file if it exists and do nothing if it does not exist. You could use something like the below code. It will loop through all files in the current directory labeled 1 through 10000 and delete them if they exist.
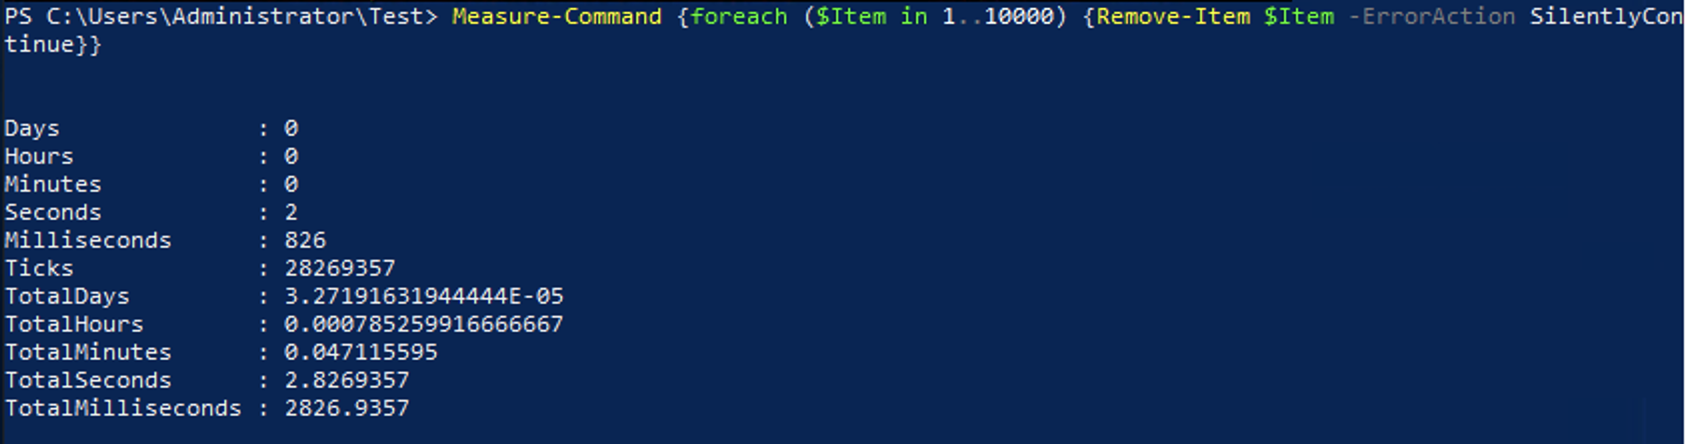
foreach ($Item in 1..10000) {Remove-Item $Item}The downside to the above code is that if the file didn’t exist you would receive an error. You may think to just mute this error so it is no longer thrown by using -ErrorAction SilentlyContinuelike this:
foreach ($Item in 1..10000) {Remove-Item $Item -ErrorAction SilentlyContinue}There are many issues with using the -ErrorAction parameter to silent errors, like how if there is an issue other than the file already not existing, you would never know without having to do additional troubleshooting. In addition to this, while you don’t see the error, it is still being thrown in the background, which is causing some performance impact. Running the above code results in the below output.
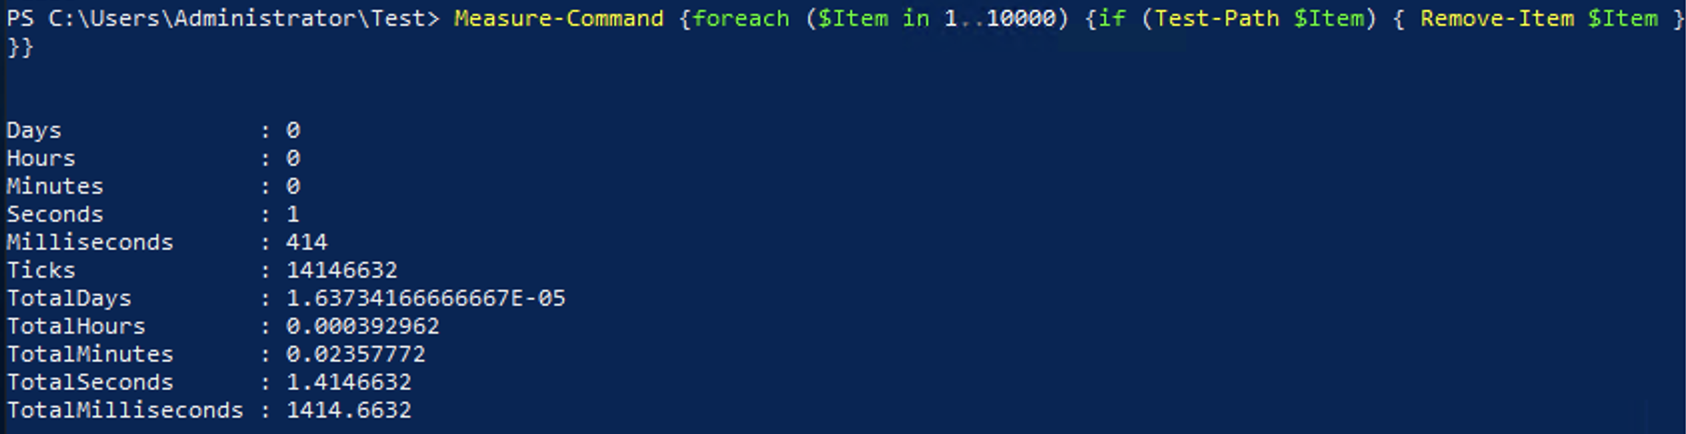
Instead of blindly trying to delete the file it exists or not, you could instead check if the file exists first and only delete it if it does with this code:
foreach ($Item in 1..10000) {
	if (Test-Path $Item) { Remove-Item $Item }
}
At first, you may think that it would take longer to check if the file existed than just to try deleting it. Still as you can see here, it completes in almost half the time, and you get the added benefit of being able to use proper error detection and handling for other errors that may occur.
Using the if statement to check if the file exists first will not always improve performance. If your code only tries to delete a file that does not exist once out of every million attempts, it would be faster to not check every time. Although, this does allow you to add error handling later easilly.
Summary
With all of PowerShell speed tweaks that we covered, you can make improvements in your code to run it more efficiently. In some cases, you may not notice a difference in runtime due to using a small dataset. Although, if you provide your code to others, they may get a noticeable improvement from the more efficient code.
Since it is impossible to determine how your code will be used in the future, it won’t ever hurt to make your code more efficient. So while you may not be able to see a difference in making changes to your code to improve performance, other may appreciate the work in the future.
Some of these recommendations do have some drawbacks such as lower compatibility or less readability but result in faster code. Due to this, some code you will only want to optimize if it requires better performance, but that goes the same for most optimization techniques.
Additional Reading
For a deeper dive into the differences between Arrays and ArrayLists you can check out this article. For help multi-threading your PowerShell code you can look here.


