


At some point, most people will run into a problem that a basic PowerShell script is just too slow to solve. This could be collecting data from lots of computers on your network or perhaps creating a ton of new users in Active Directory at once. These are both great examples of where using more processing power would get your code to run faster. Let’s get into how to solve this using PowerShell multithreading!
Not a reader? Watch this related video tutorial!
Not seeing the video? Make sure your ad blocker is disabled.
The default PowerShell session is single-threaded. It runs one command and when it finishes, it moves to the next command. This is nice as it keeps everything repeatable and does not use many resources. But what if the actions it’s performing aren’t dependent on one another and you have the CPU resources to spare? In that case, it’s time to start thinking about multithreading.
In this article, you’re going to learn how to understand and use various PowerShell multithreading techniques to process multiple data streams at the same time but managed through the same console.
Understanding PowerShell Multithreading
Multithreading is a way to run more than one command at a time. Where PowerShell normally uses a single thread, there are many ways to use more than one to parallelize your code.
The primary benefit of multithreading is to decrease the runtime of the code. This time decrease is at the tradeoff a higher processing power requirement. When multithreading, many actions are being performed at once thus requiring more system resources.
For example, what if you wanted to create one new user in Active Directory? In this example, there isn’t anything to multithread because only one command is being run. This all changes when you want to create 1000 new users.
Without multithreading, you would run the New-ADUser command 1000 times to create all of the users. Perhaps it takes three seconds to create a new user. To create all 1000 users, it would take just under an hour. Instead of using one thread for 1000 commands, you could instead use 100 threads each running ten commands each. Now instead of taking about 50 minutes, you are down to under a minute!
Note that you will not see perfect scaling. The act of spinning up and tearing down items in code, will take some time. Using a single thread, PowerShell needs to run the code and it’s done. With multiple threads, the original thread used to run your console will be used to manage the other threads. At a certain point that original thread will be maxed out just keeping all of the other threads in line.
Prerequisites for PowerShell Multithreading
You’re going to learn how PowerShell multithreading works hands-on in this article. If you’d like to follow along, below are a few things that you will need and some details about the environment that is being used.
- Windows PowerShell version 3 or higher – Everything unless explicitly stated, all code demonstrated will work in Windows PowerShell version 3 or higher. Windows PowerShell version 5.1 will be used for the examples.
- Spare CPU and memory – You will need at least a little extra CPU and memory to parallelize with PowerShell. If you do not have this available, you may not see any performance benefit.
Priority #1: Fix Your Code!
Before you dive into speeding up your scripts with PowerShell multithreading, there are a few pieces of prep work you will want to complete. First is to optimize your code.
While you can throw more resources at your code to get it running faster, multithreading does bring a lot of extra complexity. If there are ways for you to speed up your code before multithreading, they should be done first.
Identify Bottlenecks
One of the first steps in parallelizing your code is to find out what is slowing it down. The code could be slow because of bad logic or extra loops where you can make some modifications to allow for faster execution before multithreading.
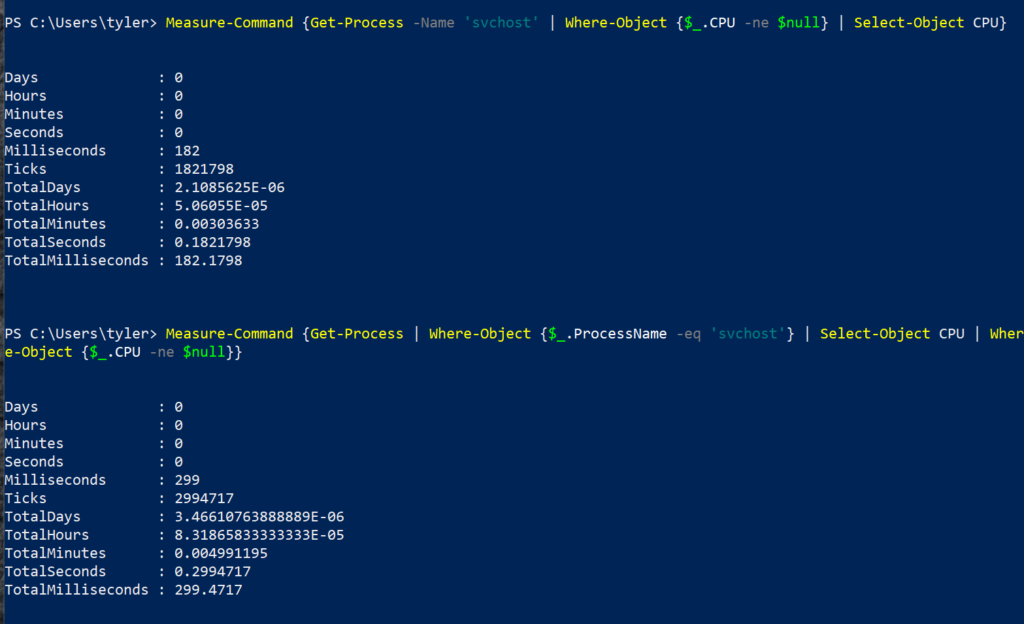
An example of a common way to speed up your code is to shift your filtering left. If you are interacting with a bunch of data, any filtering you want to allow to lessen the amount of data should be done as early as possible. Below is an example of some code to get the amount of CPU used by the svchost process.
The below example is reading all running processes then filtering out a single process (svchost). It is then selecting the CPU property and then ensuring that value is not null.
PS51> Get-Process | Where-Object {$_.ProcessName -eq 'svchost'} |
	Select-Object CPU | Where-Object {$_.CPU -ne $null}
Compare the code above to the below example. Below is another example of code that has the same output but is arranged differently. Notice that the code below is simpler and shift all of the logic possible to the left of the pipe symbol. This prevents Get-Process from returning processes you don’t care about.
PS51> Get-Process -Name 'svchost' | Where-Object {$_.CPU -ne $null} |
	Select-Object CPU
Below is the time difference for running the two lines from above. While the 117ms difference won’t be noticeable if you only ran this code once, it would start to add up if run thousands of times.
Using Thread-Safe Code
Next, make sure your code is “thread-safe”. The term “thread-safe” refers to if one thread is running code, another thread can be running the same code at the same time and not cause a conflict.
For example, writing to the same file in two different threads is not thread-safe since it will not know what to add to the file first. Whereas two threads reading from a file is thread-safe since the file isn’t being changed. Both threads get the same output.
The problem with PowerShell multithreading code that is not thread-safe is that you may get inconsistent results. Sometimes it may work fine due to the threads just happening to time it right to not cause a conflict. Other times, you will have a conflict and it will make troubleshooting the issue difficult due to the inconsistent errors.
If you are only running two or three jobs at a time they may just happen to line up just right where they are all writing to the file at different times. Then when you scale the code up to 20 or 30 jobs, the likelihood of not having at least two of the jobs try to write at the same time goes way down.
Parallel Execution with PSJobs
One of the easiest ways to multithread a script is with PSJobs. PSJobs have cmdlets built into the Microsoft.PowerShell.Core module. The Microsoft.PowerShell.Core module is included in all versions of PowerShell since version 3. Commands in this module allow you to run code in the background while continuing to run different code in the foreground. You can see all of the available commands below.
PS51> Get-Command *-Job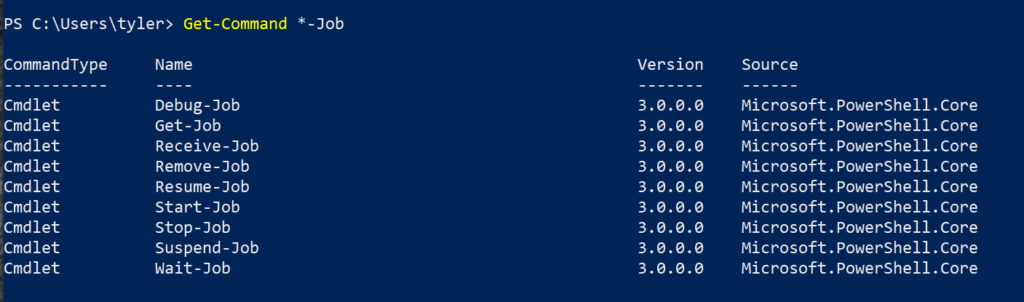
Keeping Track of Your Jobs
All PSJobs are in one of eleven states. These states are how PowerShell manages the jobs.
Below you’ll find a list of the most common states a job can be in.
- Completed – The job has finished and the output data can be retrieved or the job can be removed.
- Running – The job is currently running and cannot be removed without force stopping the job. Output also cannot be retrieved yet.
- Blocked – The job is still running, but the host is being prompted for information before it can proceed.
- Failed – A terminating error occurred during the execution of the job.
To get the status of a job that has been started, you use the Get-Job command. This command gets all of the attributes of your jobs.
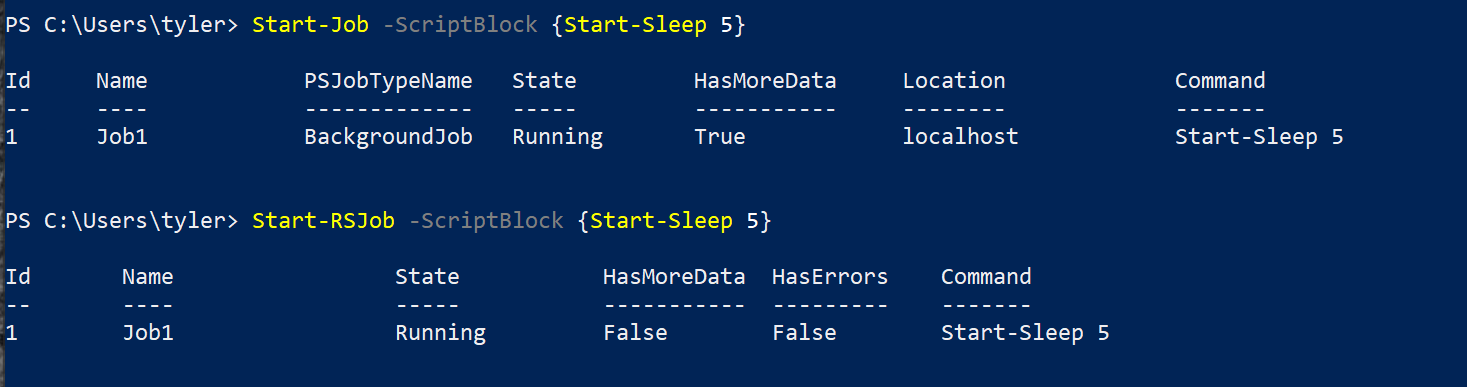
Below is the output for a job where you can see the state is Completed. The example below is executing the code Start-Sleep 5 within a job using the Start-Job command. The status of that job is then being returned using the Get-Job command.
PS51> Start-Job -Scriptblock {Start-Sleep 5}
PS51> Get-Job
When the job status returns Completed, this means that the code in the scriptblock run and is finished executing. You can also see that the HasMoreData property is False. This means there was no output to provide after the job finished.
Below is an example of some of the other states used for describing jobs. You can see from the Command column that what may have caused some of these jobs to not complete such as trying to sleep for abc seconds resulted in a failed job.

Creating New Jobs
As you saw above, the Start-Job command allows you to create a new job that start executing code in the job. When you create a job, you provide a scriptblock that is used for the job. The PSJob then creates a job with a unique ID number and starts running the job.
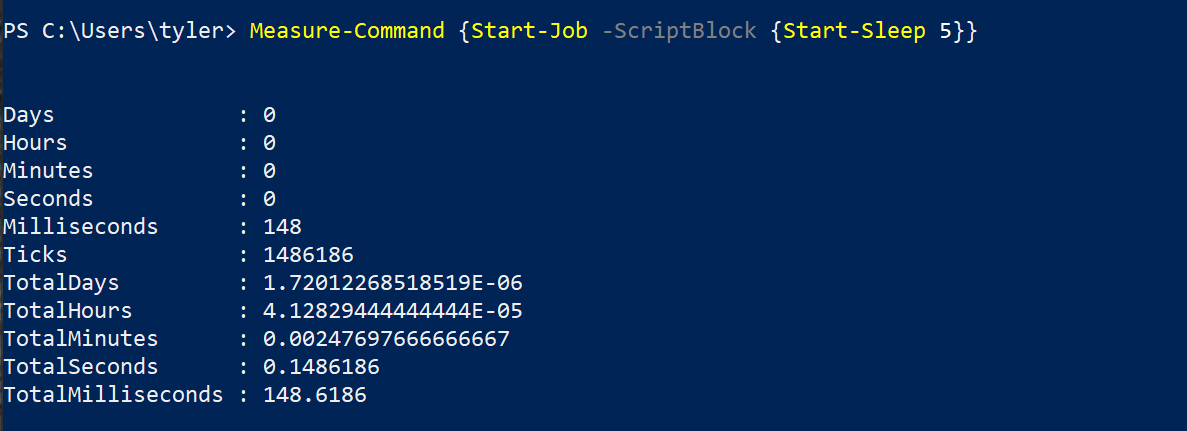
The main benefit here is that it takes less time to run the Start-Job command than it does to run the scriptblock we are using. You can see in the below image that instead of the command taking five seconds to complete, it only took .15 seconds to start the job.

The reason that it was able to run the same code in a fraction of the time was because it was running in the background as a PSJob. It took .15 seconds to set up and start running the code in the background instead of running it in the foreground and actually sleeping for five seconds.
Retrieving Job Output
Sometimes the code inside of the job returns output. You can retrieve the output of that code using the Receive-Job command. The Receive-Job command accepts a PSJob as the input and then writes the output of the job to the console. Anything that was output by the job while it was running has been stored so that when the job is retrieved it outputs all of what was stored at that time.
An example of this would be running the code below. This will create and start a job that will write Hello World to the output. It then retrieves the output from the job and outputs it to the console.
$Job = Start-Job -ScriptBlock {Write-Output 'Hello World'}
Receive-Job $Job
Creating Scheduled Jobs
Another way you can interact with PSJobs is through a scheduled job. Scheduled jobs are similar to a Windows scheduled task that can be configured with Task Scheduler. Scheduled jobs create a way to schedule complex PowerShell scriptblocks easily in a scheduled task. Using a scheduled job, you can run a PSJob in the background based on triggers.
Job Triggers
Job triggers can be things like a specific time, when a user logs on, when the system boots and many others. You can also have the triggers repeat at intervals. All of these triggers are defined with the New-JobTrigger command. This command is used to specify a trigger that will run the scheduled job. A scheduled job without a trigger has to be run manually, but each job can have many triggers.
In addition to having a trigger, you would still have a script block just like what is used with a normal PSJob. One you have both the trigger and script block, you’d use the Register-ScheduledJob command to create the job like what is shown in the next section. This command is used to specify attributes of the scheduled job like the scriptblock that is going to be run and triggers created with the New-JobTrigger command.
Demo
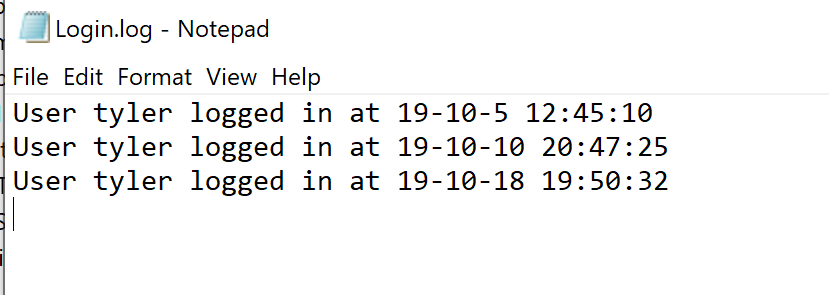
Perhaps you need some PowerShell code to run every time someone logs into a computer. You can create a scheduled job for this.
To do this, you’d first define a trigger using New-JobTrigger and define the scheduled job like what is shown below. This scheduled job will write a line to a log file every time someone logs in.
$Trigger = New-JobTrigger -AtLogon
$Script = {"User $env:USERNAME logged in at $(Get-Date -Format 'y-M-d H:mm:ss')" | Out-File -FilePath C:\Temp\Login.log -Append}

Register-ScheduledJob -Name Log_Login -ScriptBlock $Script -Trigger $Trigger
Once you run the above commands you will get an output similar to when creating a new job that will show the job ID, the scriptblock and some other attributes as shown below.

After a few login attempts, you can see from the below screenshot that it has logged the attempts.
Leveraging the AsJob Parameter
Another way to use jobs is to use the AsJob parameter that is built in to many PowerShell commands. Since there are many different commands, you can find all of them using Get-Command as shown below.
PS51> Get-Command -ParameterName AsJobOne of the most prevalent commands is Invoke-Command. Normally, when you run this command it will start executing a command immediately. While some commands will immediately return, allowing you to continue on with what you were doing, some will wait until the command is finished.
Using the AsJob parameter does exactly what it sounds like and runs the executed command as a job instead of running it synchronously in the console.
While most of the time AsJob can be used with the local machine, Invoke-Command does not have a native option to run on local machine. There is a workaround by using Localhost as the ComputerName parameter value. Below is an example of this workaround.
PS51> Invoke-Command -ScriptBlock {Start-Sleep 5} -ComputerName localhostTo show the AsJob parameter in action, the below example uses Invoke-Command to sleep for five seconds and then repeat the same command using AsJob to show the difference in execution times.
PS51> Measure-Command {Invoke-Command -ScriptBlock {Start-Sleep 5}}
PS51> Measure-Command {Invoke-Command -ScriptBlock {Start-Sleep 5} -AsJob -ComputerName localhost}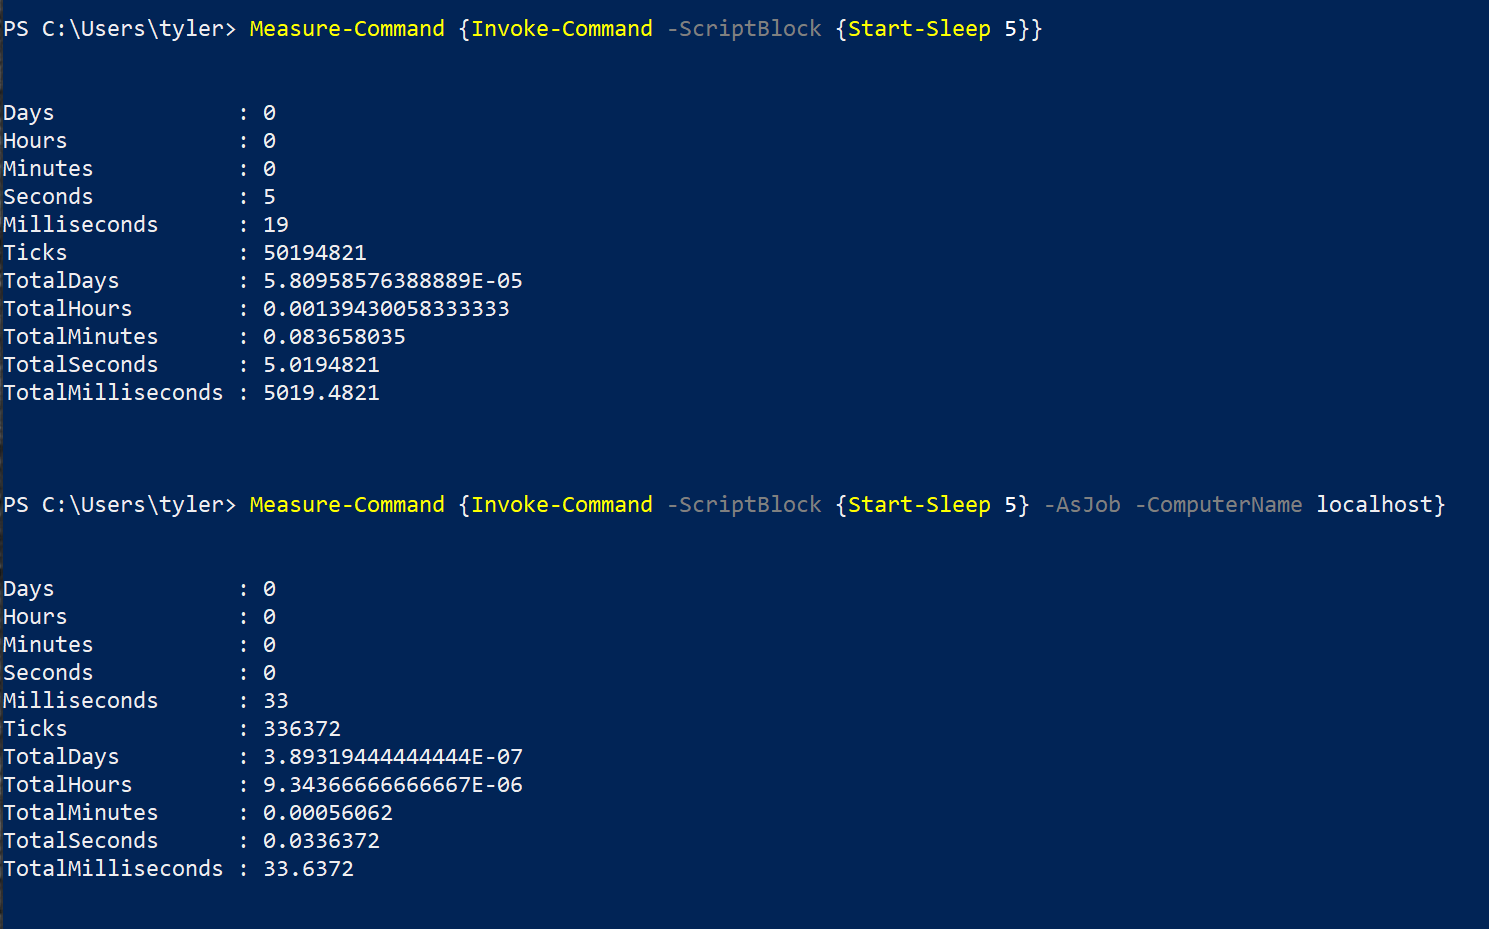
Runspaces: Kinda Like Jobs but Faster!
Up until now, you have been learning about ways to use additional threads with PowerShell only using the built in commands. Another option to multithread your script is to use a separate runspace.
Runspaces are the enclosed area that the thread(s) running PowerShell operate within. While the runspace that is used with the PowerShell console is restricted to a single thread, you can use additional runspaces to allow for use of additional threads.
Runspace vs PSJobs
While a runspace and a PSJob share many similarities, there are some big differences in performance. The biggest difference in runspaces and PSjobs is the time it takes to set up and break down each one.
In the example from the previous section, the PSjob created took about 150ms to bring up. This is about a best-case since the scriptblock for the job didn’t include much code at all and there were no additional variables being passed to the job.
In contrast to the PSJob creation, a runspace is created ahead of time. The majority of the time it takes to spin up a runspace job is handled before any code has been added.
Below is an example of running the same command that we used for the PSjob in the runspace instead.
By contrast, below is the code used for the runspace version. You can see there is much more code to execute the same task. But the benefit of the extra code shaves off nearly 3/4 of the time allowing the command to begin running in 36ms vs 148ms.
$Runspace = [runspacefactory]::CreateRunspace()
$PowerShell = [powershell]::Create()
$PowerShell.Runspace = $Runspace
$Runspace.Open()
$PowerShell.AddScript({Start-Sleep 5})
$PowerShell.BeginInvoke()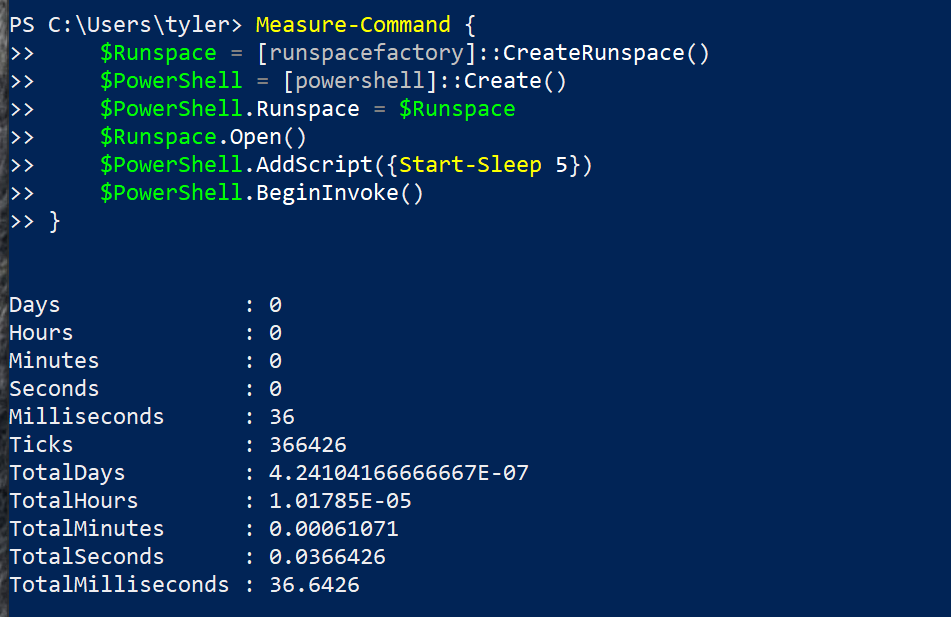
Running Runspaces: A Walkthrough
Using runspaces can be a daunting task at first since there is no more PowerShell command hand-holding. You will have to deal with .NET classes directly. In this section, let’s break down what it takes to create a runspace in PowerShell.
In this walkthrough, you are going to create a separate runspace from your PowerShell console and a separate PowerShell instance. Then you will assign the new runspace to the new PowerShell instance and add code to that instance.
Create the Runspace
The first thing you need to do is create your new runspace. You do this using the runspacefactory class. Store this to a variable, like what is shown below, so that it can be referenced later.
$Runspace = [runspacefactory]::CreateRunspace()Now that the runspace is created, assign it to a PowerShell instance to run PowerShell code. For this, you’ll use the powershell class and similar to the runspace, you will need to store this to a variable like what is shown below.
$PowerShell = [powershell]::Create()Next, add the runspace to your PowerShell instance, open the runspace to be able to run code and add your scriptblock. This is shown below with a scriptblock to sleep for five seconds.
 $PowerShell.Runspace = $Runspace
 $Runspace.Open()
 $PowerShell.AddScript({Start-Sleep 5})
Execute the Runspace
So far, the scriptblock still has not been run. All that has been done so far is to define everything for the runspace. To start running the scriptblock, you have two options.
- Invoke() – The
Invoke()method runs the scriptblock in the runspace, but it waits to return to the console until the runspace returns. This is good for testing to make sure that your code is executing properly before letting it loose. - BeginInvoke() – Using the
BeginInvoke()method is what you will want to actually see a performance gain. This will start the scriptblock running in the runspace and immediately return you to the console.
When using BeginInvoke(), store the output to a variable as it will be required to see the status of the scriptblock in the runspace as shown below.
$Job = $PowerShell.BeginInvoke()Once you have the output from the BeginInvoke() stored to a variable, you can check that variable to see the status of the job as seen below in the IsCompleted property.

Another reason you will need to store the output in a variable is because unlike the Invoke() method, BeginInvoke() will not automatically return the output when the code is finished. To do this, you must use the EndInvoke() method once it has been completed.
In this example, there would be no output but to end the invoke you would use the command below.
$PowerShell.EndInvoke($Job)Once all of the tasks that you queued in the runspace are finished you should always close the runspace. This will allow PowerShell’s automated garbage collection process to cleanup unused resources. Below is the command you would use to do this.
$Runspace.Close()Using Runspace Pools
While using a runspace does improve performance, it encounters a major limitation of a single thread. This is where runspace pools shine in their use of multiple threads.
In the previous section, you were only using with two runspaces. You only used one for the PowerShell console itself and the one that you had created manually. Runspace pools allow you to have multiple runspaces managed in the background using a single variable.
While this multi-runspace behavior can be done with multiple runspace objects, using a runspace pool makes management much easier.
Runspace pools differ from single runspaces in how they are set up. One of the key differences is that you define the maximum amount of threads that can be used for the runspace pool. With a single runspace, it is limited to a single thread, but with a pool you specify the maximum amount of threads the pool can scale up to.
The recommended amount of threads in a runspace pool depends on the amount of tasks being performed, and the machine that is running the code. While increasing the maximum amount of threads won’t negatively affect speed in most cases, you may also see no benefit.
Runspace Pool Speed Demonstration
To show an example of where a runspace pool will beat a single runspace, perhaps you want to create ten new files. If you’d use a single runspace for this task, you would create the first file, then move to the second, and then on to the third, and so on until all ten were created. The scriptblock for this example may look something below. You would feed this scriptblock ten file names in a loop and they would all be created.
$Scriptblock = {
    param($Name)
    New-Item -Name $Name -ItemType File
}
In the below example, a script block is defined that contains a short script that accepts a name and creates a file with that name. A runspace pool is created with a maximum of 5 threads.
Next, a loop cycles ten times and each time it will assign the number of the iteration to $_. So it would have 1 on the first iteration, 2 on the second and so on.
The loop creates a PowerShell object, assigns the script block, and the argument for the script and start the process.
Finally, at the end of the loop, it will wait for all of the queue tasks to finish.
$Scriptblock = {
    param($Name)
    New-Item -Name $Name -ItemType File
}

$MaxThreads = 5
$RunspacePool = [runspacefactory]::CreateRunspacePool(1, $MaxThreads)
$RunspacePool.Open()
$Jobs = @()

1..10 | Foreach-Object {
	$PowerShell = [powershell]::Create()
	$PowerShell.RunspacePool = $RunspacePool
	$PowerShell.AddScript($ScriptBlock).AddArgument($_)
	$Jobs += $PowerShell.BeginInvoke()
}

while ($Jobs.IsCompleted -contains $false) {
	Start-Sleep 1
}
Now instead of creating threads one at a time, it will create five at a time. Without runspace pools, you would have to create and manage five separate runspaces and five separate Powershell instances. This management quickly becomes a mess.
Instead, you can create a runspace pool, a PowerShell instance, use the same code block and the same loop. The difference is that the runspace will scale up to use all five of those threads all on its own.
Creating Runspace Pools
The creation of a runspace pool is very similar to the runspace that was created in a prior section. Below is an example of how to do it. The addition of a scriptblock and the invoke process is identical to a runspace. As you can see below, the runspace pool is getting created with a maximum of five threads.
$MaxThreads = 5
$RunspacePool = [runspacefactory]::CreateRunspacePool(1, $MaxThreads)
$PowerShell = [powershell]::Create()
$PowerShell.RunspacePool = $RunspacePool
$RunspacePool.Open()
Comparing Runspaces and Runspace Pools for Speed
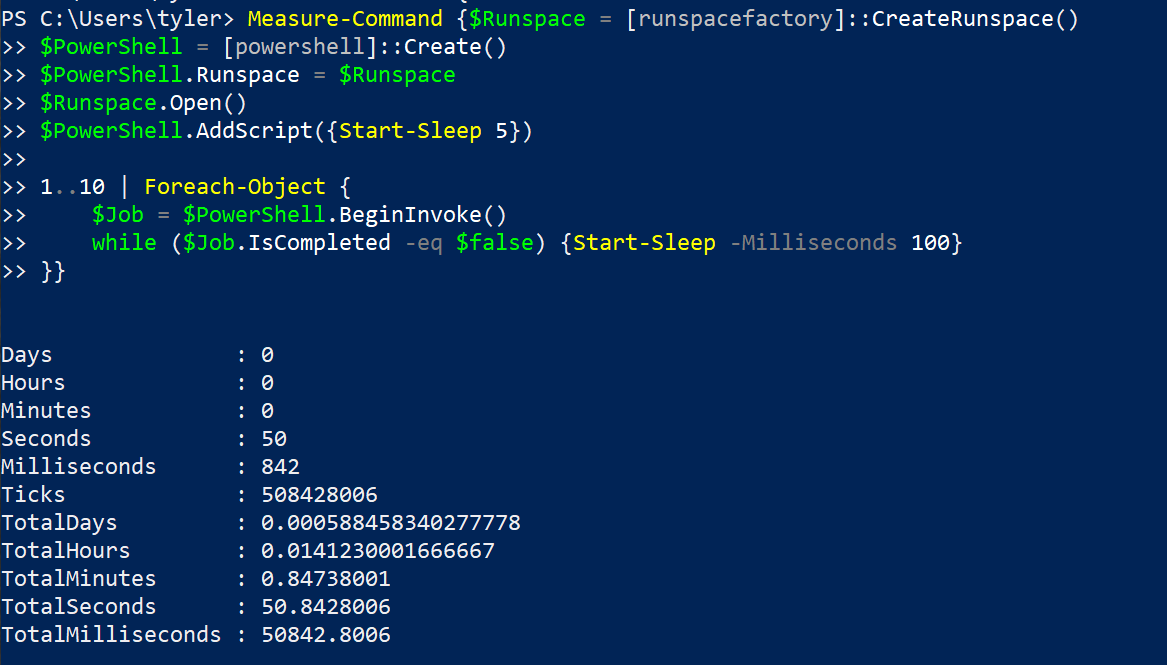
To show off the difference between a runspace and runspace pool, create a runspace and run the Start-Sleep command from earlier. This time, however, it has to be run 10 times. As you can see in the below code, a runspace is being created that will sleep for 5 seconds.
$Runspace = [runspacefactory]::CreateRunspace()
$PowerShell = [powershell]::Create()
$PowerShell.Runspace = $Runspace
$Runspace.Open()
$PowerShell.AddScript({Start-Sleep 5})

1..10 | Foreach-Object {
    $Job = $PowerShell.BeginInvoke()
    while ($Job.IsCompleted -eq $false) {Start-Sleep -Milliseconds 100}
}
Note that since you are using a single runspace, that you will have to wait until it is completed before another invoke can be started. This is why there is a 100ms sleep added until the job is completed. While this can be reduced, you will see diminishing returns as you will be spending more time checking if the job is done than waiting for the job to finish.
From the below example, you can see that it took about 51 seconds to complete 10 sets of 5 second sleeps.
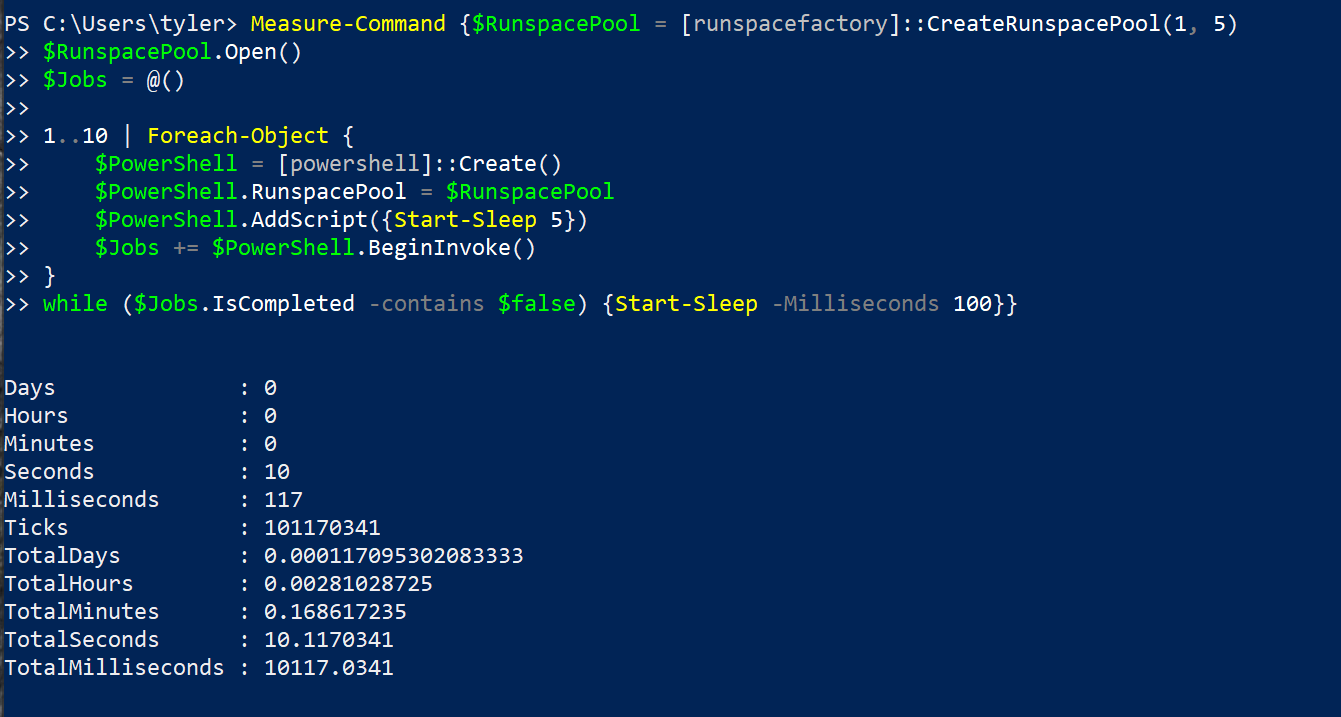
Now instead of using a single runspace, change over to a runspace pool. Below is the code that is going to be run. You can see that there are a few differences between the use of the two in the below code when using a runspace pool.
$RunspacePool = [runspacefactory]::CreateRunspacePool(1, 5)
$RunspacePool.Open()
$Jobs = @()

1..10 | Foreach-Object {
    $PowerShell = [powershell]::Create()
    $PowerShell.RunspacePool = $RunspacePool
    $PowerShell.AddScript({Start-Sleep 5})
    $Jobs += $PowerShell.BeginInvoke()
}
while ($Jobs.IsCompleted -contains $false) {Start-Sleep -Milliseconds 100}
As you can see below, this completes in just over 10 seconds which is much improved over the 51 seconds for the single runspace.
Below is a breakdown summary of the difference between a runspace and runspace pool in these examples.
| Property | Runspace | Runspace Pool |
|---|---|---|
| Wait Delay | Waiting for each job to finish before continuing to the next. | Starting all of the jobs and then waiting until they have all finished. |
| Amount of Threads | One | Five |
| Runtime | 50.8 Seconds | 10.1 Seconds |
Easing into Runspaces with PoshRSJob
A frequent occurrence when programming is that you will do what is more comfortable and accept the small loss in performance. This could be because it makes the code easier to write or easier to read, or it could just be your preference.
This same thing happens with PowerShell where some people will use PSJobs instead of runspaces because of the ease of use. There are a few things that can be done to split the difference and get the better performance without making it too much more difficult to use.
There is a widely used module called PoshRSJob that contains modules that match the style of normal PSJobs but with the added benefit of using runspaces. Instead of having to specify all of the code to create the runspace and the powershell object, the PoshRSJob module handles doing all of that when you run the commands.
To install the module, run the below command in an administrative PowerShell session.
Install-Module PoshRSJobOnce the module is installed, you can see the commands are the same as the PSJob commands with a RS prefix. Instead of Start-Job it is Start-RSJob. Instead of Get-Job it is Get-RSJob.
Below is an example of how to run the same command in a PSJob and then again in an RSJob. As you can see, they have very similar syntax and output, but they are not quite identical.
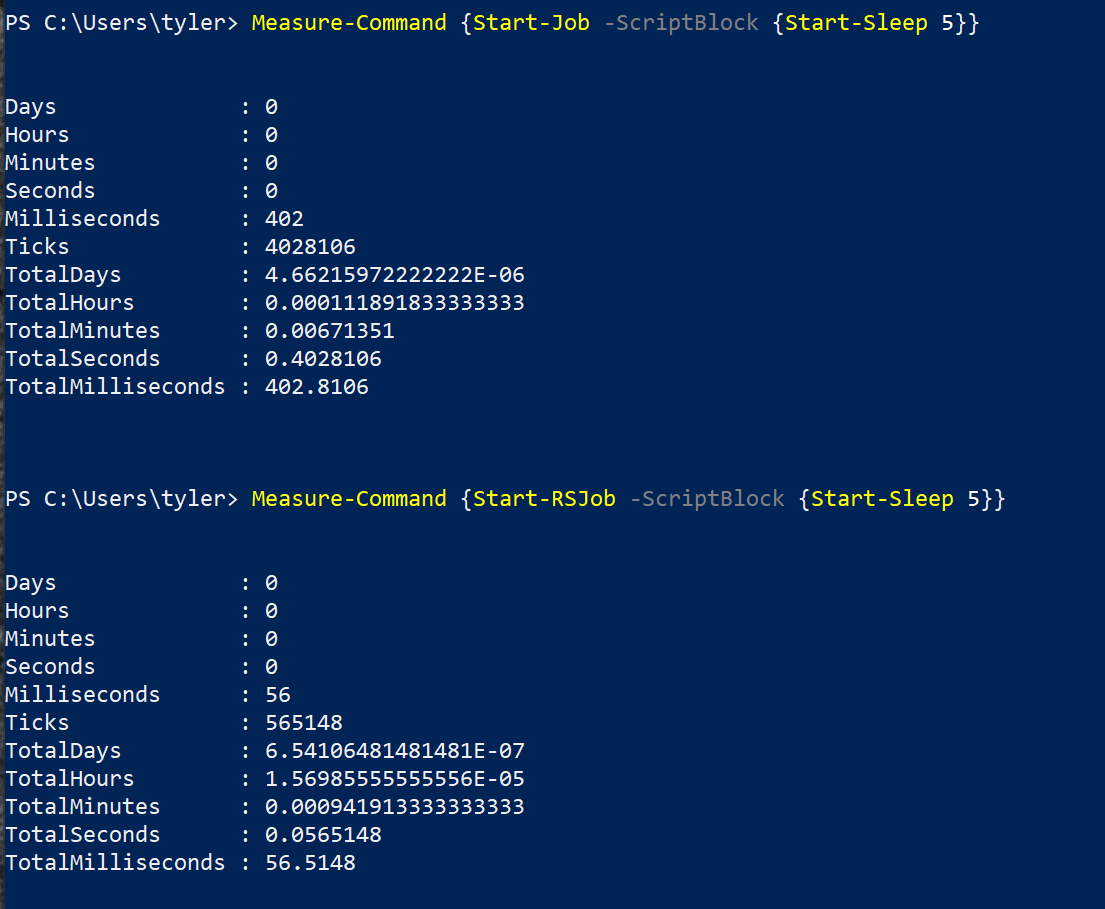
Below is some code that can be used to compare the difference in speed between a PSJob and an RSJob.
Measure-Command {Start-Job -ScriptBlock {Start-Sleep 5}}
Measure-Command {Start-RSJob -ScriptBlock {Start-Sleep 5}}
As you can see below there is a large speed difference since the RSJobs are still using runspaces below the covers.
Foreach-Object -Parallel
The PowerShell community has been wanting an easier and built-in way to quickly multithread a process. The parallel switch is what has come out of that.
As of writing this, PowerShell 7 is still in preview, but they have added a Parallel parameter to the Foreach-Object command. This process uses runspaces to parallelize the code and uses the scriptblock used for the Foreach-Object as the scriptblock for the runspace.
While the details are still being worked out, this may be an easier way to use runspaces in the future. As you can see below, you can quickly loop through many sets of sleeps.
Measure-Command {1..10 | Foreach-Object {Start-Sleep 5}}
Measure-Command {1..10 | Foreach-Object -Parallel {Start-Sleep 5}}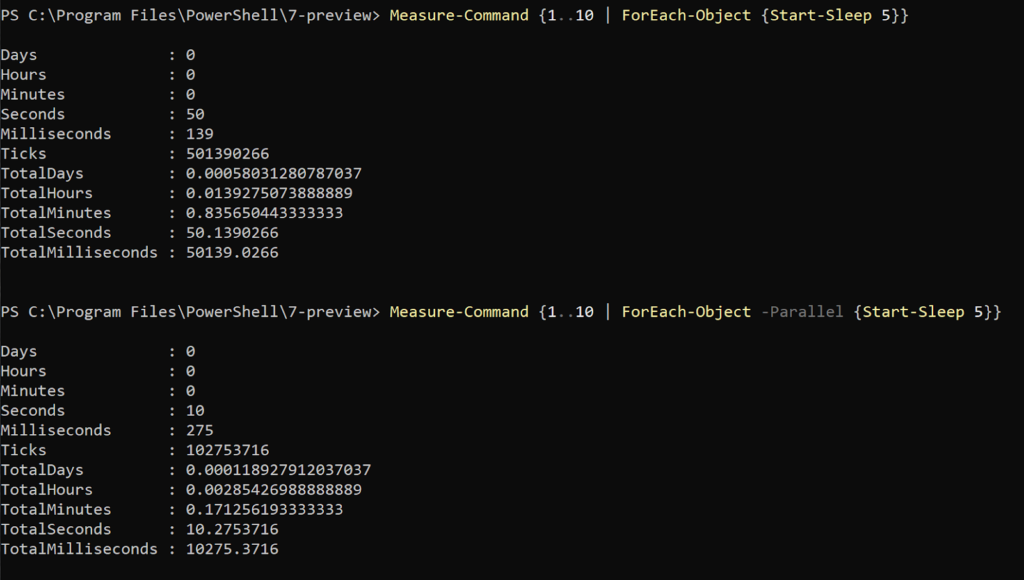
Challenges with Multi-Threading
While multithreading has sounded like nothing but amazing so far, this isn’t quite the case. There are many challenges that come along with multithreading any code.
Using Variables
One of the biggest and most obvious challenges with multithreading is that you cannot share variables without passing them as arguments. There is the one exception of a synchronized hashtable, but that is a talk for another day.
Both PSJobs and runspaces operate without any access to existing variables and there is no way to interact with variables used in different runspaces from your console.
This poses a huge challenge for dynamically passing information to these jobs. The answer is different depending on which kind of multithreading you are using.
For Start-Job and Start-RSJob from the PoshRSJob module, you can use the ArgumentList parameter to provide a list of objects that will be passed as parameters to the scriptblock in the order you list them. Below are examples of the commands used for PSJobs and RSJobs.
PSJob:
Start-Job -Scriptblock {param ($Text) Write-Output $Text} -ArgumentList "Hello world!"RSJob:
Start-RSJob -Scriptblock {param ($Text) Write-Output $Text} -ArgumentList "Hello world!"Navtive runspaces do not give you the same ease. Instead, you have to use the AddArgument() method on the PowerShell object. Below is an example of what it would look like for each.
Runspace:
$Runspace = [runspacefactory]::CreateRunspace()
$PowerShell = [powershell]::Create()
$PowerShell.Runspace = $Runspace
$Runspace.Open()
$PowerShell.AddScript({param ($Text) Write-Output $Text})
$PowerShell.AddArgument("Hello world!")
$PowerShell.BeginInvoke()
While runspace pools work the same, below is an example of how to add an argument to a runspace pool.
$MaxThreads = 5
$RunspacePool = [runspacefactory]::CreateRunspacePool(1, $MaxThreads)
$PowerShell = [powershell]::Create()
$PowerShell.RunspacePool = $RunspacePool
$RunspacePool.Open()
$PowerShell.AddScript({param ($Text) Write-Output $Text})
$PowerShell.AddArgument("Hello world!")
$PowerShell.BeginInvoke()
Logging
Multithreading also introduces logging challenges. Since each thread is operating independently of each other, they all can’t log to the same place. If you did try to log to say a file with multiple threads, whenever one thread was writing to the file, no other threads could. This could slow down your code, or cause it to fail outright.
As an example, below is some code to attempt to log 100 times to a single file using 5 threads in a runspace pool.
$RunspacePool = [runspacefactory]::CreateRunspacePool(1, 5)
$RunspacePool.Open()
1..100 | Foreach-Object {
	$PowerShell = [powershell]::Create().AddScript({'Hello' | Out-File -Append -FilePath .\Test.txt})
	$PowerShell.RunspacePool = $RunspacePool
	$PowerShell.BeginInvoke()
}
$RunspacePool.Close()
From the output you won’t see any errors, but if you look at the size of the text file, you can see below that not all 100 jobs finished correctly.
 Get-Content -Path .\Test.txt).Count” class=”wp-image-3241″/>
Some ways around this is to log to separate files. This removes the file locking problem, but then you have many log files that you would have to sort through to figure out everything that happened.
Another alternative is that you allow the timing of some of the output to be off and you only log what a job did once it finished. This allows you to have everything serialized through your original session, but you lose some of the details because you don’t necessarily know what order everything occurred in.
Summary
While multithreading can provide huge performance gains, it may also provide headaches. While some workloads with greatly benefit, others may not at all. There are many pros and cons to using multithreading, but if used correctly, you can drastically reduce the runtime of your code.


