


Maintaining free disk space is crucial when managing servers and systems. As admins, you wouldn’t want to get caught unaware of a ‘disk full’ situation. To ensure you’re in the clear, you should learn how to use PowerShell to delete files!
Not a reader? Watch this related video tutorial!In this article, you will learn just about every way you to remove files from your systems with PowerShell.
Let’s start started!
Prerequisites
This article presents examples using PowerShell, and if you plan to follow along, you will need the following.
- A computer that is running Windows 10 or above.
- Windows PowerShell 5.1 or PowerShell 7.0
- A script editor such as Visual Studio Code, Atom, or Notepad++.
Using the Remove-Item Cmdlet to Delete Files
When you simply need to use PowerShell to delete a file, you’ll probably immediately learn about the Remove-Item cmdlet. This cmdlet is the de facto standard for removing files with PowerShell.
Using Remove-Item combined with the Get-ChildItem cmdlet to read files and folders and the powerful PowerShell pipeline can really make things a breeze.
Related: Get-ChildItem: Listing Files, Registry, Certificates and More
Did you know that the
Remove-Itemcmdlet has an alias by the name ofdel? When working in PowerShell, usingRemove-Itemordelwill run the same command.
Using PowerShell to Delete a File
The first example that would be most useful is the most basic – that is, deleting a single file. To delete just a single file, you only need to use the command below. The code below deletes the file C:\temp\random.txt.
Remove-Item -Path C:\temp\random.txtRunning the code above in PowerShell would not show anything on the screen unless an error was encountered.
Using PowerShell to Delete All Files in Folder
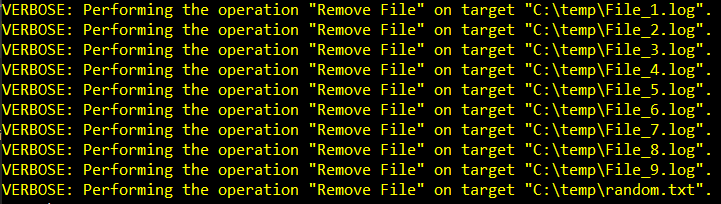
In this example, the code below deletes all files in a folder. The Get-ChildItem cmdlet targets C:\temp with the -Path parameter. The -File parameter indicates that the only type of item to be included are files. Get-ChildItem ignores folders.
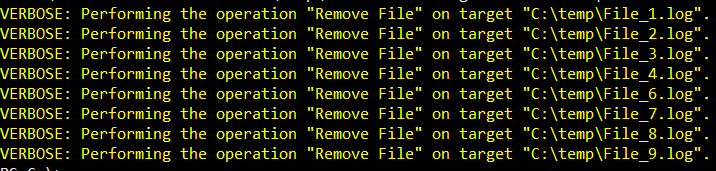
Get-ChildItem -Path C:\temp -File | Remove-Item -VerboseThe output should look like this screenshot below.
Using PowerShell to Delete All Files Recursively
The previous example only deleted files in the C:\temp folder. If you need to also delete the files inside every sub-directory, you need to add the -Recurse switch to the Get-ChildItem cmdlet to get all files recursively.
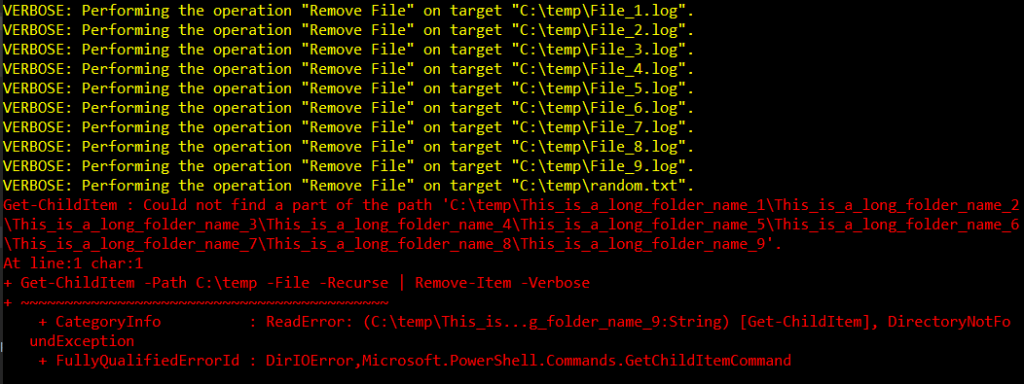
Get-ChildItem -Path C:\temp -File -Recurse | Remove-Item -VerboseRunning the above code forces PowerShell to look into all sub-folders and retrieve all the list of files. The output below shows that the code was able to delete files in the top folder; however, it failed to retrieve the files in the sub-folders.
Working Around the Long Path Problem
The error shown above indicates that the PowerShell “could not find a part of the path”. That error is indicative that the path the cmdlet is trying to get to does not exist – which is misleading.
In this case, the error was because the path that the Get-ChildItem is trying to read exceeds the maximum path length of 260 characters.
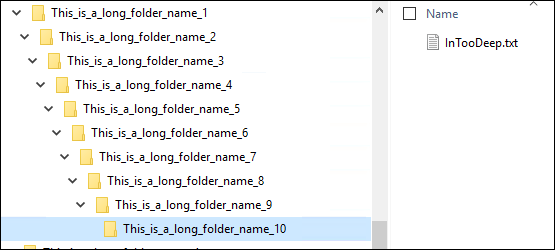
The screenshot below shows that the path or directory and its sub-directories exist and one text file named InTooDeep.txt is located in the bottom-most sub-directory. The combination of all the characters that make up the nested directory names creates a long path problem.
In Windows PowerShell 5.1, there is a workaround to the long path name problem. The workaround is to use the Unicode version of the path. Instead of specifying the path like this – C:\temp, use the Unicode version like this – ‘\\?\C:\temp’ for folders located locally, or ‘\\?\UNC\<computername>\<share>\Temp’ if the folder is located in a UNC path.
Get-ChildItem -Path '\\?\C:\temp' -File -Recurse | Remove-Item -VerboseUsing the modified code above that caters to the long path name, the output below shows that PowerShell read the deeply nested path name successfully and deleted the file.

Note that the long path name problem does not affect PowerShell 7.0. With PowerShell 7.0, there is no need to use the Unicode version of the path because it already has built-in support for long path names.
If the folders need to be deleted, too, just remove the -File parameter from the Get-ChildItem cmdlet, and PowerShell should delete all items, including files and folders.
Using PowerShell to Delete Files Older Than x Days
Another typical example of disk space housekeeping is deleting files that are older than a specific number of days. This example is useful for removing old log files, like those generated by IIS web servers, to free up disk space.
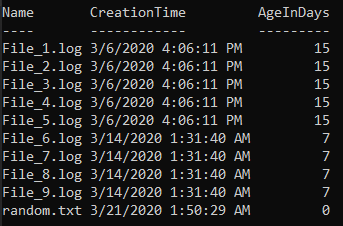
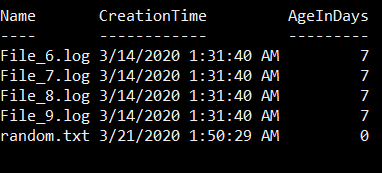
In this example, there are files in c:\temp that are older than 14 days. Using the script below, the Name, CreationTIme, and AgeInDays of each file in c:\temp is shown.
Get-ChildItem c:\temp | Select-Object Name,CreationTime,@{n='AgeInDays';e={(New-TimeSpan -Start $PSItem.CreationTime).Days}}As you can see in the screenshot below, there are files that are 15 days old, 7 days old, and 0 days old.
Now that you know the files to remove, you can create a script to only delete files that are older than a specific number of days – in this case, older than 14 days.
In this example script below, files in C:\temp whose CreationTime value is older than the set threshold will be deleted.
The first line defines the path for Get-ChildItem to search. The path is saved in the $path variable. Then, the second line is where the threshold is specified. The value of the $threshold the age in days that the file to be deleted must be.
The next line of code after the $threshold variable will:
- Get the collection of files located in the folder specified in the
$pathvariable. In this example, the path is C:\temp. - Filter the output to include only files whose
CreationTimevalue is older than the number of days saved in the$thresholdvariable. In this example, the threshold is 14 days. - Pipe the filtered list of files to the
Remove-Itemvalue to perform deletion of those files.
$path = 'C:\Temp'
$threshold = 14
Get-ChildItem -Path $path -File | Where-Object {$PSItem.CreationTime -lt (Get-Date).AddDays(-$threshold)} |Remove-Item -Verbose
When you run the above code you will see output like shown below.

Notice that from the screenshot above, based on the verbose message, the script only deleted five files older than 14 days. To confirm that files newer than 14 days still exist, run the code below to list them again.
Get-ChildItem c:\temp | Select-Object Name,CreationTime,@{n='AgeInDays';e={(New-TimeSpan -Start $PSItem.CreationTime).Days}}The result below confirms that Remove-Item did not delete the newer files.
Using PowerShell to Match and Delete File Patterns
Deleting all files, regardless of name, type, or extension is not always the best approach. Sometimes, you need to explicitly exclude or include certain files in the deletion process.
This next example below shows how to delete the files that match *.LOG filename. One way of doing it by using the Remove-Item cmdlet directly with the use of the -Include parameter, as shown below.
Remove-Item -Path C:\temp\* -Include *.logAnother way is, perhaps, the cautious approach is to use Get-ChildItem first to collect the list of files to be deleted. Only when you’re satisfied with the list of files for deletion, you can finally pipe the collection to the Remove-Item cmdlet.
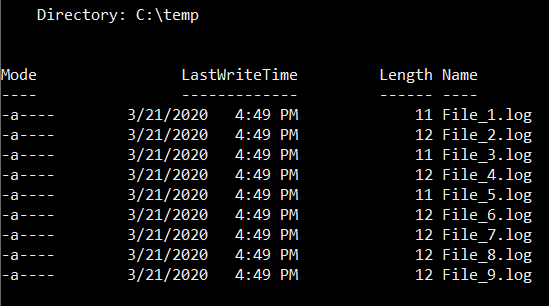
For example, the code below gets that *.LOG files in c:\temp.
Get-ChildItem -Path C:\temp\* -Include *.logAs a result of the code above, Get-ChildItem returns a list of files matching the *.LOG filename.
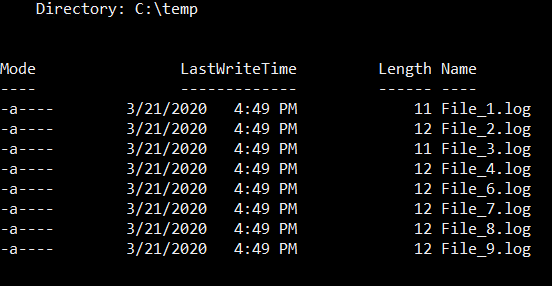
But, what if you want to exclude a file that contains the number 5 in its name? You can do so by adding the -Exclude parameter like this next code.
Get-ChildItem -Path C:\temp\* -Include *.log -Exclude *5*Since you excluded the file with the number 5, the result is now different. Specifically, the file File_5.log is no longer on the list, as shown below.
When you’re already satisfied with the collection of files that your code creates, then you can pipe the files collection to the Remove-Item cmdlet to finally delete those files.
Get-ChildItem -Path C:\temp\* -Include *.log -Exclude *5* | Remove-Item -VerboseAfter running your final code, you will have achieved your goal of deleting only the files you selected.
Deleting Files using WMI in PowerShell
Now that you have a good understanding of using the common Remove-Item cmdlet to remove files, let’s jump into a more advanced use case; using WMI.
PowerShell comes with support for WMI. And support for WMI means that WMI queries and methods can be called from within PowerShell. Yes, WMI is not just for Visual Basic scripts that admins used in the earlier days of Windows.
Microsoft released WMI-specific CIM cmdlets in PowerShell 3.0. The CIM cmdlets that will be used to delete files are the Get-CimInstance and Invoke-CimMethod.
Using PowerShell and WMI to Delete a File
This example assumes that you know the path of the specific file to delete. The Get-CimInstance cmdlet with the Cim_DataFile class is used to retrieve the information about the file to delete which is C:\Temp\random.txt.
$file2delete = Get-CimInstance -ClassName Cim_DataFile -Filter "Name = 'C:\Temp\random.txt'"
 $file2delete
In the above code, the -Filter parameter accepts a WQL format query. Using WQL requires that you escape some characters including the backslash. And, since the WQL escape character is also the backslash, resulting in the double-backslash characters – \\.
Running the code above produces the result shown in the demonstration below. The information about C:\Temp\random.txt is saved to the $file2delete variable

Now that the information for the file C:\Temp\random.txt is retrieved, the resulting object in the $file2delete variable can be piped to the Invoke-CimMethod cmdlet. The Invoke-CimMethod cmdlet has a parameter called -Name, which represents the name of the method of the Cim_DataFile class.
$file2delete | Invoke-CimMethod -Name DeleteAs you see in the screenshot below, the ReturnValue shows 0, which means that the command was successful.

To know about the possible ReturnValue codes, please refer to this link – Delete method of the CIM_DataFile class
Additionally, the screenshot below shows that after running the Invoke-CimMethod Delete() method, CIM only removed the C:\Temp\random.txt file. It did not remove the other files.
Using PowerShell and WMI to Delete All Files in Folder
In this next example, show you how to delete all files in a folder using PowerShell and WMI. The same cmdlets used in the previous example, which are Get-CimInstance and Invoke-CimMethod, will be used. But, this time, the WQL query will retrieve all files in the folder instead of just one specific file.
In this next code, the Get-CimInstance cmdlet retrieves all files located in C:\temp. As you can see below, the query filters the Drive and Path properties of the Cim_DataFile class.
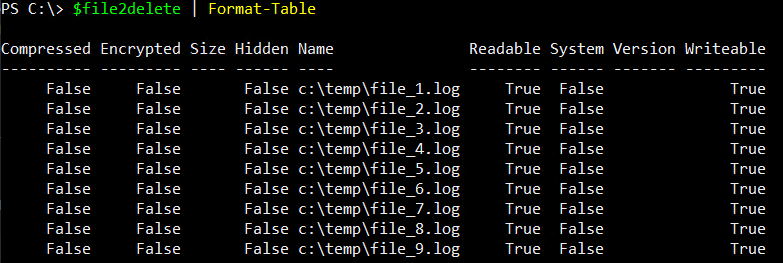
$file2delete = Get-CimInstance -ClassName Cim_DataFile -Filter "Drive = 'c:' AND Path = '\\temp\\'"Running the code above saves the retrieved information about the files in C:\temp in the $file2delete variable. Viewing the value(s) of the $file2delete variable shows the output below.
Now, the values stored in the $file2delete variable can be piped to the Invoke-CimMethod to delete all files in c:\temp.
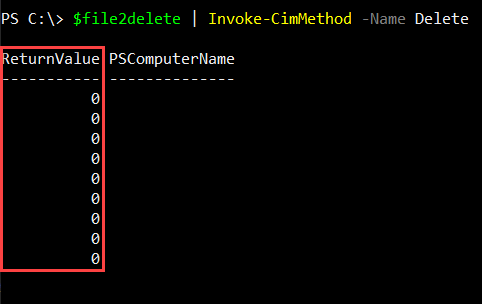
$file2delete | Invoke-CimMethod -Name DeleteRemember, the ReturnValue code of 0 means successful, and for each file that the delete method was called on will have its own ReturnValue code.
Using PowerShell and WMI to Delete Files By Extension
You’ve seen in the previous example how to delete all files in a folder regardless of extension. However, you can also control which files get deleted based on extension.
You’ll notice in the code below, this time the query has an added condition (Name LIKE '%.log). This added condition means that only files that match the .LOG extension is returned. The percent (%) sign is a WQL LIKE operator that means “A string of zero or more characters”. In programming terms, the %is the equivalent of a wildcard, which is the asterisk (*) character.
$file2delete = Get-CimInstance -ClassName cim_datafile `
-Filter "Drive = 'c:' AND Path = '\\temp\\' AND Name LIKE '%.log'"
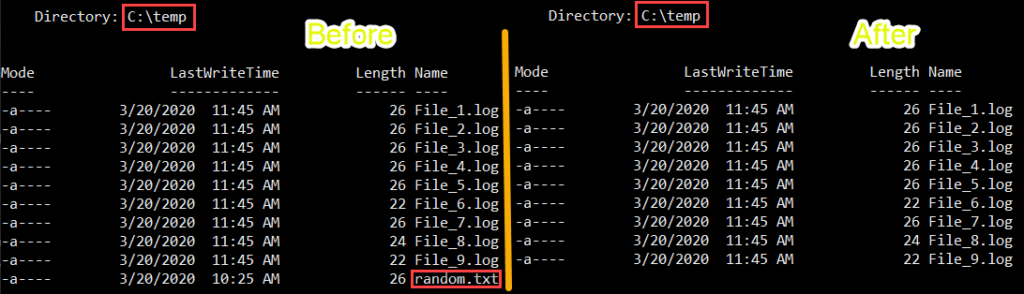
$file2delete | Invoke-CimMethod -Name DeleteThe demonstration below shows that before the code above is executed, there are nine *.LOG files and only one *.TXT file. Once the code is done running, the *.LOG files are deleted and the *.TXT file is the only file left in the folder.

Comparing WMI and Remove-Item
So far in this tutorial, you’ve gotten a broad overview of how to use PowerShell to delete files. You’ve learned about Remove-Item and also WMI. Both perform similar functions but much differently.
Which method should you use to delete files; Remove-Item or WMI?
Using a built-in cmdlet in PowerShell like Get-ChildItem and Remove-Item to retrieve and delete files is much faster than when using WMI.
The example below shows the comparison when using WMI and the built-in PowerShell cmdlet to get the list of files under the C:\windows\web directory and its sub-directories.
## List all files in C:\Windows\Web\ recursively using Get-ChildItem
Measure-Command { Get-ChildItem C:\Windows\Web\ -Recurse}

## List all files in C:\Windows\Web\ recursively using Get-CimInstance and WMI Query
Measure-Command { Get-CimInstance -ClassName Cim_DataFile -Filter "Drive = 'c:' AND Path = '\windows\web\%'"}
When you run the code above in PowerShell, you’ll see the output similar below.
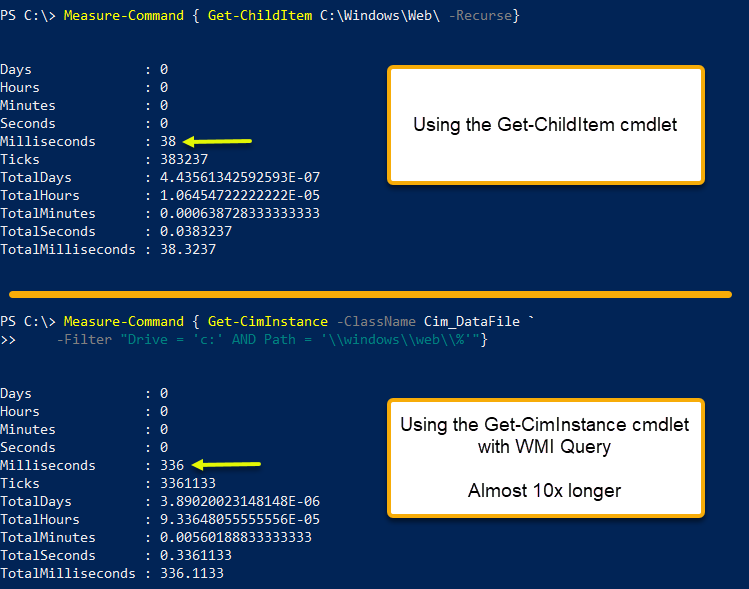
As you can see from the output shown above, listing the files in C:\windows\web almost took ten times longer using Get-CimInstance than the time it took for Get-ChildItem to complete!
Also, did you notice how the Get-ChildItem line is much shorter than Get-CimInstance? Not only you get faster execution using Get-ChildItem, but you also benefit from a cleaner and shorter code.
Next Steps
In this article, you’ve seen the two different ways you can use PowerShell to delete files with built-in cmdlets and WMI/CIM.
Know that you should always use the Get-ChildItem and Remove-Item cmdlet to remove files. These built-in cmdlets are more flexible, easier, and faster to use than when using WMI.
Try to come up with a script that can perform disk space housekeeping for you. Sure some scripts already exist for that purpose; by all means, use them as a reference, but if you’re willing to practice and learn, you should try to create your own.


