


PowerShell is an incredibly flexible language. It has its proverbial digital fingers in just about every corner of the Windows world you can imagine. However, there comes a time when you need to start integrating external sites and parties. Thankfully, many services have APIs which allow you to work with web services via code. PowerShell JSON to the rescue!
Not a reader? Watch this related video tutorial!Many APIs these days use a protocol called REST to use HTTP to communicate directly with the backend of an online server. A large portion of the Internet uses REST for backend communication, and REST talks primarily in one language Javascript Object Notation (JSON). JSON is a way to write programmatic objects as a long string of text.
In this article, you will discover the basics behind JSON and PowerShell. You’ll learn how to use PowerShell to speak directly to a REST API and translate the data into something useful! You’ll also learn how to build a couple of handy ways to use JSON in your everyday PowerShell scripts too!
Prerequisites
Throughout the article, you will be constructing some basic PowerShell scripts to demonstrate the features of JSON. To follow along, you’ll need the following:
- PowerShell 7 – This article be using v7.0.3.
- Visual Studio (VS) Code – This article is using v1.4.8 but any code editor should also work.
JSON Brings Structure
JSON is a way to straddle the line between human-readable and machine-readable data. Before structured data objects like JSON, most operating systems relied on text parsing tools that used ugly regular expressions (regex) and other methods to bring structure to simple text.
With the introduction of JSON, you can now create strings that can be read by both humans and by programs with relative ease.
Below you can see an example snippet of JSON.
{
    "string": "this is a string. backslashes (\\) have to be escaped",
    "object": {
        "description": "this is an object nested inside our javascript object. Description is a string subproperty"
    },
    "numbers": 12345,
    "array": ["a string", "another string"]
}
JSON is mostly easy to read, albeit with a lot of quotations, commas, parenthesis, and escaped characters. JSON is also mostly easy to write, albeit it’s darn simple to miss a comma somewhere and break the whole object!
You will find that most guides that teach JSON are web development-oriented. This is because JSON is first and foremost designed for the Javascript language (it’s in the name of the acronym). Javascript is a web-based language, and thus most guides for JSON are web-focused.
The goal of this guide isn’t to teach you how to write JSON. The article linked in the introduction is a great resource for that.
Let’s now jump into some examples working with JSON and one JSON-capable tool; PowerShell!
Demo: Downloading the Latest PowerShell Version with PowerShell and JSON
One of the best ways to learn how to use PowerShell to work with JSON is with a good example. Perhaps you’re tired of manually going out to GitHub every time a new version of PowerShell is released and downloading the newest release. You’d like to automate the process.
In this section, you’re going to be building a PowerShell script that:
- Queries the GitHub API to find out the latest releases of PowerShell Core
- Converts the data returned from the API in JSON to a PowerShell object
- Uses standard PowerShell cmdlets to inspect and drill down to the data we need
- Downloads the latest PowerShell (x64 version) .zip file
Grokking the API Documentation
To automate downloading the latest PowerShell release, you can’t immediately get down to coding. After first figuring out that the web service/site you’d like to query has a REST API, you must learn how the site’s specific REST API set up. In this case, GitHub.
An API is generic and not a set standard, therefore there must be some documentation provided for an API to be useful.
API is just a generic term for software-to-software communication. For this article, you will be using it in the context of RESTful communication. That said, any crosstalk between two separate pieces of software is technically an API.
Finding the API Endpoint
The first step you’ll need to complete is finding the API endpoint to call. This HTTP endpoint is a URI that your client (PowerShell in this case) will query.
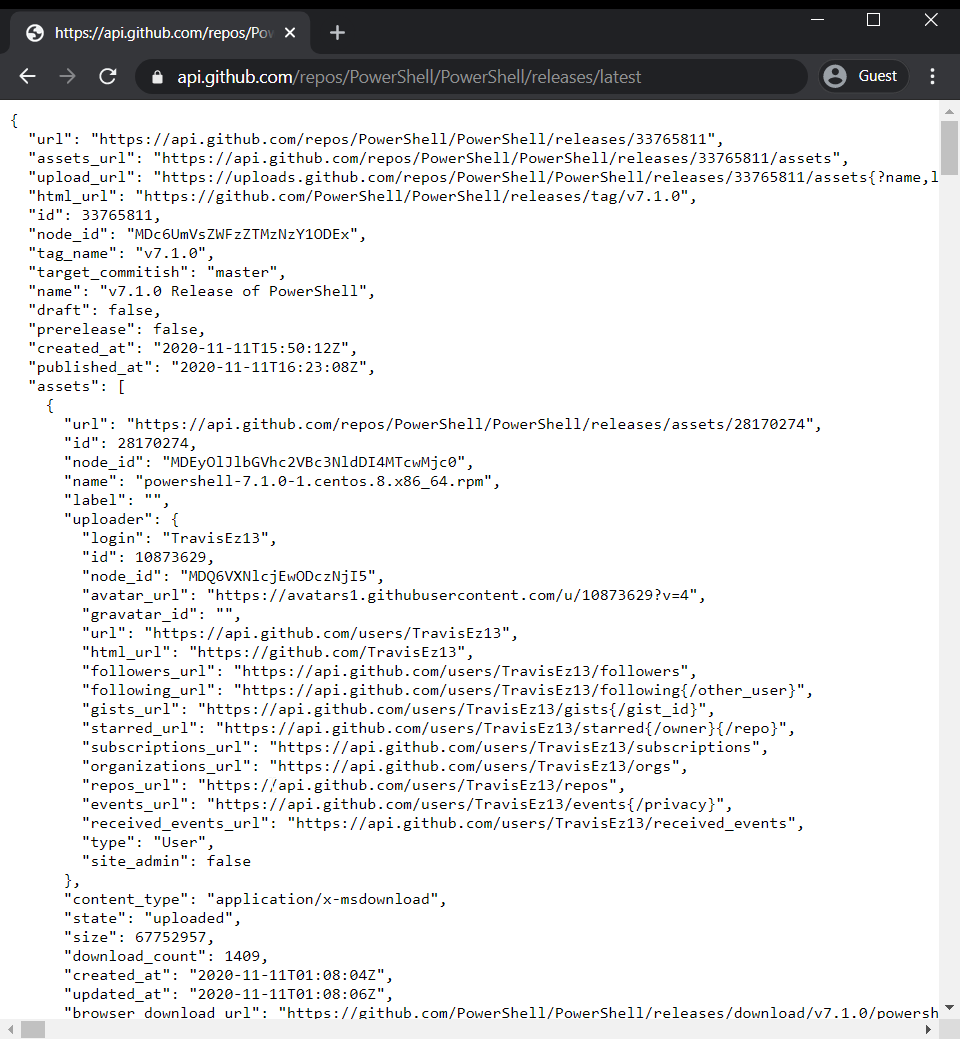
According to Github’s documentation, the URI you need to query to find the latest release of a project must be in the following format: https://api.github.com/repos/{owner}/{repo}/releases. In this case, the URI to call is https://api.github.com/repos/PowerShell/PowerShell/releases/latest.
Since you’ll need to GET information from the API (the latest PowerShell release), you need to use the HTTP GET request. The easiest way to do that is to simply paste the URI into your favorite browser which should return the raw JSON.
Below you can see the formatted JSON that’s returned for the latest PowerShell release.
A formatted JSON string is one that has all of the indentation and line breaks included. A minified JSON string is one that has all of that removed (so it looks like one, giant, single-line string with no breaks).
Sometimes it’s not obvious where to find the information you need in JSON, simply because it’s up to the API publisher to structure all of the included data. You can either find it in the website’s API documentation or simply dig through the JSON yourself.
Firefox has an excellent JSON parser: If you view that same GitHub link in Firefox, you can parse and search that JSON inside the browser.
APIs generally return much more data than you can easily sift through by hand. This is clear from the amount of text you received by visiting that API Github link above. Somewhere in all of this data, there is some information about the latest releases of PowerShell Core; you just have to find it.
Parsing JSON with VS Code
Once you have an example piece of formatted JSON, you should probably bring it into a code editor or some other product that’s syntax-aware. This way you get all of the benefits of syntax highlighting and other features. VS Code is a great code editor for viewing JSON.
- Open up VS Code.
- Go to File —> New File to create a blank text document.
- Paste in the contents of https://api.github.com/repos/PowerShell/PowerShell/releases/latest into the new tab. At this time, the JSON will just be white and shown as plain text.
- To make VS Code aware that the text is JSON, click down in the bottom right corner where it says Plain Text and change it from Plain Text to JSON. You should get the fancy highlighting now, as seen below.
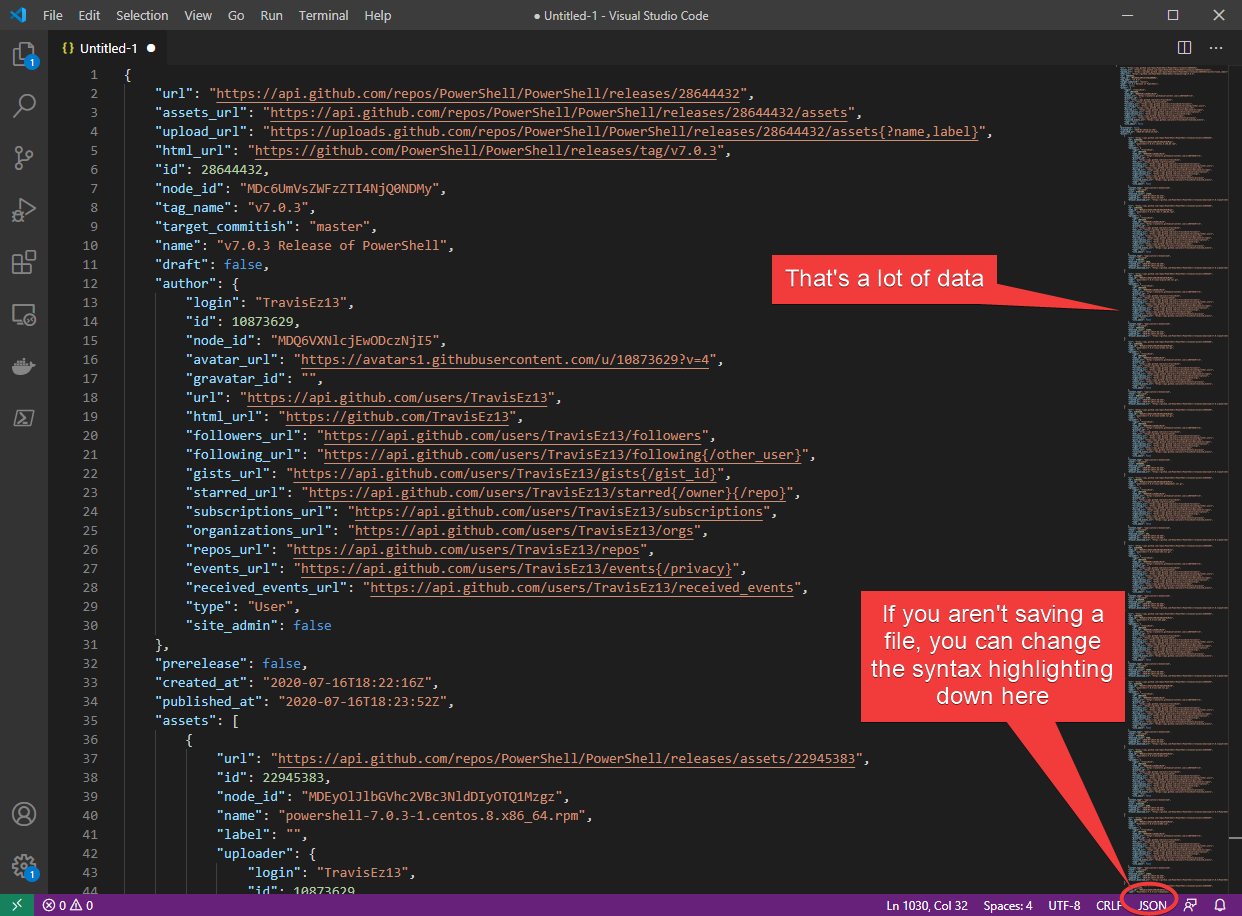
Visual Studio Code is preferred over something like notepad because Visual Studio Code is a syntax-aware editor. VS Code will perform smart highlighting so you can easily separate headers from content, and will warn you when writing JSON if you break it.
Download and Parsing JSON with PowerShell
Once you have the JSON, you need to find the download link for the latest release of PowerShell. Now what? You could break out some regex but that’d be torture. Instead, convert that JSON into a structured PowerShell object.
For PowerShell to work with JSON, you must first get that JSON from GitHub into PowerShell somehow. One of the easiest ways to do that is to use the Invoke-RestMethod cmdlet since this cmdlet does a lot of the work for you (you’ll see this used in the next section). However, it’s still important to know how to convert any ol’ JSON string.
Using the Invoke-WebRequest Cmdlet
One way to query an API with PowerShell and get some JSON in return is to use the Invoke-WebRequest cmdlet. This cmdlet can query any web service/site over HTTP and return information (not just JSON). In this example, you’re using it as an example to get some JSON to work with.
- Open up your PowerShell console.
- Run
Invoke-WebRequestto query the GitHub API as shown below. The code snippet below is assigning all of the output the cmdlet returns to the$webDatavariable for processing.
$webData = Invoke-WebRequest -Uri "https://api.github.com/repos/PowerShell/PowerShell/releases/latest"3. Run the ConvertFrom-Json cmdlet to convert the JSON string stored in the content property to a PowerShell object.
$releases = ConvertFrom-Json $webData.content4. Now pipe the PowerShell object to the Get-Member cmdlet. When you do, you’ll see that the object is a System.Management.Automation.PSCustomObject type; not just a simple string.
$releases | get-member 
Ever since PowerShell version 3, the
ConvertFrom-JSONcmdlet has been the primary way to work with JSON in PowerShell. Its purpose is quite simple; convert a JSON string into a PowerShell object. Once converted, you can use all of the native strengths of PowerShell such as object searching, filtering, selecting, sorting, and all of that fun stuff.
Using the Invoke-RestMethod Cmdlet
Using the Invoke-RestMethod cmdlet is very similar to using Invoke-WebRequest. It really only eliminates a single line of code, as the cmdlet will automatically assume a JSON response and convert it for you. It is, however, better for clarity. It makes it clear in the code that you are expecting to be using an API and you are also expecting a JSON response. Clearer code is always a good thing!
- Open up your PowerShell Console
2. Run Invoke-RestMethod to GET the release information
$releases = Invoke-RestMethod -Uri "https://api.github.com/repos/PowerShell/PowerShell/releases/latest"3. Now pipe the PowerShell object to the Get-Member cmdlet. When you do, you’ll see that the object is a System.Management.Automation.PSCustomObject type; not just a simple string.
$releases | get-member 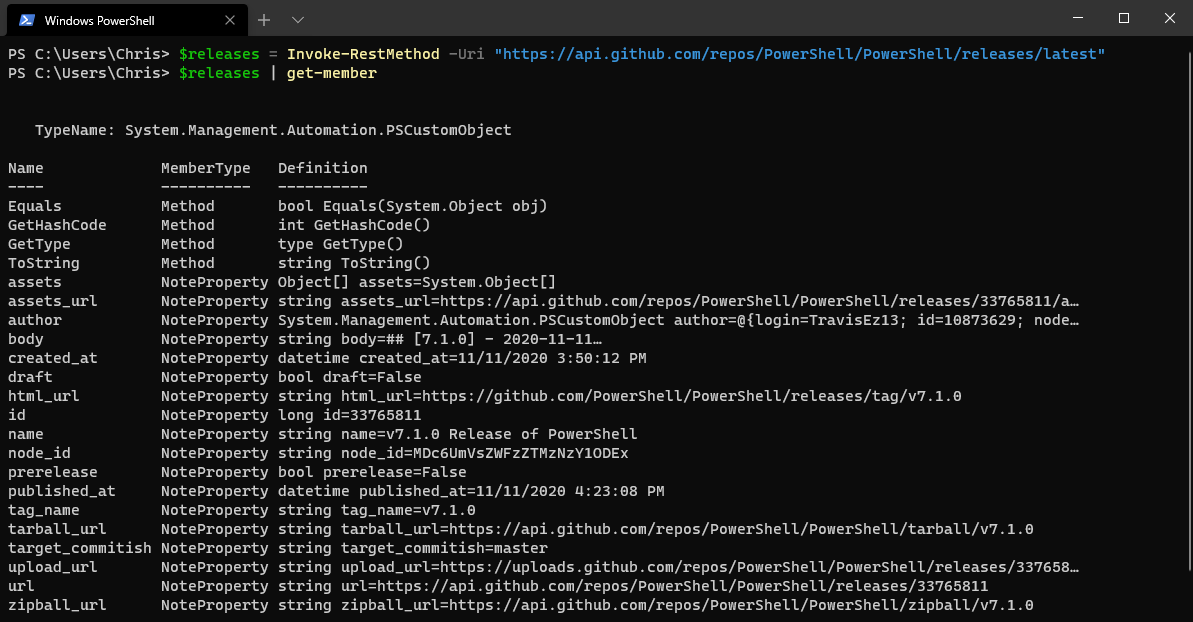
Parsing the JSON with PowerShell
Now that you have a PowerShell object, sift through the object’s properties to find the release name and download URL to eventually download the latest PowerShell release.
- Look through the
$releasesvariable defined in the last section. Two properties that stand out are thenameproperty and thebrowser_download_urlproperty. Thenameproperty probably relates to the release names, and thebrowser_download_urlproperty probably relates to the URL.
The names of the object properties such as
nameandbrowser_download_urlare entirely up to the person who created the API. There is no hard guidance on how to pick and choose what properties hold what data. If it’s not mentioned in the API documentation, you just have to go digging through the object like you just did above using the PowerShellget-membercmdlet.
2. Now inspect all of the values for the name properties as shown below. You should see file names of the latest release packages.
$releases.assets.name 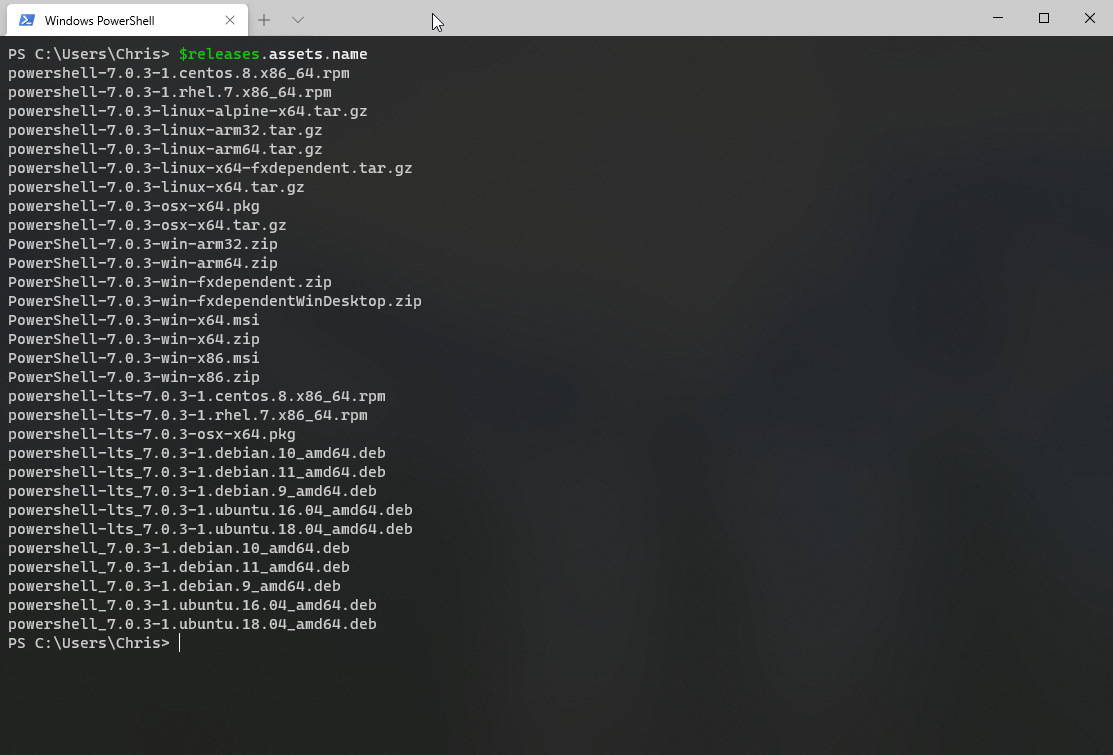
Since you’re working on Windows, you decide you need the powershell_7.0.3-win-x64.zip package. You can assume that the browser_download_url property will also contain the correct URL corresponding to that name. Reconnaissance complete. let’s put this all together!
In the below code snippet, you will do the following:
- GET the release information from the GitHub API (both the
Invoke-RestMethodandInvoke-WebRequestoptions are shown, you only need one)
2. Assign the nested assets sub-object to the $assets variable
3. Filter the assets object to find the release matching win-x64 and .zip
4. Use Invoke-WebRequest to download the filtered object
## Using Invoke-RestMethod
$webData = Invoke-RestMethod -Uri "https://api.github.com/repos/PowerShell/PowerShell/releases/latest"

## Using Invoke-WebRequest
$webData = ConvertFrom-JSON (Invoke-WebRequest -uri "https://api.github.com/repos/PowerShell/PowerShell/releases/latest")

## The release download information is stored in the "assets" section of the data
$assets = $webData.assets

## The pipeline is used to filter the assets object to find the release version we want
$asset = $assets | where-object { $_.name -match "win-x64" -and $_.name -match ".zip"}

## Download the latest version into the same directory we are running the script in
write-output "Downloading $($asset.name)"
Invoke-WebRequest $asset.browser_download_url -OutFile "$pwd\$($asset.name)"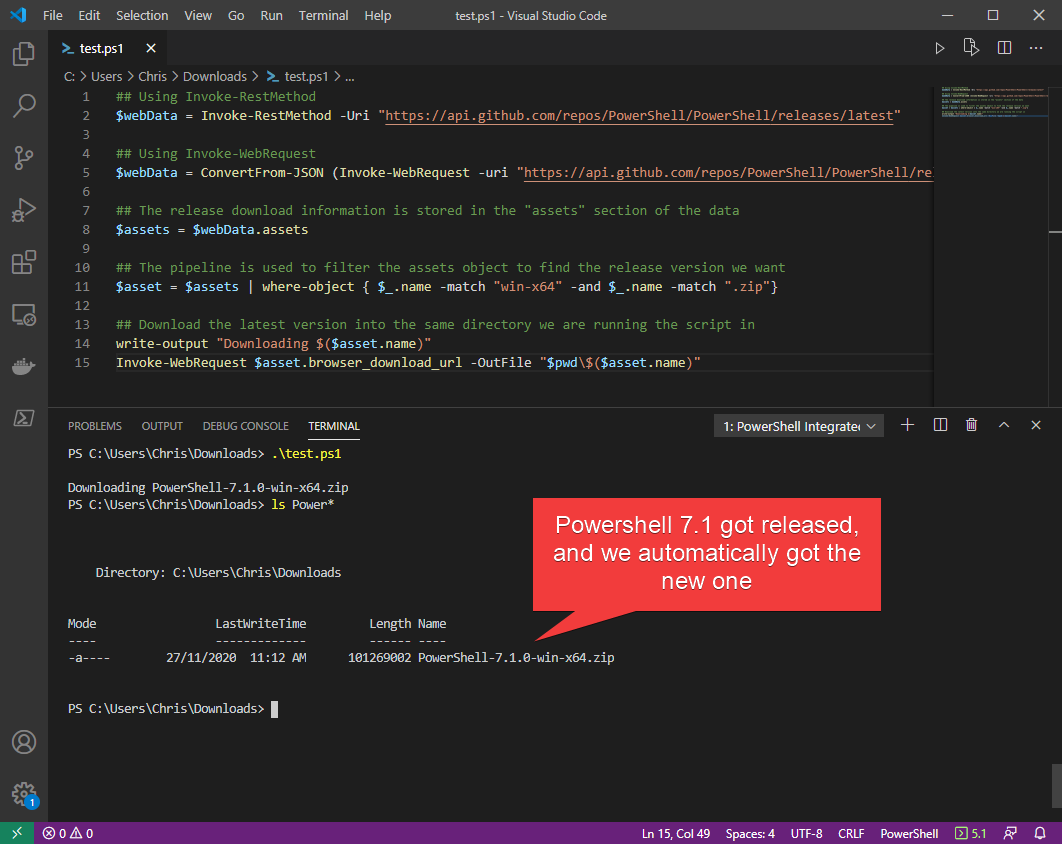
And you’ve done it! You’ve successfully leveraged an API that returns JSON, parsed it with PowerShell, and did something meaningful with it (downloaded the PowerShell Core zip file).
Demo: Using JSON as a Parameter Store
You have now interacted with the Github API and natively used it in PowerShell but JSON isn’t just useful for web APIs. It’s also useful for some native PowerShell tricks.
Let’s say you’ve got a PowerShell script called WindowsSettings.ps1 with a lot of parameters and the script is getting unwieldy. If only you could have a configuration file to store most of these parameters in.
Maybe you have a script that sets your computer name and region and installs some basic programs. Below is an example set of parameters on this fictional script.
These parameters represent a computer name to install the software to, the timezone to set on the computer and a few parameters to decide whether or not to install various pieces of software.
## WindowsSettings.ps1
param (
    [Parameter(Mandatory = $true)]
		[String]$ComputerName,
		[String]$Timezone,
    [Switch]$Install7zip,
    [Switch]$InstallVSCode,
    [Switch]$InstallGoogleChrome
)
...
You then execute this script using various parameters as usual.
.\Install-Software.ps1 -ComputerName FOO -InstallZip -InstallVSCode -InstallGoogleChrome
The above example isn’t bad but could soon lead to a lot of bad! What if this script had 15 or 30 parameters? What if you only needed to really modify five of them regularly and would rather not store default values?
## WindowsSettings.ps1
param (
    [Parameter(ParameterSetName = 'cmd', Mandatory = $true)]
		[String]$ComputerName,
		[Parameter(ParameterSetName = 'cmd')]
		[String]$Timezone,
    [Parameter(ParameterSetName = 'cmd')]
		[Switch]$Install7zip,
    [Parameter(ParameterSetName = 'cmd')]
		[Switch]$InstallVSCode,
    [Parameter(ParameterSetName = 'cmd')]
		[Switch]$InstallGoogleChrome,
    [Parameter(ParameterSetName = 'json')]
		[String]$JSON
)

if($JSON) {
		## *the ashashtable parameter for ConvertFrom-json was added in
    ## Powershell 7. If you are following along with Powershell 5.1,
    ## this will not work (or you will have to find a way to convert the
		## PSObject to a Hashtable).*
    $config = ConvertFrom-Json $json -ashashtable
    &$MyInvocation.MyCommand @config
    exit
}

write-output $computername, $timezone
What’s been done above? You’ve implemented parameter sets. You now have a choice; you can either call the script using all of those parameters or you can provide a single JSON string via the $JSON parameter to fill in those parameter values. You can now pass in all of those values you need by converting your JSON file via splatting via the @config reference.
Now you can provide a single parameter (JSON) to the script and pass in all of those parameter values at one time.
.\WindowsSettings.ps1 -json '{"computername":"mycomputer123","timezone": "Aus Eastern Standard time"}'
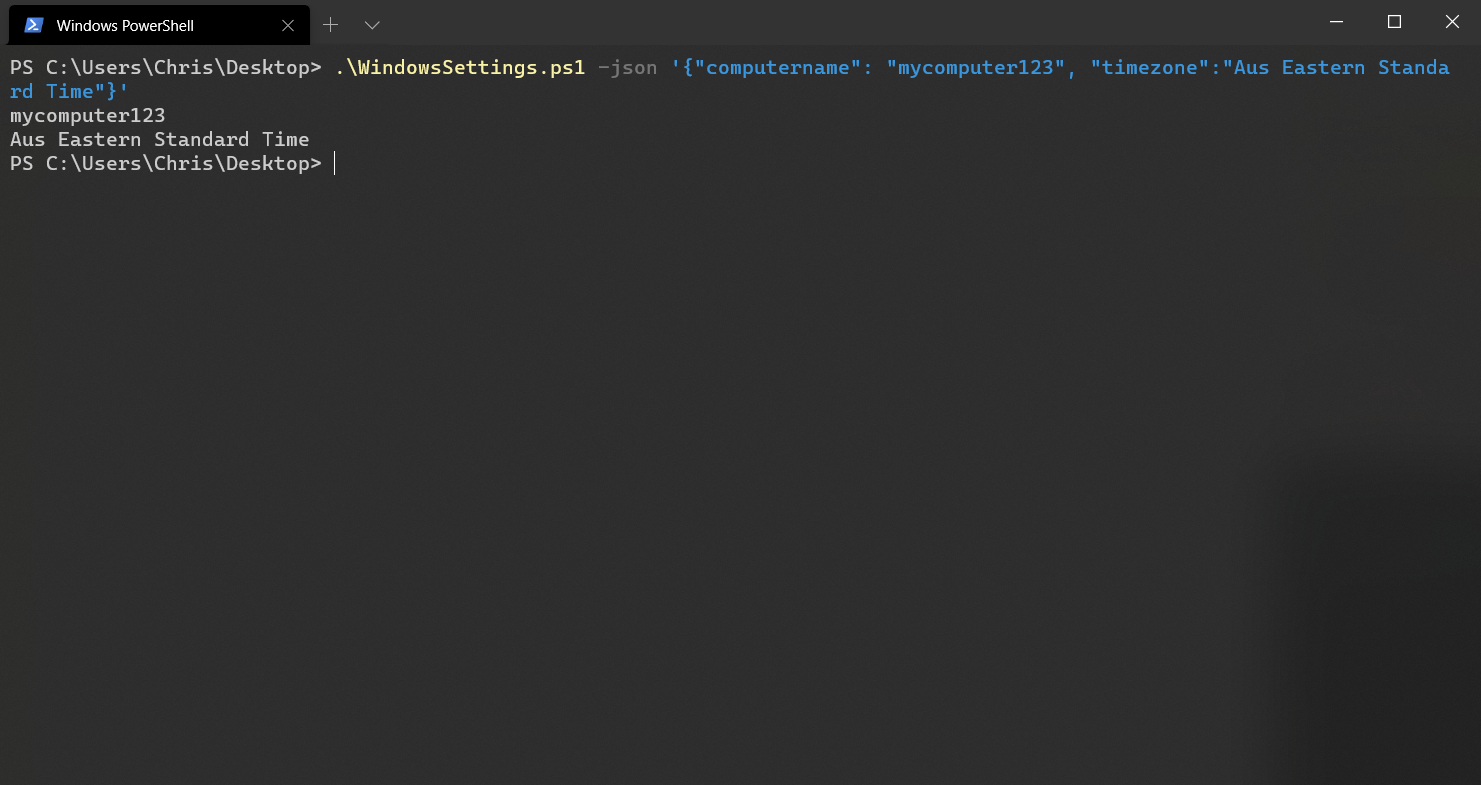
How slick is that? You can use a JSON string to specify your parameters just as if you were using the parameters directly!
Demo: Exporting the Parameter Store
Once you’ve gotten into the JSON as parameter values idea, you can take this concept one step further by exporting passed parameter values as JSON.
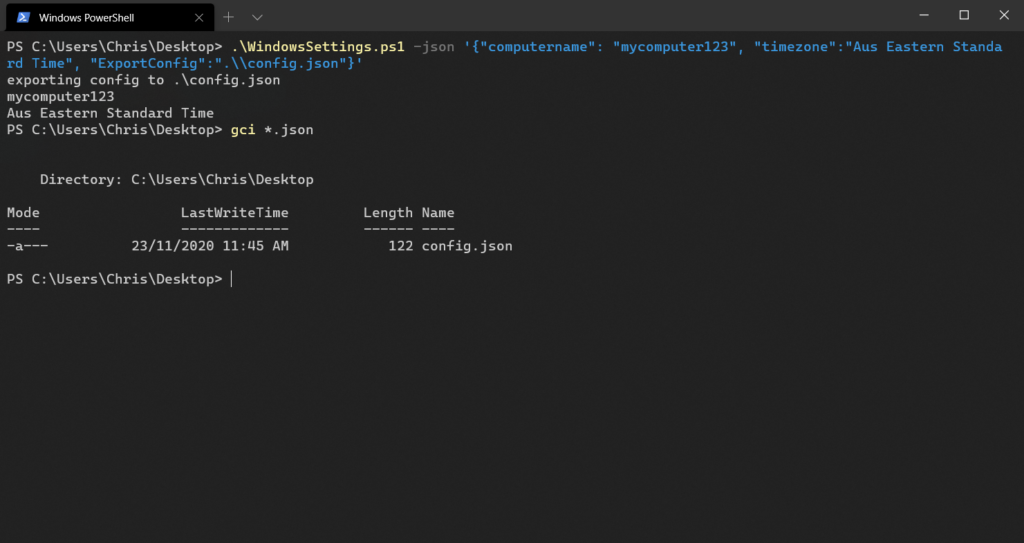
In the script you’re working on, add another string parameter calledExportConfig that represents the JSON file you’d like to export to. By using this parameter with the other parameters, you then have the ability to export all parameters passed as JSON to a file.
## WindowsSettings.ps1
param (
    [Parameter(ParameterSetName = 'cmd', Mandatory = $true)]
		[String]$ComputerName,
    [Parameter(ParameterSetName = 'cmd', Mandatory = $true)]
		[String]$Timezone,
    [Parameter(ParameterSetName = 'cmd')]
		[Switch]$Install7zip,
    [Parameter(ParameterSetName = 'cmd')]
		[Switch]$InstallVSCode,
    [Parameter(ParameterSetName = 'cmd')]
		[Switch]$InstallGoogleChrome,
    [Parameter(ParameterSetName = 'cmd')]
		[string]$ExportConfig,
    [Parameter(ParameterSetName = 'json')]
		[String]$JSON
)

if($JSON) {
    $config = ConvertFrom-Json $json -ashashtable
    &$MyInvocation.MyCommand @config
    exit
}

if ($ExportConfig) {
    write-output "exporting config to $($exportConfig)"
		## Grab all of the parameters provided into a $params object.
    $params = $PSBoundParameters
    #convert all switches to booleans. We do this because passing switches as JSON doesn't behave as expected
    $keys = $params.keys.clone()
    foreach ($key in $keys) {
        if ($params[$key]) {
						## Switches don't work that well in a JSON format, so you loop
						## through the $params object and convert any existing switches to
						## Booleans
            if ($params[$key].gettype().name -eq "SwitchParameter") {
                $params[$key] = $params[$key].IsPresent
            }
        }
    }
    #export to a file
		## Export it to the location provided in $exportConfig
    $params | convertto-JSON | out-file $exportConfig
}

write-output $computername, $timezone
Once you have the new parameter defined, use the ExportConfig parameter by adding the path to the JSON file you’d like to export parameter values to. The below example is exporting parameters passed to the WindowsSettings.ps1 script to the .\config.json file.
To use a backslash in JSON, you must always escape it with another backslash e.g.
\\.
And just like that, you can dynamically export your config as a JSON!
Demo: Using a JSON File as a Parameter Store
You may also need to accept JSON from a file, After all, you probably don’t want to type of entire JSON string every time you need to pass some parameters to a script.
To pass JSON via a file, you’ll first need to use Get-Content to read the file and then you can pass the JSON returned to the script. You can see an example below.
.\WindowsSettings.ps1 -json (get-content .\config.json -raw)
The
-Rawparameter will forceGet-Contentto return a single string instead of an array of lines.
Now you can also optionally import that config.json file instead of just supplying a string.
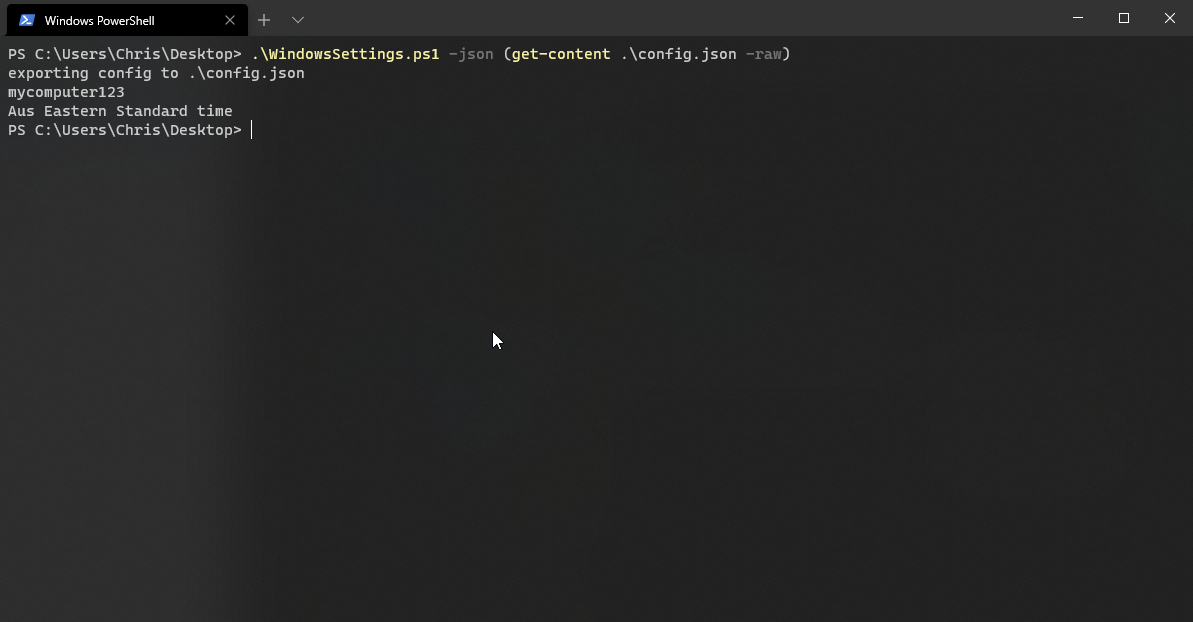
Just like that, you have a way to dynamically export and import a config file (or string) that can handle all of your parameters! This is especially useful when external programs are calling your PowerShell scripts: It’s a heck of a lot easier to provide a JSON file/string rather than a ton of parameters.
Next Steps
With this knowledge at your fingertips, you can now parse the web and build some neat PowerShell tools using JSON. What other kinds of PowerShell tools can you come up with?


