PowerShell is a command-line tool but did you know it can also be used as a base for graphical interfaces? Sometimes command-line isn’t the best kind of interface for a particular instance. Building a PowerShell GUI for your service desk is a great example. This is one of those times when it is more appropriate to build graphical tools instead.
Not a reader? Watch this related video.Enforce end-user verification when resetting passwords at the helpdesk. Reduce your social engineering vulnerability with Specops Secure Service Desk. Contact us for a Demo!
PowerShell can use and expose .NET functionality and features. As a result, it is possible to write GUI front ends for the scripts you create. Building PowerShell GUIs may seem complicated, especially if you are a beginner.
But if you have basic experience with PowerShell scripting then there’s no reason for you not to learn and adapt the practice of creating GUI for your scripts.
In this post, you will learn how to create a PowerShell GUI using the Windows Presentation Framework (WPF).
Prerequisites
Before you dive in, please be sure you meet the following requirements:
- Visual Studio 2017 or later – You’ll use this to create the graphical user interface using WPF. You can download a free/community version.
- A script editor – I use Visual Studio Code, but you can also use another text editor of your choice. Some other options are Notepad++ and the built-in PowerShell ISE
- A Windows 10 computer with Windows PowerShell 5.1.
Building the Script
In this post, you’ll create a simple script named Main.ps1. In the script, you’ll write code that will pull disk information from a local or remote system by querying the Win32_LogicalDisk WMI class.
You’ll need a script to wrap a GUI around first. I’ve chosen to use a script that allows you to provide a computer name and query disk information. This is, by no means, necessary to build a GUI though. Use the techniques you learn in this post to adapt your GUIs to your own scripts.
As an example script, I’ll create a function that performs the following actions:
- Accept input for the name of the computer to query
- Query the computer and store the fixed disks information to a variable
- Return the results
Writing the Function
Below is the function you’ll use for this project, aptly named Get-FixedDisk. This project’s purpose is to get the information about the non-removable or fixed disks on the target machine.
While this piece of code can be used as is, creating a GUI would be beneficial if you just want to perform a quick query without having to dot source the function and manually typing in the commands each time.
Function Get-FixedDisk {
    [CmdletBinding()]
    # This param() block indicates the start of parameters declaration
    param (
        <#
            This parameter accepts the name of the target computer.
            It is also set to mandatory so that the function does not execute without specifying the value.
        #>
        [Parameter(Mandatory)]
        [string]$Computer
    )
    <#
        WMI query command which gets the list of all logical disks and saves the results to a variable named $DiskInfo
    #>
    $DiskInfo = Get-WmiObject Win32_LogicalDisk -ComputerName $Computer -Filter 'DriveType=3'
   $DiskInfo
}
You can see that I’ve added a param() block in the code. This is to instruct the function to accept inputs based on the type of data indicated.
In the example, I’ve added a Computer parameter which accepts a string value. Also, by adding the Mandatory parameter attribute, it ensures that the function does not run if the Computer parameter is not specified at runtime.
Next, line 18 shows the actual WMI query command which gets the list of all logical disks and saves the results to a variable named $DiskInfo. I’ve also added a filter to get only the disks with DriveType=3. This filter ensures that only the information about local fixed disks is displayed.
Importing the Code (Dot Sourcing)
At this point, you now have a working script and are ready to test it. But before you can test the script, you need to import the code into a PowerShell session. One way of loading code into a PowerShell session is by dot sourcing.
To dot source a script, type a dot (.) and a space before the script path. If the script were in the C:\PoshGUI-sample folder, you could dot source it like below.
PS C:\PoshGUI-sample> . .\Main.ps1You can also specify the full path if you’re no in the current working directory. In the example code below, you can see the full path of the script.
PS C:>. C:\PoshGUI-sample\Main.ps1Now that we have imported the code into the memory, we can proceed with testing the function we’ve created. In the below example, it shows that the Get-FixedDisk function is used to query the computer poshLabExc.
PS51> Get-FixedDisk -Computer poshLabExc

DeviceID     : C:
DriveType    : 3
ProviderName :
FreeSpace    : 53037772800
Size         : 135838822400
VolumeName   : Windows

DeviceID     : D:
DriveType    : 3
ProviderName :
FreeSpace    : 14872641536
Size         : 17178750976
VolumeName   : Temporary Storage

DeviceID     : E:
DriveType    : 3
ProviderName :
FreeSpace    : 488202240
Size         : 524283904
VolumeName   : System Reserved
Building the PowerShell GUI
At this point, you’ve created the script file named Main.ps1, and inside the script created the function Get-FixedDisk. You were also able to test and confirm that the function is working.
Now that you know that the script works, you can start building the GUI.
Designing the PowerShell GUI Form
First plan how you’d like the GUI to look and the elements you’d like to use. For this simple example, our GUI will have:
- a text box where the computer name can be entered
- a button to execute the function
- a text box where we can display the results
Next, you can begin building it!
To start creating the GUI, open up Visual Studio and create a new project.
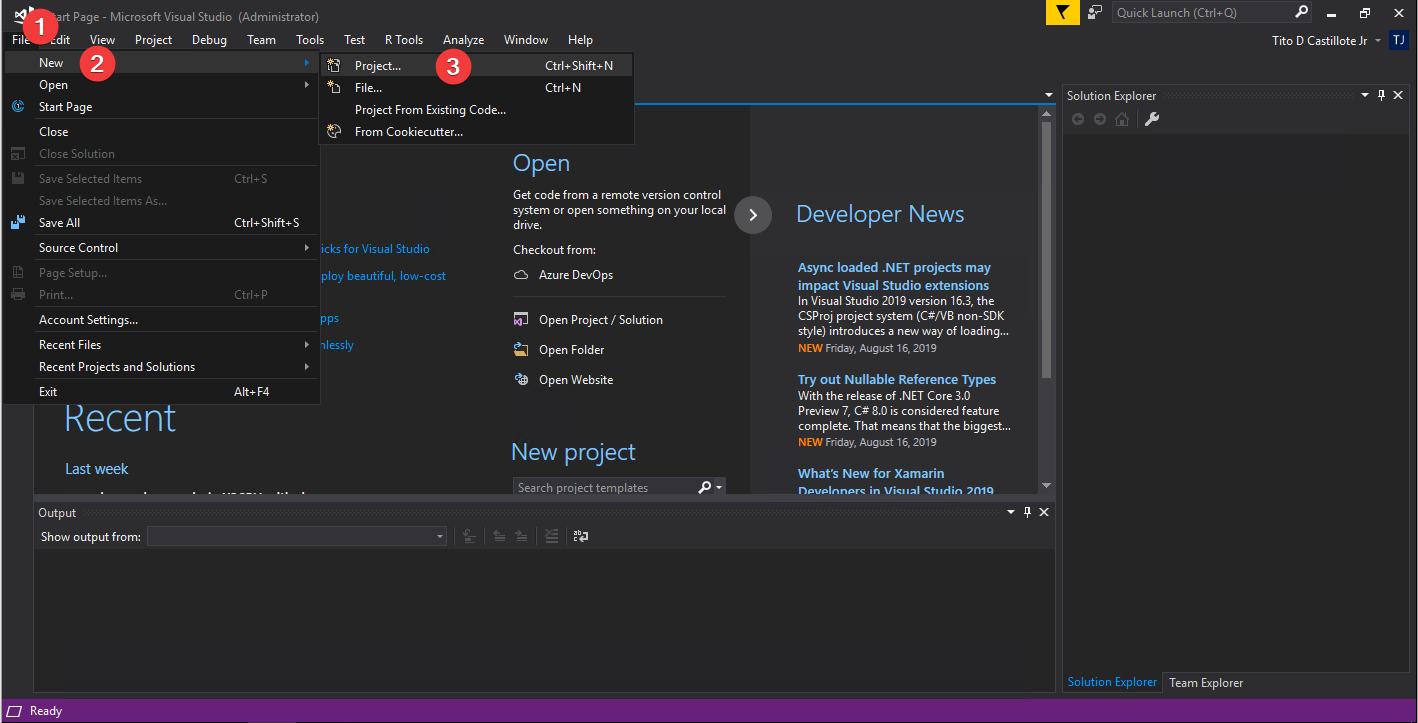
Once Visual Studio is open, click on File (1) –> New (2) –> Project (3).
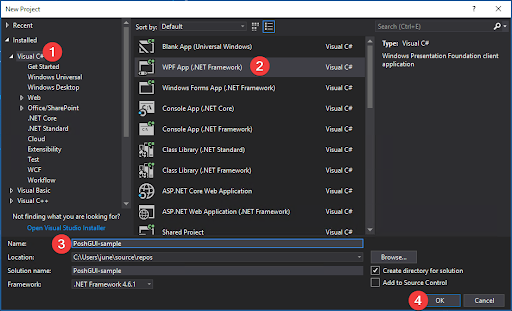
Under the New Project window, choose Visual C# (1), select WPF App (.NET Framework) (2), change the name to PoshGUI-sample (3) and click OK.
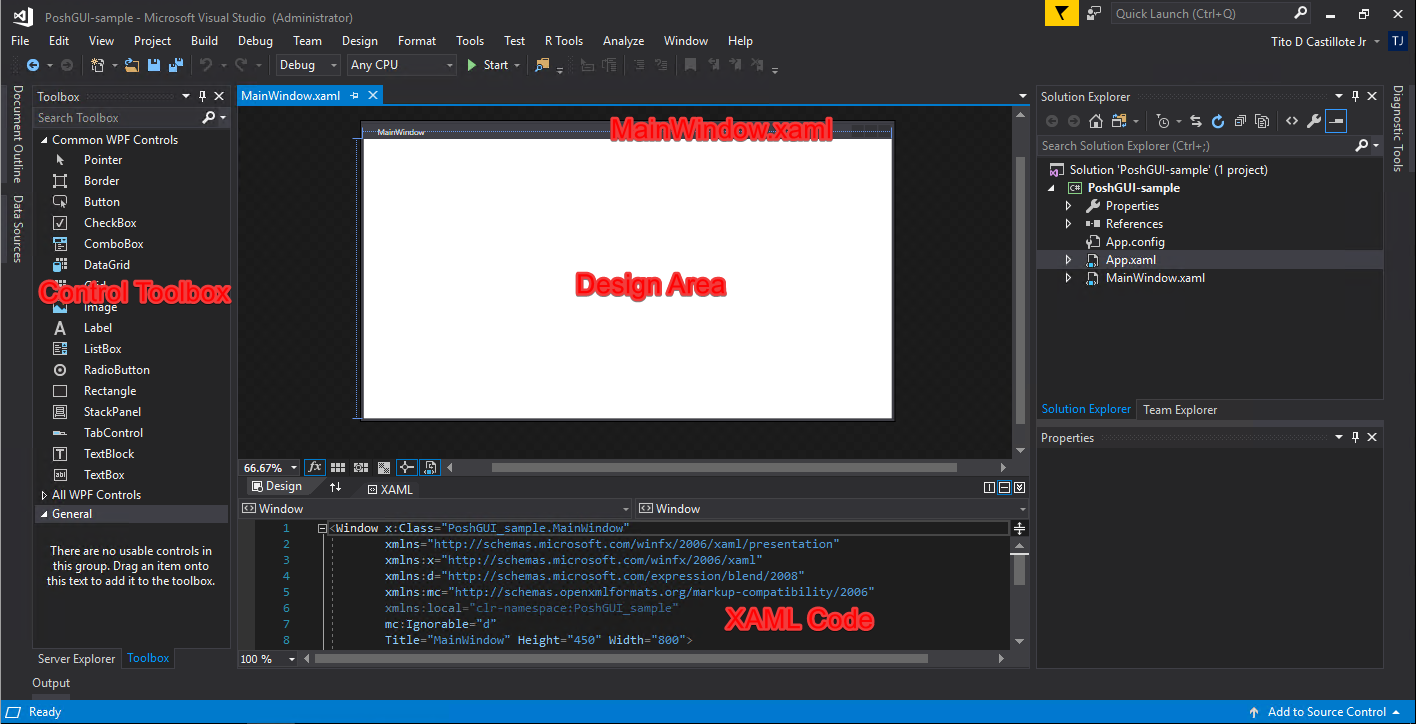
Once the project is created, a blank form will be presented with the name of MainWindow.xaml.
You now need to format this form to fit our requirements. Below are the controls and format that you’ll need to add.
- Window
- Title: Disk Information
- Height: 326
- Width: 403
- Controls (4)
- Label
- Content: “Computer Name:”
- Margin: 10, 10, 0, 0
- TextBox
- Name: txtComputer
- Text: “”
- Height: 23
- Width: 174
- Button
- Name: btnQuery
- Content: Query
- Margin: 0, 13, 12, 0
- TextBox
- Name: txtResults
- Text: “”
- IsReadOnly: True
- Margin: 10, 60, 0, 0
- Height: 225
- Width: 373
- Label
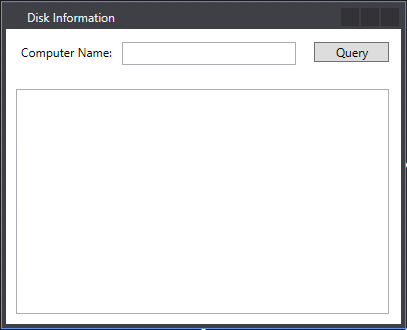
The final appearance of the form should be similar to what is shown in the image below. You can rearrange the layout of your window differently. Be creative!
Combining the Script and the PowerShell GUI
Once you are happy with your design, you can now start integrating it with the script.
PowerShell cannot display forms natively. To be able to display the form, we need to add a line of code to the very top of our script to support rendering of the WPF Form.
Add-Type -AssemblyName PresentationFrameworkThen add code to perform the following actions:
- Import and read the XAML code of the form.
- Dynamically create variables assigned to each named controls
- Display the form
Below is the updated code inside your script.
Note: Make sure to modify the line
$xamlFileand point it to the full path of your MainWindow.xaml file.
Add-Type -AssemblyName PresentationFramework

Function Get-FixedDisk {
    [CmdletBinding()]
    # This param() block indicates the start of parameters declaration
    param (
        <#
            This parameter accepts the name of the target computer.
            It is also set to mandatory so that the function does not execute without specifying the value.
        #>
        [Parameter(Mandatory)]
        [string]$Computer
    )
    <#
        WMI query command which gets the list of all logical disks and saves the results to a variable named $DiskInfo
    #>
    $DiskInfo = Get-WmiObject Win32_LogicalDisk -ComputerName $Computer -Filter 'DriveType=3'
    $DiskInfo
}

# where is the XAML file?
$xamlFile = "C:\PoshGUI-sample\MainWindow.xaml"

#create window
$inputXML = Get-Content $xamlFile -Raw
$inputXML = $inputXML -replace 'mc:Ignorable="d"', '' -replace "x:N", 'N' -replace '^<Win.*', '<Window'
[XML]$XAML = $inputXML

#Read XAML
$reader = (New-Object System.Xml.XmlNodeReader $xaml)
try {
    $window = [Windows.Markup.XamlReader]::Load( $reader )
} catch {
    Write-Warning $_.Exception
    throw
}

# Create variables based on form control names.
# Variable will be named as 'var_<control name>'

$xaml.SelectNodes("//*[@Name]") | ForEach-Object {
    #"trying item $($_.Name)"
    try {
        Set-Variable -Name "var_$($_.Name)" -Value $window.FindName($_.Name) -ErrorAction Stop
    } catch {
        throw
    }
}
Get-Variable var_*

$Null = $window.ShowDialog()
Note:
$Null = $window.ShowDialog()must always be the last line of code inside your script.
When you run this code by executing the Main.ps1 script, you should see the example output below.
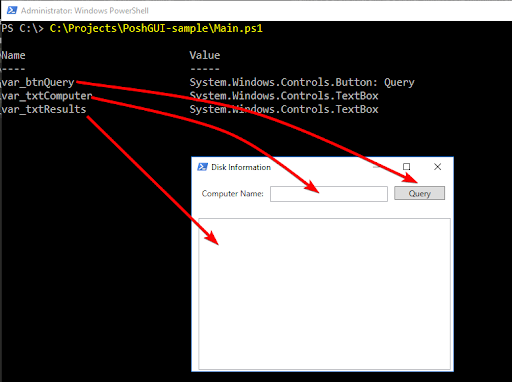
As you can see, the three named controls were assigned their variables. These variable names will be referenced later on in the script when we add the control logic code.
- var_btnQuery
- var_btnComputer
- var_txtResults
Bear in mind that the script at this point can only display the form, but the controls are useless since you haven’t added the code yet.
Adding the Button Click Event Code
Now that you’ve successfully modified the script to import and display the GUI, begin adding the code to the controls to retrieve and display the disk information data.
In this project, only the btnQuery button will be assigned an action. The other controls will only serve as input and output/display controls. This means that we only need to add a click event code to btnQuery.
To add the click action to btnQuery, assign the code below to its corresponding variable name $var_btnQuery. Copy the code below and insert it in between the Get-Variable var_* and $Null = $window.ShowDialog() code references in the script.
$var_btnQuery.Add_Click( {
   #clear the result box
   $var_txtResults.Text = ""
       if ($result = Get-FixedDisk -Computer $var_txtComputer.Text) {
           foreach ($item in $result) {
               $var_txtResults.Text = $var_txtResults.Text + "DeviceID: $($item.DeviceID)`n"
               $var_txtResults.Text = $var_txtResults.Text + "VolumeName: $($item.VolumeName)`n"
               $var_txtResults.Text = $var_txtResults.Text + "FreeSpace: $($item.FreeSpace)`n"
               $var_txtResults.Text = $var_txtResults.Text + "Size: $($item.Size)`n`n"
           }
       }
   })

$var_txtComputer.Text = $env:COMPUTERNAME
Testing the Finished PowerShell GUI
With all parts covered, below is the completed code for our script which incorporates the function and the PowerShell GUI that we’ve designed.
Add-Type -AssemblyName PresentationFramework

Function Get-FixedDisk {
    [CmdletBinding()]
    # This param() block indicates the start of parameters declaration
    param (
        <#
            This parameter accepts the name of the target computer.
            It is also set to mandatory so that the function does not execute without specifying the value.
        #>
        [Parameter(Mandatory)]
        [string]$Computer
    )
    <#
        WMI query command which gets the list of all logical disks and saves the results to a variable named $DiskInfo
    #>
    $DiskInfo = Get-WmiObject Win32_LogicalDisk -ComputerName $Computer -Filter 'DriveType=3'
   $DiskInfo
}

#where is the XAML file?
$xamlFile = "C:\Users\june\source\repos\PoshGUI-sample\PoshGUI-sample\MainWindow.xaml"

#create window
$inputXML = Get-Content $xamlFile -Raw
$inputXML = $inputXML -replace 'mc:Ignorable="d"', '' -replace "x:N", 'N' -replace '^<Win.*', '<Window'
[xml]$XAML = $inputXML
#Read XAML

$reader = (New-Object System.Xml.XmlNodeReader $xaml)
try {
    $window = [Windows.Markup.XamlReader]::Load( $reader )
}
catch {
    Write-Warning $_.Exception
    throw
}

#Create variables based on form control names.
#Variable will be named as 'var_<control name>'

$xaml.SelectNodes("//*[@Name]") | ForEach-Object {
    #"trying item $($_.Name)";
    try {
        Set-Variable -Name "var_$($_.Name)" -Value $window.FindName($_.Name) -ErrorAction Stop
    } catch {
        throw
   }
}

Get-Variable var_*

$var_btnQuery.Add_Click( {
   #clear the result box
   $var_txtResults.Text = ""
       if ($result = Get-FixedDisk -Computer $var_txtComputer.Text) {
           foreach ($item in $result) {
               $var_txtResults.Text = $var_txtResults.Text + "DeviceID: $($item.DeviceID)`n"
               $var_txtResults.Text = $var_txtResults.Text + "VolumeName: $($item.VolumeName)`n"
               $var_txtResults.Text = $var_txtResults.Text + "FreeSpace: $($item.FreeSpace)`n"
               $var_txtResults.Text = $var_txtResults.Text + "Size: $($item.Size)`n`n"
           }
       }
   })

$var_txtComputer.Text = $env:COMPUTERNAME
$Null = $window.ShowDialog()
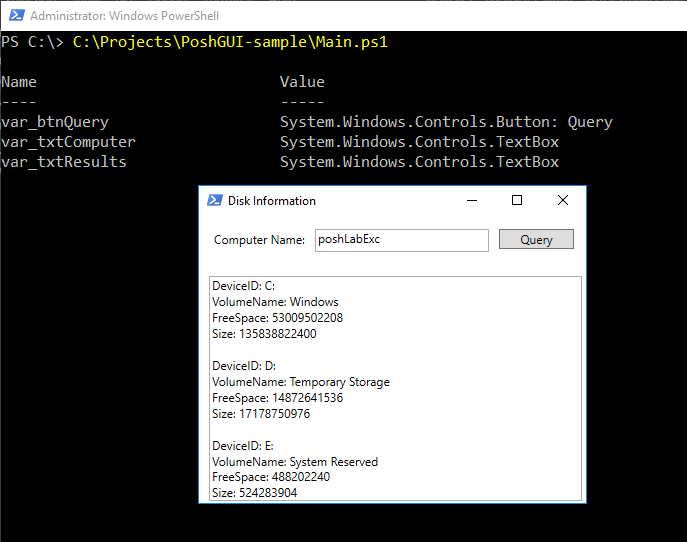
As you can see below, after calling the script in PowerShell, the PowerShell GUI windows appeared. Then you’re able to enter a valid computer name to test the functionality.
Securely verify callers with authentication methods that remove the opportunity for user impersonation. Block helpdesk hackers with Specops Secure Service Desk. Try it Free!
Summary
In this article, you learned how to create a simple function that accepts input and return results. You also learned how to create a basic WPF PowerShell GUI as well as how to import it to act as a front-end for the PowerShell script you created.
This is just a basic script and GUI combination. Numerous improvements can be done such as:
- Formatting the size and free space to display as GB values.
- Change the name of the property displayed.
- Use GridView instead of TextBox to show the results.
- Add an import button to loop through a list of servers from a CSV file.
It is up to you to modify and add functionality based on your requirements.


