


When you create Power BI reports, the viewers expect the report to be refreshed periodically and the data to be constantly updated. How? Manually updating the reports works, but Power Bi Direct Query offers a much better feature, scheduled refresh.
In this tutorial, you will learn how to take advantage of Power Bi Direct Query functionality by connecting a dataset stored in a server and running queries against your data.
Stay tuned and increase productivity while saving time in the process!
Prerequisites
This tutorial will be a hands-on demonstration. To follow along, be sure you have the following:
- Power Bi desktop – This tutorial uses Power Bi desktop version 2.109.1021.0.
- An SQL Server.
- A code editor – This tutorial uses VS code version 1.71.
- SQL Server Management Studio (SSMS) – This tutorial uses SQL Server Management Studio 18.12.1.
Creating an SQL Database to Manage with Power BI Direct Query
Power Bi Direct Query enables you to connect directly to a dataset and gives your project an option to upload live data to your project. But before making an SQL database and connection, you must know the server name and Data Source Name to acquire the correct details.
To create an SQL database, follow these steps:
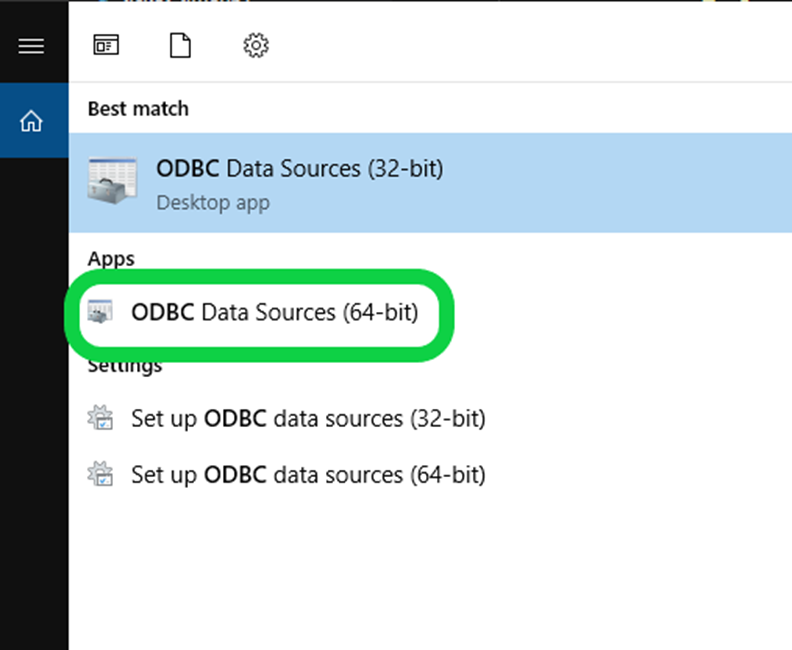
1. Search for ODBC in your search bar, look for and click ODBC Data Source Administrator (64-bit) to open it.
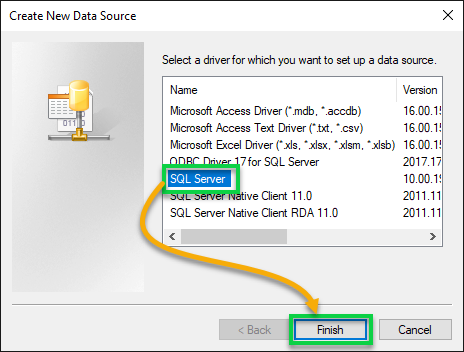
2. Next, navigate to the System DSN tab in the ODBC Data Source Administrator window, and click Add to initiate adding a new data source.

3. Select the SQL Server driver from the list below, and click Finish to create an SQL Data Source.
DirectQuery supports not every data source. MySQL is not supported, while SQL is.
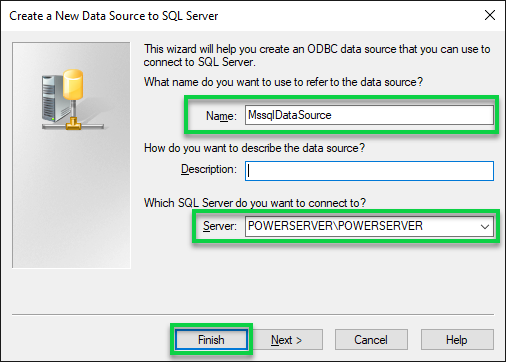
4. Now, name your data source (MssqlDataSource), select an SQL instance (POWERSERVER\POWERSERVER) installed in your machine, and click Finish.
Take note of the SQL Server and Data Source Name, as you will need them for your Python connection string.
5. Review the details of your data source, and click Test Data Source to test your data source.
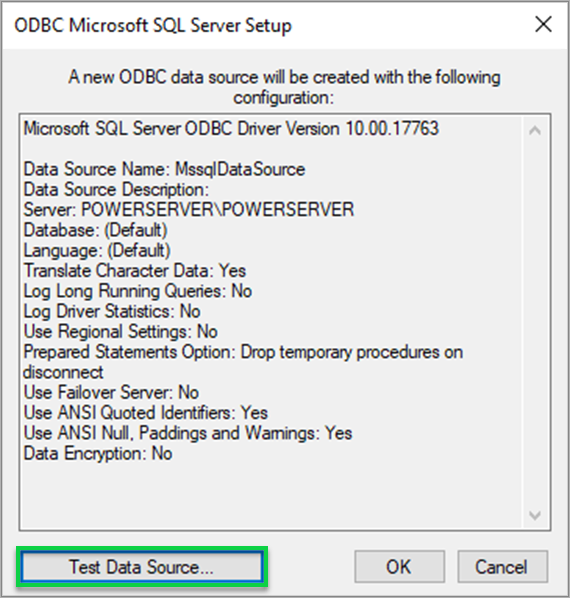
If the connection is good, you will get a TEST COMPLETED SUCCESSFULLY message, as shown below.

Connecting to the SQL Server
Now that you have created a Data Source for your SQL server, you will use that Data source to create a connection string for your Python code.
1. Fire up your visual studio, and press CTRL+SHFT+` to open a new terminal.
2. Next, run the sqlcmd command below to log in to your SQL server instance.
sqlcmd -S SQL_SERVER -E
3. Once logged in, run the following queries to create a new database (CREATE DATABASE) called MSSQLDB.
CREATE DATABASE MSSQLDB;
GO
4. Create a Python file DBconnect.py and add the code below, which lets you connect to your SQL database using the SQLAlchemy ORM for Python.
The engine marks the starting point of your SQLAlchemy application. The engine describes the connection pool and dialect for the Python Database API Specification (DBAPI). Python DBAPI is a specification within Python to define common usage patterns for all database connection packages. This specification communicates with the database specified.
//DBconnect.py
import sqlalchemy as sa
from sqlalchemy import create_engine
import urllib
import pyodbc
# Creating a connection string, using urllib to format the text.
conn = urllib.parse.quote_plus(
# Values for the connection string taken from the Data source
'Data Source Name=MssqlDataSource;'

'Driver={SQL Server};'

'Server=POWERSERVER\POWERSERVER;'

'Database=MSSQLDB;'

'Trusted_connection=yes;'

)

try:
# Creating connection with sqlalchemy engine
	coxn = create_engine('mssql+pyodbc:///?odbc_connect={}'.format(conn))
	print("Passed")
except:
	print("failed!")
5. Create a Python file called CreateTable.py in your main folder and add the code below, and run it. The code below creates a table called students in your SQL database.
//CreateTable.py
from DBconnect import coxn
from sqlalchemy import Table, Column, Integer, String, MetaData

# Creates a Metadata construct that contains definitions of tables
  # and associated objects such as index, view, triggers, etc.
meta = MetaData()

# Represents the CREATE TABLE in regular SQL syntax to create a table.
students = Table(
'students', meta,
Column('id', Integer, primary_key = True),
Column('name', String),
Column('lastname', String),
)

# Uses the engine object to create all defined table objects
  # and stores the information in metadata.
meta.create_all(coxn)
6. Next, open your SSMS, and check the database, table, and columns created.
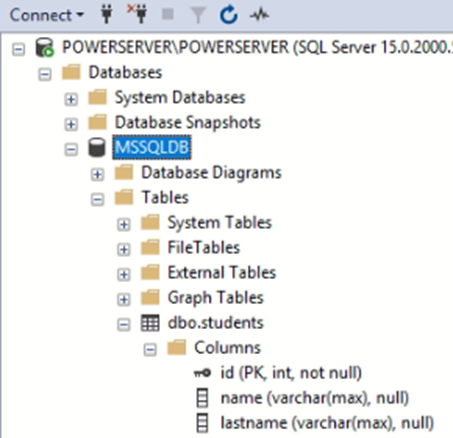
7. Create a Python file called WriteToTable.py, add the code below, and run it.
This code contains the logic for writing values to the database table.
//WriteToTable.py
# Importing the students table from the CreateTable.py file.
from CreateTable import students
# Importing coxn connection string from the DBconnect.py file.
from DBconnect import coxn
# Inserting multiple values into the students table
ins = students.insert().values([
   {'name':'Bob','lastname':'Marley'},
   {'name':'Bob','lastname':'Dylan'}
])
conn = coxn.connect()
conn.execute(ins)
Preparing On-premises Data Gateway
Now that you have created a connection string and managed to connect to the database, you will need to create a Data Gateway. This Data Gateway will be responsible for connecting your database to Power BI.
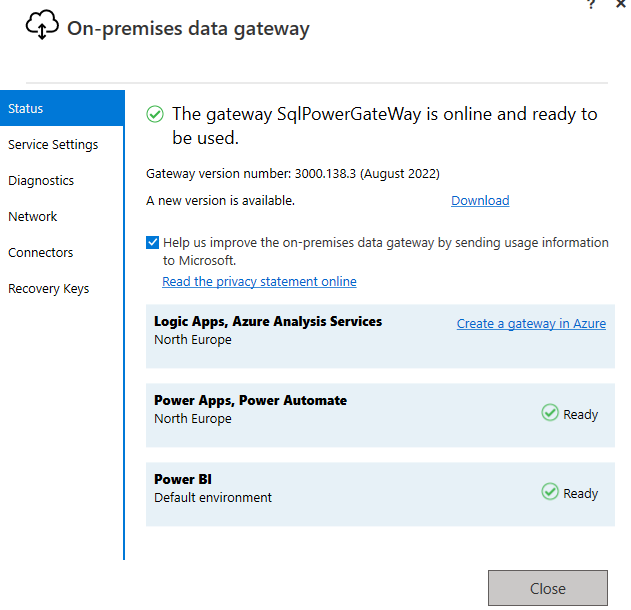
1. Open the On-premises data gateway and sign in.
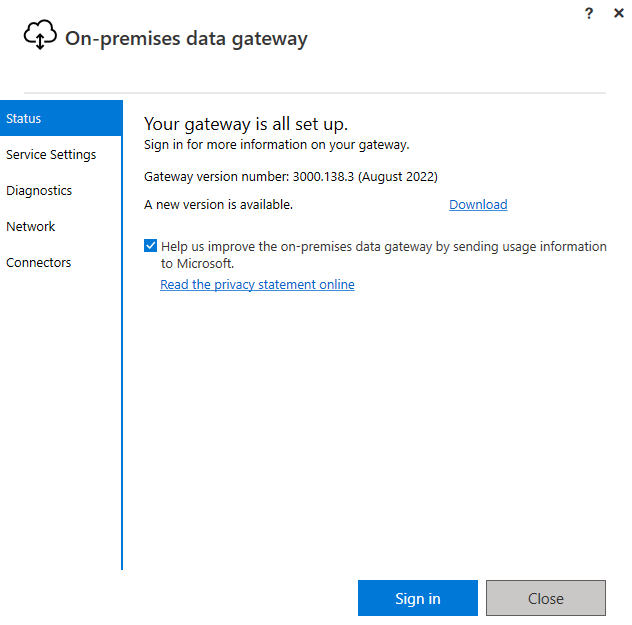
2. Check the status of your On-premises data gateway, and confirm it is online, as shown below.
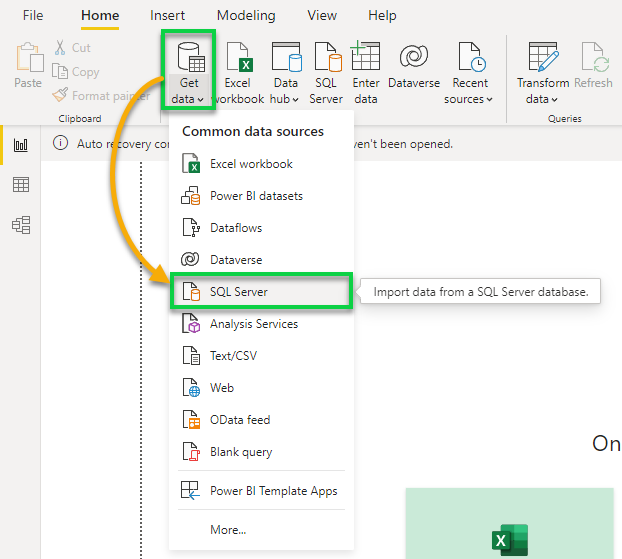
3. Next, open Power BI, click Get Data under the Home ribbon tab and choose SQL Server to initiate connecting your data source to Power BI.
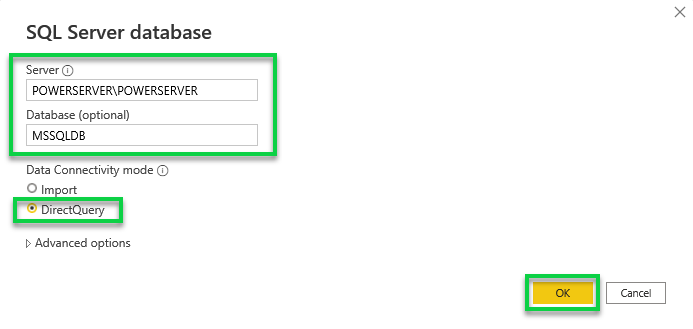
4. Now, connect to DirecQuery with the following:
- Insert your Server name and Database name in the fields accordinglyEnsure the DirectQuery option is selected.Click OK to connect to DirectQuery.
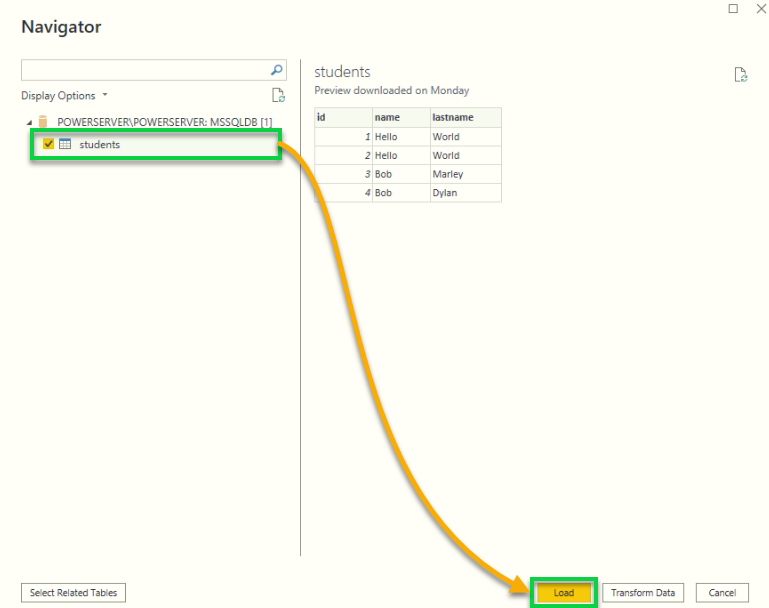
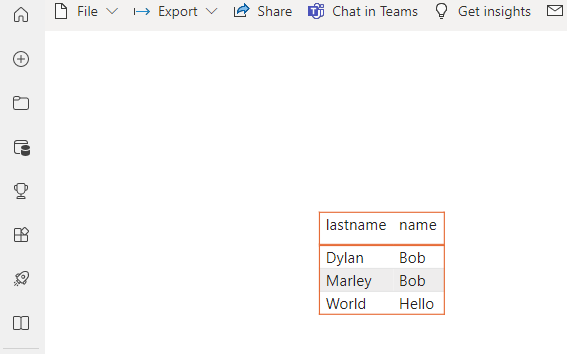
5. Select a table (students) from the database, and click Load to load the data.
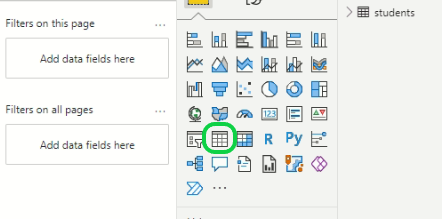
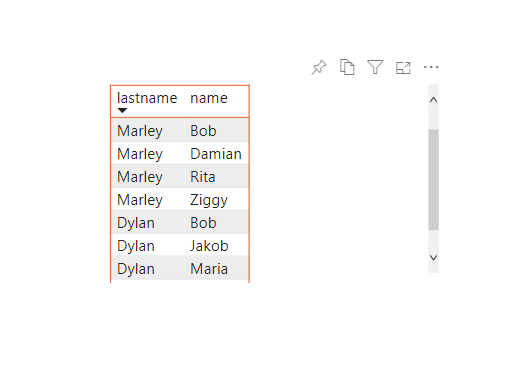
6. Next, click on the table icon to use a table visual to view the data.
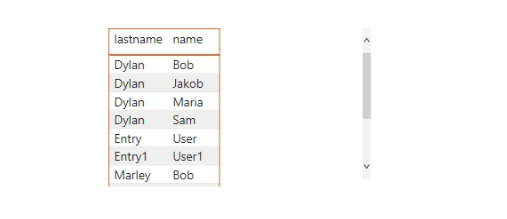
The table below shows the data you loaded from the database table
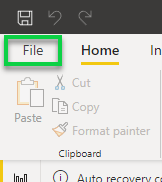
7. Click on the File menu to access actions to perform on Power BI.
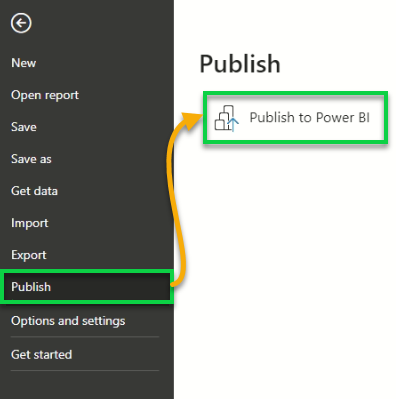
8. Now, click Publish → Publish to Power BI to publish your data report.
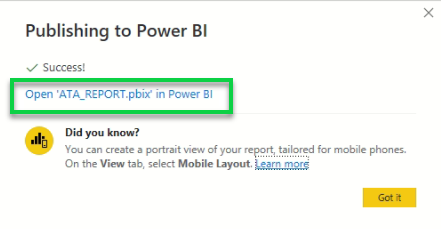
9. Click Open <your report> once your publishing is successful, redirecting your browser to the list of recent activities you made in Power BI (step 10).
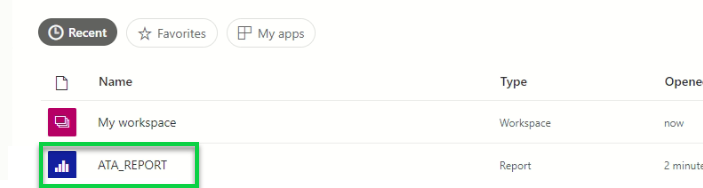
10. Click on the report to open it, as shown below.
Upon the first setup, you might run into a gateway issue as below since you have not yet connected the project’s data source to Power BI’s data gateway.
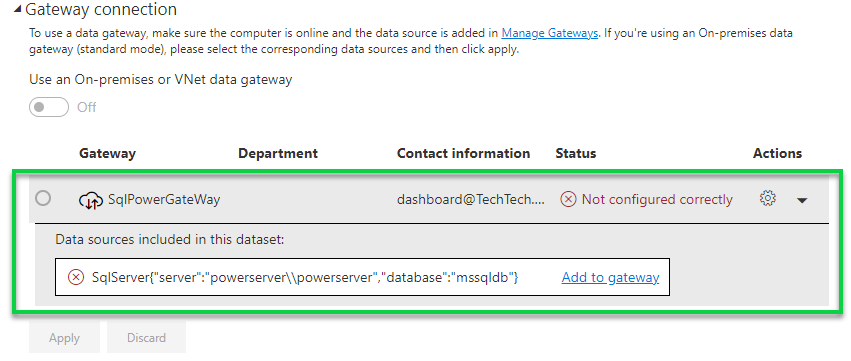
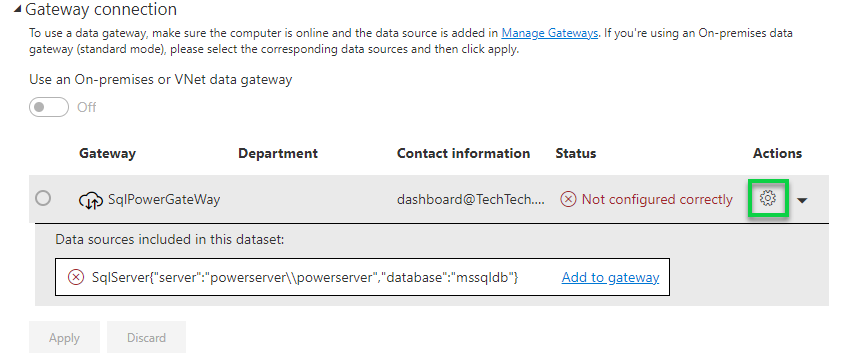
11. Click on the settings icon under the Actions column to initiate adding a new gateway connection. Doing so lets you fix the gateway configuration error.
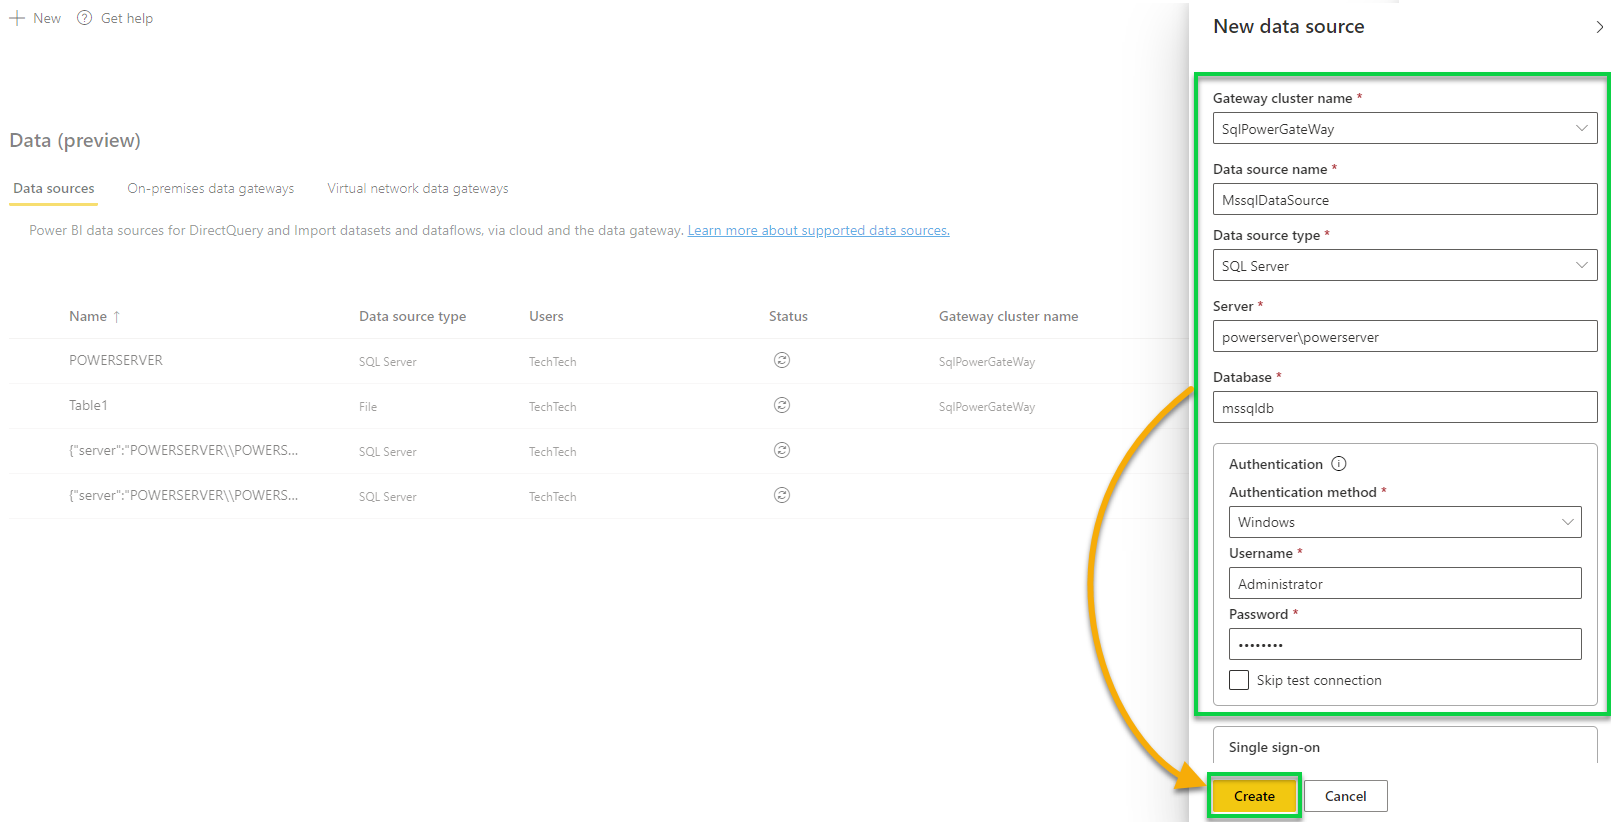
12. Configure the new gateway connection, and click on Create to create a new connection between your data source and the gateway.
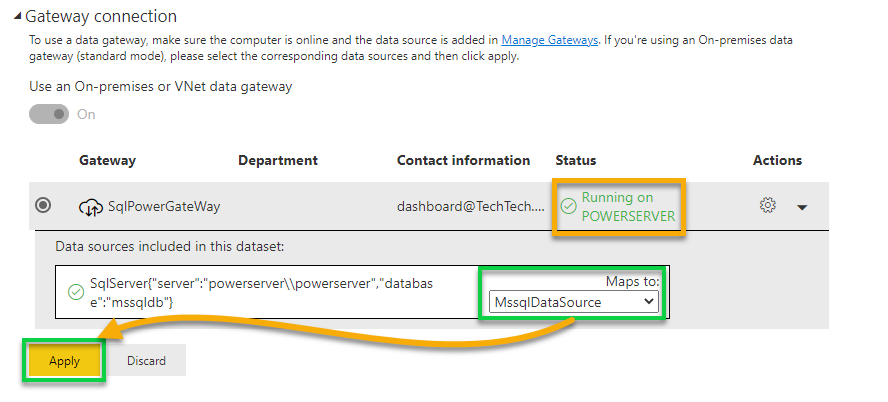
13. Lastly, once you see the gateway is running, select the data source name (MssqlDataSource) from the Maps to drop-down field, and click on Apply.
Viewing and Managing Data Reports
After establishing a connection between the gateway and Power BI, you can view your report and set up a refresh schedule.
1. Navigate to your Power BI reports home page.
The performance of Power Bi Direct Query depends on the underlying dataset source. The time taken for the underlying dataset to respond to requests will determine how fast the user can view the report. Or if they will successfully see the reports in the first place.
2. Next, click on the report, as shown below, to open it.
After opening the report, you should see the data, as shown below.
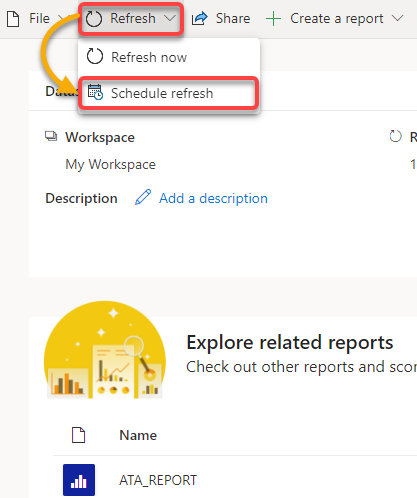
3. Go back to the report home, and click Refresh → Schedule refresh to set a scheduled refresh of the report.
Besides creating live reports, Power Bi Direct Query lets you set a scheduled refresh, automatically updating your reports.
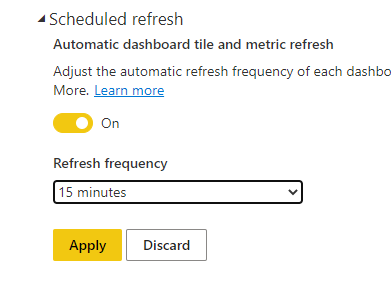
4. Now, select the refresh interval of your choice from the drop-down field, and click Apply to apply the changes.
5. Open your WriteToTable.py Python script and add the code below to insert more entries to your database with the following, and run the script.
Running this code does not provide output, but you will verify the inserted values in the table later in the following steps.
There is no Power Query Editor for multi-dimensional sources like SAP Business Warehouse, which limits what you can accomplish with your data.
//WriteToTable.py
# Importing students table from the CreateTable.py file.
from CreateTable import students
# Importing coxn connection string from the DBconnect.py file.
from DBconnect import coxn

# Inserting multiple values into the students table
ins = students.insert().values([
{'name':'Damian','lastname':'Marley'},
{'name':'Rita','lastname':'Marley'},
{'name':'Ziggy','lastname':'Marley'},
{'name':'Sam','lastname':'Dylan'},
{'name':'Jakob','lastname':'Dylan'},
{'name':'Maria','lastname':'Dylan'}
])
# Creating connection cursor.
conn = coxn.connect()
# Executing insert() command.
conn.execute(ins)
6. Next, switch to your Power BI browser, and click on the Datasets + dataflows tab.
If all goes well, you will see the last Refreshed time and the Next refresh of the dataset like in the screenshot below.
Note that Power Bi Direct Query is sensitive to changes and formatting. You may get an error if your Power Query Editor contains complex steps.

As expected, the reload happens automatically after 15 minutes, and the next refresh is set to happen in another 15 minutes.
Conclusion
Throughout this tutorial, you have learned how to use Power Bi Direct Query functionality to connect your dataset stored in your server. You have also touched on running queries directly against your data.
Creating reports is a long process of collecting, cleaning, uploading to a data source, loading data to Power BI, and working on the Power BI visuals. This process mentioned is given. But afterward, you can either refresh the dataset manually or refresh the data automatically per the set schedule.
Power BI Direct Query has its cons when handling and manipulating data in your dataset. But the fact that you can create a report once and never work on the backend again is a massive incentive when using this feature.


