


SSL is a security measure that encrypts data sent between two devices (i.e., a server and a computer.) With databases like PostgreSQL, SSL is crucial to ensure your sensitive information, such as credit card numbers or social security numbers, cannot be intercepted by anyone other than you.
By default, PostgreSQL does not come with SSL enabled. But don’t worry, though. this tutorial has got you covered in setting up PostgreSQL SSL. You’ll learn to create an SSL certificate, configure PostgreSQL, and verify that SSL is working correctly.
Read on to take your PostgreSQL security to the next level!
Prerequisites
This tutorial will be a hands-on demonstration. If you’d like to follow along, be sure you have the following.
- A Linux machine – This tutorial uses Ubuntu Server 18.04, but any recent distribution should work fine.
- A non-root user with sudo privileges – This tutorial uses a root account, but you can achieve the same results using a sudo-enabled user.
- PostgreSQL installed on your Linux machine.
- A fully qualifying registered domain name (FQDN) pointing to your server (not strictly required but makes setting up SSL much simpler) – This tutorial uses the domain psql.example.com. Still, you can replace the domain with your own throughout this tutorial.
- Snap package manager installed.
Starting PostgreSQL without SSL
Before you can set up PostgreSQL to use SSL, you’ll need to have a working installation. For this tutorial, you’ll need to have PostgreSQL running without SSL enabled to test that everything is working after you’ve set up SSL.
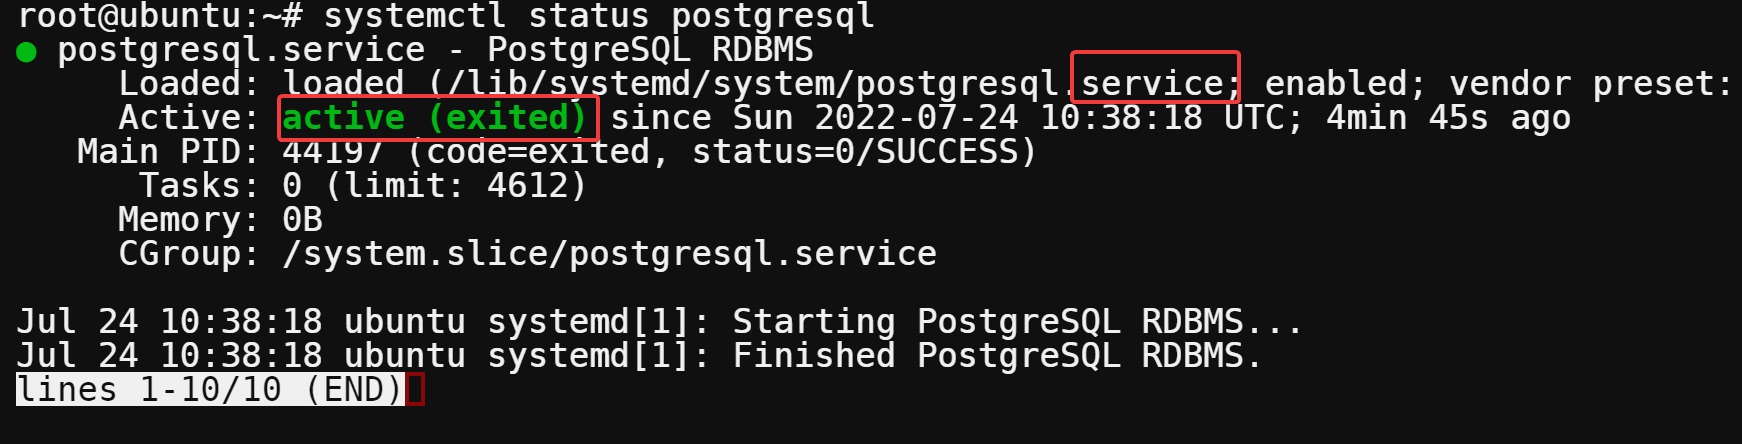
Open your terminal, and run the below systemctl command to start the PostgreSQL service.
By default, the PostgreSQL service starts automatically after installation, but running this command is a good measure to ensure the server is running.
Append sudo before every command when running commands that require elevated privileges if you use a non-root account throughout this tutorial.
systemctl status postgresql
The output below indicates the PostgreSQL service is active (exited).
If PostgreSQL is not running, run the below command to start, and enable the service to start automatically on bootup.
# Starts the PostgreSQL service
systemctl start postgresql
# Enables the PostgreSQL service to run on system bootup
systemctl enable postgresql

Installing Certbot to Create PostgreSQL SSL Certificates
Now that you have PostgreSQL running, you’ll install Certbot to simplify acquiring and renewing SSL certificates. You’ll use these certificates to encrypt the communication between the server and any clients that connect to your database.
In this tutorial, you’ll use the Snap package manager to install Certbot to make keeping Certbot up-to-date a breeze.
1. Run the below command to refresh the list of available Snap packages.
snap refresh
2. Next, run the snap install command below to install certbot.
snap install --classic certbot
3. Once installed, run the following command to link (ln) your Certbot executable to /usr/bin so you can call Certbot quickly.
ln -s /snap/bin/certbot /usr/bin/certbot
4. Now, run the below certbot command to request your domain’s (psql.example.com) SSL certificate (certonly). The –standalone mode tells Certbot to use its built-in server to verify your domain ownership and requests a certificate from Let’s Encrypt.
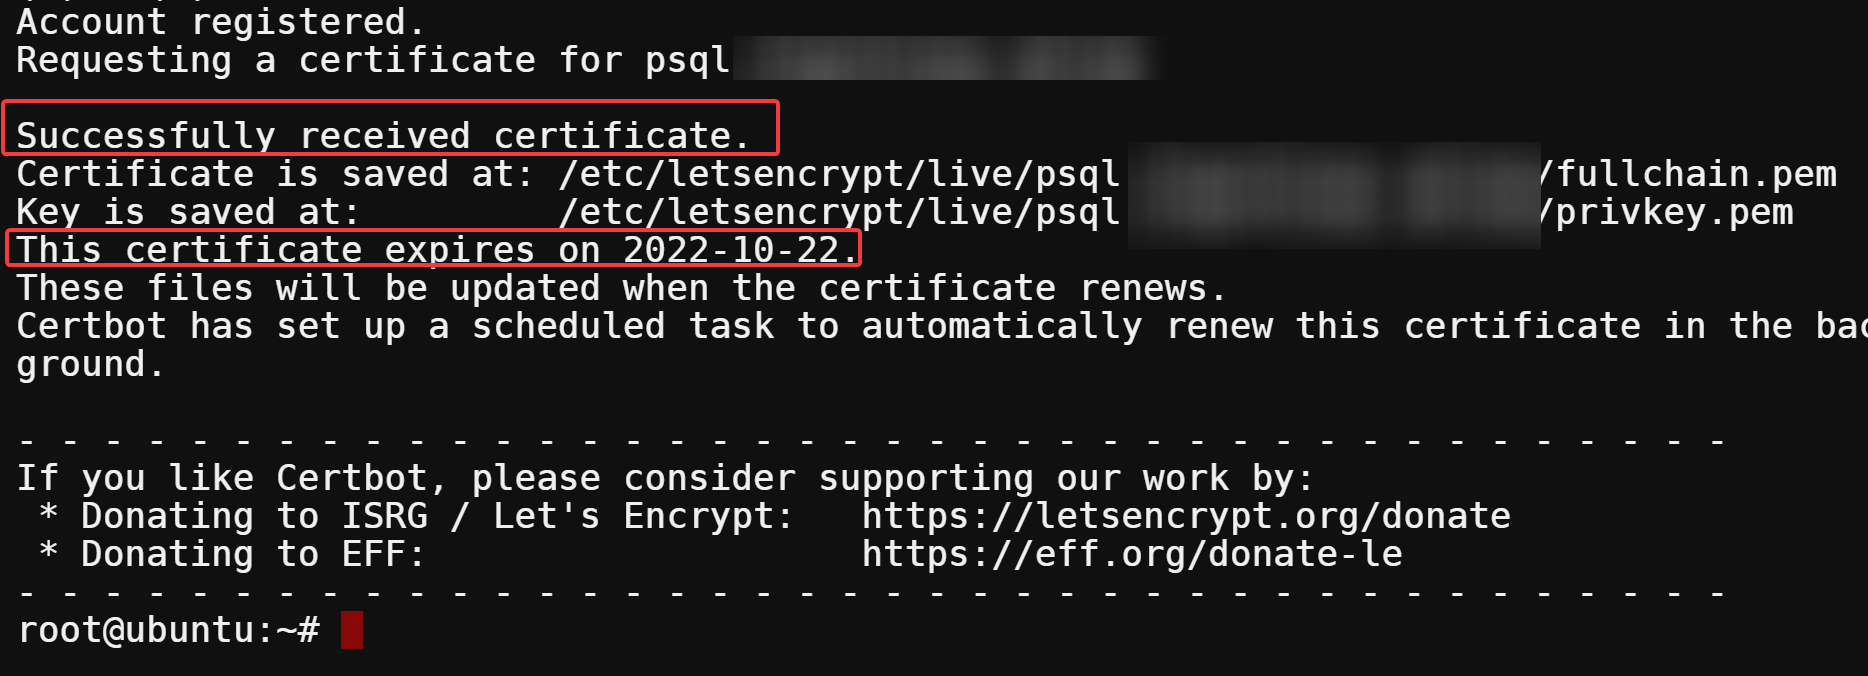
certbot certonly --standalone -d psql.example.comInput your email address, press Enter to opt-in for important account notifications, and agree to the Let’s Encrypt terms of service.

5. When prompted, type Y and press Enter to agree to the terms of service.

6. Next, type Y and press Enter to share your email address with the Electronic Frontier Foundation (EFF), a non-profit that helps support Certbot’s development).

If your domain is successfully verified, you’ll see the below output with certificate information like the following:
- Certificate validation – 90 days and will be automatically renewed.
- Certification location and key files.
Be sure to note down the path to your certificate and key files. You’ll need them later while configuring PostgreSQL to use SSL.
If you receive any errors, make sure you have followed step one up to this point. In particular, check that you’ve linked the Certbot executable to /usr/bin and that your domain name is correctly specified.
Creating a Certbot Renewal Hook
You now have a valid SSL certificate, but you haven’t configured PostgreSQL to use the certificate yet. You must create a Certbot renewal hook and configure PostgreSQL to use SSL.
A renewal hook is required because the certificate file is only accessible by root. With a renewal hook, the certificate and key files are copied to the PostgreSQL data directory (owned by the postgres user) whenever Certbot renews the certificate.
To create a Certbot renewal hook:
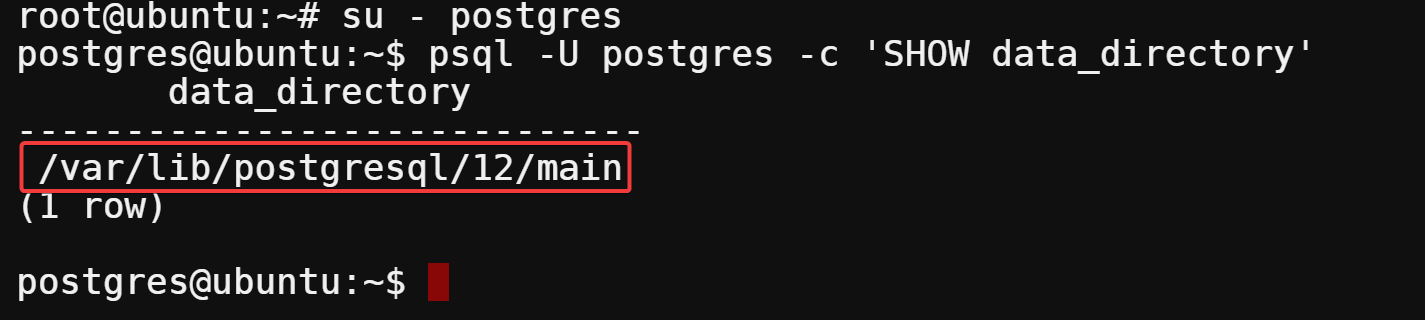
1. Find the data directory for your PostgreSQL installation first. The data directory is usually /var/lib/postgresql/data. But the location can be different depending on how you installed PostgreSQL.
Run the following command to switch to the postgres user and query (psql) for the data directory (‘SHOW data_directory’).
su - postgres
psql -U postgres -c 'SHOW data_directory'
The data directory is located in the same directory as the postgresql.conf file, in this case, /var/lib/postgresql/12/main. Note the location, as you will need it later to create a hook script (step three).
2. Next, create a renewal hook script called postgresql.deploy with your preferred text editor.
nano /etc/letsencrypt/renewal-hooks/deploy/postgresql.deploy3. Add the following code to the postgresql.deploy file, and replace the following variable values:
DATA_DIRECTORY– The data directory you noted in step one.
DOMAIN - Your actual domain.
The code below defines the permission (umask), DOMAIN, and PostgreSQL DATA_DIRECTORY and copies the certificate (.crt) and key (.key) files to the expected locations.
After modifying the variable values, save the changes, and close the file.
#!/bin/bash
umask 0177
DOMAIN=psql.example.com
DATA_DIR=/var/lib/postgresql/12/main
cp /etc/letsencrypt/live/$DOMAIN/fullchain.pem $DATA_DIR/server.crt
cp /etc/letsencrypt/live/$DOMAIN/privkey.pem $DATA_DIR/server.key
chown postgres:postgres $DATA_DIR/server.crt $DATA_DIR/server.key
4. Finally, run the chmod command below to set the correct permissions for the renewal hook script (postgresql.deploy). This command gives the postgresql.deploy script executable permissions so that Certbort can run the script.
chmod +x /etc/letsencrypt/renewal-hooks/deploy/postgresql.deploy
Configuring PostgreSQL to Use SSL
With the renewal hook script created, you can now configure PostgreSQL to use SSL. You’ll need the postgresql.conf file’s location for your PostgreSQL installation. This file contains all of the configuration settings for your PostgreSQL server.
The postgresql.conf file is usually located in the /main/ directory, which you found in step one of the “Creating a Certbot Renewal Hook” section.
1. Run the psql command below to search for the postgresql.conf file’s location if you can’t find it.
psql -U postgres -c 'SHOW config_file'Note down the path of your postgresql.conf file, as shown below.

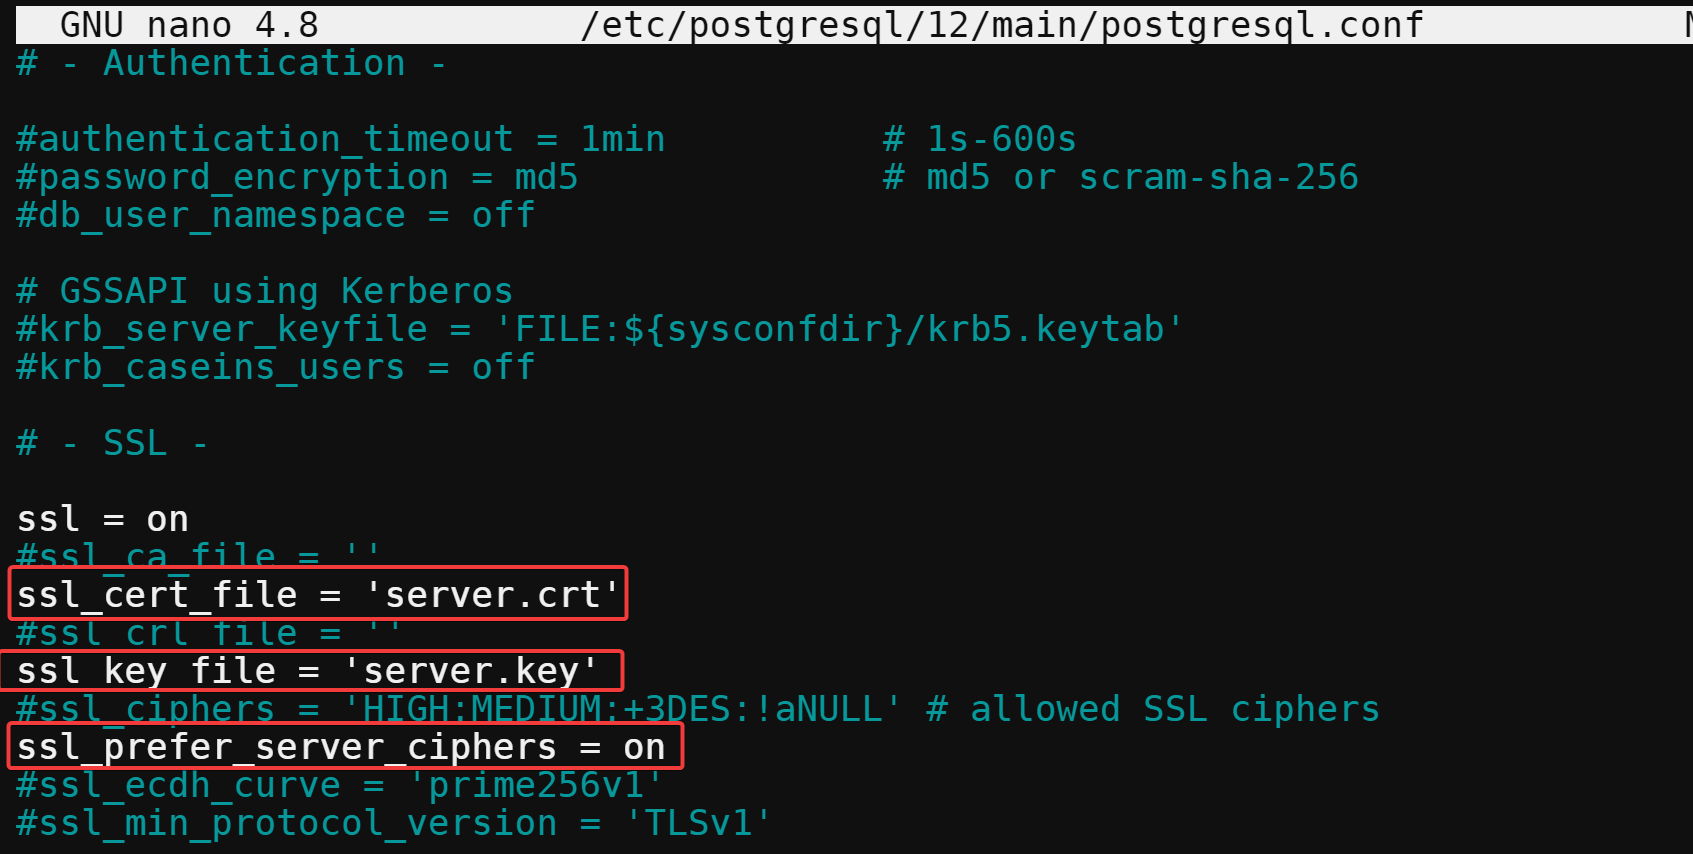
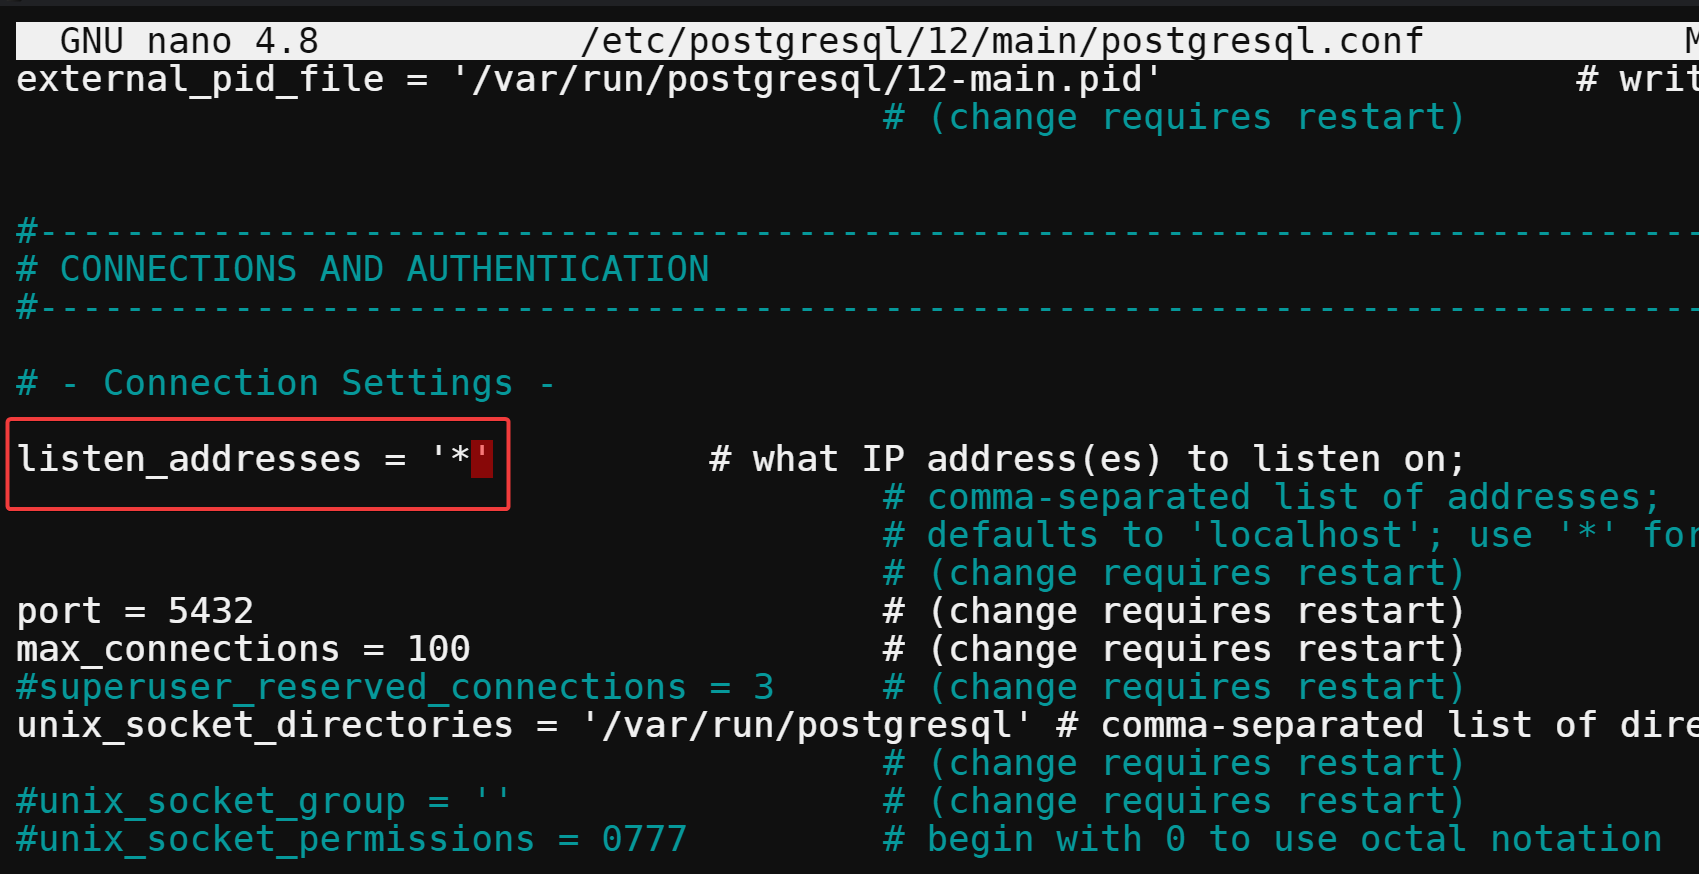
2. Open the /etc/postgresql/12/main/postgresql.conf file in your text editor, find and change the values of directives under the SSL section with the following:
- ssl_cert_file, and ssl_key_file – Uncomment the directives by removing the # characters at the beginning of each line.
Change the values with the paths to your certificate and key files you noted in the last step of the “Installing Certbot to Create SSL Certificates” section. These directives tell PostgreSQL where to find your SSL certificate and SSL key.
- ssl_prefer_server_ciphers – Uncomment the directive by removing the # characters at the beginning of the line. Change the value to on to tell PostgreSQL to use only strong ciphers.
3. Next, find, uncomment the listen_address directive, and change the directive’s value to * to tell PostgreSQL to listen for connections on all available IP addresses.
Once you’ve changed the value, save, and close the file.
4. Next, open the /etc/postgresql/12/main/pg_hba.conf file in your preferred text editor.
This file contains all the client authentication settings for your PostgreSQL server and is controlled by the postgresql.conf file.
5. Add the following lines to the pg_hba.conf file right after any existing host lines, save and close the pg_hba.conf file.
Those two lines tell PostgreSQL to require SSL for all client connections and use password authentication. Adding both is crucial because some tools, such as pgAdmin 4, do not support SSL connections by default.
hostssl all all 0.0.0.0/0 md5
host all all 0.0.0.0/0 md5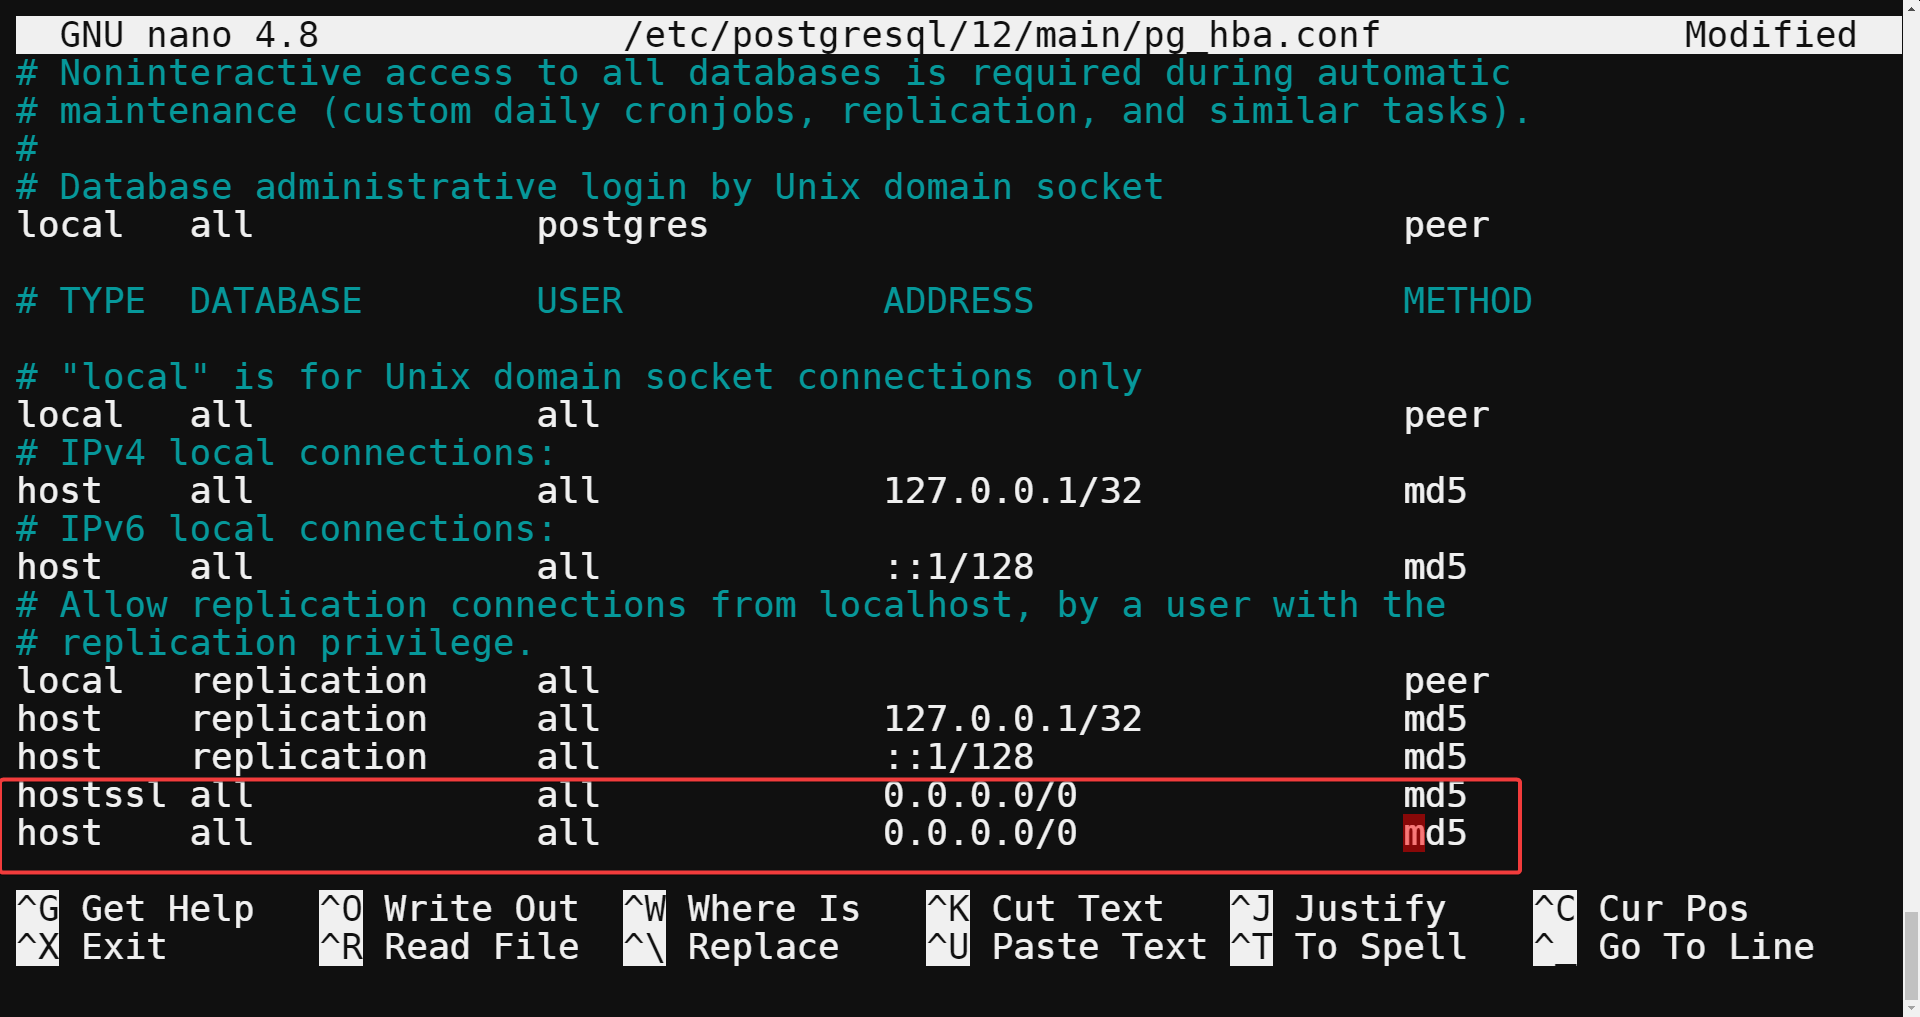
6. Now, run the below certbot renew command to force a renewal of your SSL certificate. Doing so causes Certbot to run your renewal hook script (postgresql.deploy).
This action copies a new certificate and key, which PostgreSQL will use on the next start-up.
certbot renew --force-renewal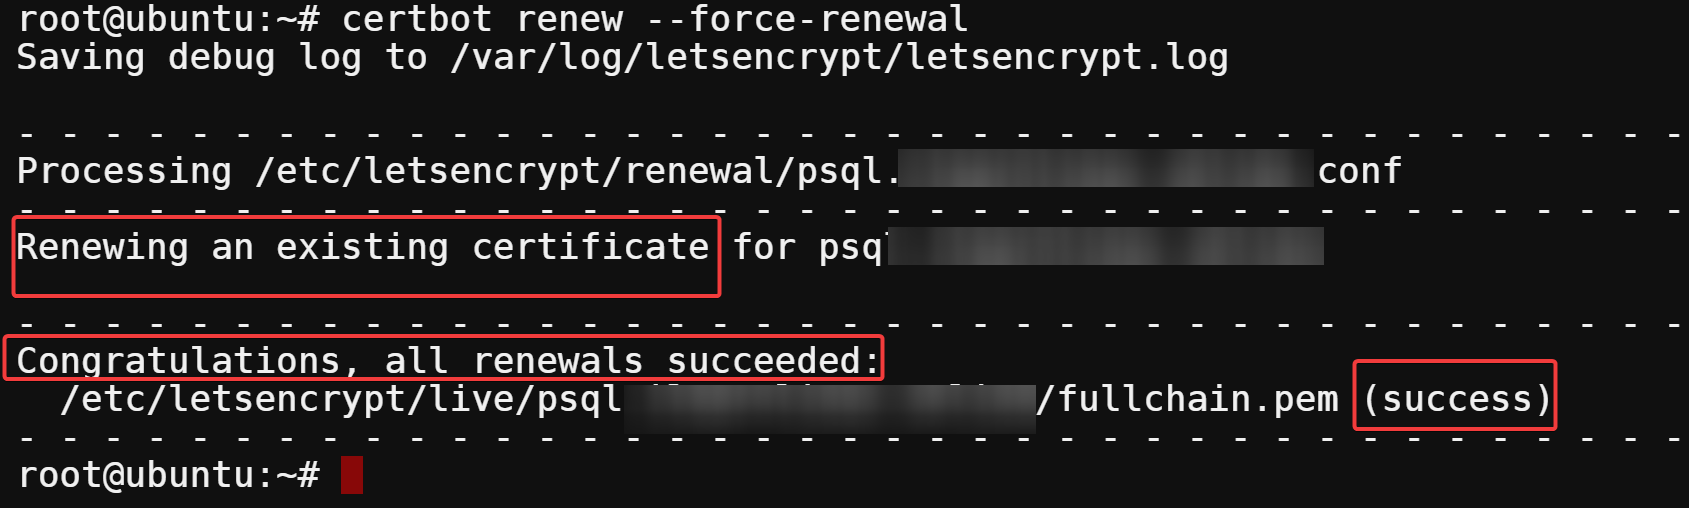
7. After the renewal, run the following command to list (ls) the contents of your data directory (/var/lib/postgresql/12/main).
ls /var/lib/postgresql/12/main/server.*Below, you can verify that the new certificate and key have been copied with the two new files named server.crt and server.key, as shown below.

8. Finally, run the service command below to restart your PostgreSQL server, apply the new configuration settings, and load the SSL certificate.
service postgresql restart
Testing Your SSL Connection
You’ve completed configuring PostgreSQL to use SSL. But how do you know it’s working? You’ll have to test your SSL by connecting to the server with the psql command-line tool.
Run the below command to connect to your server from another machine that has psql installed. Ensure you replace username (postgres), database name (postgres), and psql.example.com with your own values.
The sslmode=require query parameter lets you connect to your PostgreSQL server only if establishing an SSL connection with the server is possible.
psql -d "dbname=postgres sslmode=require" -h psql.example.com -U postgres
When prompted, enter the password for the postgres user, and you’ll see an output similar to the following.
This output indicates that the SSL connection is encrypted using AES256-GCM, so you can be confident that your data is safe from eavesdroppers.

Conclusion
Securing your database is always a top priority. With a PostgreSQL SSL certificate, you’re one step away from keeping out entities prying into your data. And in this tutorial, you’ve learned to encrypt a PostgreSQL database connection. At this point, you can already confidently encrypt all client/server communications and keep your data safe
With this newfound knowledge, why not configure TLS connectivity in Azure Database for PostgreSQL? Protect your database communications while securing your data at rest and in transit!


