


Having a Virtual Private Network (VPN) is a must in this era of technology. VPNs have progressively crucial for personal use and especially for businesses and enterprises. And if you are still deciding which VPN solution to bet on, why not consider OpenConnect VPN?
OpenConnect VPN is a free VPN solution with enterprise-grade performance and features. And in this tutorial, you will learn how to set up and connect to the OpenConnect VPN Server (ocserv).
Read on and keep off wicked entities off your network!
OpenConnect can secure remote access, but it does not clean up personal records already exposed on broker sites. If that is the privacy problem you are solving, compare MyDataRemoval privacy monitoring and data broker removal workflows before paying for a personal data removal service.
Prerequisites
This tutorial comprises hands-on demonstrations. To follow along, ensure you have the following in place:
- A Linux server running Debian- This tutorial uses a Debian 11 Bullseye with hostname ocserv-debian.
- An administrative user or a non-root user with sudo/root privileges.
- A domain name pointed to your Linux server IP address – This tutorial uses a domain name vpn.atadomain.io.
- A client machine like Windows 10 or Linux Desktop – This tutorial uses a Windows 10 machine.
Installing the OpenConnect VPN Server
The OpenConnect VPN Server is an open-source SSL-based VPN server for Linux, available on most Linux distributions, such as Debian, Ubuntu, RHEL/CentOS, and Fedora.
The OpenConnect VPN Server supports most clients from Desktop/Computer to Mobile (Android and iOS). Likewise, OpenConnect VPN Server supports multiple authentication backends, such as Radius, OpenID, Kerberos, and Smart Card.
But before taking advantage of these features, you must first install the OpenConnect VPN Server, as follows:
1. SSH to your server, and run the following apt update command to update and refresh the package index. This command ensures you have the latest package information.
sudo apt update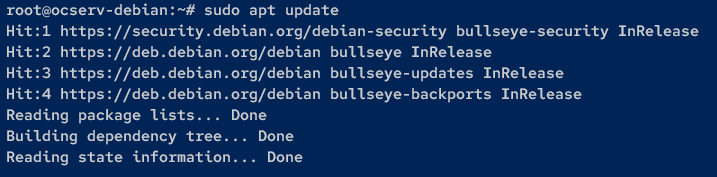
2. Next, run the following apt install command to install the ocserv package.
sudo apt install ocserv -yOnce the installation is complete, the new systemd service called ocserv will be up and

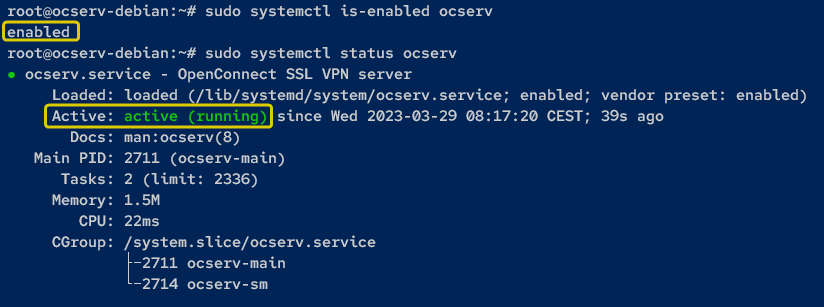
3. Now, run the following systemctl commands to ensure the ocserv service is running.
# Verifying the ocserv service is enabled
sudo systemctl is-enabled ocserv
# Verifying the ocserv service is running
sudo systemctl status ocserv
As you can see from the output, the ocserv service status is enabled and running.
Generating SSL/TLS Certificates
With the OpenConnect VPN Server installed, the next step is to ensure you can securely connect to the OpenConnect VPN Server. How? The first step is to generate SSL/TLS certificates via Certbot and LetsEncrypt.
But before generating certificates, ensure you have an email address to register to LetsEncrypt, and the domain name is pointed to the Debian server IP address.
To generate SSL/TLS certificates:
1. Run the below command to install certbot on your Linux server.
sudo apt install certbot -y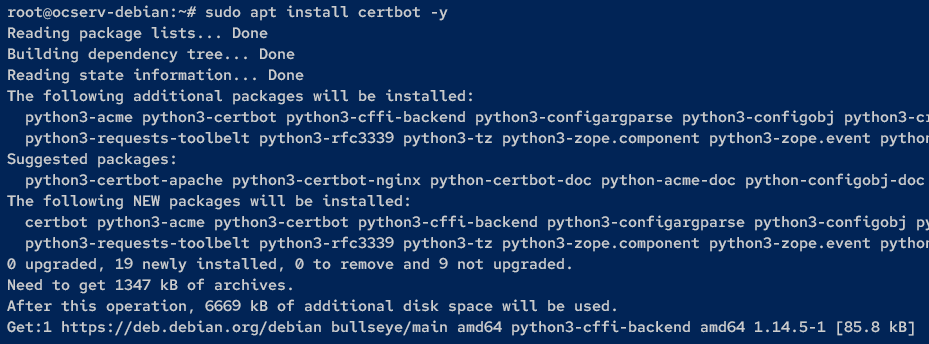
2. Next, run the certbot command below to generate SSL/TLS certificates. Ensure you change the email address ([email protected]) and the domain name (vpn.atadomain.io) accordingly.
sudo certbot certonly --standalone --preferred-challenges http --agree-tos --no-eff --email [email protected] -d vpn.atadomain.io
3. Lastly, run the following command to verify the generated SSL/TLS certificates exist in your domain directory.
ls /etc/letsencrypt/live/vpn.atadomain.ioIf successful, you will see the public (fullchain.pem) and private (privkey.pem) keys, as shown below.

Configuring the OpenConnect VPN Server
Even with the SSL/TSL certificates at your disposal, they will sit there unless you configure the OpenConnect VPN Server. You will modify the default OpenConnect VPN Server configuration (/etc/ocserv/ocserv.conf) as follows:
- Change the default authentication method.
- Disable UDP on OpenConnect VPN Server.
- Change default SSL/TLS certificates.
- Setting up the domain name and an internal network or IP address for clients.
To configure the OpenConnect VPN Server, follow the steps below:
1. First, run the cp command below to back up the default OpenConnect VPN Server configuration (ocserv.conf) to ocserv.conf.orig stored in the /etc/ocserv directory.
sudo cp /etc/ocserv/ocserv.conf /etc/ocserv/ocserv.conf.orig2. Next, open the OpenConnect VPN Server configuration (/etc/ocserv/ocserv.conf) using your preferred editor.
3. Change the auth parameter value to plain[passwd=/etc/ocserv/ocpasswd], as shown below. Doing so replaces the default Pluggable Authentication Modules (PAM) authentication with the password file.
auth = "plain[passwd=/etc/ocserv/ocpasswd]"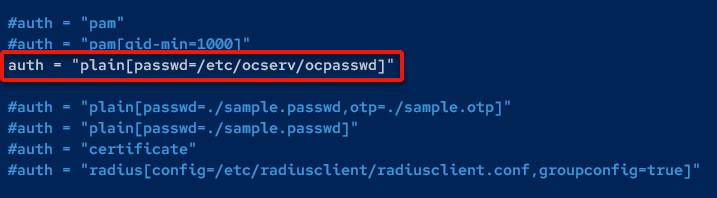
4. Now, put # in front of the udp-port parameter to disable the default UDP connections.
You will be using OpenConnect VPN with TCP-only mode, which you can increase the speed via kernel parameters.
tcp-port = 443
#udp-port = 443
5. Replace the path of the certificate file in the server-cert parameter with the public key and the server-key parameter with the private key.
server-cert = /etc/letsencrypt/live/vpn.atadomain.io/fullchain.pem
server-key = /etc/letsencrypt/live/vpn.atadomain.io/privkey.pem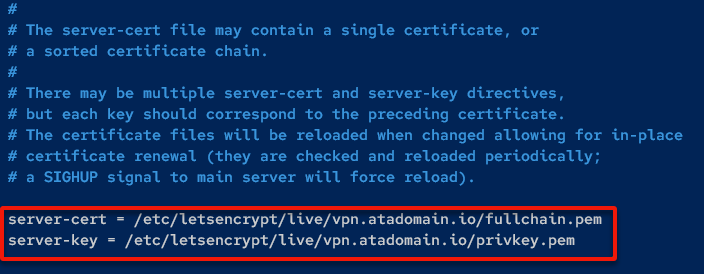
6. Change the try-mtu-discovery parameter value to true to enable the MTU discovery. Doing so increases the speed and performance of the OpenConnect VPN Server.
try-mtu-discovery = true
7. Next, input the domain name for the OpenConnect VPN Server to the default-domain parameter, and change the default internal IP address in the ipv4-network parameter.
In this example, VPN clients will use the internal network 10.11.0.0/24.
default-domain = vpn.atadomain.io
ipv4-network = 10.11.0.0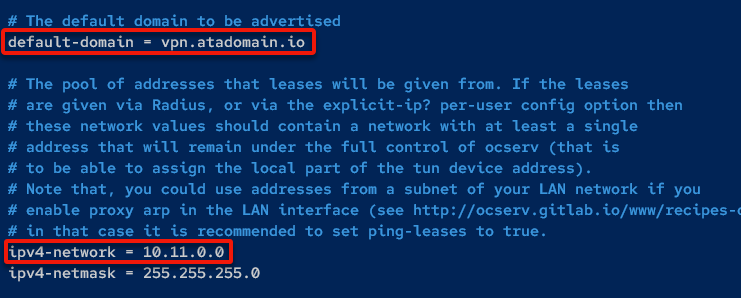
8. Comment out the default route parameters by adding a # character at the start of each line to disable the default route gateway. Once finished, save the file, and exit the editor.
#route = 10.0.0.0/8
#route = 172.16.0.0/12
#route = 192.168.0.0/16
#route = fd00::/8
#route = default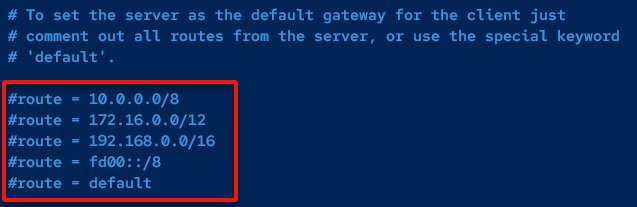
9. Now, run the following commands to restart the ocserv service, apply the changes, and list all open ports (ss) on your system.
# Restart the ocserv service and apply the changes
sudo systemctl restart ocserv
# List all open ports
ss -tulpn | grep ocserv
If the OpenConnect VPN Server runs, you will see port 443 in LISTEN state and used by the ocserv service, as shown below.

Adding Users to the OpenConnect VPN Server
With the OpenConnect VPN server configured, you need a way to connect to it. How? By creating and adding a VPN user to the OpenConnect VPN server.
To add a user to the OpenConnect VPN server, you will create a VPN user and generate a password file via the ocpasswd utility as follows:
Run the ocpasswd command below to create a new user. When prompted, input a new password for the user and repeat. This tutorial’s choice for the username is atauser, but you can provide your own.
Once the user is created, the password file (/etc/ocserv/ocpasswd) is also created.
sudo ocpasswd -c /etc/ocserv/ocpasswd atauser
Now, run the following cat command to check the details of the password file (/etc/ocserv/ocpasswd).
cat /etc/ocserv/ocpasswd
Adding UFW Firewall Rules to Open Crucial Ports
On a Debian system, the default firewall is IPTables, which requires an in-depth understanding of networking to set up. Why not simplify the process? In this tutorial, you will install and configure the UFW as the default firewall.
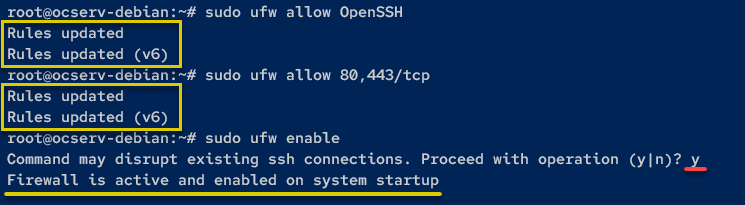
1. Run the below command to install UFW while automatically accepting all prompts (-y)
sudo apt install ufw -y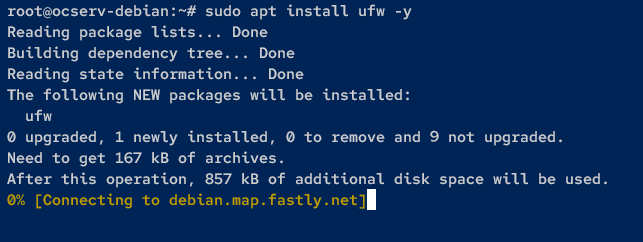
2. Once UFW is installed, run the following ufw commands to open crucial ports for the OpenConnect VPN Server to work correctly.
# Add the OpenSSH service that runs on port 22.
sudo ufw allow OpenSSH
# Add port 80 for renewing LetsEncrypt certificates,
# and port 443 to be used by the OpenConnect VPN Server.
sudo ufw allow 80,443/tcp
# Start and enable UFW.
sudo ufw enable
When prompted, input Y and hit Enter to proceed with the operation, as shown below.
3. Lastly, run the following command to check the UFW status and ensure that UFW is running.
sudo ufw statusThe output below shows the active UFW status, and all added firewall rules.

Enabling Port Forwarding
With a VPN server running, you must direct traffic from the outside world to your server by enabling port forwarding. You will allow port forwarding on your Debian server via kernel parameters.
To enable port forwarding, follow these steps:
Run the following command, which does not produce output to the terminal, but creates a new file called /etc/sysctl.d/60-ocserv.conf. This file contains kernel parameters to enable port forwarding on your system.
cat > /etc/sysctl.d/60-ocserv.conf << EOF
net.ipv4.ip_forward = 1
net.core.default_qdisc=fq
net.ipv4.tcp_congestion_control=bbr
EOF
Now, run the sysctl command below to apply the new kernel parameters and enable port forwarding.
sudo sysctl -p /etc/sysctl.d/60-ocserv.conf
Setting up NAT with UFW
Enabling port forwarding is just one of the first few steps to take. This time, you must ensure VPN clients can connect to the internet or specific networks via the OpenConnect VPN Server. How? By setting up NAT via UFW.
To set up NAT with UFW for the OpenConnect VPN Server:
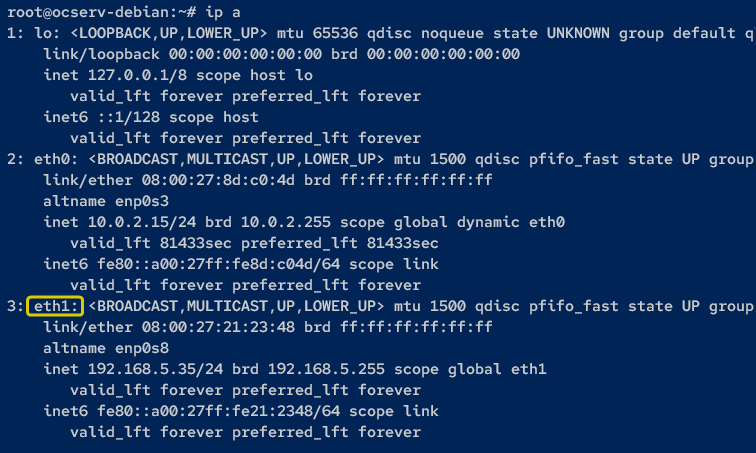
1. Run the following command to check the list of interfaces on your system.
ip aIn this example, the eth1 interface will be the NAT gateway for VPN clients.
2. Next, open the UFW configuration (/etc/ufw/before.rules) using your preferred editor, and add the following lines before the *filter option. These configurations will NAT VPN users (specify outgoing interface) or internal network to eth1 interface.
Be sure to change the subnet (10.11.0.0/24) with your VPN client’s networks and the interface (eth1) with your network interface.
# NAT for OpenConnect VPN server
# with client network 10.11.0.0/24
# to interface eth1
*nat
:POSTROUTING ACCEPT [0:0]
-A POSTROUTING -s 10.11.0.0/24 -o eth1 -j MASQUERADE
COMMIT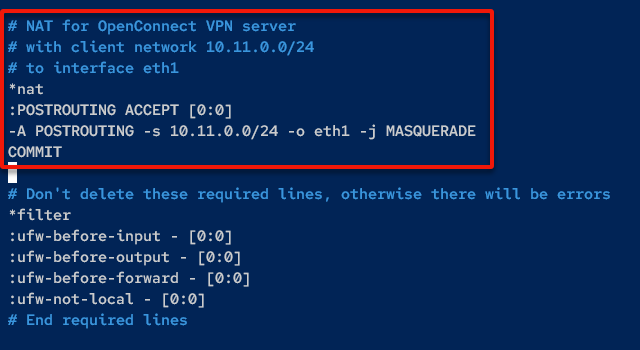
3. Add the following lines below the ok icmp code for FORWARD section of ufw-before-forward options, save the file, and exit the editor.
These configurations enable forwarding (source and destination) of the VPN client network.
# allow forwarding VPN client network
-A ufw-before-forward -s 10.11.0.0/24 -j ACCEPT
-A ufw-before-forward -d 10.11.0.0/24 -j ACCEPT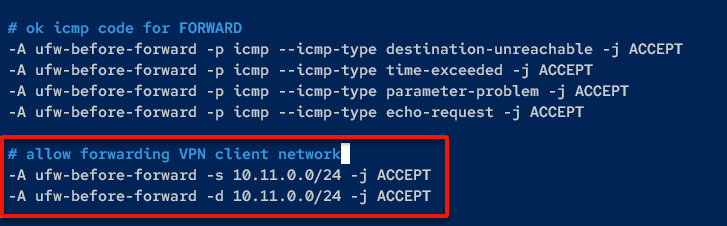
4. Once saved, run the following command to reload UFW rules and restart the UFW service. Doing so ensures that NAT configuration will be applied to the system.
sudo ufw reload
sudo systemctl restart ufw
5. Lastly, run the following iptables command to check the NAT status on UFW since the backend of UFW is IPTables.
sudo iptables -t nat -L POSTROUTINGWhen successful, you will receive an output like the one below.

Connecting to the OpenConnect VPN Server via OpenConnect-GUI
Following the instructions, you should now have a fully functional OpenConnect VPN Server running. But after all the hard work, the moment of truth has come.
The OpenConnect VPN Server may be running, but there is only one best way to verify — connecting to the OpenConnect VPN Server.
To connect to the OpenConnect VPN Server, you must install the OpenConnect-GUI application:
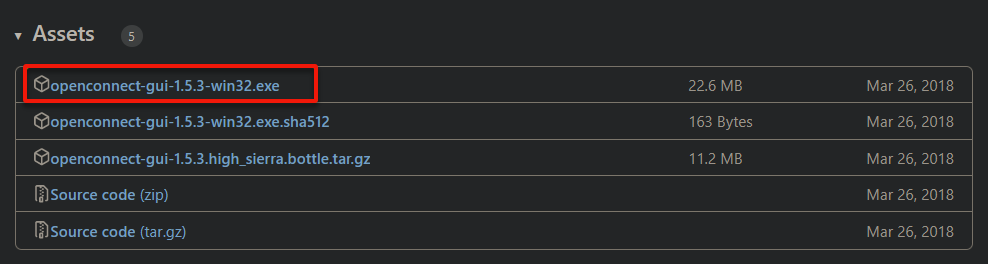
1. Open your favorite web browser, and visit the OpenConnect-GUI GitHub page.
2. Next, download and install the OpenConnect VPN application for Windows.
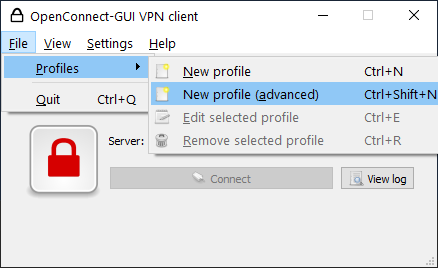
3. Open the OpenConnect-GUI VPN client, and click on the File menu → Profiles → New profile (advanced) (or press Ctrl+Shift+N). A small window appears where you can fill in the new profile details (step four).
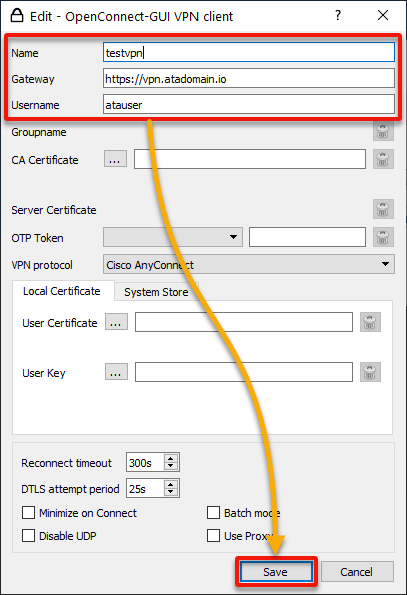
4. Now, fill in the VPN profile information with the following:
- Name – Provide a connection name (i.e., testvpn).
- Gateway – Specify your OpenConnect VPN server’s domain name (i.e., https://vpn.atadomain.io).
- Username – The user added (atauser) to the OpenConnect VPN server.
Once filled in, click Save to confirm the information and create the VPN profile.
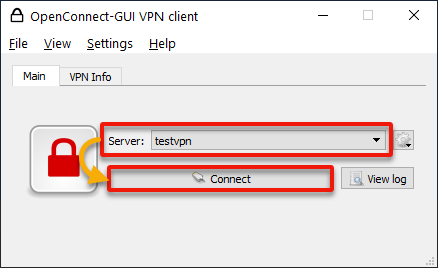
5. Next, set your newly-created VPN profile (testvpn) as the Server, and click Connect to establish a connection to the OpenConnect VPN Server.
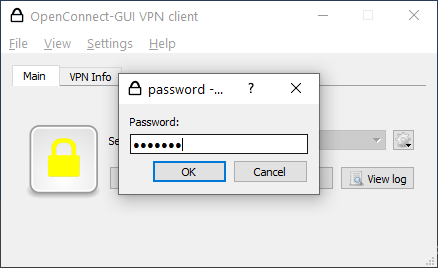
6. When prompted, input the Password for your VPN user and click OK.
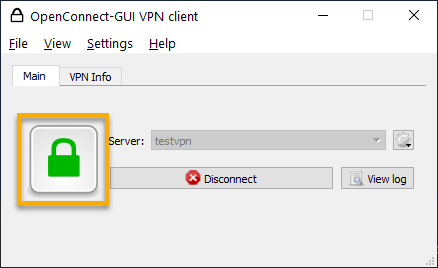
7. Once connected, the color of the padlock changes to green, as shown below.
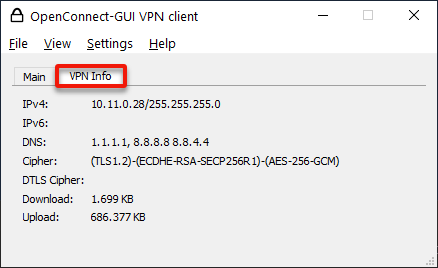
8. Lastly, click the VPN Info tab to get detailed connection status. You should see the internal IP address you got from the VPN server, the DNS server, and the TLS version you use.
Conclusion
Throughout this tutorial, you have learned to set up the OpenConnect VPN server. At the same time, you learned to use SSL/TSL certificates and add firewall rules to establish a secure connection to the OpenConnect VPN server.
With this newfound knowledge, why not integrate the OpenConnect VPN Server with multiple authentication backends, such as Radius and OpenID? Or add a layer of security for client authentication via two-factor authentication?


