
Got YAML files multiplying like rabbits in your Kubernetes projects? Feeling lost in the maze of configurations? Worry not! There’s a magic wand called “Kustomize” to untangle the mess and simplify your Kubernetes configuration woes.
This tutorial is your ticket to a land of cleaner, more manageable configurations. No more drowning in YAML, no more copy-paste nightmares.
Get ready to craft custom configurations effortlessly with Kustomize!
Prerequisites
This tutorial comprises hands-on demonstrations. If you wish to follow along, ensure you have the following in place:
- A Kubernetes cluster – This tutorial uses Minikube.
- A Linux OS – This tutorial uses an Ubuntu 22.04 LTS.
Building a Customized Deployment
Developing becomes significantly more efficient when you don’t have to repeat yourself. The good news is that Kustomize ensures you only manage the necessary configurations once and seamlessly adapt them for different environments.
In this example, you’ll deploy an Apache HTTP Server and create a service to expose the server in your cluster.
To build a customized deployment, carry out the following:
1. Create (mkdir) and navigate (cd) into a working directory called kustomize (arbitrary). These commands have no output but prepare you a workspace.
mkdir kustomize
cd kustomize
2. Next, create a directory called base in your workspace directory (~/kustomize) to serve as the foundation for your Kubernetes configurations.
This base directory will contain the essential, unaltered configurations that form the starting point for your deployment.
mkdir base
cd base
3. Create a file called httpd-deploy.yaml with your preferred editor, like Vim, populate the following configuration, save the file, and close the editor.
This configuration defines a deployment for the Apache HTTP Server, instructing Kubernetes to maintain two replicas of pods running the specified image (httpd).
apiVersion: apps/v1
# Specifies a Kubernetes deployment object.
kind: Deployment
metadata:
  labels:
    # Label the application as "httpd".
    app: httpd
  name: httpd
spec:
  # The two instances of the Apache HTTP Server should be created.
  replicas: 2
  selector:
    matchLabels:
      # Select pods with the label 'app: httpd'.
      app: httpd
  template:
    metadata:
      labels:
        # Label the application inside the pod as "httpd".
        app: httpd
    spec:
      containers:
      # Specifies the name of the official Apache HTTP Server image.
      - image: httpd
        # Specifies the name of the Apache HTTP Server image container.
        name: httpd
4. Now, create another file called httpd-svc.yaml, add the configuration below, save the file, and close the editor.
This configuration creates a service named httpd-service of type ClusterIP, directing traffic to pods labeled with app: httpd on port: 80. This setup allows other components within your Kubernetes cluster to access the Apache HTTP Server pods through the defined service.
apiVersion: v1
# Specifies a Kubernetes service object.
kind: Service
metadata:
  # The name of the service
  name: httpd-service
spec:
  # Specifies that this service is of type ClusterIP
  type: ClusterIP
  selector:
    # Select the pods with the label 'app: httpd'
    app: httpd
  ports:
    - protocol: TCP
      # The port that the service exposes
      port: 80
      # The target port on the container to send traffic to
      targetPort: 80
5. Head back to your workspace directory (~/kustomize).
cd ..6. Next, create another file called kustomization.yaml, add the configuration below, save the file, and close the editor.
Kustomize searches for a file named kustomization.yaml (or kustomization.yml) by default to understand how to assemble and apply your Kubernetes resources. This file is your configuration’s anchor, directing Kustomize on what resources to include, how to modify them, and where to deploy them.
The configuration below works as follows:
- Outlines the process of instructing Kustomize on assembling and customizing Kubernetes resources.
- Instructs Kustomize to use your base configuration files (
httpd-deployment.yamlandhttpd-svc.yaml) in the./base/directory. - Kustomize can then apply overlays, patches, or other customizations specified in the directory structure.
- Creates the final customized set of Kubernetes manifests for deployment.
apiVersion: kustomize.config.k8s.io/v1beta1
# Specify the API version for the Kustomization resource.
kind: Kustomization

resources:
# Specify the relative paths to the base configuration files.
- ./base/httpd-deployment.yaml
- ./base/httpd-svc.yaml
7. With configurations set, execute the below kubectl command to perform the following:
- Let Kustomize read the
kustomization.yamlfile, and process the configurations based on the instructions provided. - Generate the final set of Kubernetes manifests.
This command ensures that these manifests are applied to your Kubernetes cluster, resulting in the creation or updating of the specified resources.
kubectl apply -k .
💡 Kustomize is integrated into Kubernetes from version 1.14 onward and doesn’t require a separate installation when using Kubernetes 1.14 or later. Kustomize seamlessly works with the
kubectlcommand-line tool, allowing you to leverage Kustomize features directly throughkubectlcommands.
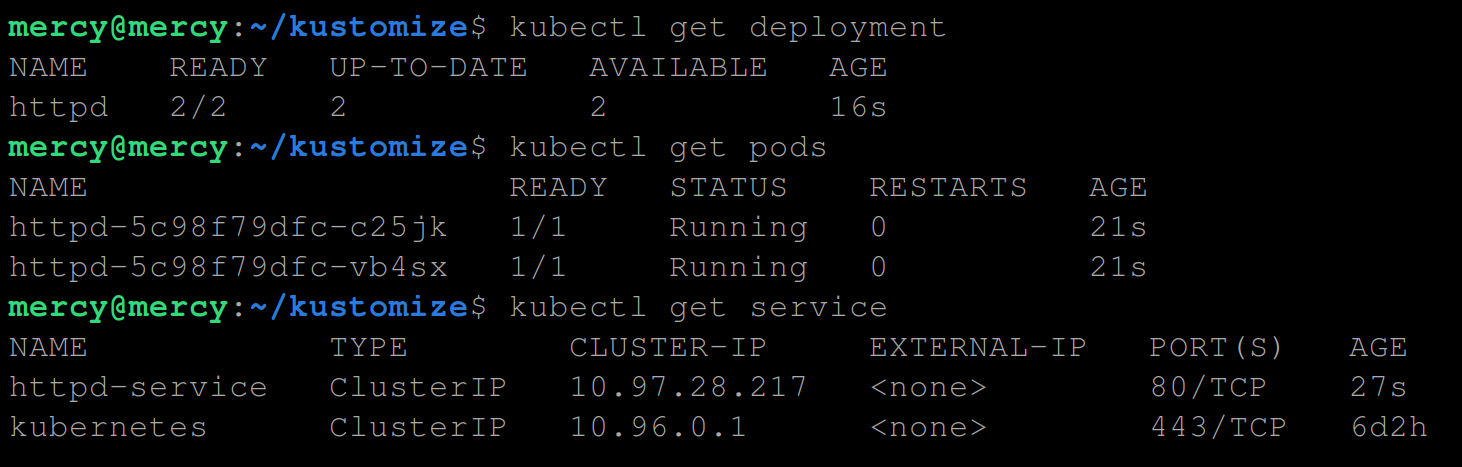
8. Lastly, run all commands below to confirm the deployment and service objects have been created.
# Check the status of deployments
kubectl get deployment

# List all pods
kubectl get pods

# Display information about services
kubectl get service
If all goes well, you’ll see an output similar to the one below.
Applying Environment-specific Customizations with Overlays
With a customized deployment and service objects created, you switch your focus to making deployments seamlessly adapt to different environments. Say hello to “overlays”.
Overlays allow you to tailor configurations for specific environments without duplicating entire files. Instead, you strategically layer adjustments, keeping your manifests clean and manageable.
In this example, you’ll leverage the Kustomize overlay feature to configure your existing deployments with environment-specific customizations.
To apply environment-specific customizations with overlays, proceed with these steps:
1. Move your already existing kustomization.yaml file into the kustomize/base directory.
2. Once moved, open the kustomization.yaml file, update the path of the httpd-deploy.yaml and httpd-svc.yaml files with the following:
This step is crucial since you’ve relocated the kustomization.yaml file to the /base directory, changing its relative path to the resource files. Updating these paths ensures that Kustomize can correctly locate and use these files in the base configuration.
resources:
- ./httpd-deploy.yaml
- ./httpd-svc.yaml
3. Move back to your workspace directory (~/kustomize) and create an overlays/prod directory. The aim is to create a specific configuration for a production (prod) environment.
# Move back to your workspace directory (~/kustomize)
cd ..
# Create a parent directory (overlays) and a sub-directory (prod)
mkdir -p overlays/prod
# Move to the overlays/prod directory
cd overlays/prod
4. In the overlays/prod directory, create a kustomization.yaml file and add the configuration below.
This configuration instructs Kustomize to build upon the base resources, applying specific customizations for the production environment by adding the following:
namePrefix– Adds a prefixprod-to all resource names in this overlay.commonLabels– Instructs Kustomize to add a label calledproductionto all resources.
Doing so lets Kustomize quickly identify and filter resources belonging to the production environment.
# List of resources to include in the customization.
resources:
  # Path to the base directory containing configuration files.
  - ../../base

# Prefix to be added to names of resources.
namePrefix: prod-

# Common labels to be applied to all resources.
commonLabels:
  env: production
5. Now, execute the following command to create product-specific resources with the prefix prod- in the overlays/prod directory.
kubectl apply -k .
6. Ultimately, run each command below to verify your product-specific resources.
# Verify the deployment
kubectl get deployment

# Verify the pods
kubectl get pods

# Verify the service
kubectl get service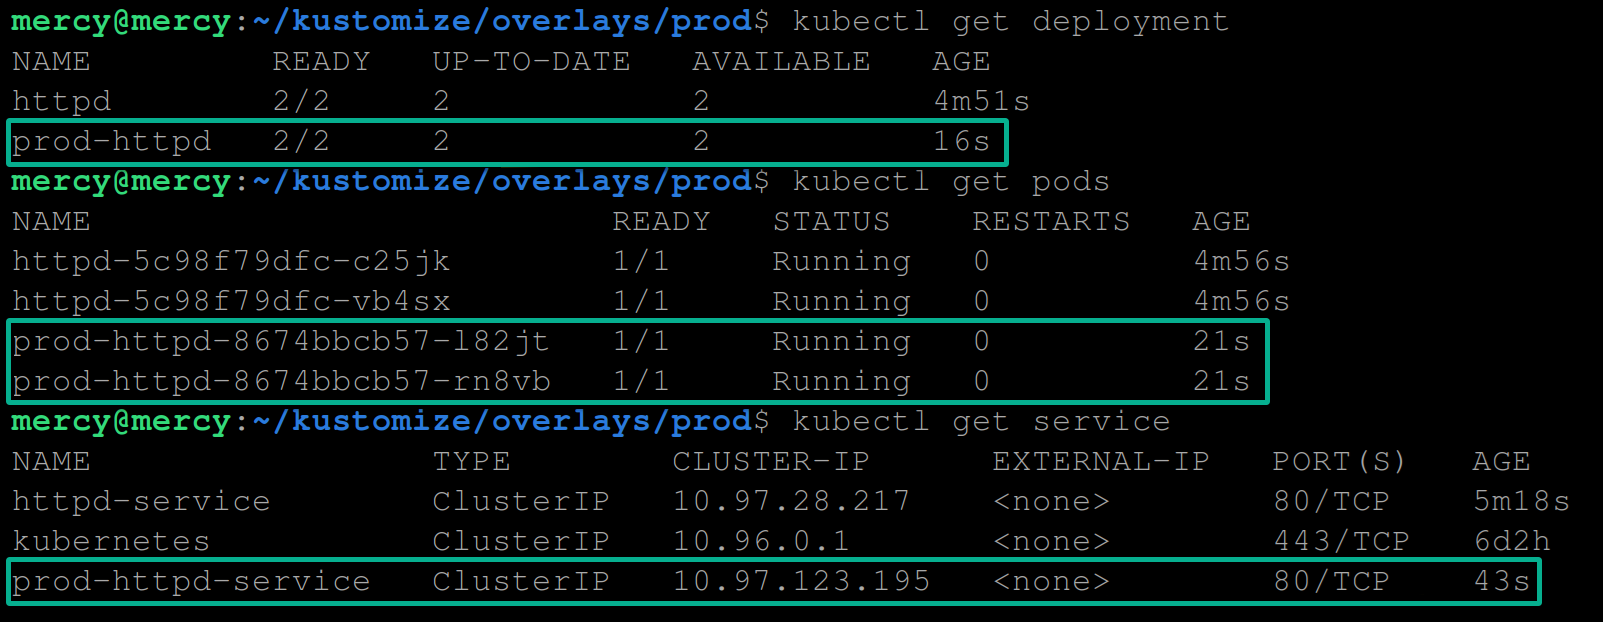
Applying Specific Changes with Patches
Overlays are just a part of the equation in customizing your Kubernetes configurations for different environments. When you must apply specific and targeted changes to your resources, patches will do the trick.
While overlays let you manage complete environment-specific configurations, patches give fine-grained control necessary to tweak individual elements. Patches allow you to apply resource changes defined in your base configuration within the overlays.
To apply specific changes with patches, complete the steps below:
1. Execute the commands below to create a prod namespace and confirm its existence. The goal is to deploy resources associated with the production environment in a namespace called prod.
# Create the prod namespace
kubectl create namespace prod

# Confirm the prod namespace exists
kubectl get namespace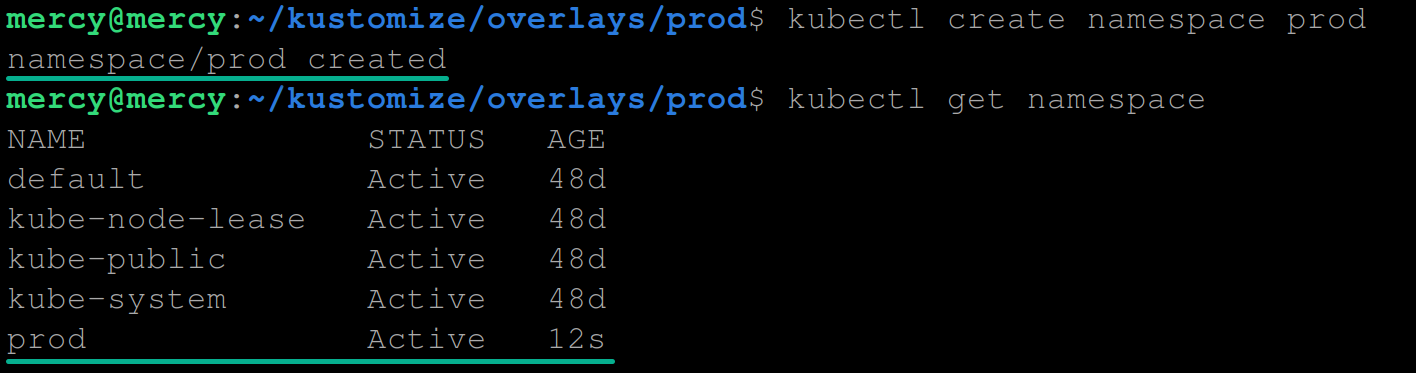
2. In the overlay/prod directory, create a file deployment-patch.yaml (arbitrary) and add the following configuration settings.
This patch targets the base deployments via the name httpd and modifies the number of replicas to four (4) for the production environment.
At this point, you can add other configuration settings like using an NGINX web server instead, changing the container name, and a lot more.
apiVersion: apps/v1
# Specifies a Kubernetes deployment object
kind: Deployment
metadata:
  name: httpd
spec:
  # Specifies four instances of the Apache HTTP Server that should be created
  replicas: 4
3. Next, create another file called service-patch.yaml and populate the following configuration.
This patch instructs Kustomize to create a service of type NodePort for the production environment accessible on port 31708.
apiVersion: v1
kind: Service
metadata:
  # The name of the service
  name: httpd-service
spec:
  # Specifies that this service is of type NodePort
  type: NodePort
  ports:
    - protocol: TCP
      # The port that the service exposes
      port: 80
      # The target port on the container to send traffic to
      targetPort: 80
      nodePort: 31708
4. In the same directory, update your already existing kustomization.yaml file to include the following configuration.
This configuration tells Kustomize to deploy the prod overlay to the namespace prod alongside the deployment-patch.yaml and service-patch.yaml patches.
# List of resources to include in the customization.
resources:
  # Specifies the path to the base directory containing configuration files.
  - ../../base

# Prefix to be added to names of resources.
namePrefix: prod-

# Namespace for the resources.
namespace: prod

# Common labels to be applied to all resources.
commonLabels:
  env: production

# Patches to be applied to specific resources.
patches:
  - target:
      kind: Deployment
      name: httpd
    path: deployment-patch.yaml
  - target:
      kind: Service
      name: httpd-service
    path: service-patch.yaml
5. Subsequently, run the following command below to create the specified resources.
kubectl apply -k .
6. Finally, execute each command below to verify the prod namespace’s resources (deployment, pods, and service).
# Verify the deployment
kubectl get deployment -n prod

# Verify the pods
kubectl get pods -n prod

# Verify the service
kubectl get service -n prod
Assuming everything works, you’ll see the following output.

Conclusion
Throughout this tutorial, you’ve learned how to manage and customize your Kubernetes deployments efficiently using Kustomize.
You’ve seen firsthand how Kustomize simplifies and streamlines managing Kubernetes resources. Be it from setting up a basic Apache HTTP Server deployment to applying sophisticated overlays and patches for different environments.
As a next step, would you explore other features of Kustomize, like patchesStrategicMerge and secretGenerator?


