

Deployments in Kubernetes pose challenges, especially when striving for zero downtime and seamless user experiences. In such challenges, the Kubernetes blue green deployment strategy shines! By minimizing risks and enabling live testing in production, this approach ensures uninterrupted service—a true game-changer for Kubernetes deployments.
Kubernetes doesn’t support this strategy by default. But fear not, as in this tutorial, you’ll learn how to implement this strategy to ensure safer updates for your deployments in Kubernetes.
Ready? Dive in to unlock the secrets to efficient, hassle-free deployments!
Prerequisites
Before mastering the Kubernetes blue-green deployment strategy, ensure a Kubernetes cluster is running. This tutorial uses Minikube for demonstrations.
Preparing the Blue Deployment
With the prerequisites out of the way, it’s time to set the stage for seamless transitions and efficient deployment management. When it comes to blue-green deployments, the blue deployment typically represents your application’s current, live version, serving all production traffic.
The primary goal in this initial phase is to ensure the blue deployment is correctly configured and deployed. The blue deployment serves as the baseline for introducing the new, or green, version.
To prepare the blue deployment, you’ll need a YAML configuration file as follows:
1. Create a file blue-deployment.yaml with your preferred editor, and populate the following configuration.
This configuration serves as your initial deployment (blue) with three replicas (replicas: 3) of a custom NGINX web server (mercybassey/nginx:v1) with a label version: blue. This setup empowers you to manage and channel traffic seamlessly to this precise NGINX application version.
# Define a Kubernetes Deployment object
apiVersion: apps/v1
kind: Deployment
metadata:
  # Name of the deployment
  name: nginx-deployment
spec:
  # Set the number of replicas to 3 for high availability
  replicas: 3
  selector:
    matchLabels:
      # Label selector for identifying pods controlled by this deployment
      app: nginx-deployment
      version: blue
  template:
    metadata:
      labels:
        # Labels applied to all pods created by this deployment
        app: nginx-deployment
        version: blue
    spec:
      containers:
      - name: nginx
        # Use the custom NGINX web server image
        image: mercybassey/nginx:v1
        ports:
        - containerPort: 80 # Define the container port
2. Next, create another file called service.yaml and add the configuration settings below.
This configuration ensures your application’s blue version is accessible through a stable endpoint port: 80.
# Define a Kubernetes Service object
apiVersion: v1
kind: Service
metadata:
  # Name of the service
  name: nginx-service
spec:
  # Select pods with the following labels to provide the service
  selector:
    app: nginx-deployment
    version: blue
  # Define ports for the service
  ports:
  - protocol: TCP
    # Port on the service
    port: 80
    # Port on the pods to forward traffic to
    targetPort: 80
3. Now, execute the following kubectl commands to create the deployment defined in the blue-deployment.yaml configuration file.
# Apply the configuration defined in the blue-deployment.yaml file
kubectl apply -f blue-deployment.yaml

# Retrieve information about pods in the Kubernetes cluster
kubectl get pods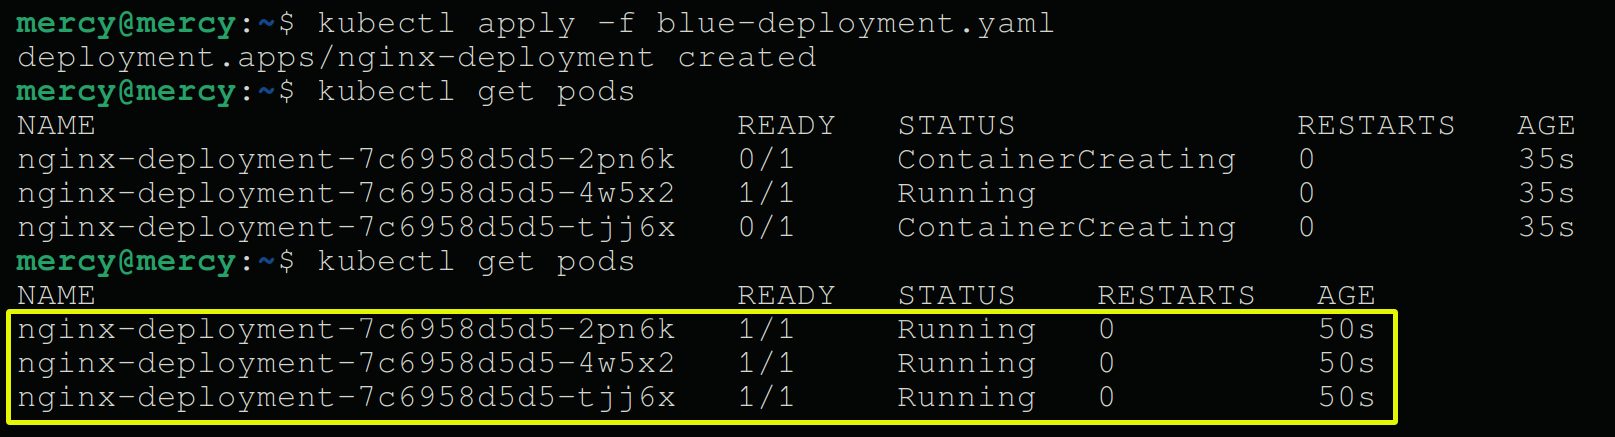
4. Subsequently, run the commands below to create the NGINX service as defined in the service.yaml configuration file, and retrieve information about the service.
# Apply the configuration defined in the service.yaml file to the Kubernetes cluster
kubectl apply -f service.yaml

# Retrieve information about the services running in the Kubernetes cluster
kubectl get service
Take note of the CLUSTER-IP (i.e., 10.97.158.242) and PORT (i.e., 80), as you’ll need them later.

5. Execute the below command to run curl within an interactive (-i) pod in the same namespace as the service. This command checks if the service is accessible from inside the cluster.
kubectl run curl --image=radial/busyboxplus:curl -i --tty
curl within a pod Related: CURL Linux Command : Learning By Example
6. Lastly, run either of the following curl commands to view the content of the nginx-service.
Ensure you replace <cluster-ip> and <port> with the IP address and port you noted in step four (i.e., http://10.97.158.242:80).
# Send an HTTP request to an IP address and port within the Kubernetes cluster
curl http://<cluster-ip>:<port>

# This command also works since the service only listens on a single port
curl http://<cluster-ip>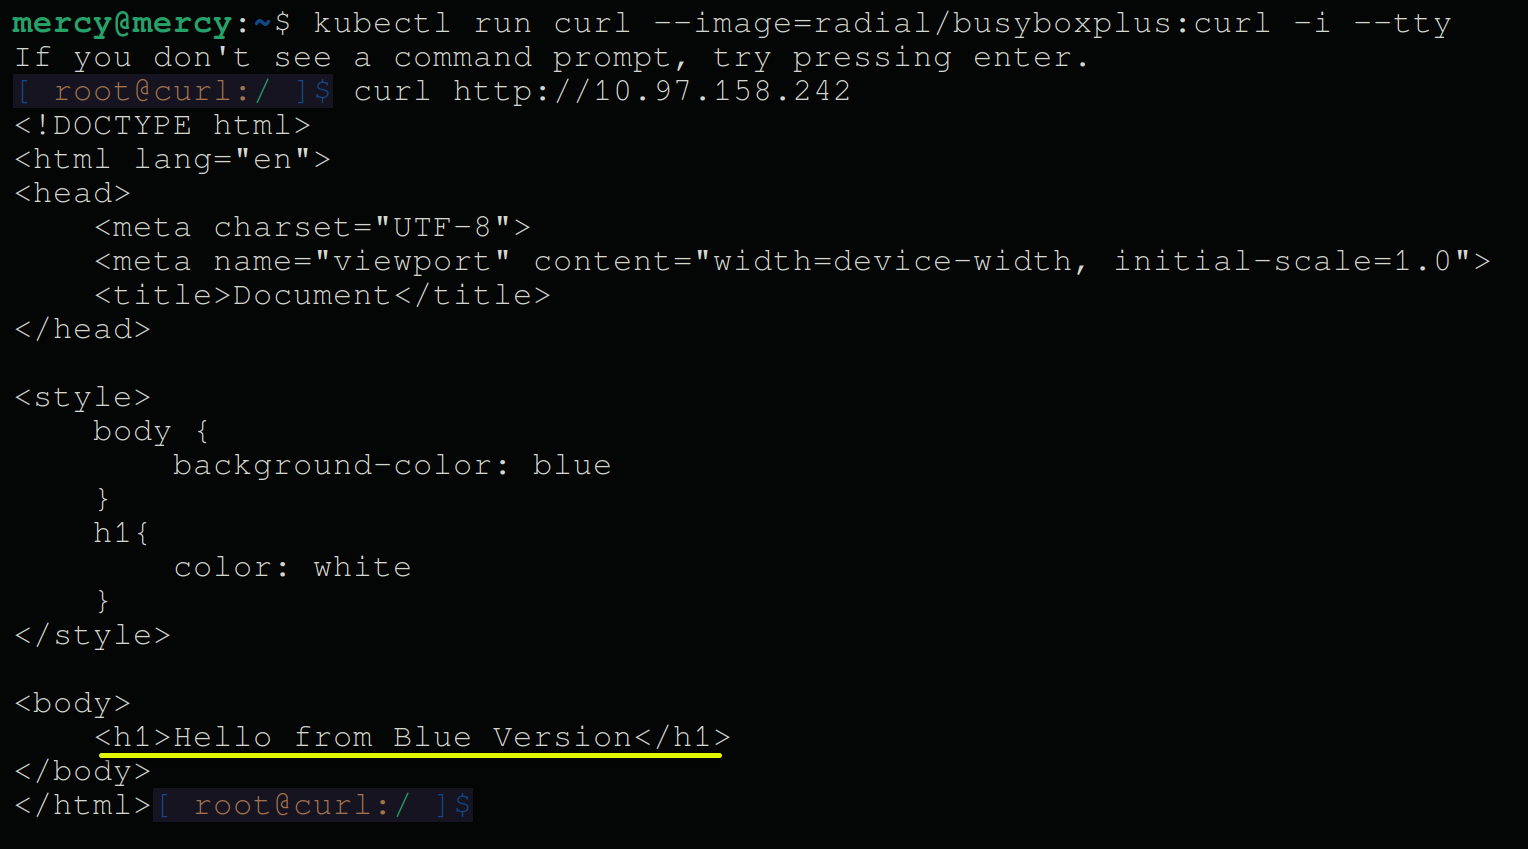
Preparing the Green Deployment
Coming off the meticulous preparation of the blue deployment, you now shift focus to setting the stage parallel to the blue deployment for a flawless transition. You’ll prepare the green deployment, minimizing disruptions and maximizing efficiency in your Kubernetes environment.
While the blue deployment represents your application’s current and stable version, the green deployment introduces a new version. This version is poised for testing and eventual promotion to serve production traffic.
To prepare the green deployment, you’ll need another YAML configuration file that defines traffic routing decisions with the following:
1. Create a file called green-deployment.yaml and add the following configuration settings.
This configuration launches an updated NGINX deployment (mercybassey/nginx-green:v1) as the green deployment, distinguished by a version: green label. This label acts as the GPS for traffic routing decisions, facilitating rapid identification and management of deployment versions.
# Define the API version and kind for the Deployment resource.
apiVersion: apps/v1
kind: Deployment
metadata:
# Specify the name of the Deployment resource.
name: nginx-deployment-green
spec:
# Set the desired number of replicas for the NGINX Deployment to 3.
replicas: 3
selector:
matchLabels:
# Define the labels to match the pod selection.
app: nginx-deployment
version: green
template:
metadata:
labels:
# Apply labels to the pods managed by this Deployment.
app: nginx-deployment
version: green
spec:
containers:
- name: nginx
# Define the NGINX container image to use for the Deployment.
image: mercybassey/nginx-green:v1
ports:
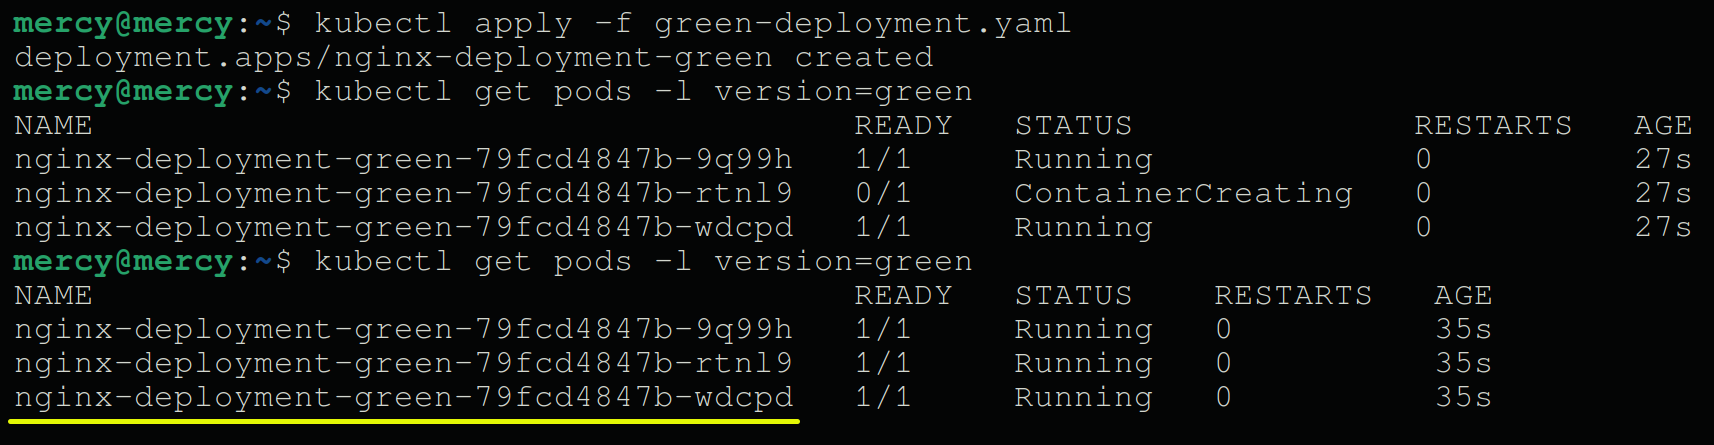
- containerPort: 802. Next, execute the following commands to apply the deployment configurations against the green-deployment.yaml file and get all pods available.
# Apply the green deployment configuration to your Kubernetes cluster
kubectl apply -f green-deployment.yaml

# View the pods belonging to the green deployment
kubectl get pods -l version=green
Note down one of the green deployment pod’s names, as you’ll need it to test the deployment later.
3. Once deployed, run the commands below to ensure everything works fine before routing traffic to the newly updated deployment.
Ensure you replace <green-pod-name> with the green deployment pod name you noted in step two.
# Find a Pod from the green deployment
kubectl get pods -l app=nginx-deployment,version=green

# Forward local port 8080 to port 80 on the green Pod
kubectl port-forward pod/<green-pod-name> 8080:80
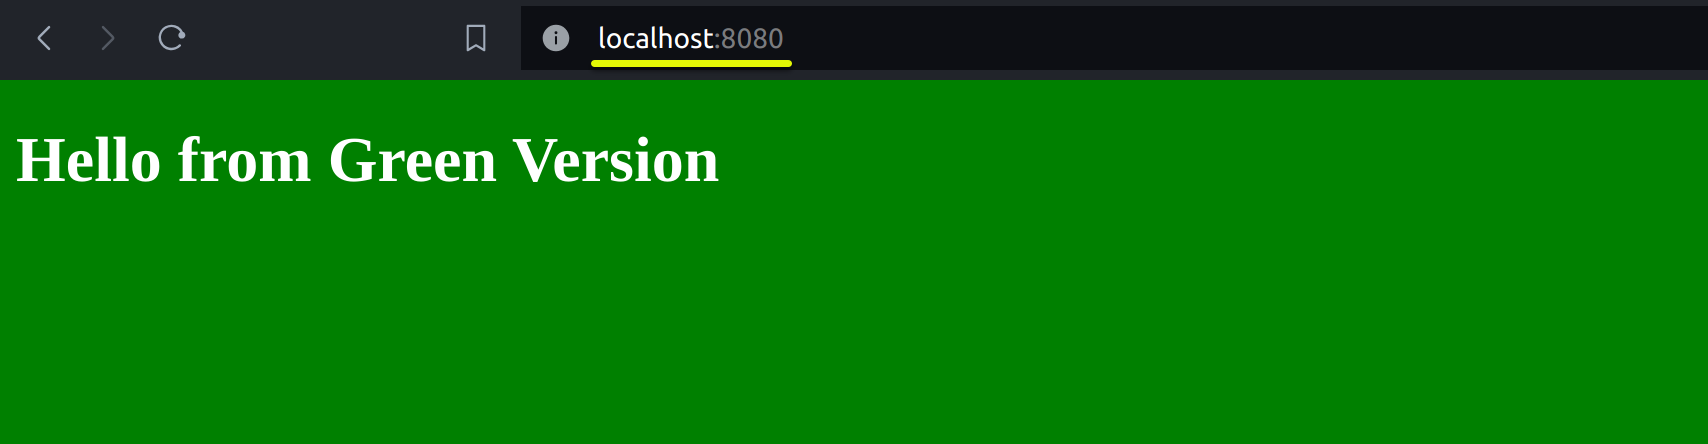
4. Now, execute the curl command below or visit http://localhost:8080 in your browser to access the green deployment locally.
Validating the green deployment in this isolated environment thoroughly before proceeding to route live traffic to it is crucial. Doing so minimizes the risk of introducing errors or downtime in your production environment.
curl http://localhost:8080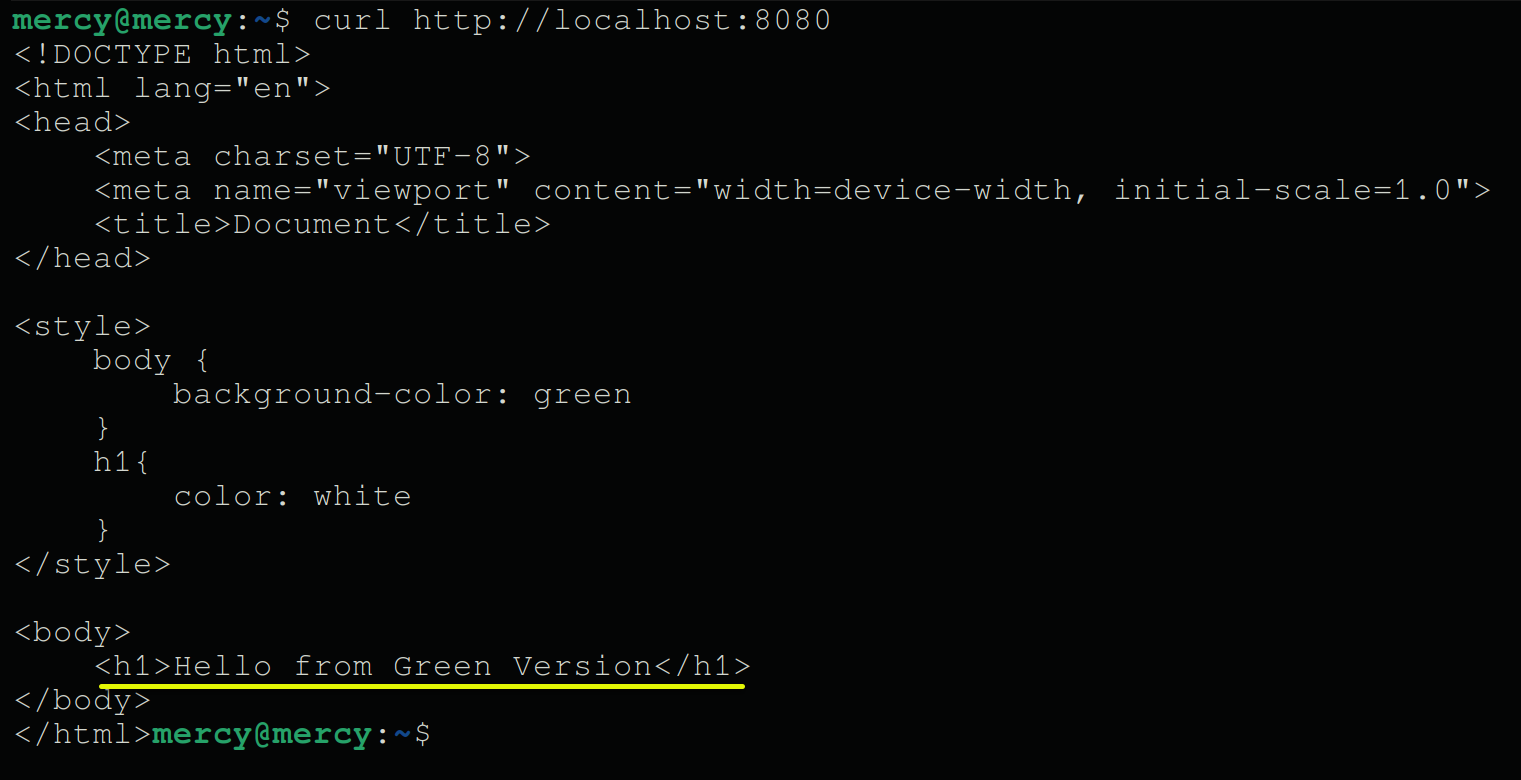
💡 At this point, any other testing and validation should be performed to ensure the green deployment meets all operational, functional, and performance criteria. This step may include automated tests for API responses, manual user interface checks, security vulnerability scans, and performance benchmarking.
5. Since the green deployment works, update the service.yaml configuration’s selector to match the labels of the green deployment with the following.
  selector:
    app: nginx-deployment
    version: green
6. Next, run the following command to apply the changes in the service.yaml configuration.
Applying the changes causes Kubernetes to reroute all incoming traffic to the pods of the green deployment based on the updated selector.
kubectl apply -f service.yaml 
7. With the service updated, execute each command below to verify that traffic successfully routes to the green deployment.
# Attach to the "curl" running pod using the "curl" container.
kubectl attach curl -c curl -i -t

# Send an HTTP GET request to the specified IP address.
curl http://10.97.158.242

# Exit the curl pod.
exit
The output below confirms you’ve successfully updated the service selector, and traffic is now sent to the updated (green) deployment.
The green deployment allows for thorough validation and testing in a production-like environment without impacting the live version. At this point, you can delete the previous deployment (blue) or keep it on standby so you can roll back if anything goes wrong.

Setting up Argo Rollouts for Simplified Blue-Green Deployments
You’ve successfully implemented a blue-green deployment via Kubernetes deployment manifest files and service selectors to switch between deployments. But is there a better way to simply complex blue-green deployments? Yes! Argo Rollouts, a Kubernetes controller, is up to the task.
With Argo Rollouts, you can implement a blue-green deployment strategy. Plus, automating the steps involved in rolling out new versions of your application, from traffic routing and analysis to automatic rollback in case of detected issues.
To leverage Argo Rollouts in your blue-green deployments, you must first delete all resources you’ve created so far in the following steps:
1. Execute the command below to delete all resources you’ve created for your previous deployments. This command deletes all pods, services, deployments, stateful sets, and replica sets.
kubectl delete all --all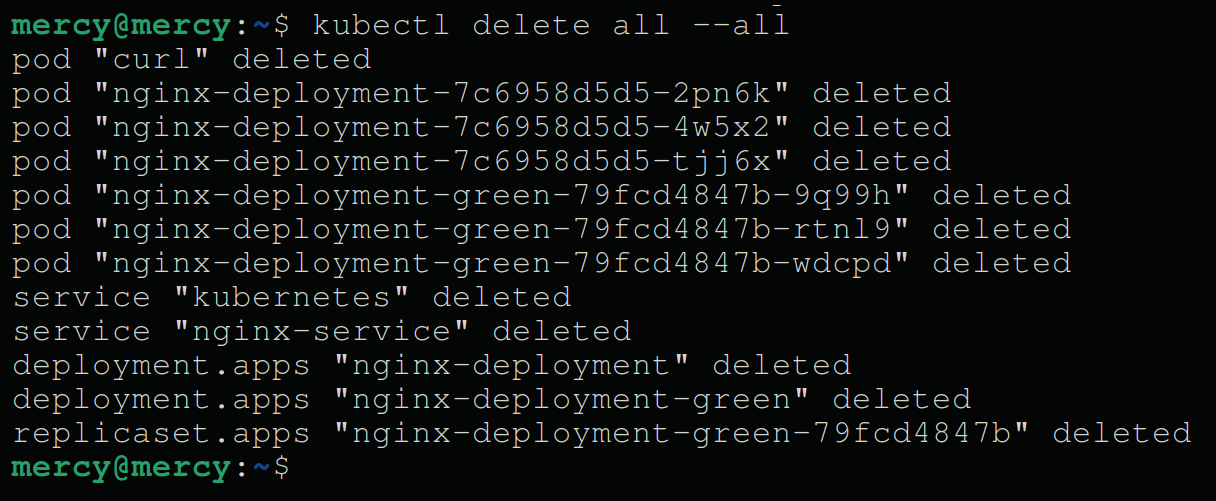
2. Next, run these kubectl commands to create a new namespace called argo-rollouts and install the Argo Rollouts CRDs.
# Create a namespace (argo-rollouts) to isolate Argo Rollouts resources.
kubectl create namespace argo-rollouts

# Retrieve a list of all namespaces in the Kubernetes cluster.
kubectl get namespace

# Apply the Argo Rollouts installation manifest from the latest release using the specified namespace.
kubectl apply -n argo-rollouts -f https://github.com/argoproj/argo-rollouts/releases/latest/download/install.yaml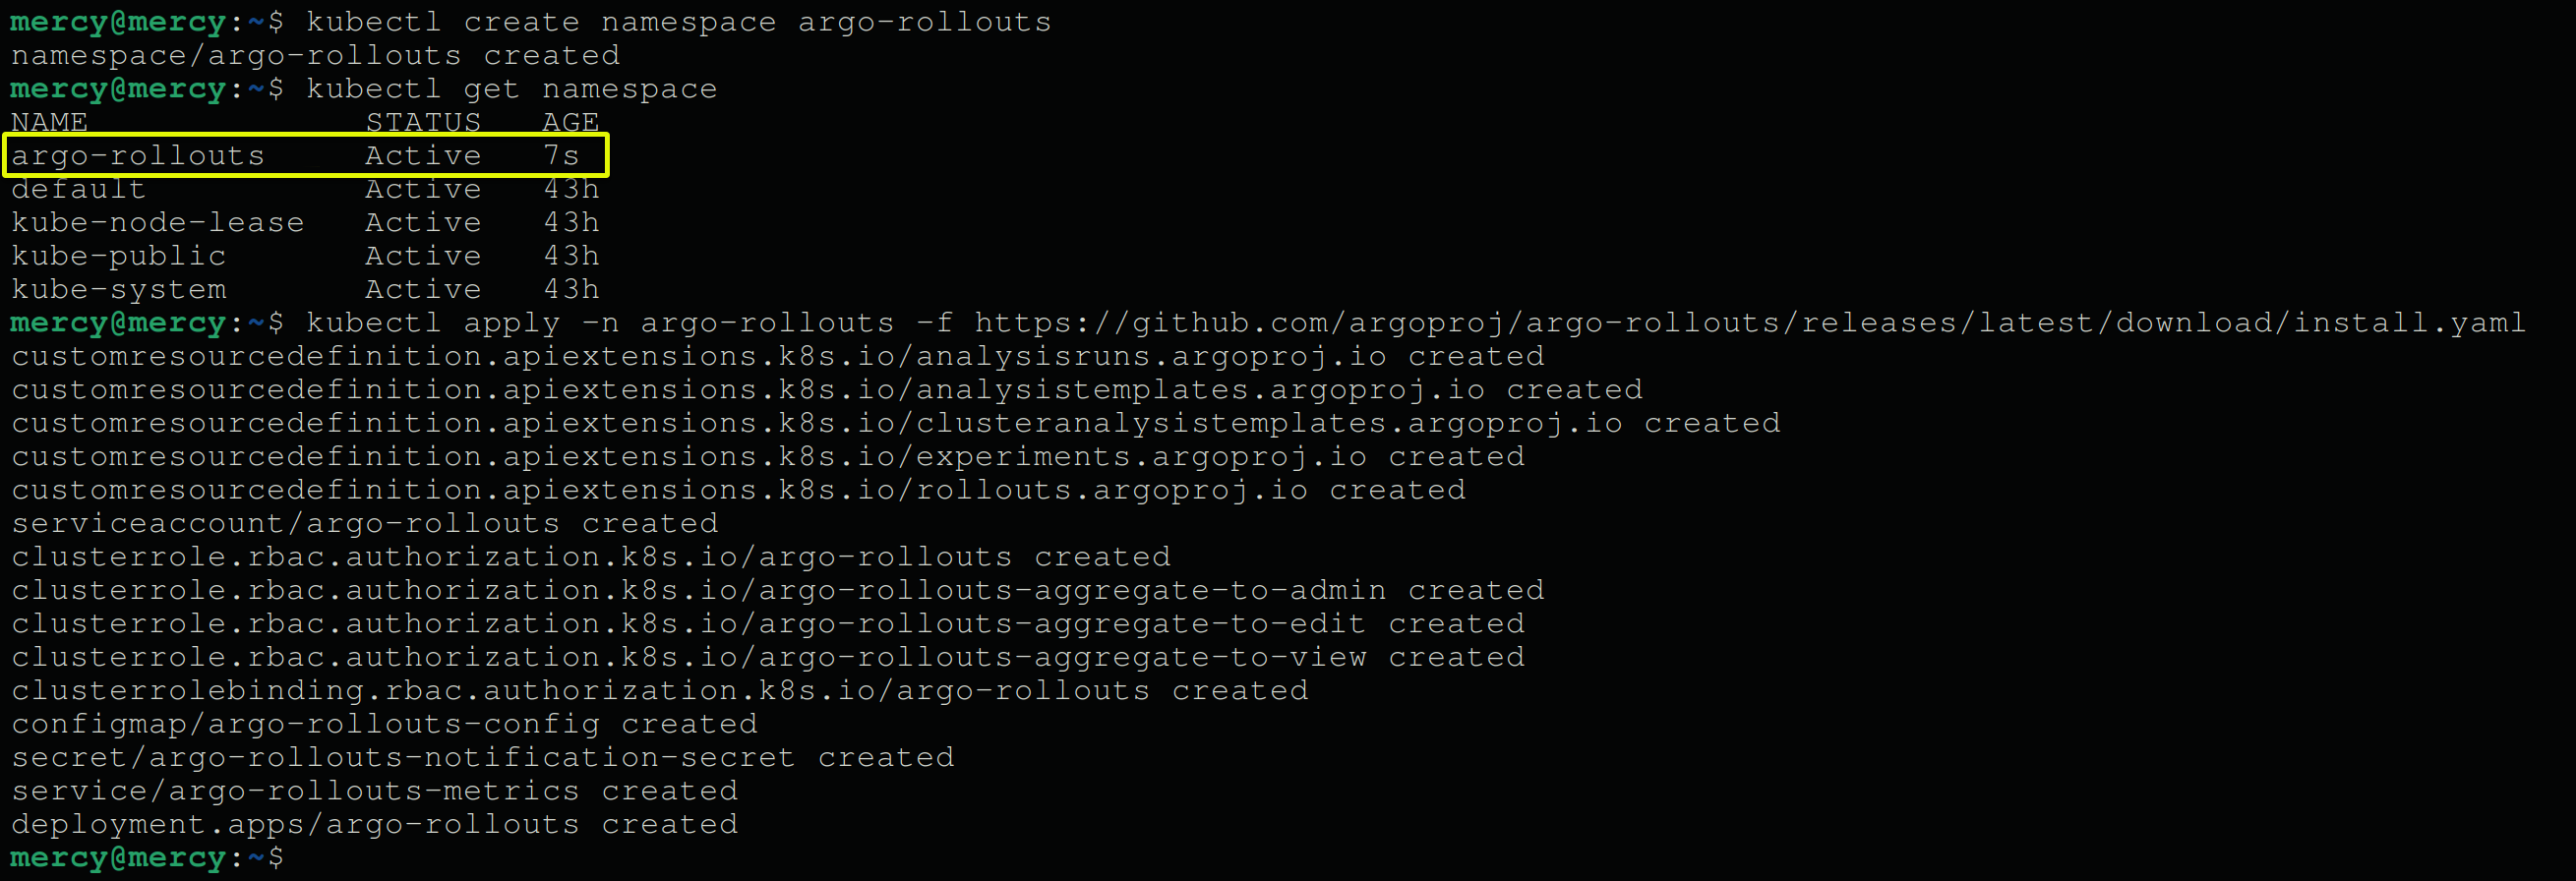
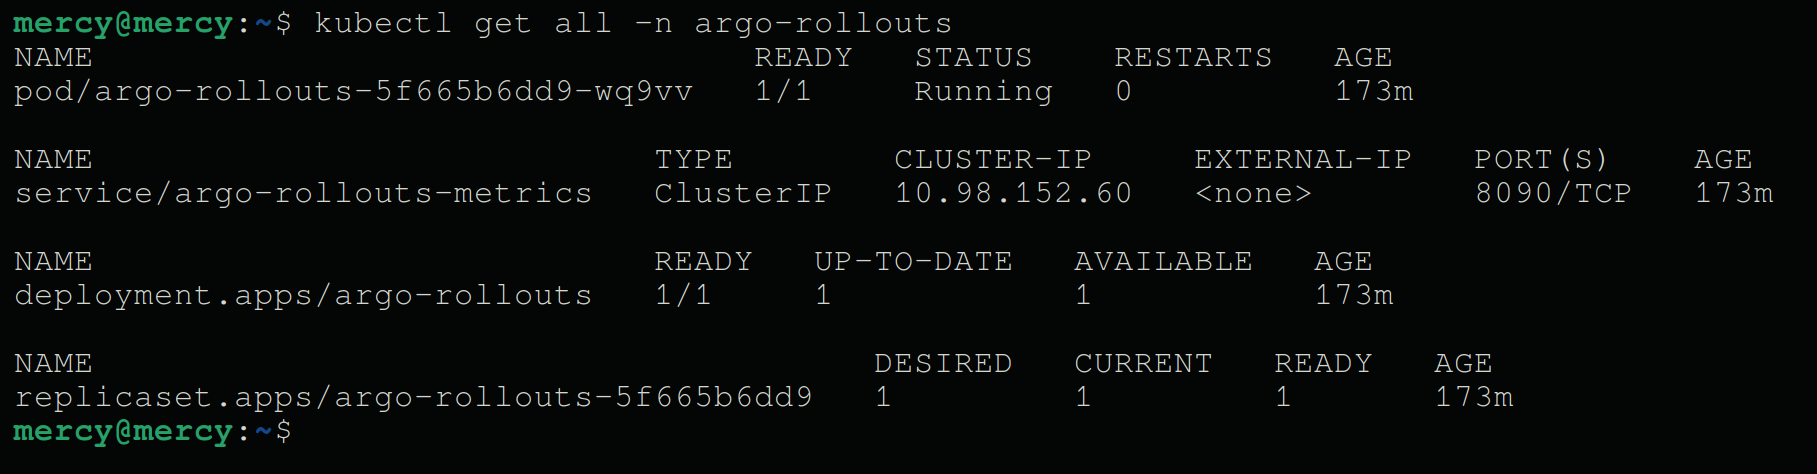
3. Now, run the following command to view (get) all resources and CRDs created by argo-rollouts are running.
kubectl get all -n argo-rolloutsIf everything is installed and running, you’ll see the following output.
Configuring Argo Rollouts for Managing Application Deployments
With Argo Rollouts resources in place, you’ll define a resource that provides additional fields for managing deployment strategies like blue-green or canary—a Rollout resource.
To use Argo Rollouts for managing your application deployments, proceed with these steps to configure a Rollout resource:
1. Create a YAML file named rollout.yaml and add the following configuration settings.
This configuration creates a Rollout resource that implements a blue-green deployment strategy. This deployment uses the same custom NGINX image (mercybassey/nginx:v1) as in the “Preparing the Blue Deployment” section.
# Define the API version and kind for the Rollout resource.
apiVersion: argoproj.io/v1alpha1
kind: Rollout
metadata:
  # Specify the name of the Rollout resource.
  name: nginx-rollout
  # Define the namespace for the Rollout resource.
  namespace: default
spec:
  # Set the desired number of replicas for the NGINX Rollout to 3.
  replicas: 3
  selector:
    matchLabels:
      # Define the labels to match the pod selection.
      app: nginx
  template:
    metadata:
      labels:
        # Apply labels to the pods managed by this Rollout.
        app: nginx
    spec:
      containers:
      - name: nginx
        # Define the NGINX container image to use for the Rollout.
        image: mercybassey/nginx:v1
        ports:
        - containerPort: 80
  strategy:
    # Specify the Blue-Green deployment strategy.
    blueGreen:
      # Define the active service to direct traffic to the stable version of NGINX.
      activeService: nginx-active
      # Define the preview service to direct traffic to the new version of NGINX for testing.
      previewService: nginx-preview
      # Specify whether auto-promotion of the new version is enabled (false in this case).
      autoPromotionEnabled: false
2. Next, create another file called active-service.yaml and populate the configuration settings below, which defines a Kubernetes Service named nginx-active.
# Define the API version and kind for the Service resource.
apiVersion: v1
kind: Service
metadata:
  # Specify the name of the Service resource.
  name: nginx-active
spec:
  # Define the selector to identify the pods to which the service will route traffic.
  selector:
    # Select pods with the label 'app: nginx'.
    app: nginx
  # Define the port configuration for the service.
  ports:
  -
    # Specify the protocol used for the port (TCP).
    protocol: TCP
    # Specify the port number on which the Service will listen for incoming traffic.
    port: 80
    # Specify the port on the pods to which traffic will be forwarded.
    targetPort: 80
3. Create one more file called preview-service.yaml and put in the same configuration from step two, but with a different name (nginx-preview) as follows.
Like the active service, this service also targets pods with the label app: nginx. But Argo Rollouts uses this service to route traffic to the new application version when you’re testing or gradually rolling out changes.
metadata:
  name: nginx-preview
4. Now, run the following commands to apply configurations from each newly created YAML file to your Kubernetes cluster.
kubectl apply -f rollout.yaml
kubectl apply -f active-service.yaml
kubectl apply -f preview-service.yaml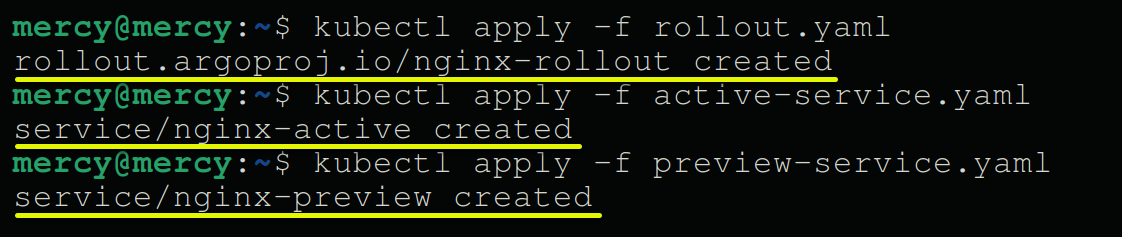
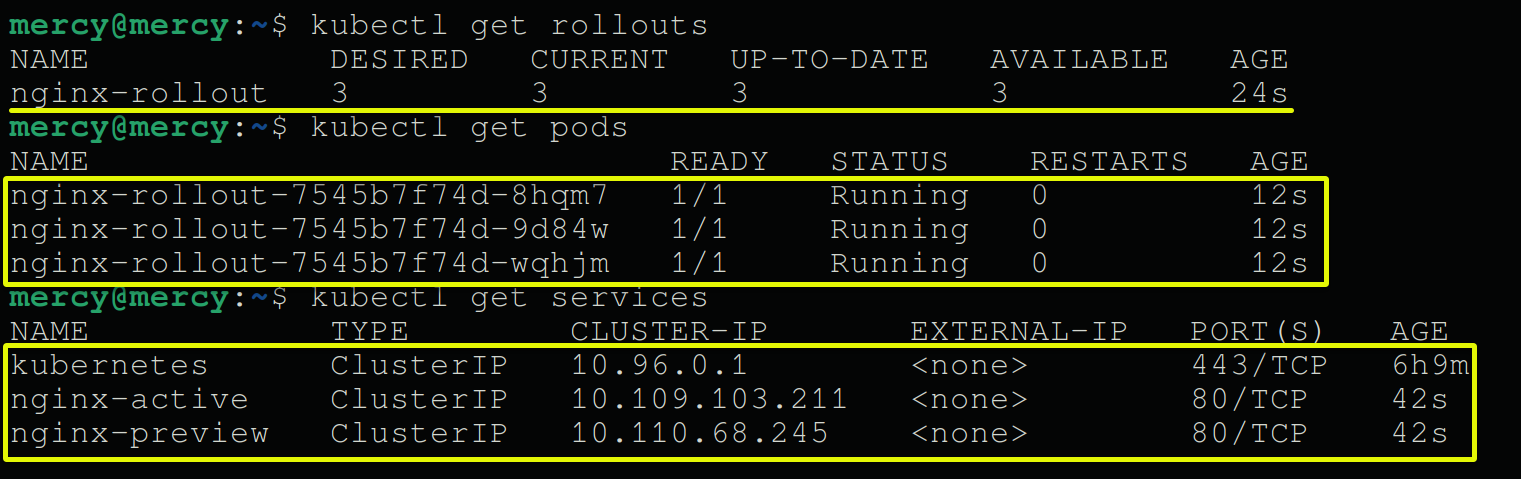
5. With configurations applied, run these commands to view the rollouts resource, pods, and services.
kubectl get rollouts
kubectl get pods
kubectl get services
Jot down the IP addresses for both the nginx-active and nginx-preview services.
6. Afterward, execute the below command to run curl within a pod.
kubectl run curl --image=radial/busyboxplus:curl -i --tty
curl within a pod7. Next, run the following commands to test the active and preview services.
Remember to substitute the placeholders <nginx-active-service-ip> and <nginx-preview-service-ip> with the ones you noted in step five.
curl http://<nginx-active-service-ip>
curl http://<nginx-preview-service-ip>
💡 In Argo Rollouts’ blue-green deployment, the preview service routes traffic to new versions for testing before they go live. Initially, with one version deployed, both active and preview services direct traffic to the same pods. After updating, the preview service enables testing of the new version before manual promotion to active status.
curl
curlInstalling the Argo Rollouts Kubernetes CLI Plugin
When you’re knee-deep in orchestrating your Kubernetes environment, having the right tools at your fingertips is crucial. For instance, how do you keep a handle on your Argo Rollouts deployments? The Argo Rollouts Kubernetes CLI extends kubectl with additional commands to interact with Argo Rollouts resources.
The Argo Rollouts Kubernetes CLI plugin is only available for Linux and Mac OS but provides detailed information about your rollouts’ status, history, and configuration.
To leverage additional commands tailored for your Argo Rollouts resources, carry out the following:
Exit out of the curl pod (if you haven’t yet), and run each command below to install the Argo Rollouts Kubernetes CLI plugin.
💡 If you’re not on a Linux distro, visit the official documentation for installing the Argo Rollouts Kubernetes CLI plugin.
# Download the kubectl-argo-rollouts binary for Linux (latest release on GitHub).
curl -LO https://github.com/argoproj/argo-rollouts/releases/latest/download/kubectl-argo-rollouts-linux-amd64

# Make the kubectl-argo-rollouts binary executable.
chmod +x ./kubectl-argo-rollouts-linux-amd64

# Move the binary to a directory included in your system's PATH.
sudo mv ./kubectl-argo-rollouts-linux-amd64 /usr/local/bin/kubectl-argo-rollouts
Once installed, execute the command below to view the current status of your rollout.
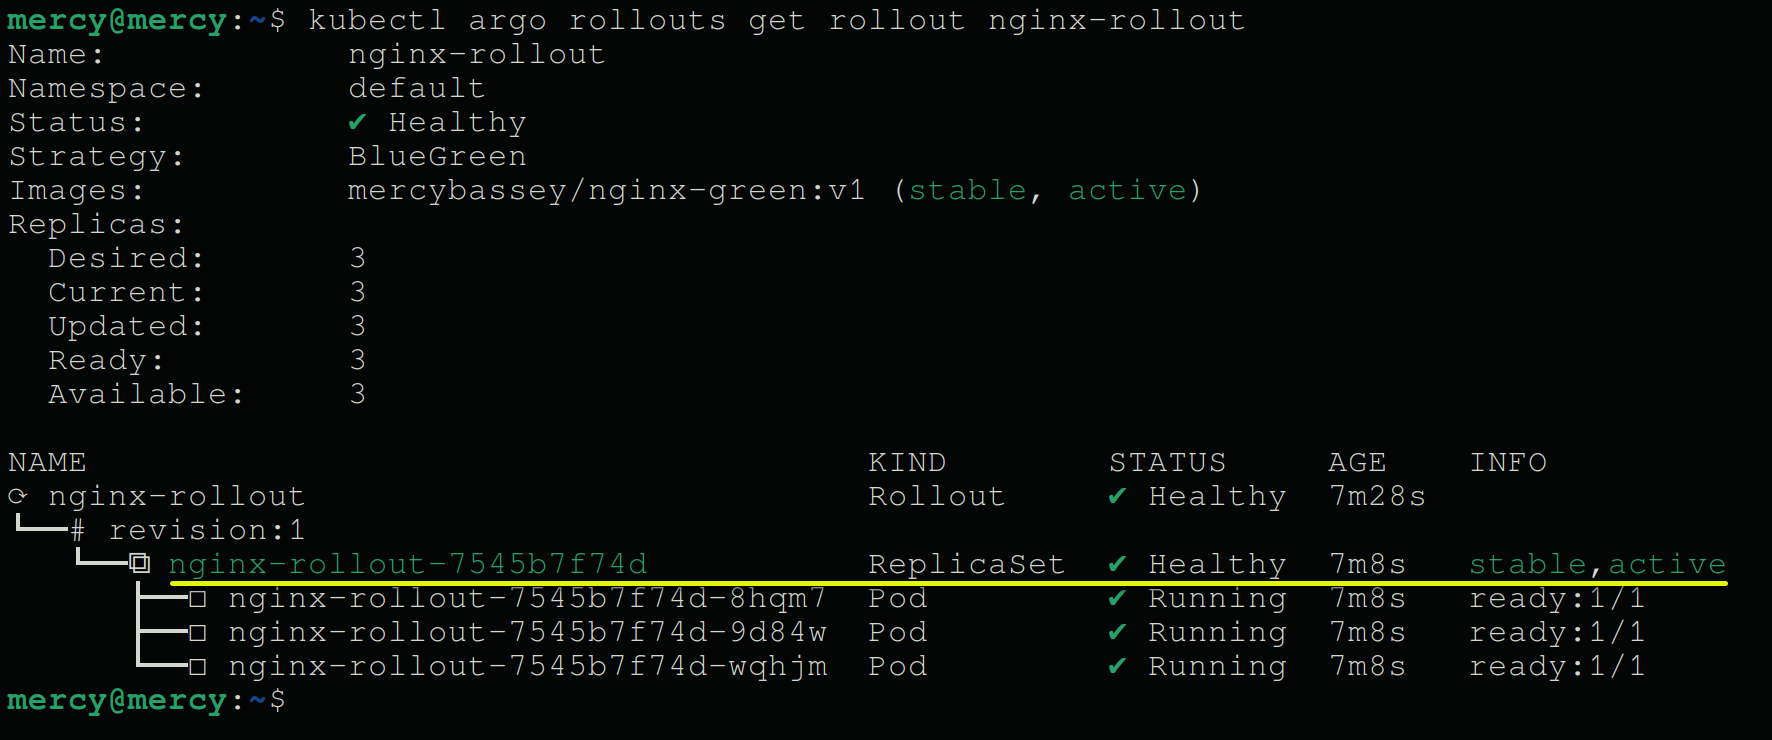
kubectl argo rollouts get rollout nginx-rolloutThe output below shows the current revision, the rollout name, and the ReplicaSet marked as the stable and active version with a Healthy status.
Initiating an Update for a Seamless Version Switching
With the installed Argo Rollouts Kubernetes CLI plugin, you can seamlessly transition between different application versions without skipping a beat. But first, you must initiate an update for a blue-green deployment strategy.
To set up for a seamless application version switching, perform the following:
1. Edit the rollout configuration settings in the rollout.yaml file to use an NGINX container (i.e., mercybassey/nginx:v1), as shown below.
spec:
containers:
# Define the container named nginx.
- name: nginx
# Specify the NGINX container image to be used.
image: mercybassey/nginx:v1
ports:
# Define the port configuration for the container.
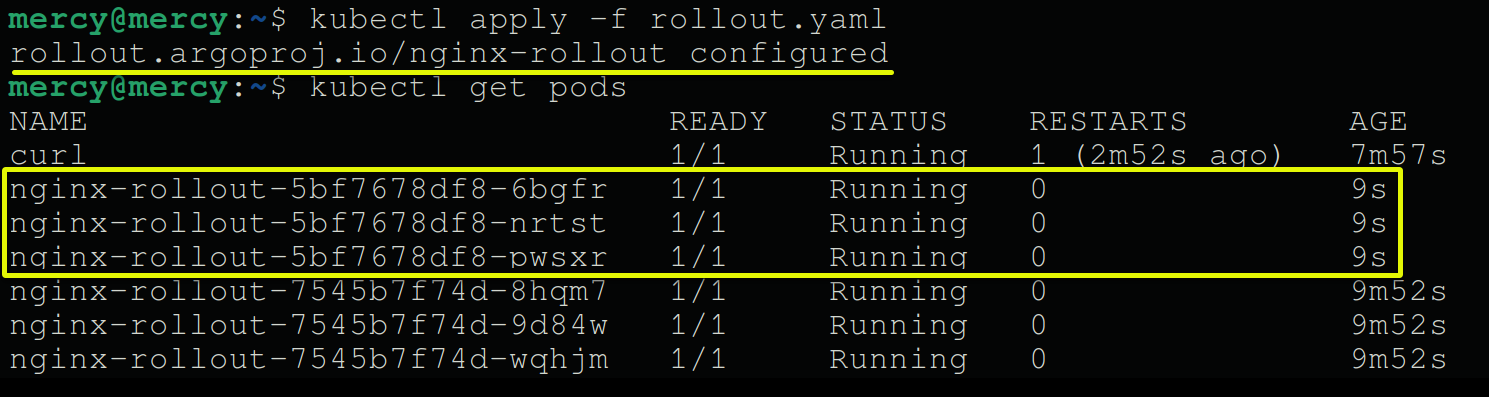
- containerPort: 802. Next, apply the configuration changes you made in the rollout.yaml file, and get all running pods.
kubectl apply -f rollout.yaml
kubectl get pods
Below, you can see additional pods created.
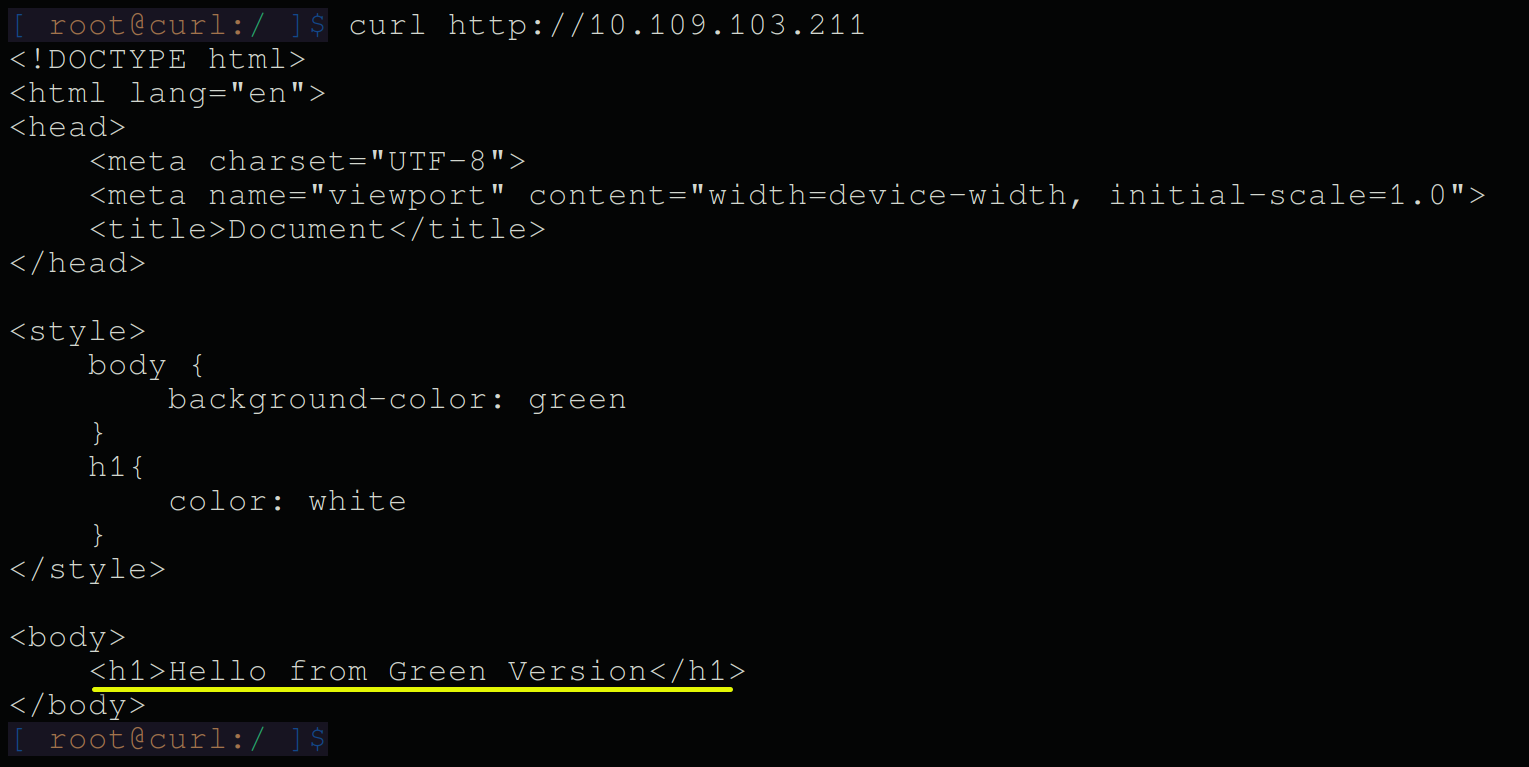
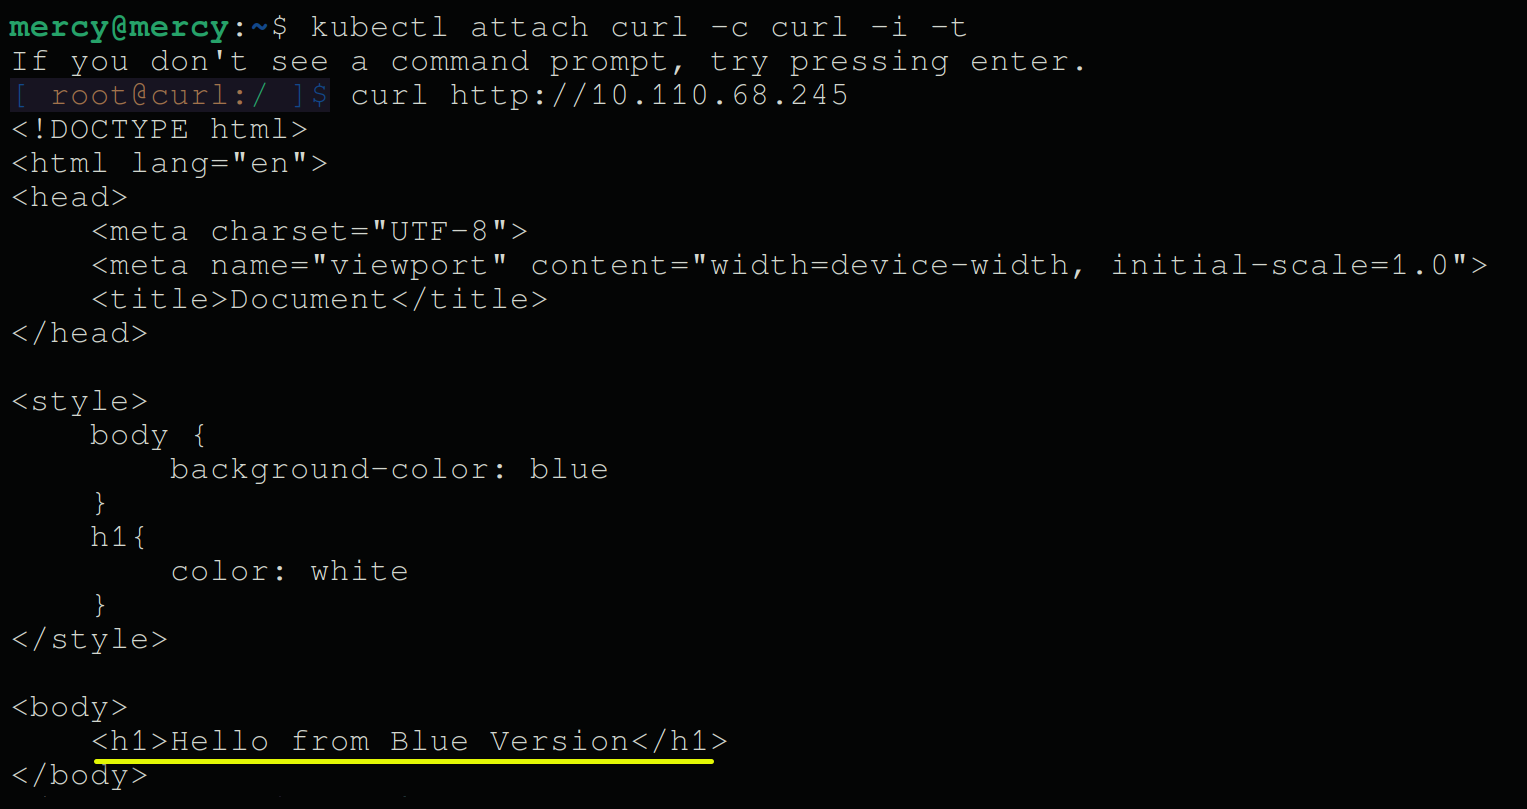
3. With the changes applied, run each command below to test connectivity and responses from the preview and active services.
Replace the placeholders <nginx-preview-service-ip> (i.e., 10.110.68.245), and <nginx-active-service-ip> (i.e., 10.109.103.211), accordingly.
kubectl attach curl -c curl -i -t
curl http://<nginx-preview-service-ip>
curl http://<nginx-active-service-ip>
The output below shows the nginx-preview service routes to the new pods (blue version).
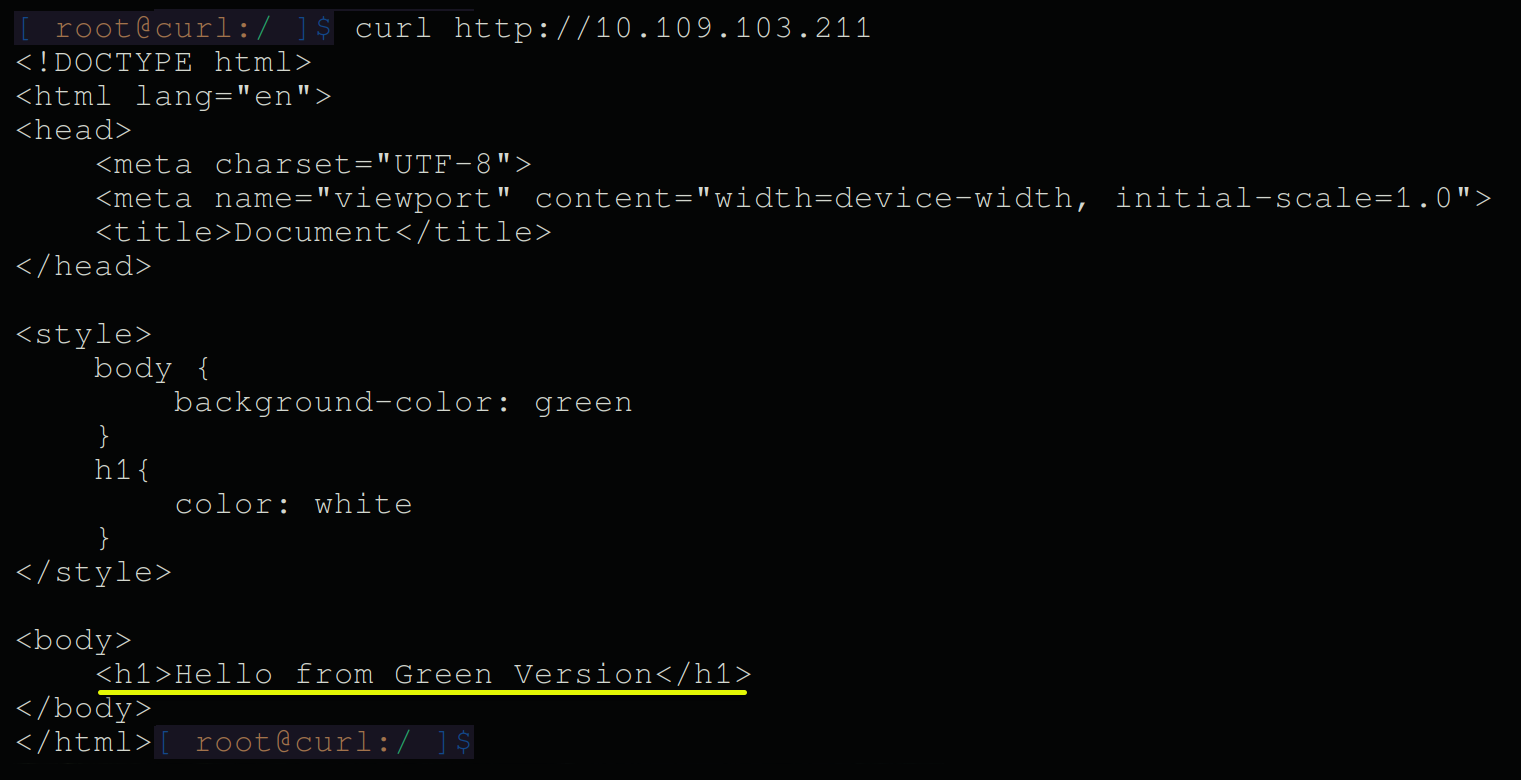
Notice the nginx-active service below routes to the previous deployment (revision 1).
This result is expected since you’ve not promoted the newly created pods (revision 2) yet to stand as the active rollout, which you’ll work on in the following section.
4. Now, exit out of the curl pod and execute the command below to view (get) the current status of the rollout.
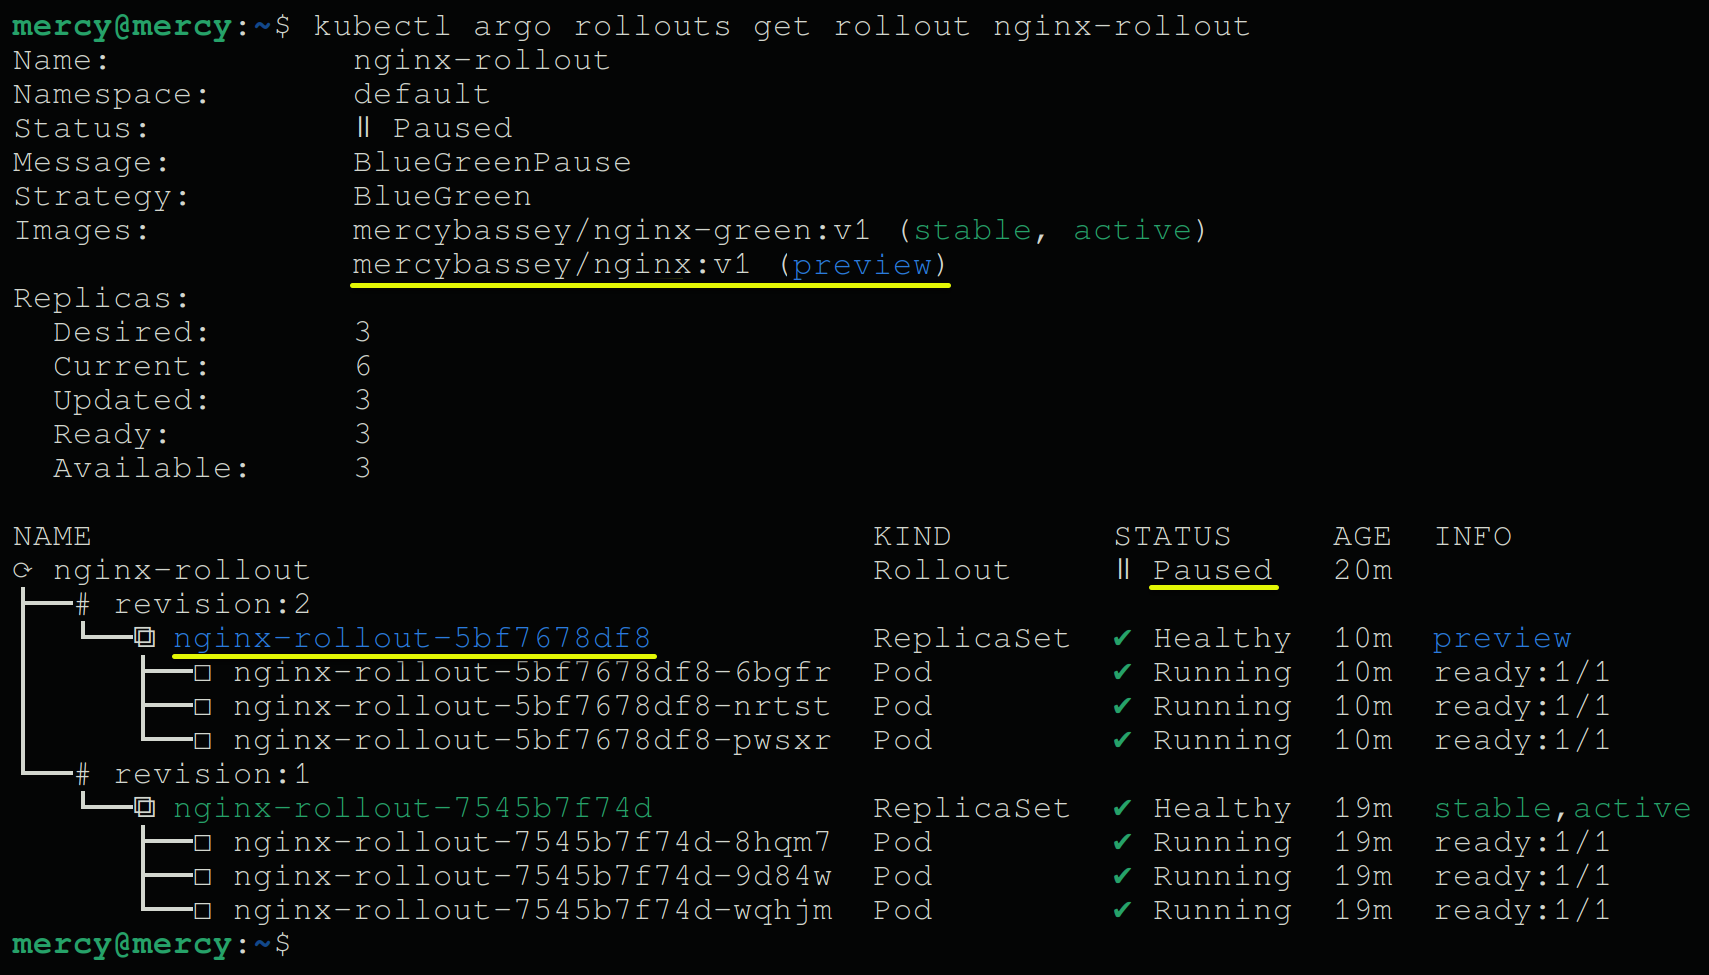
kubectl argo rollouts get rollout nginx-rolloutYou’ll see the following output, which displays the update (revision:2) in blue.
Notice the replica set of revision:2 as the preview, indicating that no traffic is routed to it yet (inactive), and the status is marked as Paused.
Promoting and Rolling Back Updates to Switch Application Version
After initiating an update, you’re ready for version switching, which helps ensure the stability and reliability of your application. Using the Argo Rollouts Kubernetes CLI plugin, you’ll promote and roll back updates to quickly switch between application versions.
To see how version switching works, proceed with the following:
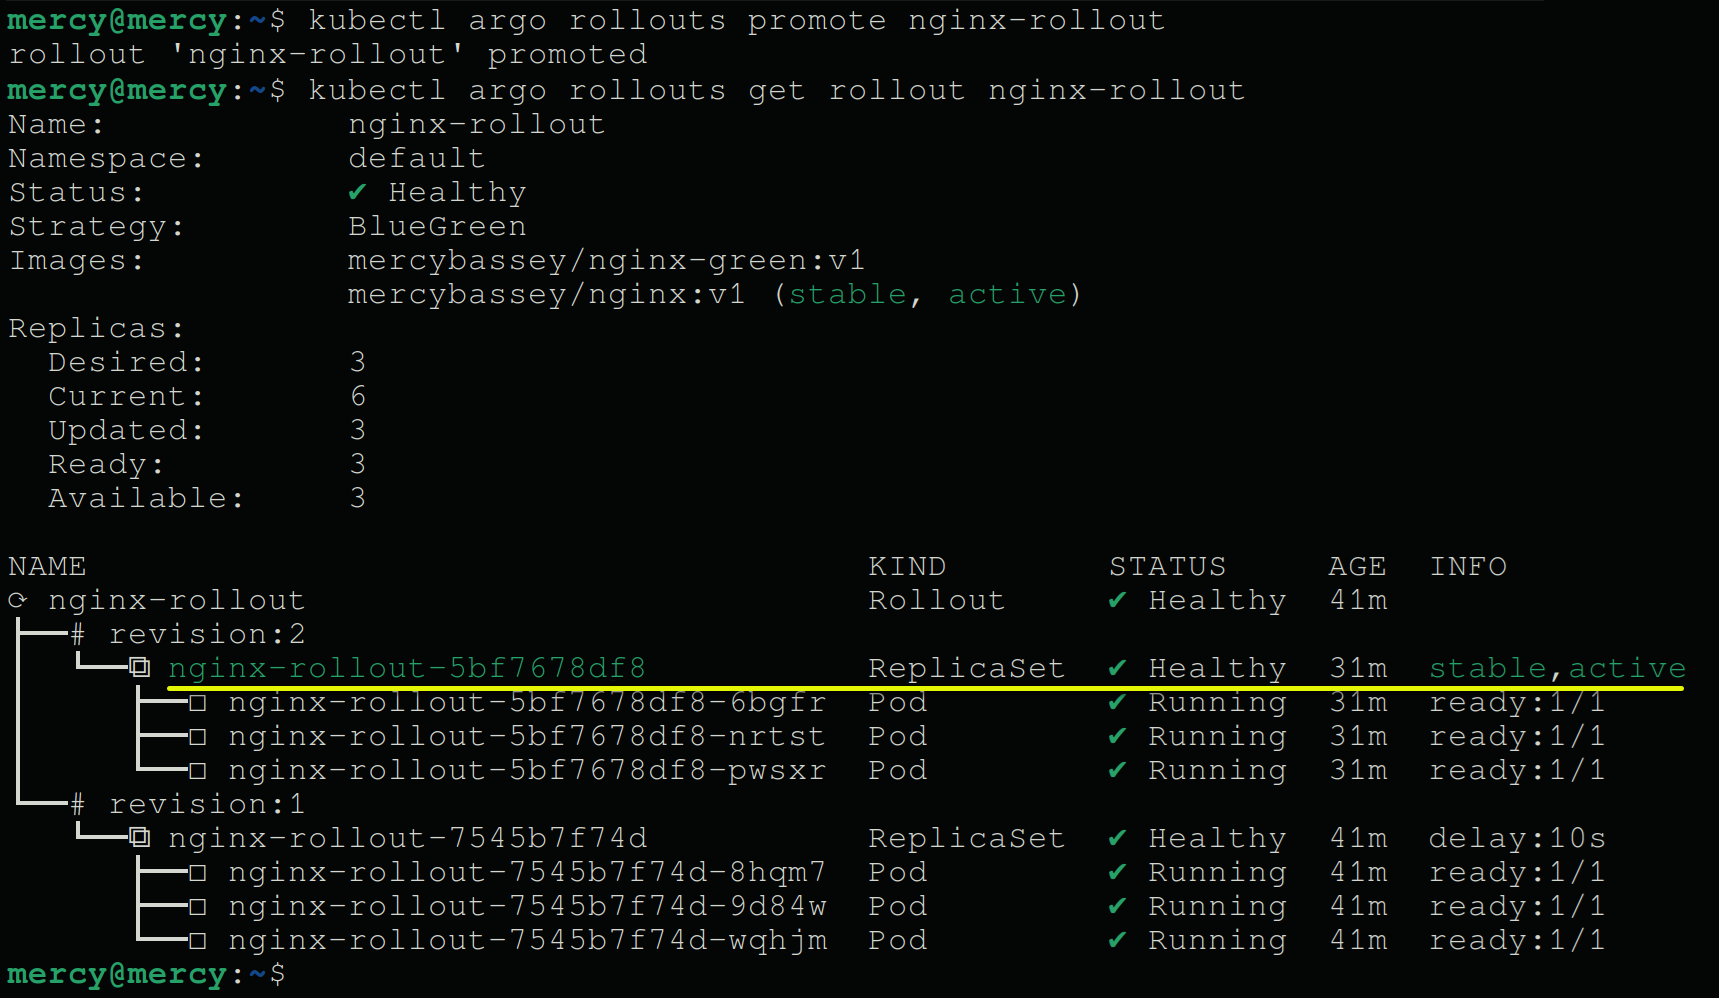
Execute the commands below to promote the update you initiated (nginx-rollout) and view the rollout status.
kubectl argo rollouts promote nginx-rollout
kubectl argo rollouts get rollout nginx-rollout
The output below confirms the new update is now the active and stable version (converted to green).
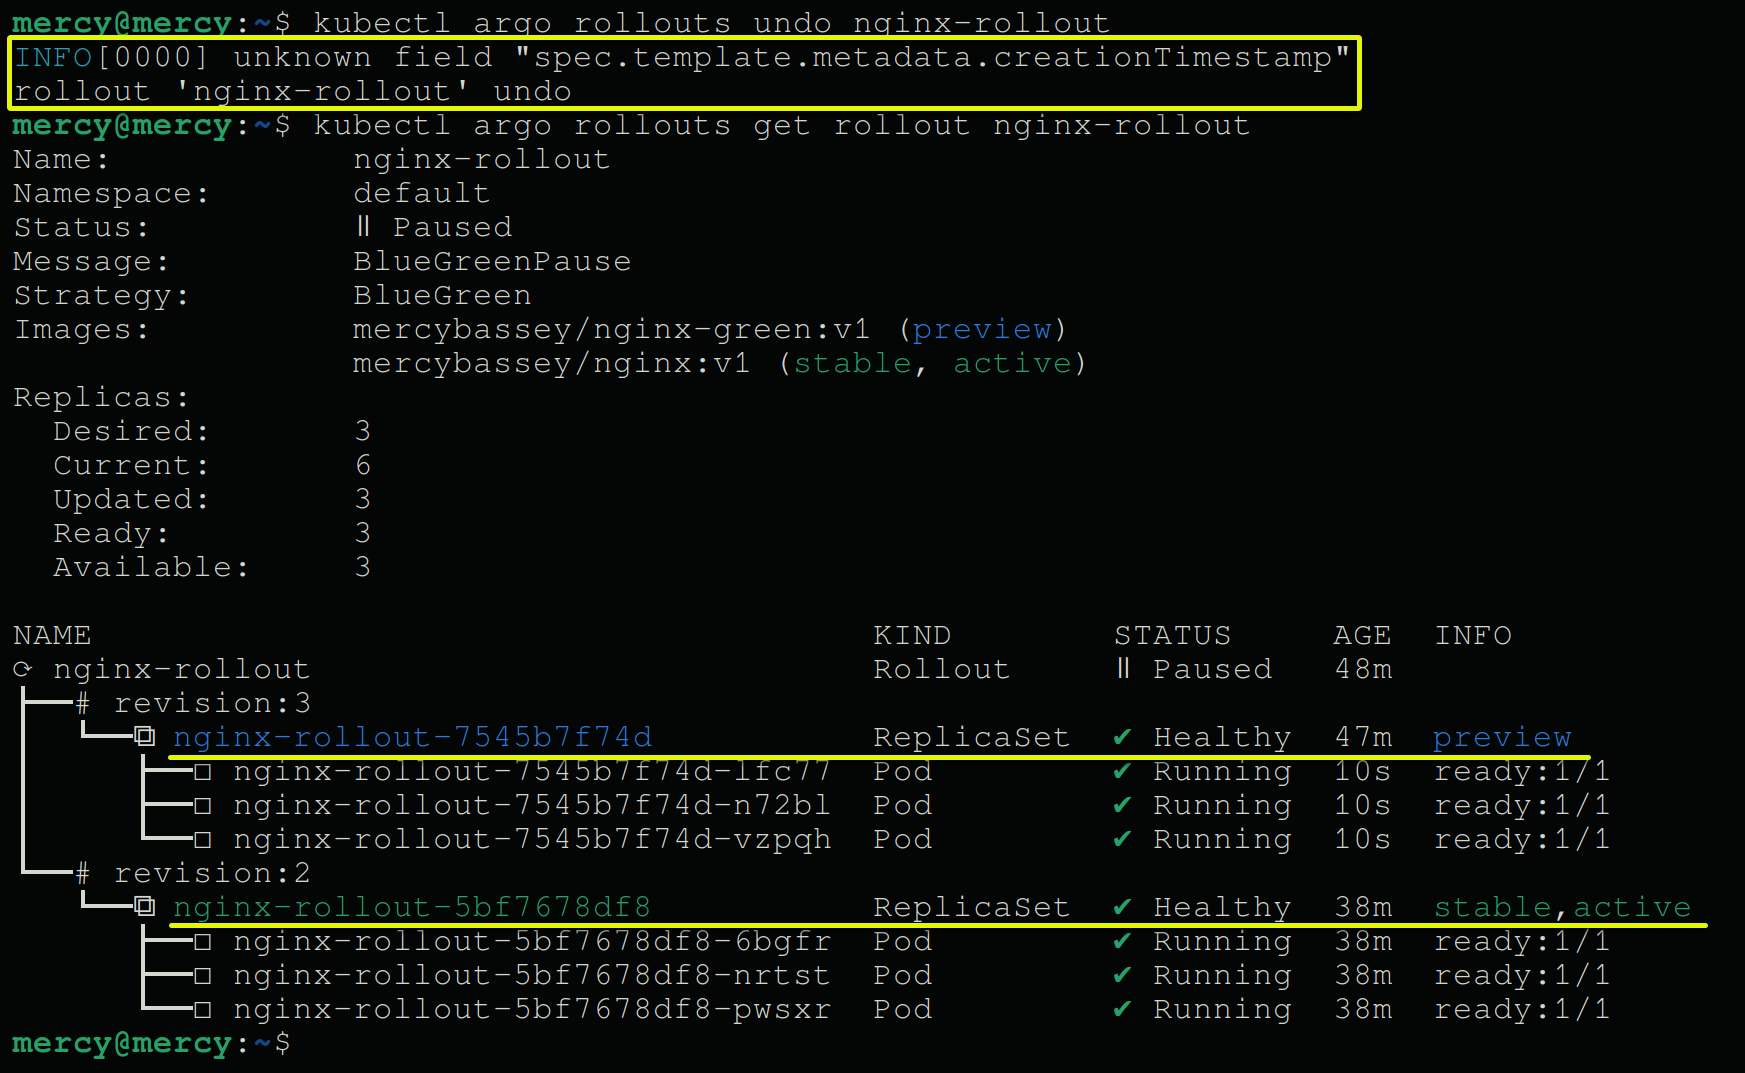
Now, execute the following commands to undo the update to roll back to the previous version and view the rollout status.
kubectl argo rollouts undo nginx-rollout
kubectl argo rollouts get rollout nginx-rollout
Undoing the update makes the active service the preview service (converted to blue) and the previous deployment the active service (converted to green).
💡 Perhaps you prefer to rollback to a specific application version. If so, append the
--to-revisionflag and specify the revision number as follows:
kubectl argo rollouts undo <rollout-name> --to-revision=<revision-number>
Conclusion
Throughout this tutorial, you’ve delved into the ins and outs of setting up and configuring Kubernetes Blue-Green deployments and getting hands-on with Argo Rollouts. Besides preparing deployments, you can now seamlessly switch between application versions.
You’ve initiated updates for seamless version switching and mastered the art of promoting and rolling back updates to switch application versions. At this point, smoother transitions and minimized downtime are now at your fingertips.
Now, why not explore advanced strategies for managing traffic between different application versions? Dive into canary deployments and traffic splitting, and let a small subset of users receive the new version for testing before a full rollout.


