


Did you receive a video with those annoying black bars on the side? Do you wonder how you could change the orientation and remove those black bars? Or maybe you want to create a montage of your favorite pictures and make a music video. You can do all that for free when you install FFmpeg.
Not a reader? Watch this related video tutorial!In this guide, you will learn to install FFmpeg and how to use it by following many examples. By the end, you’ll have acquired the foundation to start converting and altering media files!
Prerequisites
This tutorial will be a hands-on demonstration. If you’d like to follow along, be sure you have the following.
- You’ll need a computer running on a compatible operating system, such as Windows, Linux (RHEL-based, Debian-based, or Ubuntu-based), and macOS. This tutorial will be using Ubuntu 20.04, Windows 10, and macOS Big Sur for the installation.
While the installation method varies, FFmpeg usage should be the same across different operating systems.
- Your computer must have at least 4GB of RAM and a two-core CPU. Multimedia processing is generally a resource-intensive task. As such, your computer must have decent hardware capacity.
Installing FFmpeg on Ubuntu
FFmpeg is available in the default repositories of most Linux distributions. Conveniently, you can install FFmpeg through your distro’s package manager, such as apt in Ubuntu.
To install FFmpeg on Ubuntu, follow these steps:
1. SSH into your Ubuntu server and update the apt package index.
sudo apt update -y2. Next, install FFmpeg and all the necessary libraries.
apt install ffmpeg -y3. Finally, check the FFmpeg version you installed.
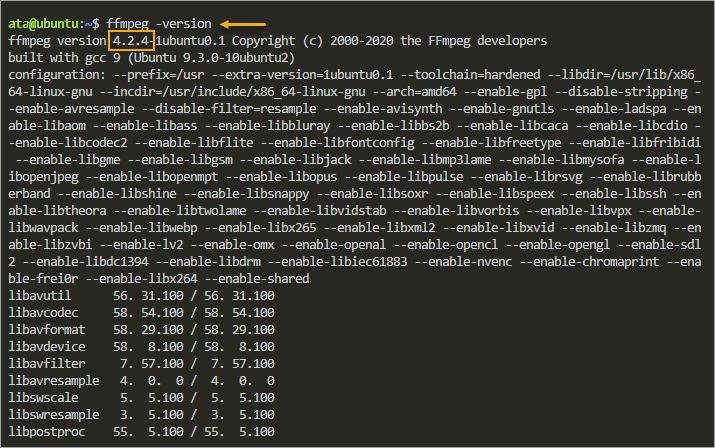
ffmpeg -versionYou will see an output similar to the following screenshot. Your version may be different.
Installing FFmpeg on Windows 10
So far, you have learned how to install FFmpeg on Ubuntu. Now, know two ways to install FFmpeg on Windows 10 in this section.
Method 1: Install FFmpeg via PowerShell
This method gives you more control over where to download and install FFmpeg on your computer. Best of all, you’ll perform everything within PowerShell.
To install FFmpeg on Windows 10, follow these steps.
1. Open a PowerShell as administrator on your computer.
2. Create the folder where you’ll download and install FFmpeg. This command creates the folder C:\ffmpeg.
New-Item -Type Directory -Path C:\ffmpeg ; Set-Location C:\ffmpeg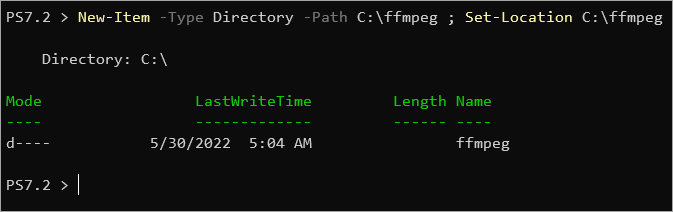
3. Run the below command to download the latest FFmpeg release for Windows. This command saves the file as ffmpeg.zip.
curl.exe -L 'https://www.gyan.dev/ffmpeg/builds/ffmpeg-release-essentials.zip' -o 'ffmpeg.zip'
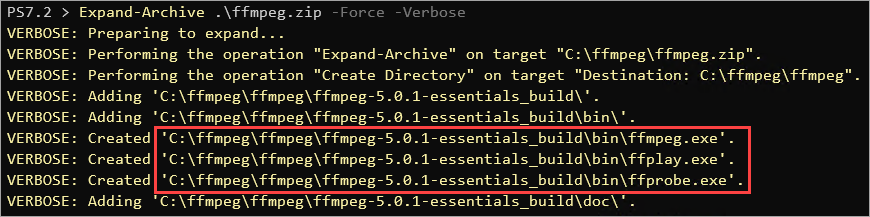
4. After downloading, extract the ffmpeg.zip file to the current directory. To do so, run the Expand-Archive command below.
# Expand the Zip
Expand-Archive .\ffmpeg.zip -Force -Verbose
As you can see, the command extracted all files from the zip file. The only files you’ll need are the executable files.
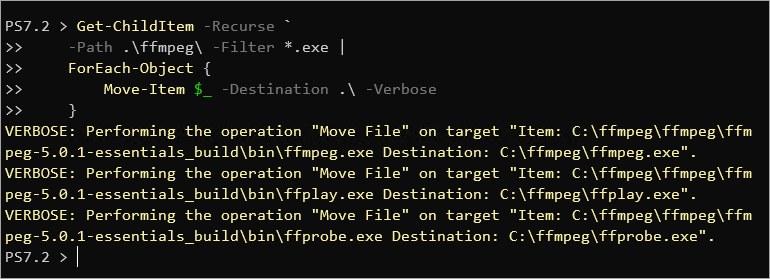
5. Move the executable files to the top folder for simplicity and quick access.
# Move the executable (*.exe) files to the top folder
Get-ChildItem -Recurse `
    -Path .\ffmpeg\ -Filter *.exe |
    ForEach-Object {
        Move-Item $_ -Destination .\ -Verbose
    }
6. Now, clean up the FFmpeg directory by deleting the unnecessary files and folder.
# Clean up
Remove-Item .\ffmpeg\ -Recurse
Remove-Item .\ffmpeg.zip
# List the directory contents
Get-ChildItem
At this point, only the executable files remain

7. Now, prepend the C:\ffmpeg folder to the system path environment variable. This step ensures that you can run the ffmpeg.exe command from any directory without specifying the full path.
# Prepend the FFmpeg folder path to the system path variable
[System.Environment]::SetEnvironmentVariable(
    "PATH",
    "C:\ffmpeg\;$([System.Environment]::GetEnvironmentVariable('PATH','MACHINE'))",
    "Machine"
)
8. For the new system variables to take effect, perform either one of the two options below.
Note: You only need to do either option once. Every subsequent PowerShell or CMD session will pick up the environment variables automatically.
Option 1: Close your current PowerShell session and open a new one.
Option 2: Run the below command in the current PowerShell session to import the machine’s PATH variable into the current session.
$env:Path = [System.Environment]::GetEnvironmentVariable("Path","Machine")9. Finally, check the FFmpeg version by running the below command.
ffmpeg -versionAs you can see, you don’t need to specify the full path of the ffmpeg.exe executable file due to what you did in steps 5 and 6.

Method 2: Install FFmpeg via Chocolatey
Since Windows 10 does not have a default package manager like Ubuntu’s apt, an excellent alternative is to use Chocolatey.
Follow the steps below to install FFmpeg via Chocolatey.
1. If you don’t have Chocolatey yet, open an elevated PowerShell terminal and run the following code to install.
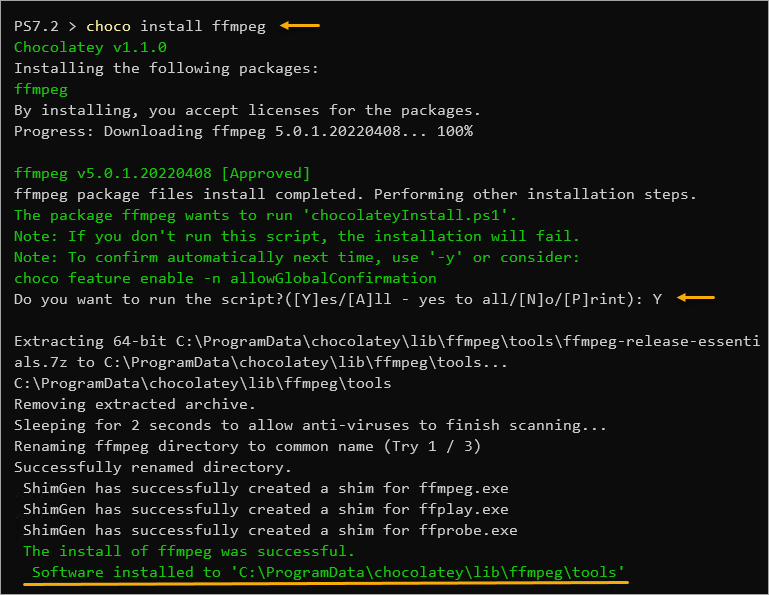
Set-ExecutionPolicy Bypass -Scope Process -Force; [System.Net.ServicePointManager]::SecurityProtocol = [System.Net.ServicePointManager]::SecurityProtocol -bor 3072; iex ((New-Object System.Net.WebClient).DownloadString('https://community.chocolatey.org/install.ps1'))2. After installing Chocolatey, close your current PowerShell window and reopen a new one. On your new PowerShell window, run the following command to install FFmpeg.
choco install ffmpegType Y and press Enter at the confirmation prompt.
3. Finally, check the FFmpeg version you installed.
ffmpeg -version
Installing FFmpeg on macOS
If you’re using a macOS computer, the most convenient way to install FFmpeg is through Homebrew. Homebrew is a package manager for macOS but does not come out of the box.
1. Open a terminal window on your macOS computer.
2. If you don’t have Homebrew yet, run the below command to install it on your computer.
/bin/bash -c "$(curl -fsSL https://raw.githubusercontent.com/Homebrew/install/HEAD/install.sh)"3. Once you’ve installed Homebrew, run the below command in the terminal to install FFmpeg.
brew install ffmpeg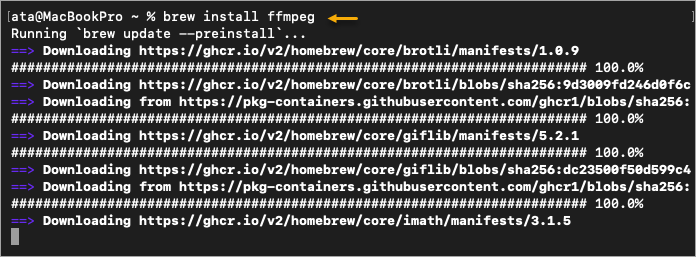
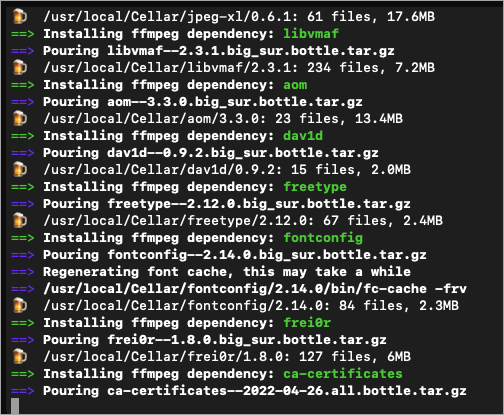
As you can see below, Homebrew automatically detects and installs every FFmpeg dependency.
Installing FFmpeg on macOS could take several minutes, especially when many dependencies are missing. Be patient.
4. Finally, check your version of FFmpeg by running the below command.
ffmpeg -version
Listing Available Encoders and Decoders
FFmpeg is known for its media processing capabilities, especially in converting media formats. Converting media files between different formats involves encoding and decoding. What enables FFmpeg to convert media files are the encoders and decoders.
These encoders and decoders determine which media file formats FFmpeg can process. How do you know which encoders and decoders come with FFmpeg?
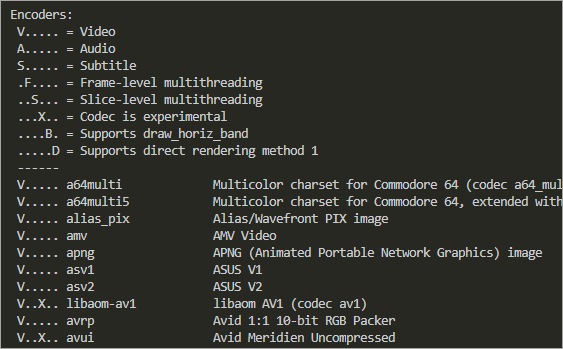
To display the list of encoders or decoders, run the commands below.
# Show encoders
ffmpeg -encoders
# Show decoders
ffmpeg -decoders
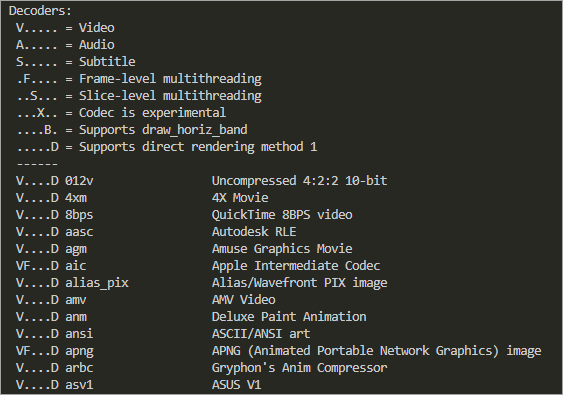
The below screenshots show only a portion of the available encoders and decoders. The legend at the beginning indicates whether the encoder supports video, audio, subtitles, etc.
Extracting Media File Information
After installing FFmpeg, the first thing you will want to do is to get the essential information about a media file. This information includes the duration of a video or which codecs were used during an audio file encoding.
To get a file’s media information, run the below command. Ensure to provide the correct filename after the -i option. The -f null – flag prevents FFmpeg from encoding the output to a file, where null means no file format and – means no filename.
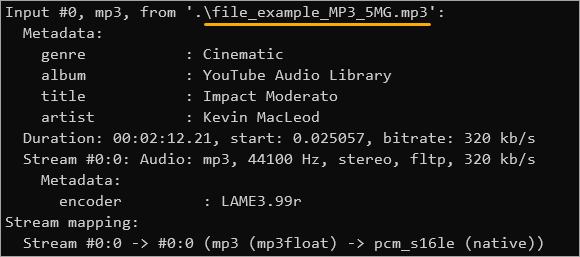
This example uses a sample MP3 file named file_example_MP3_5MG.mp3 downloaded from this link.
ffmpeg -i .\\file_example_MP3_5MG.mp3 -f null -
As you can see, the input file information shows the metadata, bitrate, duration, and container format, among others.
Converting Media Files with FFmpeg (Examples)
Suppose you have a WEBM video file that you want to watch on your smart TV. But your TV does not support the WEBM format. You can use FFmpeg to convert the WEBM file to a format that your TV supports, such as MP4.
This example uses a sample video file called file_example_WEBM_1920_3_7MB.webm downloaded from this link.
Example 1: Basic Conversion with Automatic Codec Selection
The command is as follows to perform a basic conversion of a video format. This command takes file_example_WEBM_1920_3_7MB.webm as the input, converts it, and saves the output file file_example_MP4_1920_3_7MB.mp4.
ffmpeg -i file_example_WEBM_1920_3_7MB.webm file_example_MP4_1920_3_7MB.mp4
Notice that you didn’t have to specify the output format? Because FFmpeg recognized the format since MP4 is well-known and uses the correct codecs and encoders.
Example 2: Changing the Container without Encoding
In some cases, you may want to change a file container into another without re-encoding the video or audio streams. One reason could be that you’ve already encoded the streams correctly but chose the wrong container in the first place.
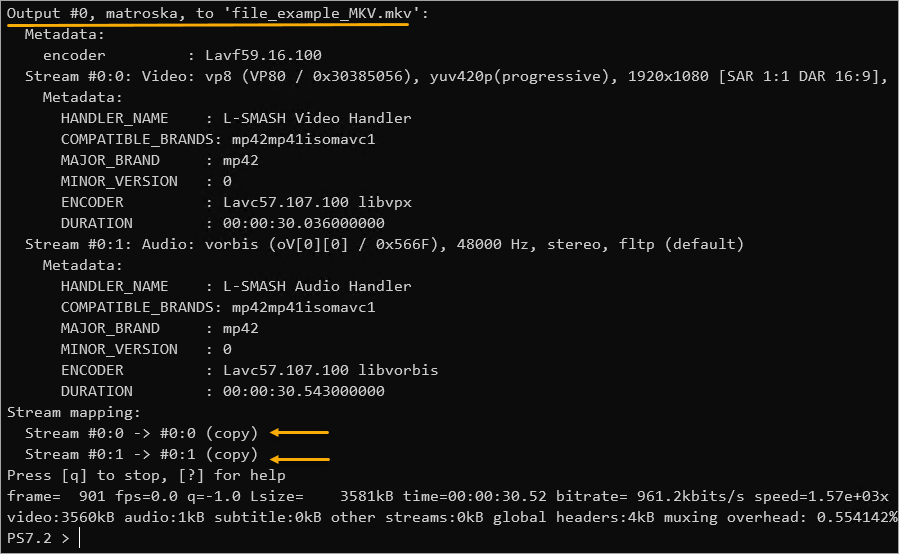
To change contains without transcoding, run the below command. This command uses the -c:a copy and -c:v copy options to copy the audio and video streams from a WEBM into an MKV container.
ffmpeg -i file_example_WEBM_1920_3_7MB.webm -c:v copy -c:a copy file_example_MKV.mkv
Example 3: Changing the Video Resolution
What you are mainly playing videos on a small screen, perhaps on a mobile phone. Smaller screens may have fewer benefits with higher video resolutions, such as 1920×1080, and bigger file sizes.
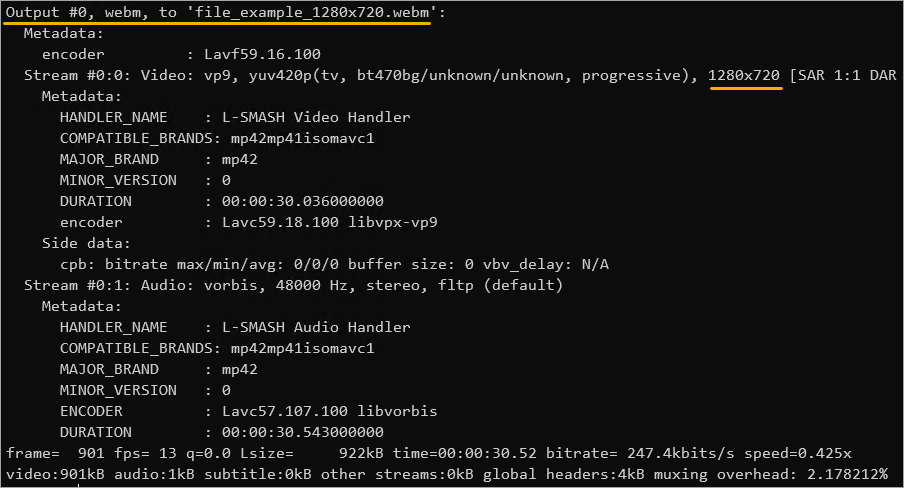
In such cases, FFmpeg can resize a video to a smaller resolution, like 1280×720. To do so, run the following command. This command uses the -c:a copy option to copy the audio stream (without conversion), and the -s 1280×720 option specifies the output video resolution.
ffmpeg -i file_example_WEBM_1920_3_7MB.webm -c:a copy -s 1280x720 file_example_1280x720.webm
Example 4: Extracting Audio from a Video File
You can also use FFmpeg to extract the audio from a video file. This FFmpeg usage is widespread for converting music videos or instructional videos to audio files like MP3 and OGG.
To extract the audio from a video file, run the below command. This command uses the -vn option to disable the video stream and save the output to an MP3 file.
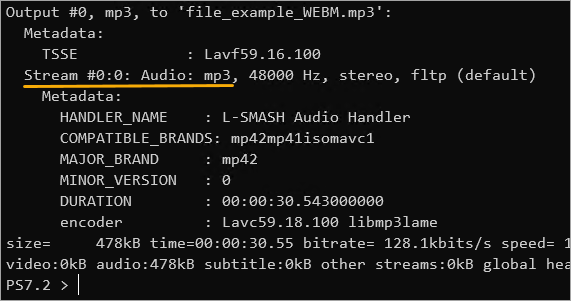
ffmpeg -i file_example_WEBM_1920_3_7MB.webm -vn file_example_WEBM.mp3
As you can see below, the input file had two streams; Stream#0:0 for video and Stream#0:1 for audio.
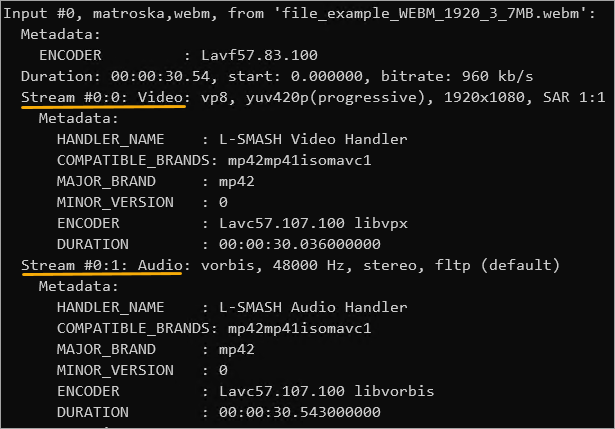
But the output only contains one stream, which is the audio-only since you’ve disabled the video stream.
Conclusion
FFmpeg is a powerful multimedia tool for converting media files between different formats and extracting audio from video files. This guide taught you how to install FFmpeg and used its command with several real-life examples.
With FFmpeg, you can make your media files work on any device or platform. So don’t be afraid to give it a try. Don’t stop here! There’s a lot more you can do with FFmpeg, like how to compress a large video file to save space or extract all the images from a movie to create a photo gallery.
For more ideas, check out the FFmpeg documentation. Thanks for reading, and happy learning!


