


As a developer, spending time performing repetitive is turns out unproductive in the long run. Why not automate your build, test, and deployment workflow with CI/CD technology? Make GitHub Actions Matrix Strategy your first choice, and run several tasks concurrently.
In this tutorial, you will learn how to set up your GitHub Actions Matrix Strategy and the different ways to apply them.
Ready? Make your life easier while GitHub Actions Matrix Strategy takes care of everything else!
Prerequisites
This blog post is a tutorial with various examples. To follow along, ensure sure you have the following in place:
- A GitHub account with a repository – To follow along use the code available in the ATA Scripts repository.
- Git installed and configured on your computer.
Setting up GitHub Actions Matrix Strategy
Before defining a GitHub Action matrix of several job setups, you must use strategy.matrix, define one or more variables in your matrix, followed by an array of values.
To set up a matrix strategy, follow these steps:
1. Create a .github/workflows folder in your local machine, which will hold your configuration files.
2. Next, create a .yml file with your preferred editor in the .github/workflows folder. You can name the .yml file as you like, but this tutorial uses the file name example.yml.
A YAML file defines GitHub Actions Workflows. This file is checked into your repository and runs manually or according to schedule when prompted by an event.
3. Populate the code below to the example.yaml file, save the changes and close the file.
This code runs six jobs, one for each combination of the os and version variables. Each job provides the current version value to the actions/setup-node action and sets the runs-on value to the current os value.
This example is a multi-dimensional matrix that can be created by specifying many variables. Every possible combination of the variables will result in a job running.
The maximum number of jobs that can run using the matrix strategy in a single workflow is 256.
name: Matrix Strategy Sample
on: push
# The trigger to which the workflow will run
jobs:
  example_matrix:
    strategy:
      matrix:
        os: [ubuntu-latest, windows-latest] # Defining Ubuntu and Windows OS
        version: [10, 12, 14] # Defining versions (three Node.js versions)
    runs-on: ${{ matrix.os }}
    steps:
      - uses: actions/setup-node@v3
        with: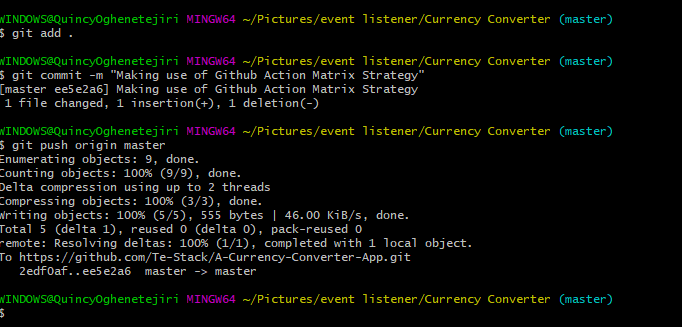
node-version: ${{ matrix.version }}4. Now, run each git command below to add, commit and push your code to your GitHub repository.
# Add to git
git add .
# Commit your code
git commit -m "Making use of Github Action Matrix Strategy"
# Push the code to your GitHub repository
git push origin masterThis tutorial uses the Git Bash terminal to run commands, but any terminal will work so long as you have Git installed and configured on your system.
After pushing the code to your GitHub repository, your workflow file (example.yml) runs to the trigger event. In this case, the trigger is “push.”
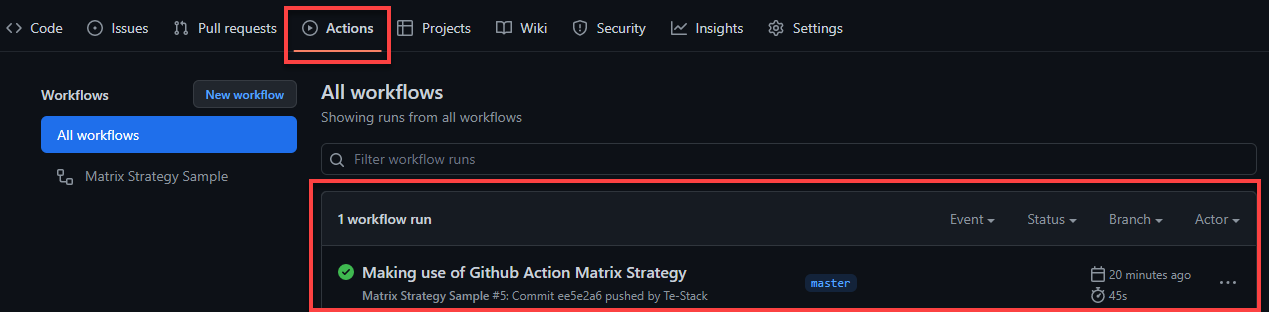
5. Open your web browser, log in to your GitHub account, navigate your repository, and click the Actions tab. The result will look exactly like in the screenshot below.
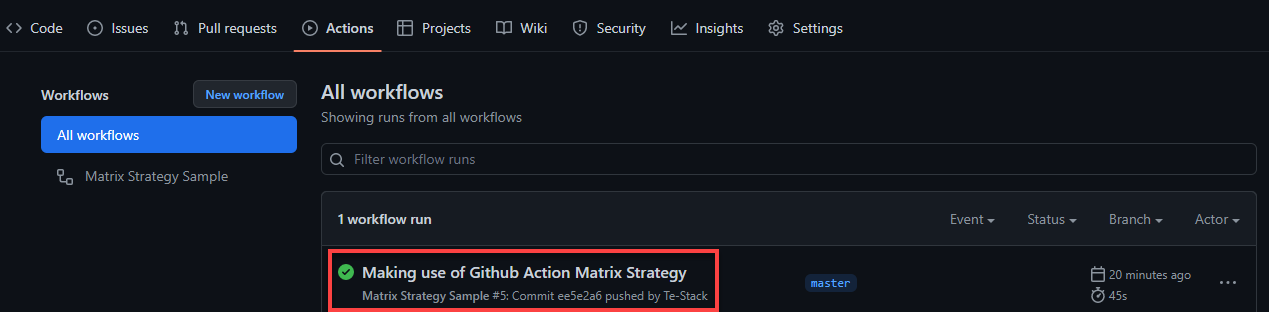
6. Lastly, click on the workflow you ran to see the details of the various jobs.
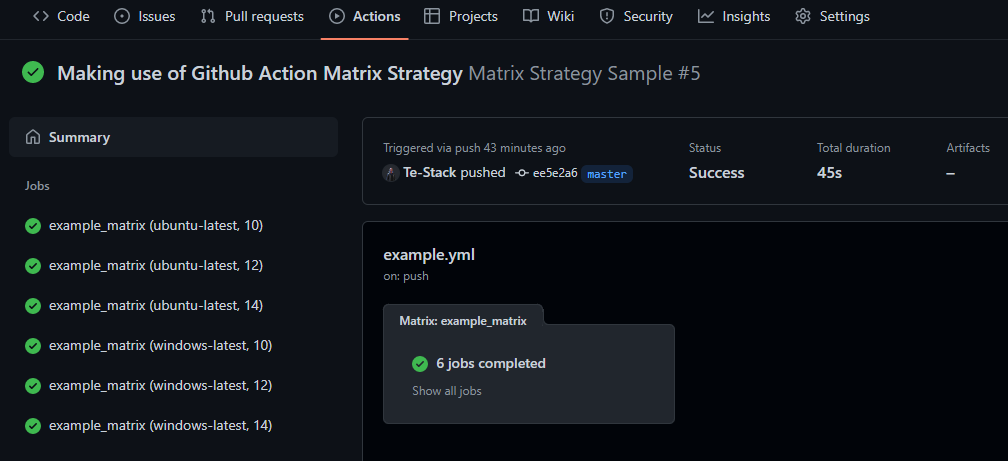
Below, you can see the jobs that were previously run and completed.
Defining the Maximum Number of Jobs to Run
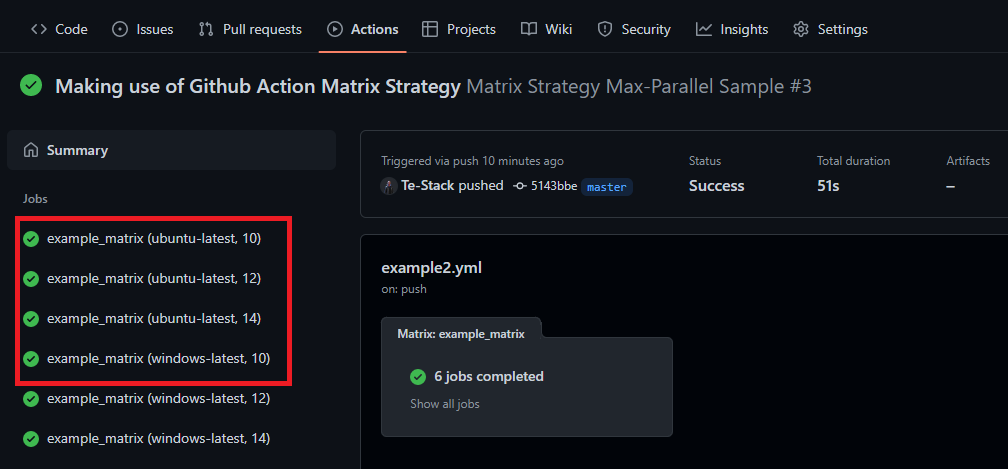
By default, GitHub will run the most jobs concurrently possible based on runner availability. But can you also define the maximum number of jobs to run concurrently? Yes. Using the strategy.max-parallel method.
1. Create another .yml inside the .github/workflow folder and name the file as example2.yml.
2. Add the code below into the example2.yml file, which runs four jobs simultaneously. These jobs run even if runners are available to run all six jobs concurrently. This behavior is defined by the strategy.max-parallel method.
name: Matrix Strategy Max-Parallel Sample
# The trigger event for the workflow file to run
on: push
# Defines jobs to run
jobs:
  example_matrix:
    strategy:
      max-parallel: 4 # Sets the limit of jobs to run concurrently
      matrix:
        os: [ubuntu-latest, windows-latest]
        version: [10, 12, 14]
    runs-on: ${{ matrix.os }}
    steps:
      - uses: actions/setup-node@v3
        with:
          node-version: ${{ matrix.version }}
3. Commit and push your code to GitHub as you did in step five of the “Setting up GitHub Actions Matrix Strategy” section.
4. Finally, navigate to your Actions tab, and click on the example2.yml file.
You will see an output similar to the screenshot below that shows the maximum number of jobs being run concurrently using the strategy.max-parallel.
Adding New or Expanding Matrix Configurations
You have seen how the matrix strategy works in automating tasks. But perhaps, you need to add or expand an existing configuration when there is a value update of an existing variable. If so, adding the include keyword will do the trick, where its value is a list of objects in key:value pairs.
To add new or expand matrix configurations:
1. Create a new .yml file called example3.yml, and add the code below to the file.
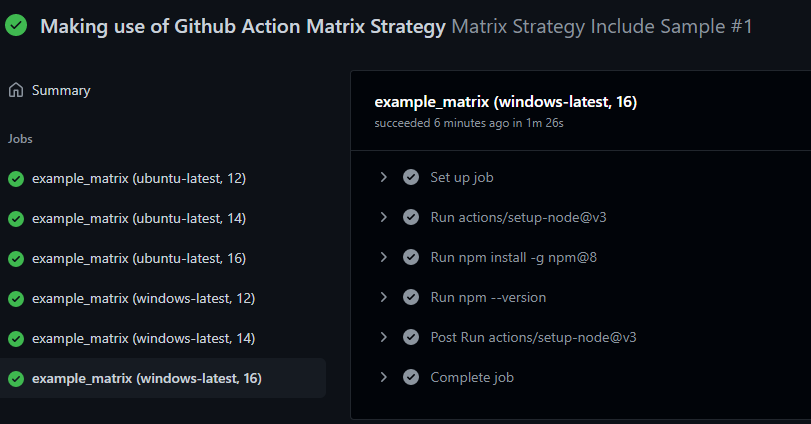
The following code executes nine jobs, one for each possible pairing of an os and node. A new variable called npm with the value of 8 will be added to the job when it runs for the os value of windows-latest and node value of 16.
name: Matrix Strategy Include Sample
# The trigger event
on: push
# The jobs to run
jobs:
  example_matrix:
    strategy:
      matrix:
        os: [ ubuntu-latest,windows-latest,]
        node: [12, 14, 16]
        # The include keyword that adds a new variable
        include:
          - os: windows-latest
            node: 16
            npm: 8
    runs-on: ${{ matrix.os }}
    steps:
      - uses: actions/setup-node@v3
        with:
          node-version: ${{ matrix.node }}
      - if: ${{ matrix.npm }}
        run: npm install -g npm@${{ matrix.npm }}
      - run: npm --version
If none of the key: value pairs for an object in the include list overwrite any of the original matrix values, the object’s key: value pairs are added to all matrix combinations for that item.
A new matrix combination is made if the object cannot be added to existing ones. Remember, though, that while newly-inserted matrix values cannot be overwritten, the previous ones can be.
2. Next, commit and push your code to GitHub.
3. Navigate into the Action tab of your repository, click the example3.yml file, and you will see the added variable called npm.
4. Now, create another .yml file called example4.yml and add the code below.
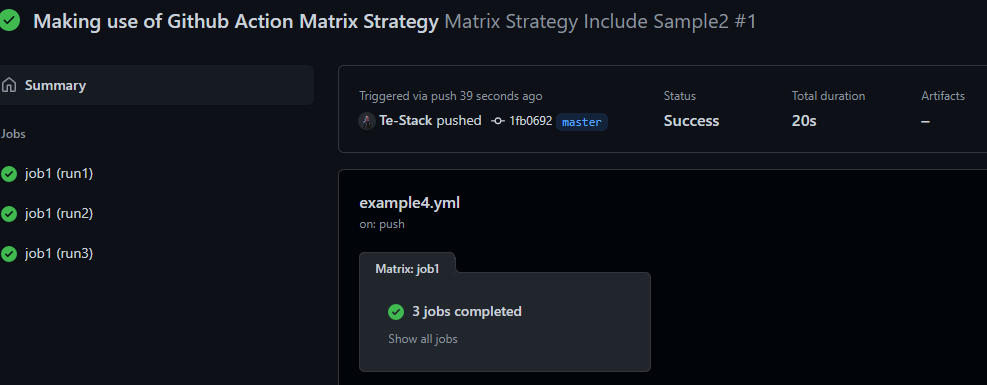
In the following code, the run variable has only two values (run1 and run2) but runs three jobs due to the added value (run3) by the include keyword.
name: Sample Run Include Syntax
# The trigger event
on: push
jobs:
  job1:
    runs-on: ubuntu-latest
    strategy:
      matrix:
        run: ['run1', 'run2'] # Defines two jobs to run
        include: # Includes one more job
          - run: 'run3'
    steps:
    - run: echo Run ${{ matrix.run }}
    - run: date
    - run: sleep 1
    - run: date
5. After saving the example4.yml file, commit and push your code to your GitHub repository.
6. Lastly, navigate to your Actions tab on your GitHub repository, and you will see the result of running jobs with one more job in the included keyword.
The screenshot below shows that three jobs have been completed, with the third job added by the include keyword.
Using JSON Syntax in Matrix Configurations
Expanding your matrix configurations with the include keyword is a game changer. But perhaps you are looking for a more dynamic matrix. In that case, try using the JSON syntax on your matrix configurations.
The GitHub actions expression language has a fromJson(value) method that takes and binds a stringified JSON object to a property. This action is combined with the job.outputs method that allows you to create a process with a fully dynamic matrix.
1. Create a .yml file named example5.yml, and populate the code below to the file.
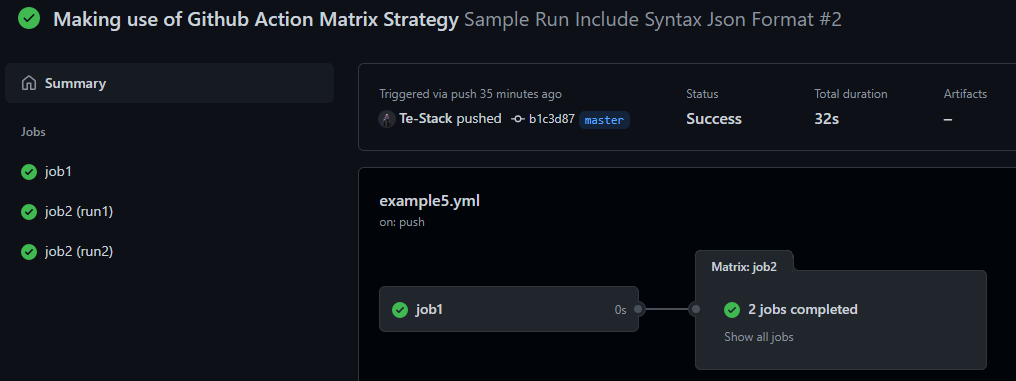
The code below shows a fully functional workflow using the fromJSON(value) and outputs.matrix method.
name: Sample Run Include Syntax Json Format
on: push
# The Trigger event
jobs:
  job1:
    runs-on: ubuntu-latest
    outputs:
	# Making use of job.output
       matrix: ${{ steps.setmatrix.outputs.matrix }}
    steps:
      - name: Set Dynamic Matrix
        id: setmatrix
        run: |
           matrixStringifiedObject="{\"include\":[{\"run\":\"run1\"},{\"run\":\"run2\"}]}"
           echo "::set-output name=matrix::$matrixStringifiedObject"
  job2:
    needs: job1
    runs-on: ubuntu-latest
    strategy:
		# Making use of fromJson (JSON syntax)
      matrix: ${{ fromJson(needs.job1.outputs.matrix) }}
    steps:
    - run: echo Run ${{ matrix.run }}
    - run: date
    - run: sleep 1
    - run: date
2. Next, commit and push your code to GitHub.
3. Once pushed, navigate your repository’s Actions tab, and you will have results like the one below.
As you can see, the output shows jobs that successfully ran, including the one you configured using the JSON syntax.
Handling Failures Using the fail-fast Method
You have seen how jobs work in your workflow matrix successfully. But what if they fail? No worries. You can control how job failures are handled in the matrix with the strategy.fail-fast and strategy.continue-on-error methods.
But for a start, you will work on the strategy.fail-fast method first in this tutorial. If the strategy.fail-fast is true, GitHub cancels all in-progress and queued jobs in the matrix if any job in the matrix fails. Otherwise, all other jobs run if the strategy.fail-fast is set to false.
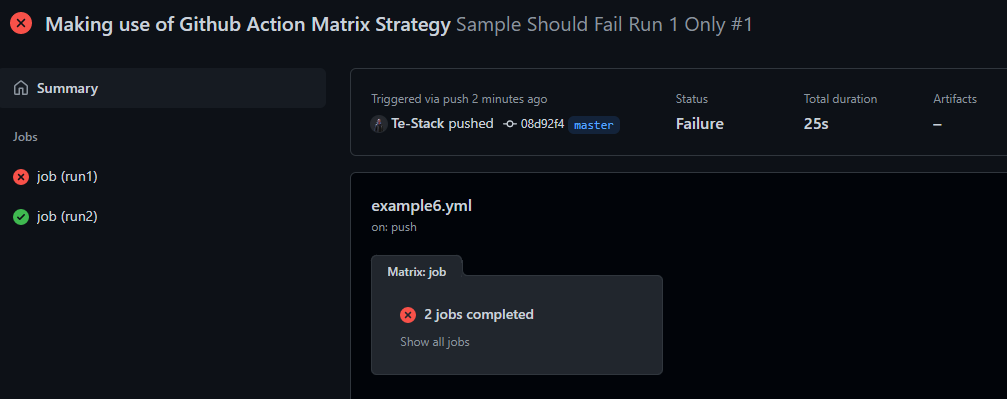
1. Create a file called example6.yml, and add the code below to the file.
You can see that strategy.fail-fast is set to false, which lets the other jobs run even if the first job fails.
name: Sample Should Fail Run 1 Only
# The trigger event
on: push
jobs:
  job:
    runs-on: ubuntu-latest
		# Sets the strategy.fail-fast method to false
    strategy:
      fail-fast: false
      matrix:
        run: ['run1', 'run2']
    steps:
    - run: echo Run ${{ matrix.run }}
    - run: date
    - name: Exit early if matrix run is run1
      run: '[ "${{ matrix.run }}" = "run1" ] && exit 1 || echo "continue"'
    # Ensures all processes that do not match the above check
      # don't finish before the one that will exit
    - run: sleep 5
    - run: date
2. Next, commit and push your changes to GitHub.
3. Lastly, navigate to your repository’s Action tab and you will see an output like the one below.
As you can see, two jobs ran, one failed, and one ran successfully without stopping the workflow file, even if the first job failed.
Handling Failures Using the continue-on-error Method
Unlike the strategy.fail-fast method, handling failures using the continue-on-error method only applies to a single job, but the effect extends to all the other jobs. If continue-on-error is true, other jobs in the matrix continue to run even if the job where the continue-on-error is used fails.
Note the continue-on-error and the strategy.fail-fast methods can be used in the same workflow.
To see how the continue-on-error method works:
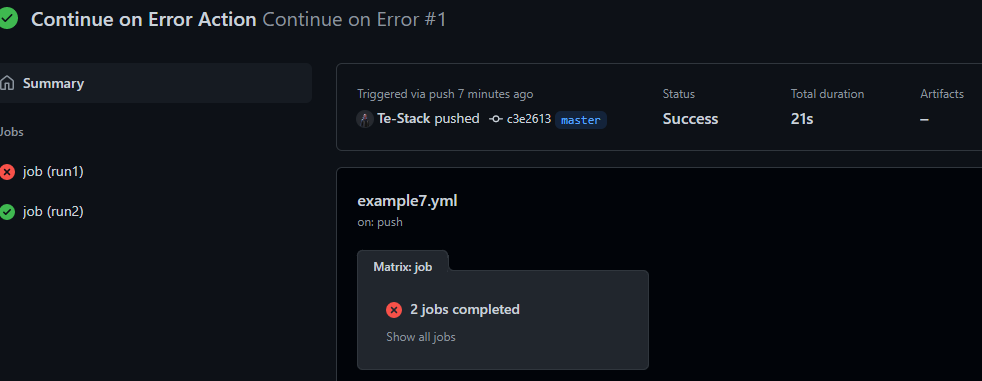
1. Create a file called example7.yml, and copy/paste the code below to the file.
In this code, you can see that continue-on-error is set to true, which lets other jobs run even if the first job fails.
name: Continue on Error
# The trigger event
on: push
jobs:
  job:
    runs-on: ubuntu-latest
		# Sets the continue-on-error method to true
    continue-on-error: true
    strategy:
      matrix:
        run: ['run1', 'run2']
    steps:
    - run: echo Run ${{ matrix.run }}
    - run: date
    - name: Exit early if matrix run is run1
      run: '[ "${{ matrix.run }}" = "run1" ] && exit 1 || echo "continue"'
    # Sleep to ensure all processes that do not match the above check
      # don't finish before the one that will exit
    - run: sleep 5
    - run: date
2. Now, commit and push code to GitHub.
3. Finally, navigate your repository’s Actions tab for the last time, and you will have results like in the screenshot below.
In the following output, two jobs run where one fails, and one runs successfully regardless of the first job run’s result, without stopping the workflow file from running.
Conclusion
This tutorial has walked you through the various ways to leverage the GitHub Action Matrix Strategy for your deployment. You learned to set up your matrix strategy, using the include and max-parallel methods for expanding configurations.
At this point, you are confident enough to improve your workflow and handling of failures. But how do you plan to use this newfound knowledge when working with GitHub Actions Matrix? Perhaps make use of Shadow jobs in your matrix?


