


If you need to make changes to a SQL database, you could open SQL Server Management Studio, click around a little bit and make it happen. But what happens when you need to manage changes across dozens or even hundreds of databases? You need database deployment automation.
Not a reader? Watch this related video tutorial!In this tutorial, you will learn how to automate SQL database deployments and changes with a CI/CD pipeline built in Azure DevOps. This pipeline will demonstrate how to automate database changed in an automation fashion by maintaining a list of SQL servers in your environment.
Prerequisites
This tutorial is going to be a step-by-step process to build a specific project. If you intend to follow along, be sure you have the following:
- A computer to run PowerShell – This tutorial uses Windows 10 using Windows PowerShell v5.1 but later versions of PowerShell should work.
- An Azure DevOps project. This tutorial will use a project called sandbox.
- An Azure service principal.
- An Azure DevOps service connection – This tutorial uses a service connection called ServiceConnection.
- A code editor like Visual Studio (VS) Code.
- An Azure resource group – The tutorial will use a resource group called rg-dbaautomation.
- An Azure SQL database. This tutorial will use a database called Estate.
- The following PowerShell modules installed on your local computer.
- dbops – The tutorial will use v0.6.
- dbatools – The tutorial will use v1.0.145.
- az – The tutorial will use v5.9.0. Be sure to authenticate to Azure before starting.
- Pester – The tutorial will use v5.2.0
- The Azure CLI connected to your Azure subscription – This tutorial will use v2.18.0.
- azure-devops extension – The tutorial will use v0.18.0
- A Github account – Be sure that you have setup a service connection and a token. This tutorial uses a service connection called Github.
Tutorial Overview
This tutorial will build an entire database deployment automation project from scratch. This tutorial will be organized in a few different rough steps:
1. Forking a pre-configured GitHub repository (repo) to work with on your own.
2. Manually creating an Azure SQL database.
3. Manually running some T-SQL scripts against the Azure SQL database using a database package with the dbops PowerShell module.
4. Manually testing changes the T-SQL scripts made with the PowerShell testing framework Pester.
5. Create the Azure DevOps pipeline and integrate all of the tasks performed manually.
6. Create a new T-SQL script in your GitHub repo, commit changes, and sync to GitHub to demonstrate the entire automation workflow.
By the end, you’ll have a complete Azure DevOps pipeline that will automate database changes. If this sounds like an interesting project to walk through, let’s get started!
Creating the Environment Manually
Before you get started, know that creating Azure resources will incur some kind of cost. It is up to you to manage your Azure resources accordingly!
Like with any good automation project, you must first know how to perform each task manually. There are many steps in this process so first, you’re going to learn how to manually perform each step.
Once you understand each step and have mastered performing the tasks manually, you’ll then learn how to bring all of this together into an automated Azure DevOps pipeline.
Setting up the Azure SQL Database
Before you can automatically deploy changes to a SQL database, you must create one first. Let’s start here.
Rather than covering each command to create an Azure SQL database, this tutorial will provide the basic instructions. If you need help, check out the ATA blog post How to Create an Azure SQL Database with PowerShell for specific instructions.
To create an Azure SQL database with the exact specifications you need to follow along in this tutorial be sure you create:
- A resource group called rg-dbaautomation
- An Azure SQL Server called sqlestate.
- An Azure SQL Server firewall rule called FirewallRule_AccessRule allowing your public IP address access to the Azure SQL database.
- A Basic edition Azure SQL database called estate using the Azure SQL server sqlestate, in the resource group rg-dbaautomation with a SQL Administrator user account of SqlAdministrator, password of My@VeryStrongPassword!1
Run the following PowerShell code below and you should configure all of the above.
$resourceGroupName = 'rg-dbaautomation'
$location = 'EastUS'
$sqlServerName = 'sqlestate'
$sqlAdministrator = 'SqlAdministrator'
$sqlPassword = '*My@VeryStrongPassword!1*'
$publicIp = Invoke-RestMethod '<http://ipinfo.io/json>' | Select-Object -ExpandProperty IP

$azSqlServer = New-AzSqlServer -ResourceGroupName $resourceGroupName `
    -ServerName $sqlServerName `
    -Location $location `
    -SqlAdministratorCredentials $(New-Object -TypeName System.Management.Automation.PSCredential -ArgumentList $sqlAdministrator, $(ConvertTo-SecureString -String $sqlPassword -AsPlainText -Force)) `
    -ErrorAction Stop

# Create a server firewall rule that allows access from the specified IP range
$serverFirewallRule = New-AzSqlServerFirewallRule -ResourceGroupName $resourceGroupName `
	-ServerName $sqlServerName `
	-FirewallRuleName "FirewallRule_AccessRule" -StartIpAddress $publicIp -EndIpAddress $publicIp `
	-ErrorAction Stop

$database = New-AzSqlDatabase  -ResourceGroupName $resourceGroupName `
	-ServerName $sqlServerName `
	-DatabaseName $sqlDatabaseName `
	-Edition "Basic" `
	-ErrorAction Stop
In the C:\repos\database-deployment-automation\psscripts folder, you’ll see a PowerShell script called New-AzureSqlDatabase.ps1 that includes all of the steps covered in this section in a single script. This will be the script Azure DevOps will execute.
Executing T-SQL scripts with dbops
Now that you’ve created the Azure SQL database, it’s time to run some T-SQL scripts in the database. To run T-SQL scripts against the database, this tutorial will be using the PowerShell dbops module.
Although the dbops module contains commands to run T-SQL scripts manually like you are in this section, it also has excellent CI/CD capabilities for SQL database deployments later on.
1. Open PowerShell and create a new folder that will contain the T-SQL scripts and database package. The below command is creating a C:\package and C:\package\sqlscripts folder.
 New-Item -Path C:\package -ItemType Directory -Force
 New-Item -Path C:\package\sqlscripts -ItemType Directory -Force
2. Open your favorite code editor and copy and paste the following T-SQL code into the script and save it as C:\package\sqlscripts\Script0001-inventorytable.sql. This T-SQL script creates a database table called DatabaseInventory with two columns in it.
The tutorial will create a table containing fictitious server names and descriptions. But, using the techniques you’ll learn in this tutorial, your table can hold any schema you’d like.
/* Create a database table for storing servers */
 CREATE TABLE [dbo].[DatabaseInventory] (
     [ServerName] NVARCHAR(60) NOT NULL,
     [Description] NVARCHAR(60) NULL
     )
 GO
3. Create a database package at C:\package\sqlscripts\DBOPackage.zip using the Invoke-DBOPackageCI command which will collect up all SQL scripts in the C:\package directory. This cmdlet will create a “database package” containing all the SQL scripts, configuration files, and version which can be executed against a database.
The
Versionis static because the command smart enough to figure out if new files should be added with a new version when you get to automating this process.
# Create the database package and include all the SQL scripts
 Invoke-DBOPackageCI -Path C:\package\sqlscripts\DBOPackage.zip -ScriptPath C:\package -Version 1.0
4. Next, update the configuration file inside of the package with the name of the Azure SQL database and the Azure SQL server it’s running on with the Update-DBOConfig command.
# Updates the configuration file inside the database package
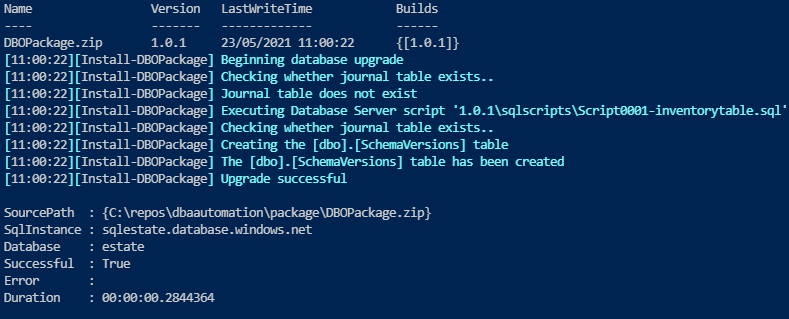
Update-DBOConfig -Path C:\package\sqlscripts\DBOPackage.zip -Configuration @{ SqlInstance = "sqlestate.database.windows.net"; Database = "estate"; }5. Finally, “install” the database package with the Install-DBOPackage command. This command sends the SQL script inside of the package to the database and executes the scripts within. It executes the script using the provided SQL admin account and password.
# Install the database package and make a PSCredential object to pass on
 Install-DBOPackage -Path C:\package\sqlscripts\DBOPackage.zip -Credential $(New-Object -TypeName System.Management.Automation.PSCredential -ArgumentList 'SqlAdministrator', $(ConvertTo-SecureString -String 'My@VeryStrongPassword!1' -AsPlainText -Force))
When you’re done running these commands, you should see an output similar to the following indicating Install-DBOPackage executed the SQL script and created the SQL DatabaseInventory table.
Introducing SQL Changes to the Database
At this point, you have a SQL database with a single table called DatabaseInventory in it. The goal of this project is to perform SQL database deployment automation which includes running SQL scripts to update the database.
Before automating the step of running update SQL scripts against the database, let’s first manually walk through the steps. As an example, let’s create two T-SQL scripts to insert a dummy record.
- In your favorite code editor, copy and paste the following T-SQL script and save the script as C:\package\sqlscripts\Script0002-CreateInventorySP.sql. This script will create a stored procedure you’ll be using for inserting new records in the DatabaseInventory table.
CREATE PROCEDURE dbo.AddInventoryRecords @ServerName NVARCHAR(60) = NULL,
     @Description NVARCHAR(20) = NULL
 AS
 BEGIN
     SET NOCOUNT ON
 INSERT INTO dbo.DatabaseInventory (     [servername],     [description]     ) VALUES (     @ServerName,     @Description     )
 END
 GO
2. Copy and paste the following T-SQL script and save it as C:\package\sqlscripts\Script0003-insertdummyrecord.sql. This script calls the AddInventoryRecords stored procedure above to create a row in the DatabaseInventory table.
EXEC [dbo].[AddInventoryRecords]
@ServerName = N'SRV1',
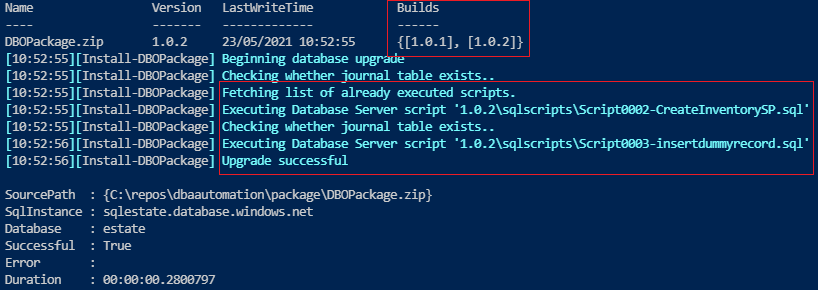
@Description = N'My server'3. Now, run the same PowerShell commands as earlier to create a database package, update the package with your SQL instance information and run the scripts on the SQL database.
The dbops commands will now identify, compare the new T-SQL script against the old database package and increment the version number.
# Create the database package and include all the sql scripts
 Invoke-DBOPackageCI -Path C:\package\sqlscripts\DBOPackage.zip -ScriptPath C:\package -Version 1.0

# Updates the configuration file inside the database package
 Update-DBOConfig C:\package\sqlscripts\DBOPackage.zip -Configuration @{ SqlInstance = "sqlestate.database.windows.net"; Database = "estate"; }

# Install the database package and make a PSCredential object to pass on
 Install-DBOPackage -Path C:\package\sqlscripts\DBOPackage.zip -Credential $(New-Object -TypeName System.Management.Automation.PSCredential -ArgumentList 'SqlAdministrator', $(ConvertTo-SecureString -String 'My@VeryStrongPassword!1' -AsPlainText -Force))
Notice below the build version for the package has been incremented and the Install-DBOPackage command has only executed the newly created files.
Yay! At this point, you’ve now got a workflow set up to introduce changes into a SQL database.
Testing Database Changes with Pester
Up to this point, you’ve created the Azure SQL Server, the database, the table and added a record to the table. In any reputable Azure DevOps pipeline, you must have at least one test to confirm the tasks you’ve executed actually did so.
To test infrastructure in PowerShell, the Pester testing framework is a great choice. Pester allows you to create PowerShell scripts in a domain-specific language (DSL) to define unit and infrastructure tests.
1. Open PowerShell and create a folder to hold all of your tests.
New-Item -Path C:\package\tests -ItemType Directory -Force2. Open your favorite code editor, copy and paste the below PowerShell script, and create save the script as C:\package\tests\CheckProcedure.Tests.ps1. This test suite will be testing the T-SQL stored procedure with the Invoke-DbaQuery PowerShell cmdlet against the database.
[CmdletBinding()]
 param (
     [Parameter(Mandatory=$true,
                 HelpMessage="SQL Server name in Azure.")]
     [string]
     $sqlServerName,
 [Parameter(Mandatory=$true,         HelpMessage="SQL Database name in Azure.")] [string] $sqlDatabaseName, [Parameter(Mandatory=$true,         HelpMessage="SQL administrator for connection to SQL server in Azure.")] [string] $sqlAdministrator, [Parameter(Mandatory=$true,         HelpMessage="SQL password for connection to SQL server in Azure.")] [string] $sqlPassword
 )
 Describe "Check stored procedure" {
     It "Gets stored procedure exist" {
         $credPwd = ConvertTo-SecureString $sqlPassword -AsPlainText -Force
         $credential = New-Object System.Management.Automation.PSCredential ($sqlAdministrator, $credPwd)
         $query = "select count(*) from sys.procedures where name = 'AddInventoryRecords'"
         $result = (Invoke-DbaQuery -SqlInstance $sqlServerName -Database $sqlDatabaseName -SqlCredential $credential -Query $query)[0]
         $result | Should -Be 1
     }
 }
3. Now, create a file at C:\package\tests\CheckAzureResources.Tests.ps1 and copy and paste the following code inside the file and save it. These tests use the Get-AzSqlServer and Get-AzSqlDatabase PowerShell cmdlets to gather the resources and test if the Azure Resources are created accordingly.
Describe 'Azure Resources' {
     BeforeAll {
         $resourceGroup = 'rg-dbaautomation'
         $sqlServer = Get-AzSqlServer -ResourceGroupName $resourceGroup
         $sqlDatabase = Get-AzsqlDatabase -ResourceGroupName $resourceGroup -ServerName $sqlServer.ServerName | Where-Object {$_.DatabaseName -notin "master"}
     }
     It "$($sqlServer.ServerName) should be sqlestate" {
         $sqlServer.ServerName | Should -Be 'sqlestate'
     }
     It "$($sqlServer.SqlAdministratorLogin ) name should be SqlAdministrator" {
         $sqlServer.SqlAdministratorLogin | Should -Be 'SqlAdministrator'
     }
     It "$($sqlDatabase.DatabaseName) contain a database called estate" {
         $sqlDatabase.DatabaseName | Should -Be 'estate'
     }
 }
4. Create and save another file called C:\package\tests\CheckInventoryTable.ps1 copying and pasting the following code inside and save it. This tests queries the database and ensures all expected records are in the database table.
[CmdletBinding()]
 param (
     [Parameter(Mandatory=$true,
                 HelpMessage="SQL Server name in Azure.")]
     [string]
     $sqlServerName,
 [Parameter(Mandatory=$true,         HelpMessage="SQL Database name in Azure.")] [string] $sqlDatabaseName, [Parameter(Mandatory=$true,         HelpMessage="SQL administrator for connection to SQL server in Azure.")] [string] $sqlAdministrator, [Parameter(Mandatory=$true,         HelpMessage="SQL password for connection to SQL server in Azure.")] [string] $sqlPassword
 )
 Describe "Check inventory table" {
     It "Gets inventory table records" {
         $credPwd = ConvertTo-SecureString $sqlPassword -AsPlainText -Force
         $credential = New-Object System.Management.Automation.PSCredential ($sqlAdministrator, $credPwd)
         $query = "SELECT [ServerName], [Description] FROM dbo.DatabaseInventory"
         $result = Invoke-DbaQuery -SqlInstance $sqlServerName -Database $sqlDatabaseName -SqlCredential $credential -Query $query
         $result.Count | Should -BeGreaterOrEqual 1
     }
 }
5. Finally, open PowerShell and run the following code. This code creates a Pester container to include all of the test scripts created in steps 1-3. Once you have the container, it then calls the Invoke-Pester cmdlet to invoke all of the scripts to run the code to verify the test results
# Specify the data for container
 $parameters = @{
     sqlServerName = 'sqlestate.database.windows.net'
     sqlDatabaseName = 'estate'
     sqlAdministrator = 'SqlAdministrator'
     sqlPassword = 'My@VeryStrongPassword!1'
 }
 Create container
 $container = New-PesterContainer -Path C:\pakage\tests\ -Data $parameters
 Invoke pester tests
 Invoke-Pester -Container $Container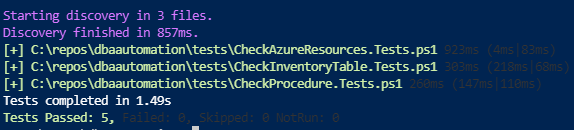
Great job! You’ve now manually performed all of the required steps to create a SQL database deployment automation routine!
Setting up the GitHub Repo
Before you create an automated pipeline, you need a source repo to detect changes and pull scripts from. Since you’ve already done the hard work and created all of the SQL and PowerShell scripts, you shouldn’t have to create all of that again. To speed up the process, this tutorial provides you with a pre-built GitHub repo that followed all of the above steps.
- First, fork the tutorial’s GitHub repo. This action will get the database-deployment-automation repo in your own account to work with.
- Next, open PowerShell on your computer and clone your forked repo to your local computer. This tutorial will clone the repo to the C:\repos folder.
git clone https://github.com//database-deployment-automation c:\reposOnce you have a folder called C:\repos\database-deployment-automation on your computer with all of the files in the GitHub repo, you’re ready to proceed to create the automation!
Building the Database Deployment Automation Workflow
Let’s now put all of your hard work together and automate this entire process! You will now build an Azure DevOps pipeline that will automatically run SQL scripts against your database and run all Pester tests.
Assuming you have an Azure DevOps project already set up and you’ve got PowerShell open, let’s get started!
Creating the Azure DevOps Pipeline
Create a GitHub service endpoint. You’ll need this so that Azure DevOps can authenticate to your GitHub repo.
az devops service-endpoint github create --github-url 'https://github.com//Database-Deployment-Automation' --name 'GitHub' | ConvertFrom-JsonNext, retrieve the ID of the service endpoint just created and create the pipeline.
$gitHubServiceConnectionId = az devops service-endpoint list | ConvertFrom-Json | Where-Object {$_.Name -eq 'Github'} | select -ExpandProperty id
 az pipelines create --name 'dbaautomation' --description 'Pipeline for database automation workflow' --repository https://github.com//Database-Deployment-Automation --branch main --skip-run --service-connection $gitHubServiceConnectionId
Setting up Prerequisites for the YAML Pipeline
Inside of the GitHub repo, you’ll notice a pre-created Azure DevOps pipeline. This pipeline defined in YAML brings together all of the steps you manually performed earlier.
As-is, the pipeline is almost entirely complete but to get it to work for you, you must change a few variables. At the top of the pipeline, update all variables to match your environment. The only required variables to change are rgLocation and ip which represents your public IP.
Run the command
(Invoke-RestMethod <http://ipinfo.io/json> | Select-Object -ExpandProperty ip) | clipin PowerShell to retrieve your public IP address and copy it to the clipboard.
rgName: "rg-dbaautomation"          #   The Resource Group name     #
rgLocation: "westeurope"            #   The region location         #
ip: ""                              #   The public IP address       #
azSqlDatabaseName: "Estate"         #   The Azure SQL database name #
azSQLServerName: "sqlestate"        #   The Azure SQL server name   #
adminSqlLogin: "SqlAdministrator"   #   The Azure SQL login         #
artifactName: "DBOPackage"          #   The artifact name           #
Once you’ve edited the variables in the pipeline, head back to the PowerShell and create an Azure variable called adminSqlPassword. The pipeline uses this variable to reference the SQL admin password instead of storing it in cleartext.
$pipelineId = az pipelines list --name Database-Deployment-Automation | ConvertFrom-Json | select -ExpandProperty id
 az pipelines variable create --name 'adminSqlPassword' --pipeline-id $pipelineId --secret true --value 'My@VeryStrongPassword!1'
Executing the Azure DevOps Pipeline Manually
The variables are all set now, let’s execute the Azure DevOps pipeline manually and see what happens.
1. Open a web browser and navigate to your pipeline.
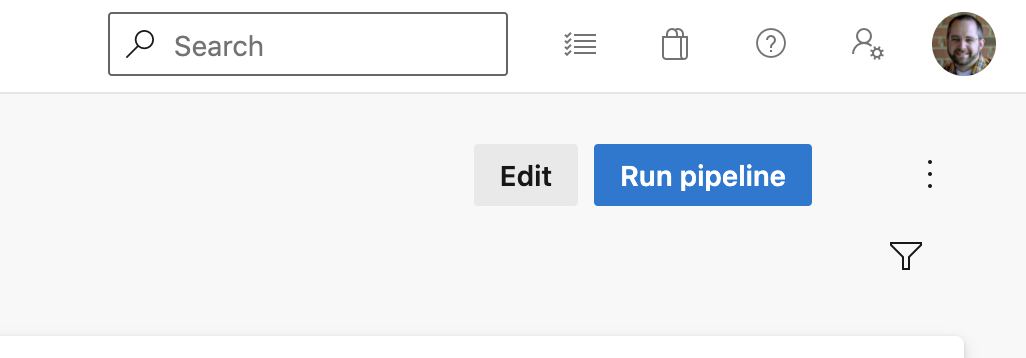
2. Click the Run Pipeline button in the top right corner. This action will trigger the pipeline.
3. Now, check the status of the pipeline. You should eventually see the following.
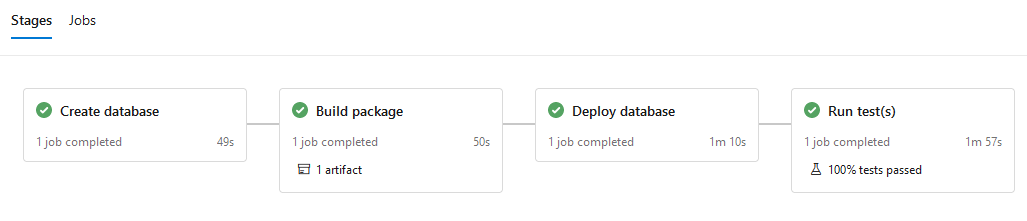
You can see the pipeline is broken down by stages.
- Create database
- Build package
- Deploy database
Run test(s)You’ve already built and executed all of the actions each of these stages performs so just sit back and enjoy the automation!
Implementing Continuous Integration
At this point, you’re almost finished. You have a pipeline set up that will trigger off changes to the GitHub repo. But, you’re not quite done yet. As-is, it will trigger off any change. You want to deploy database changes via SQL scripts when a SQL script is dropped into a directory.
Let’s now add a trigger to only invoke the pipeline when a change is made to any file in the repo’s sqlscripts directory. To do so:
1. In your favorite code editor, open the YAML pipeline file C:\package\azure-pipelines.yml.
2. At the top, just under the name, add the following code. This code will make sure that if a new file is introduced in the directory, the pipeline will be trigger.
trigger:
   paths:
     include:
       - sqlscripts/*
3. Now, commit the new pipeline to your local Git repo, as shown below.
# Add file content to index
 git add C:\package\azure-pipelines.yml
# Record the changes to the repository
 git commit -m "Trigger added for SQL scripts"
# Push the changes to the repository
 git push
You just committed a change to the repo but notice the pipeline did not trigger! The only change that will trigger the pipeline is a change occurring in the sqlscripts directory.
Implementing Continuous Delivery
Now, without further ado, it’s time to try out your SQL deployment automation project!
Perhaps you’d like to create a table called DatabaseJobs in your SQL database with the below script.
/* Create a job table for storing potential jobs */
CREATE TABLE [dbo].[DatabaseJobs] (
	[JobName] NVARCHAR(60) NOT NULL
	)
GO
Instead of running this script against the SQL database manually, you should now be able to simply drop the script in the sqlscripts directory and push the change to your GitHub repo.
1. Create a file at C:\package\sqlscripts\Script0004-dummytable.sql, copy, paste and save the SQL script above inside the file.
2. Next, commit the new SQL script to your Git repo and push the SQL script to your GitHub repo.
# Add file content to index
 git add C:\package\sqlscripts\Script0004-dummytable.sql
# Record the changes to the repository
 git commit -m "New database table added"
# Push the changes to the repository
 git push
3. Open the pipeline in the Azure DevOps project and notice that the pipeline has begun. The pipeline is now processing all of the steps you defined earlier.

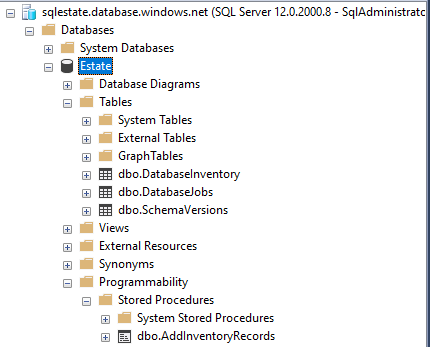
Finally, to verify the pipeline invoked the SQL script you intended, open the Azure SQL database and notice that the pipeline has created the DatabaseJobs table!
Conclusion
You should now have a solid understanding of the steps to build a SQL database deployment automation routine. In addition, you now have a fully automated CI/CD pipeline that allows you to deploy database changes easily!
Now, start introducing your own SQL scripts and see how you can use this pipeline in production! Don’t forget to add further Pester tests.


