Azure SQL Database is a managed SQL database service that’s built so developers and admins don’t have to perform the tedious tasks of installing SQL server, or spending hours setting up failover clusters.
Microsoft Azure has taken the heavy lifting out of setting up the database tier, so all that’s left to do is connect to it, so that’s what this article is going to cover. Here are several different ways to connect to an Azure SQL database.
Prerequisites
If you’d like to connect to Azure SQL database, you’ll need to meet a few prerequisites ahead of time.
- An Azure account, or access to one
- An Azure SQL Database (You can use your own if you like, but I’ll be using the sample.
- A Windows 10, Mac OS, or Linux laptop or desktop with PowerShell, Visual Studio Code and SQL Server Management Studio installed. The screenshots are all from Windows 10.
There are dozens of different ways to connect to Azure SQL, and unfortunately I can’t go over them all, but the ones I will be covering in this post are:
- The Azure Portal
- SQL Server Management Studio
- Visual Studio Code
- PowerShell
Configuring the Azure SQL Database
Before you get started, you must make sure you have a database available and can connect to it. Using the instructions from the quickstart document, I’ve set up a sample database called ata-demo. This database has a SQL admin (sa) user AtaAdmin and the password is Admin123.
The password I’m using isn’t the most secure, but it’ll do for demo purposes. For the love of Equifax, please use best practices for passwords when you set something like this up in QA or Production!
Next, you’ll need to login to the Azure Portal to make sure that your device can to connect to the database. You can connect this to an existing Azure virtual network, or define an IP range that can access the database, which is what is done in the demos below. Go to the resource page of the SQL Database you want to connect to and look for an option called Set Server Firewall.
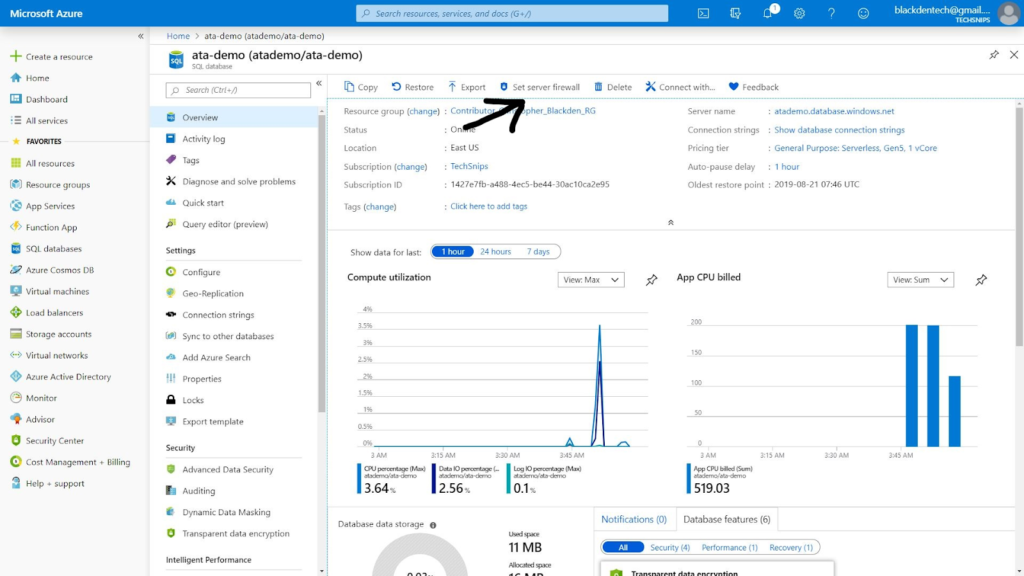
Once here, you’ll have the option to choose an IP range. This page also shows your device’s IP address, which is what I’ll be using for the demo. But in practice, this will be the subnet range or virtual network of your application tier. Once that’s done, you’re ready to move on to the first demo!
Connecting to an Azure SQL Database with The Azure Portal
Since you’re already on the Azure Portal, you can stay right here for the first demo.
Go back to the Overview page using the navigation menu on the left and look for Query Editor. Once you’re there, you’ll be prompted to login with a Microsoft account or SQL Credentials. Use the SA account, you set up earlier to login (AtaAdmin:Admin123).
Once you have logged in, you’ll see a panel with the Tables, Views, and Stored Procedures on the left of Query Editor. As of the time of this writing, there isn’t any right-click functionality in this UI, so your only option to interact with the database is through the Query Editor. If you’re using the sample database, you can use the sample query below.
SELECT pc.Name as CategoryName, p.name as ProductName
FROM [SalesLT].[ProductCategory] pc
JOIN [SalesLT].[Product] p
ON pc.productcategoryid = p.productcategoryid;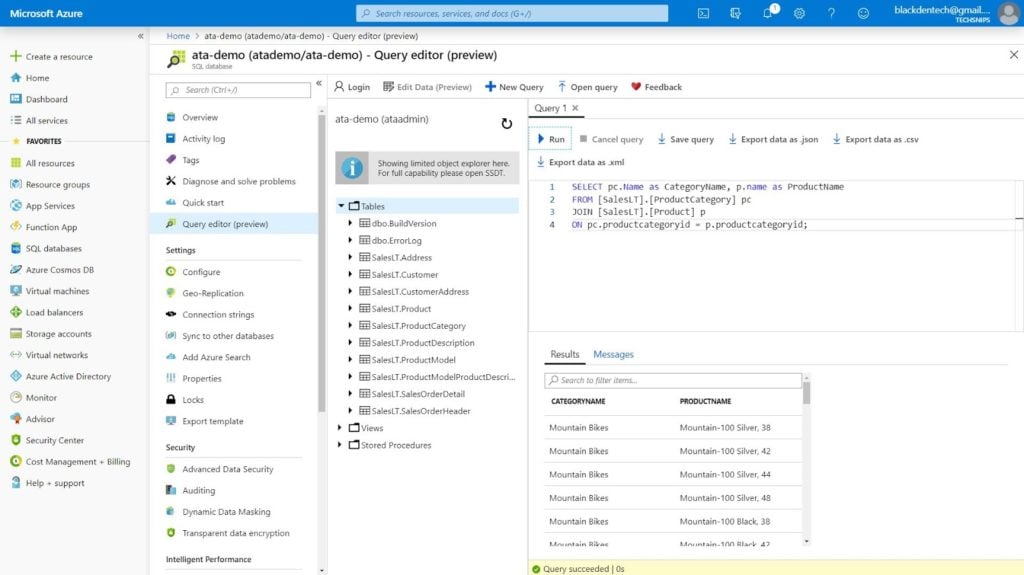
Now that you know the firewall rules have been setup, we can start trying this from other platforms.
Connecting to an Azure SQL Database with SQL Server Management Studio (SSMS)
By far the most robust tool for managing a SQL Database server is SSMS. Time-tested and battle-hardened, this has been the tool of choice for SQL server database administrators for over a decade.
SSMS is also fully compatible with Azure SQL databases. If you don’t have it installed, you can download the latest version from Microsoft or install it using a package manager.
Go back to your SQL Database resource page and copy the Server Name. The server name will be <Your Database Name>.database.windows.net.
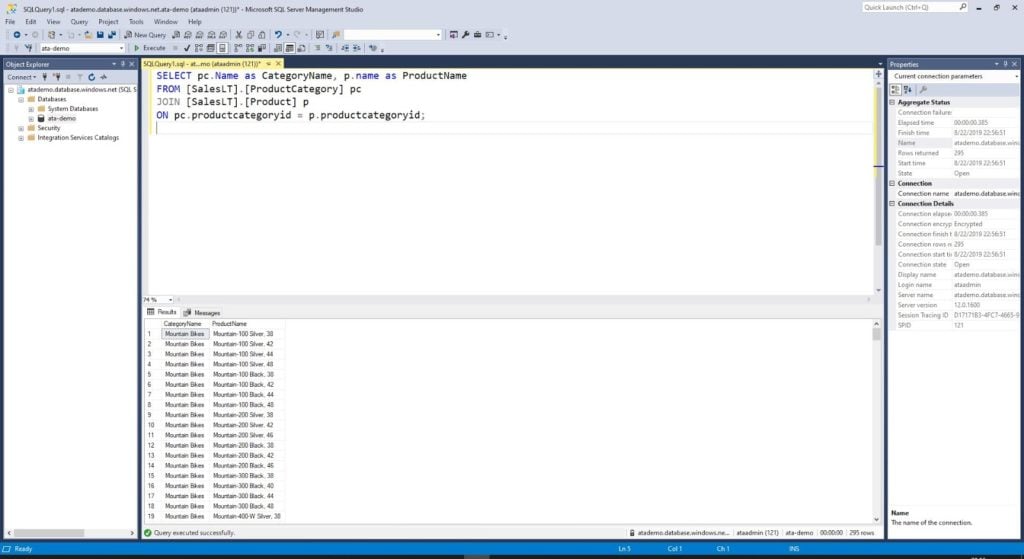
Open SQL Server Management Studio to connect to the database name using SQL Server authentication and the SA user you set up earlier. If you haven’t setup the firewall rule already, you will be prompted by SSMS to authenticate with your Azure account.
Now that you have authenticated to the database and the firewall is set up, you can start running your queries by going to <ServerName> –> Databases, right-clicking on your database, and selecting New Query. Now run the query you used earlier and watch the magic happen.
Connecting to an Azure SQL Database with Visual Studio Code (Code)
To connect to an Azure SQL database with Visual Studio Code, you’ll need to install the mssql extension for Visual Studio Code. Once installed, press Ctrl + Shift + P to open the dialog box and search for MS SQL: Connect.
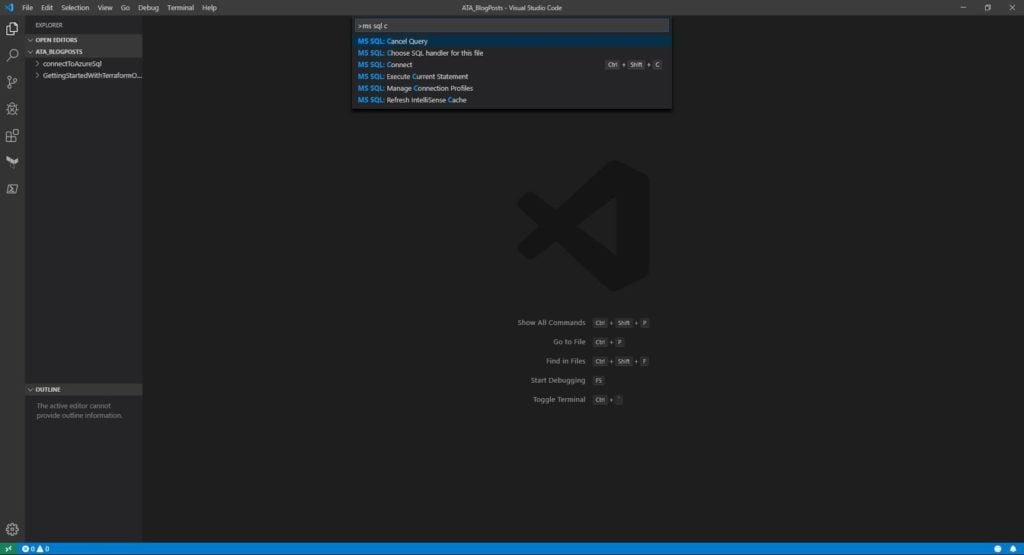
Once you select that, Visual Studio Code will run you through a wizard prompting you to enter the information of the database to connect to. You’ll be prompted for the server name, database name, username and password. Once you supply all this, it will be saved into a connection profile which can be used to execute queries against that database.
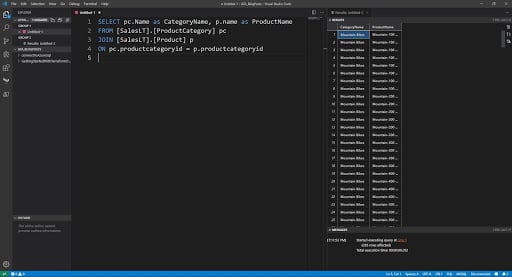
Input a SQL query to run against your database in the editor window. With the query open, press Ctrl + Shift + E. You will be prompted for which connection you want to run that query with. Choose the one you created and Code will open another panel with the results without ever leaving the screen!
Connecting to an Azure SQL Database with PowerShell
To connect to an Azure SQL database with PowerShell, you’ll need to install the Az PowerShell module. You can find this module on the PowerShell Gallery. Download and install the module by running the command Install-Module Az. At the time of this writing, the module is on version 2.5
The module only needs to be installed once on the machine you want to run your script from. Next, authenticate to Azure by running Connect-AzAccount. Learn about how to use the Connect-AzAccount cmdlet, if you’d like to know more.
To verify everything works, you can find the database by running Get-AzSqlServer -ResourceGroupName <Your Resource Group>. If that returns the database you wanted to connect to, you are ready to run the script.
Now that you have authenticated and can see the database, you can query it by running the script below. This code will import the Azure SQL module, set up the parameters (database, username, credentials and query) and run Invoke-SqlCmd to initiate the transact SQL query.
# Import the module
Import-Module Az.Sql -Force

# Setup your parameters
$Params = @{
   'ServerInstance' = 'atademo.database.windows.net';
   'Database' = 'ata-demo';
   'Username' = 'ataadmin';
   'Password' = 'Admin123';
   'Query' = 'SELECT pc.Name as CategoryName, p.name as ProductName
FROM [SalesLT].[ProductCategory] pc
JOIN [SalesLT].[Product] p
ON pc.productcategoryid = p.productcategoryid;'
}

# Splat
Invoke-Sqlcmd @Params
You can also use PowerShell to read the Azure SQL server and database and use that information to pass to the query as seen below. Assuming that you have $rgName defined and are passing the password as a secure string, there isn’t a functional difference between the first script and the second.
Import-Module Az.Sql -Force

$rgName = '<Resource Group Name>'
$sqlServer = Get-AzSqlServer -ResourceGroupName $rgName
$sqlDatabase = Get-AzSqlDatabase -ServerName $sqlServer.ServerName -ResourceGroupName $rgName

$Params = @{
   'ServerInstance' = $sqlServer.FullyQualifiedDomainName;
   'Database' = $sqlDatabase.DatabaseName[0];
   'Username' = $sqlServer.SqlAdministratorLogin;
   'Password' = ‘<Password>’;
   'Query' = 'SELECT pc.Name as CategoryName, p.name as ProductName
       FROM [SalesLT].[ProductCategory] pc
       JOIN [SalesLT].[Product] p
       ON pc.productcategoryid = p.productcategoryid;'
}

Invoke-Sqlcmd @Params
Wrapping Up
Now that you’ve connected to an Azure SQL Database a few different ways, you should be comfortable using it either with or instead of a traditional SQL Server installation!
