


Are your systems secure enough against brute force attacks? How do you secure them? If these questions trigger your inner blue team sysadmin, you have come to the right place.
In this tutorial, you will learn how to test your systems practically, step by step, against brute force attacks to beef up your defenses.
Sounds exciting? Grab your security hat and read on!
Prerequisites
This tutorial will be a hands-on demonstration. To follow along, be sure you have the following:
- A Windows machine to host some target services with Remote Desktop enabled – This tutorial uses a Windows 10 Pro machine.
- A Fedora machine to host some target services – This tutorial uses a Fedora 35 system with the following features:
| Secure Shell Deamon (SSHD) enabled. |
| A local user account to serve as a target for Secure Shell (SSH) attacks – This tutorial uses an account called test with password 1234567890. |
| A known IP address. |
- A Fedora machine for hosting the attack setup with Docker installed and enabled to run the attack setup, which consists of a Kali Linux Docker container – This tutorial uses Docker v20.10.17.
- User accounts with sufficient access to implement defense steps on each target machine.
Testing Windows Desktop Sign-In with Brute Force
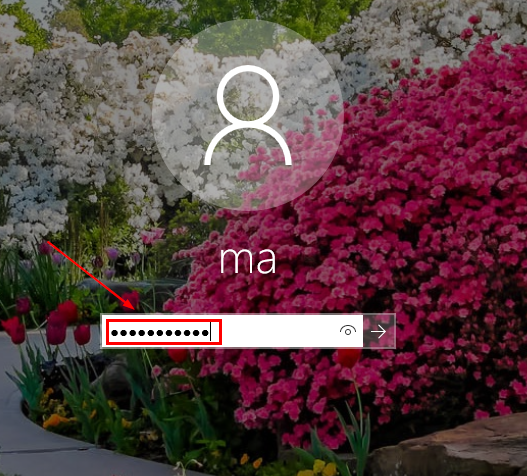
With all the prerequisites in place, it is time to start testing your defenses. One of the most common brute force attacks is through your Windows login. If you have direct access, brute force login prompts are straightforward: typing in likely credentials manually.
Turn on the target Windows machine to the sign-in prompt, as shown below, and try a password guess.
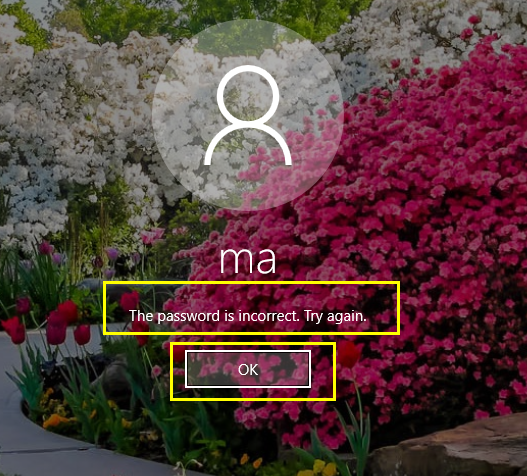
Now, click OK on the warning screen, as shown below, to try again if the password is wrong.
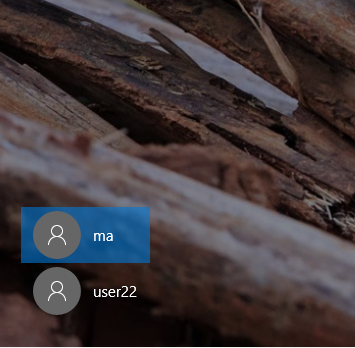
If the username is also unknown, the attacker has to attempt to guess that one too.
But for Windows systems, already provided usernames are common or selected from a list, as shown below. No worries, though. You will increase login security in the following sections.
Increasing the Minimum Password Length
Password length plays a big part in securing your password. Attackers can typically get into your account if your password is less than eight characters. When that happens, it is game over.
To increase the minimum password length:
1. Log in to your desktop, and press Ctrl+R to open the Run dialogue box.
2. Next, type in gpedit.msc and hit OK (or press Enter) to open the Local Group Policy Editor, where you can edit group policies.

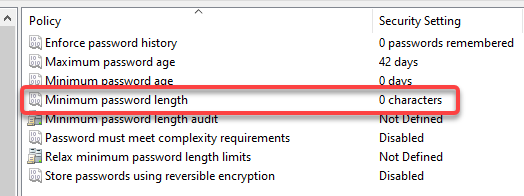
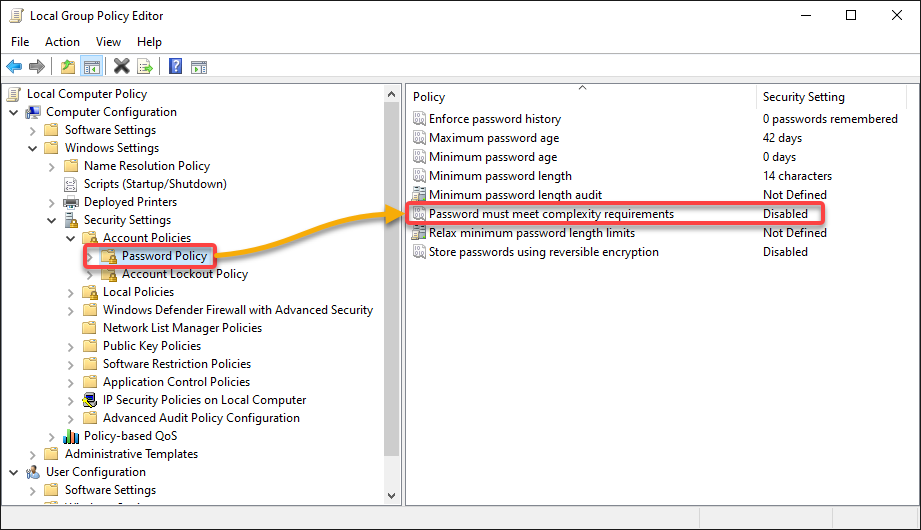
3. Expand Computer Configuration → Windows Settings → Security Settings → Account Policies → Password Policy in the navigation panel on the left. Doing so shows your machine’s Password Policy, as shown below.
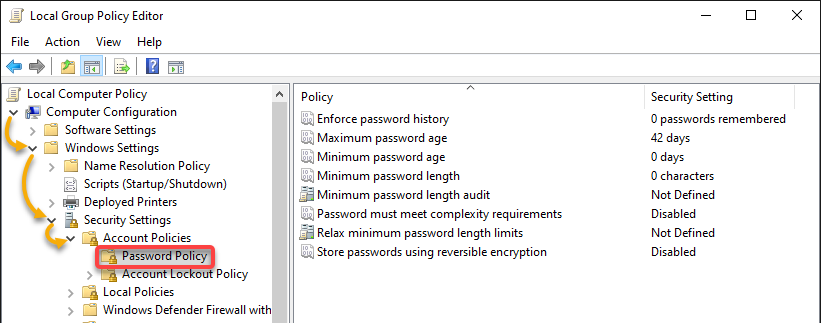
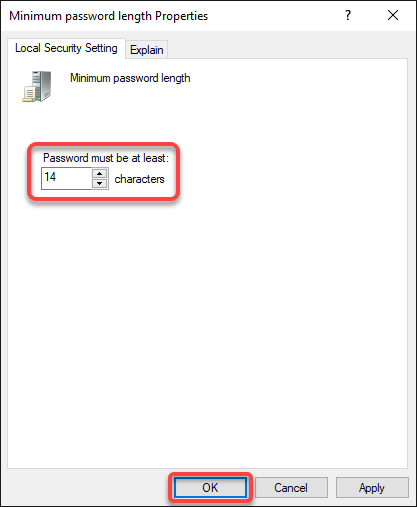
4. Now, double-click Minimum password length, which options a pop-up window where you can set a minimum password length.
5. Set a minimum password length in the field below, and click OK. This action makes guessing or picking up passwords for your machine hard for attackers by shoulder surfing.
You can set a value between 1 and 20 to enforce a minimum password length for all accounts created on your machine.
You can also harden other policy entries to improve your defenses further, but this tutorial can only cover the password length policy.
Limiting the Account Lockout Threshold
Increasing the password length helps a lot in securing your account. But if the attacker gets your password in a few tries, you will be in trouble. Limiting the account lockout threshold in the Account Lockout Policy lets you control the chances an attacker can try and log in to your account.
To modify the Account Lockout Policy:
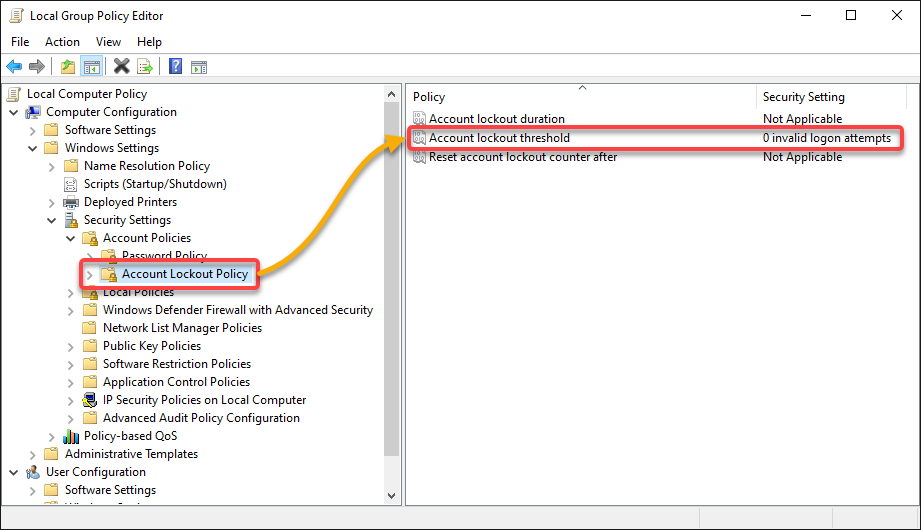
1. Select Account Lockout Policy (left panel), and double-click on Account lockout threshold, which opens a Properties window (step two).
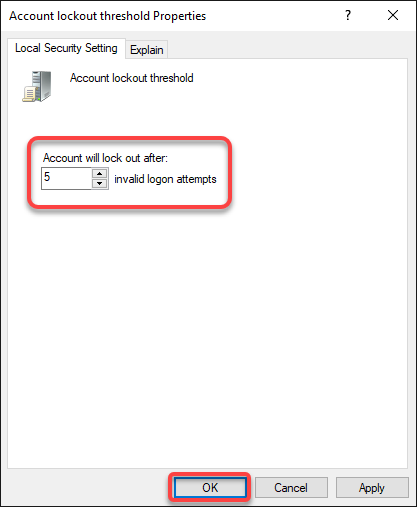
2. Set the maximum number (i.e., 5) of invalid attempts before an account gets locked in the field, as shown below, and click OK.
Setting the account lockout threshold is another way to prevent manual brute force attacks. This setting forces accounts to be locked after a number of incorrect attempts.
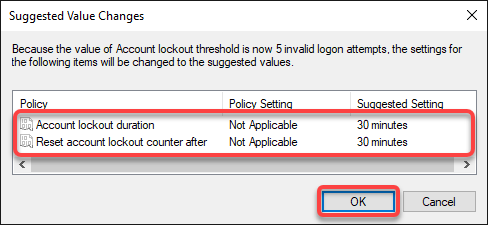
3. Review the suggested related values below, and click OK.
- Account lockout duration – The duration the account is locked out.
- Reset account lockout counter after – Duration until the number of invalid logins is reset to zero, which should always be less than or equal to the Account lockout duration.
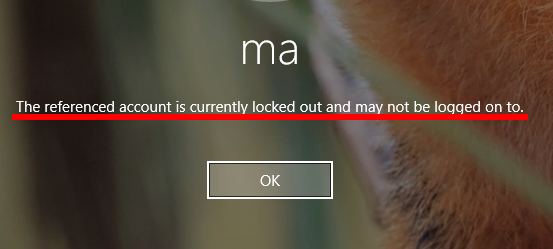
4. Lastly, logout from your account and log in with the wrong password more than five times, and you will see a warning like in the screenshot below.
With this behavior, the attacker will have to wait 30 minutes to retry another password, severely limiting the efficiency of a manual brute force attack.
Testing Windows RDP Dictionary Attacks
You have seen that restricting manual attacks works excellently. But the attackers are not limited to manual methods; they find ways to automate brute force attacks.
Another form of brute force attack involves automatically submitting passwords from a pre-defined list, also known as a dictionary. And in this example, you will use Hydra, a brute forcing tool, to automatically attack the target Windows machine via RDP.
But first, you have to set up the attack environment:
1. Log in to your Fedora attach machine, and launch the terminal.
2. Next, execute the following docker command to run the latest Kali Linux container (kalilinux/kali-rolling) in interactive mode(it). Doing so lets you install the automation tools in a tested environment
docker run -it kalilinux/kali-rollingIf all goes well, the container starts, and you will be presented with a root prompt within the container, as shown below.
The first time you run a Kali container, the image will be pulled automatically.

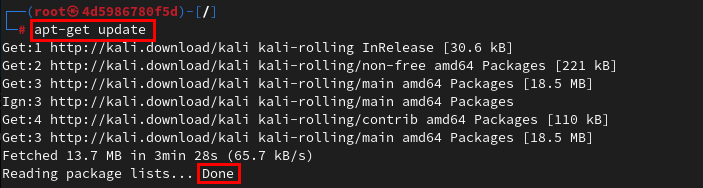
3. Run the apt-get command below to update the container.
apt-get updateThe list of packages should now be up to date, as indicated in the screenshot below.
4. Now, execute the following apt install command to install hydra for automated attacks.
apt install hydra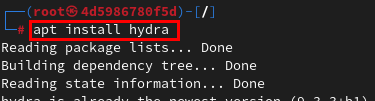
5. Create a file in your preferred text editor, populate the following text into the passlist.txt file to serve as a password list, save the file and close the editor. You can name the file as you wish, but this tutorial uses the name passlist.txt.
This word list was taken from a public file named 2020-200_most_used_passwords.txt. Word lists can also be installed as packages in some Linux distributions or manually generated.
123456
123456789
picture1
password
12345678
111111
123123
12345
1234567890
senha
1234567
qwerty
abc123
Million2
000000
1234
iloveyou
aaron431
password1
qqww1122
6. Create another file in your text editor for a list of usernames (userlist.txt), and add the following text to the file to serve as a username list.
This username list is also freely available on the internet and is extracted from Daniel Miessler’s SecList.
root
admin
test
guest
info
adm
mysql
user
administrator
oracle
ftp
pi
puppet
ansible
ec2-user
vagrant
azureuser
7. Lastly, execute the following hydra command on the Kali container to attack the login user name user22 on the Windows machine (192.168.8.102) over rdp. This command supplies your password list (-P) passlist.txt with increased verbosity (-V).
hydra -l user22 -P passlist.txt -V rdp://192.168.8.102As in the screenshot below, if the user account on your target machine has a password in a popular wordlist, breaching your defenses is a matter of time. All the attacker has to do is wait.
On the attack side, it is worth noting that some services, such as RDP, require you to reduce the attack rate deliberately. As indicated in the shot below, doing so enables you not to overwhelm the server.

Defending Against Dictionary Attacks on Windows RDP
If your password is in the list of common passwords, you must change your password to a strong one. But to severely reduce the effectiveness of dictionary attacks, increase the complexity of passwords via the Local Group Policy Editor.
To increase your password complexity:
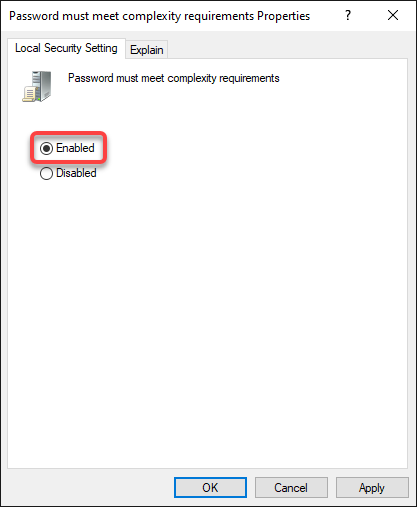
1. Open the Local Group Policy Editor, navigate the Password Policy, and double-click the Password must meet complexity requirements policy.
2. Next, select the Enabled option to enable the policy.
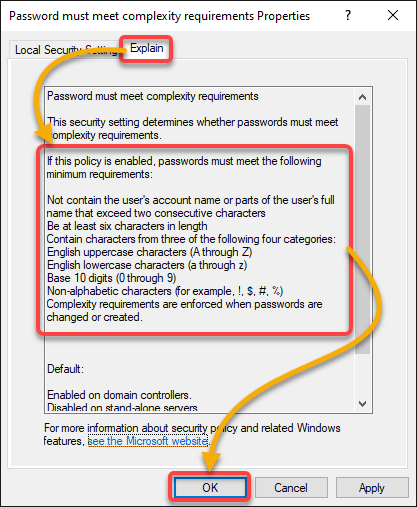
3. Navigate to the Explain tab, review the minimum requirements, and click OK to activate the changes.
Passwords that conform to these requirements are more difficult to find in public word lists.
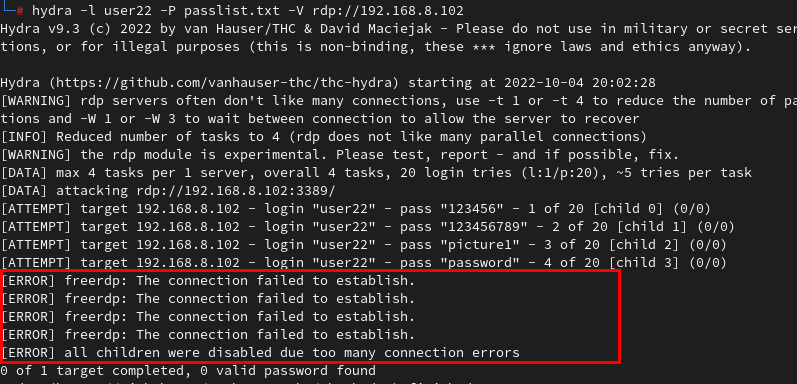
4. Now, rerun the hydra command below with the same passlist.txt file and Windows rdp target (192.168.8.102).
hydra -l user22 -P passlist.txt -V rdp://192.168.8.102You can see below that the brute force attack fails because Hydra cannot wait for the lockout period to expire, indicating errors right after the 4th attempt.
Testing and Defending Against SSH Authentication Attacks
You have previously seen how to carry out manual and automated brute force attacks. But this time, you will test brute force attacks, where the password is known, but the user account is unknown (aka Reverse Brute Force Attack).
You will later defend against brute force attacks with a rate limiter, Fail2ban, to reduce the effectiveness of Hydra and other automated tools. Fail2ban works by setting up firewall rules on the fly to block suspicious attempts in SSH access logs.
To test and defend against SSH authentication attacks:
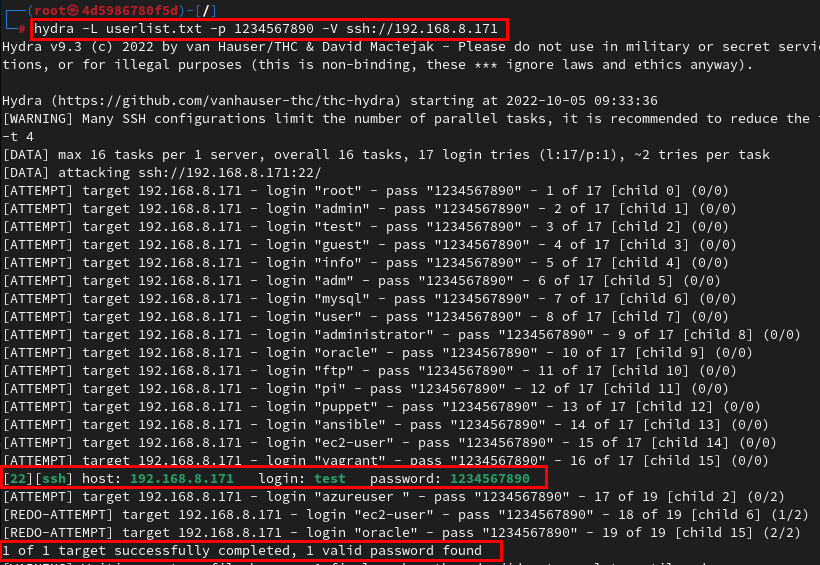
1. Run the following command supplying (-L) the username list (userlist.txt) to attack the ssh server (192.168.8.171) using a known password (1234567890).
hydra -L userlist.txt -p 1234567890 -V ssh://192.168.8.171Your screen lights up as each attempt returns with a status. Eventually, if the username is found, you should be notified of a successful brute force attack, as in the shot below.
2. Log in to a new terminal on your Fedora machine, and execute the su command below as a superuser (sudo) to switch to the root user (-) for elevated privileges.
sudo su -Provide your password when prompted, as shown below.

3. Run the below dnf command to install fail2ban on your machine.
dnf install fail2ban
4. Now, run the following systemctl command to enable and start the fail2ban service immediately (–now)
systemctl enable --now fail2ban
5. Open the fail2ban configuration file (/etc/fail2ban/jail.local) in your preferred text editor, and add the following configuration to the file.
[sshd]
# Enables fail2ban jail for sshd
enabled = true `
# Deny access after five incorrect attempts from the same IP
maxretry = 5
# Ban for 30 mins
bantime = 30m
# Interval within which consecutive retries are counted
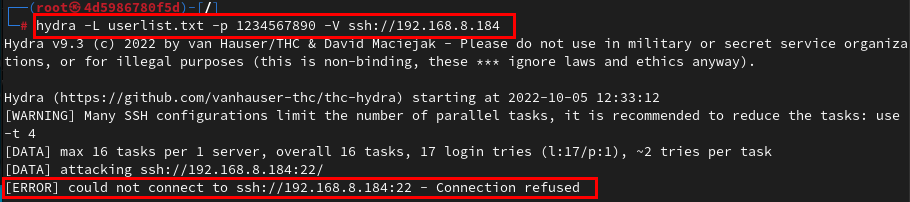
findtime = 30m 6. Finally, rerun the same hydra command from step one twice to confirm that fail2ban is working as expected.
hydra -L userlist.txt -p 1234567890 -V ssh://192.168.8.184The first execution begins to run and triggers the ban in the process, while the second fails outrightly, as shown below.
Conclusion
Brute forcing is a common means attackers employ to breach systems. By coming to the end of this tutorial, you have learned to stand up to brute force attacks.
Do not stop here, though. There are many brute-force attack (pen testing) tools out there you can use to test your defenses and ensure you can defend against different attacks.


