


If you have always envisioned creating powerful, dynamic web applications but found the process overwhelming, you are in for a treat! With AWS Amplify, your path to becoming a full-stack developer becomes achievable and remarkably efficient.
By completing this tutorial, you will have a secret weapon in your developer toolkit to simplify complex tasks and build robust applications.
Start your AWS Amplify journey and revolutionize your development workflow!
Prerequisites
Before you set sail into the world of AWS Amplify, ensure you have the below essentials covered to follow along in this tutorial:
- An AWS Account – A free tier account is sufficient to get started.
- A system running Windows 10 or later – This tutorial uses Windows 10.
- PowerShell 5 or later installed – This tutorial uses PowerShell 7.
- Node.js v12.x (or later) and Node Package Manager (npm) v5.x (or later) installed, as AWS Amplify CLI requires.
Installing and Configuring the AWS Amplify CLI
With the required tools taken care of, you can kickstart the real action, starting with installing the AWS Amplify CLI. This step is crucial, as AWS Amplify CLI is a powerful tool that streamlines the process of building and deploying full-stack applications.
Installing and configuring the AWS Amplify CLI lets you connect the CLI tool to your AWS account and set up the required credentials.
To install and configure the AWS Amplify CLI, follow these steps:
1. Open PowerShell and run the below npm command to install the AWS Amplify CLI (@aws-amplify/cli) globally (-g) from the npm registry.
npm install -g @aws-amplify/cli
2. Once installed, execute the following amplify command to view the installed AWS Amplify CLI --version to verify the installation.
amplify --version
3. Next, run the below command to configure your AWS Amplify CLI installation.
amplify configureThis command automatically opens a browser window with the AWS Management Console sign-in page (step four).
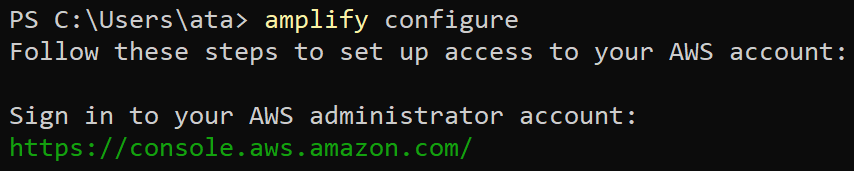
4. Now, enter your AWS account credentials to sign in to your AWS account.
 Signing in to the AWS account
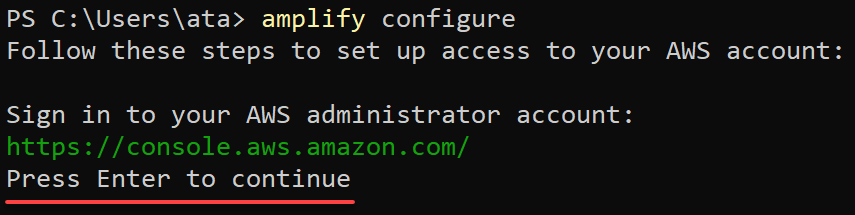
5. Once signed in, switch back to PowerShell and press Enter to continue.
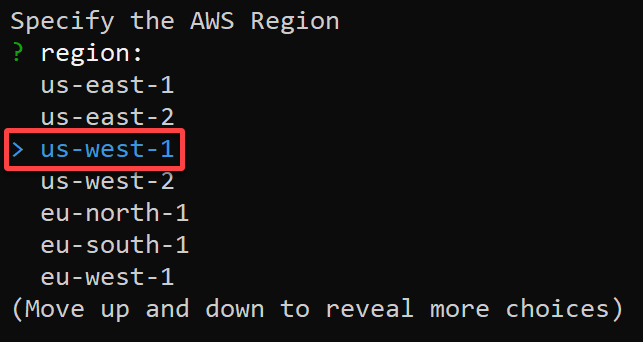
6. Specify the region (i.e., us-west-1) to create and manage your AWS Amplify resources using the arrow keys on your keyboard, and press Enter.
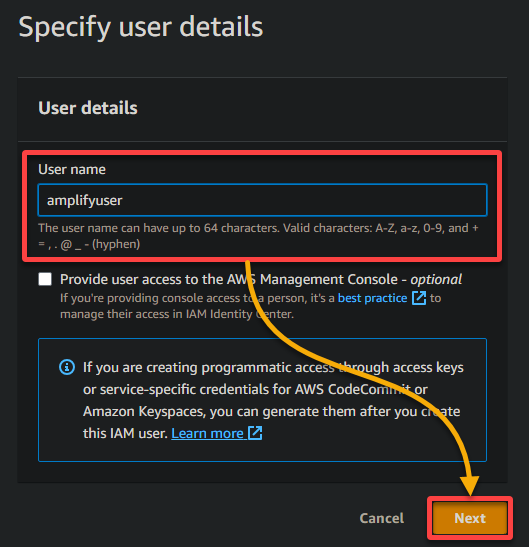
After specifying the region, another web browser tab opens automatically, where you will create a dedicated user for accessing your AWS resources (step seven).
7. Provide a User name (i.e., amplifyuser) for your dedicated user in accessing your AWS resources, and click Next.
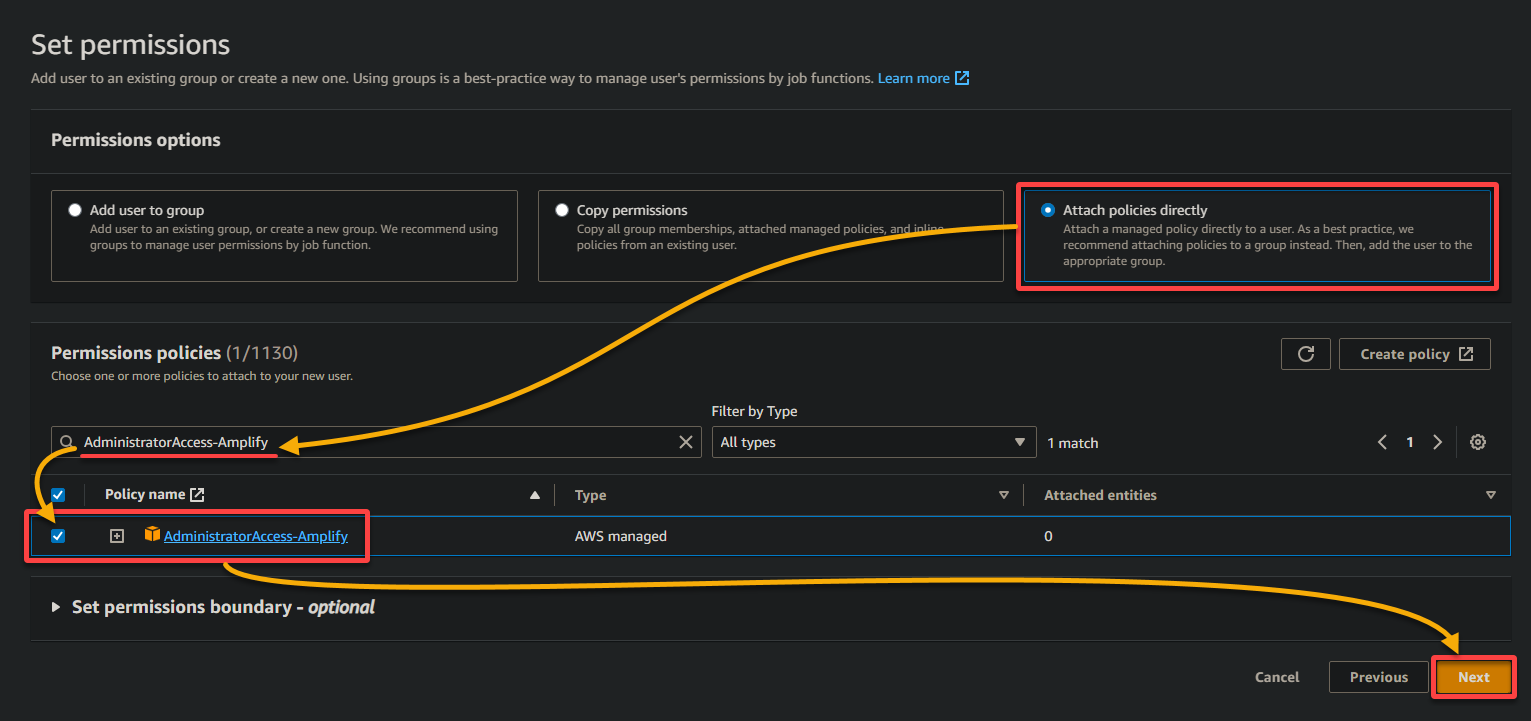
8. On the next page, set permissions options and policies as follows:
- Permissions options – Select the Attach existing policies directly option – For simplicity in this tutorial, you will attach an existing policy.
- Permissions policies – Search for and tick the AdministratorAccess–Amplify checkbox. This policy grants your IAM user full administrative access to AWS Amplify resources.
Once permissions are set, click Next to continue.
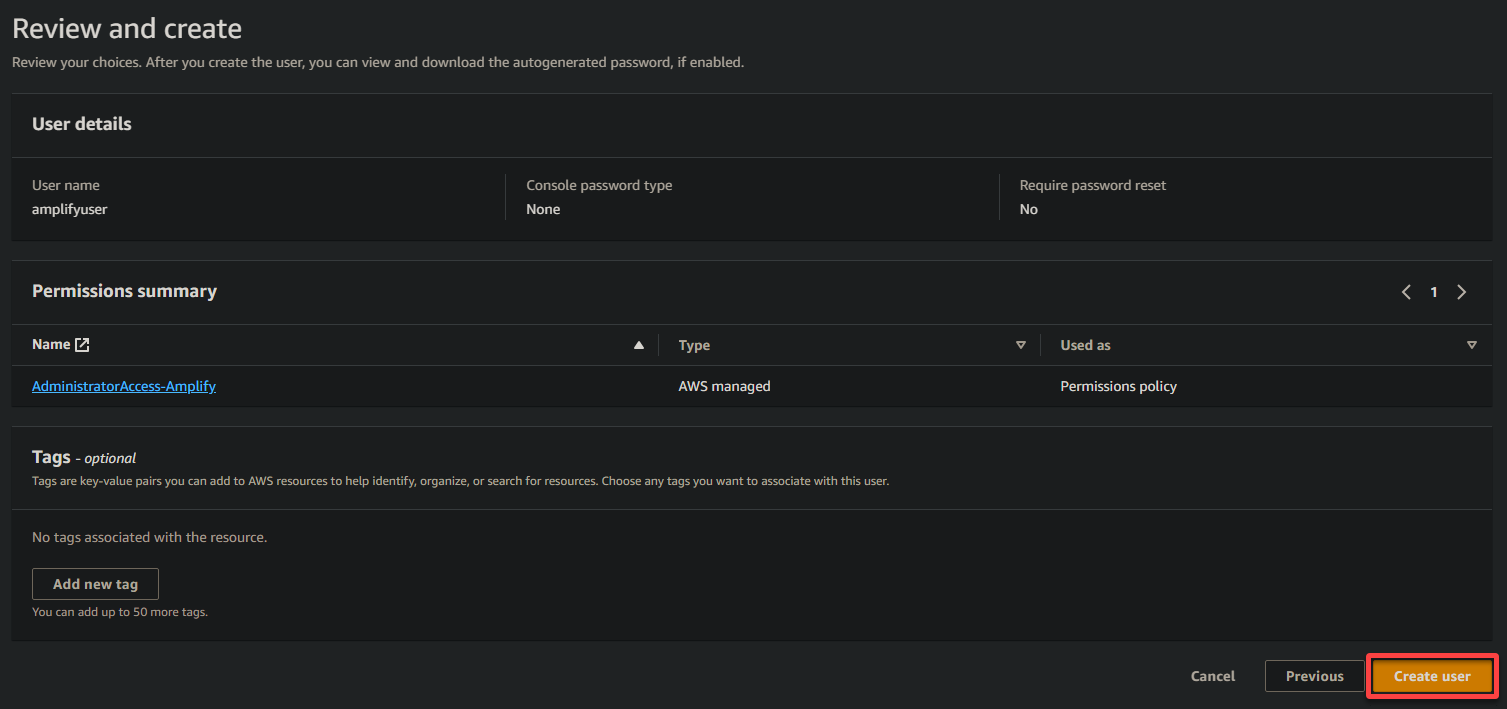
9. Review the user details, and click Create user to finalize creating the user.
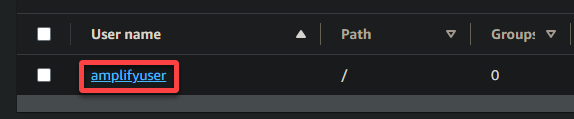
10. Once created, click on the user name to access the user’s details.
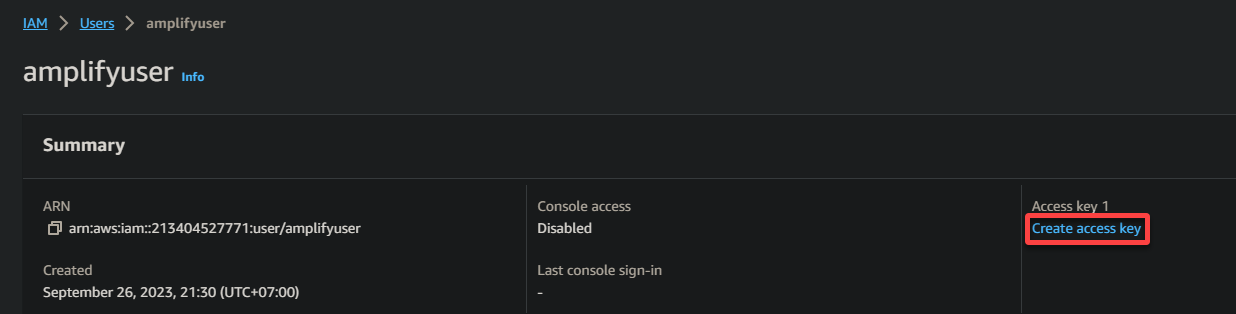
11. On the user details page, click Create access key to generate your Access Key ID and Secret Access Key.
Configuring the Amplify CLI involves setting up your AWS account credentials, including the Access Key ID and Secret Access Key. These credentials authenticate your CLI requests and authorize access to your AWS resources.
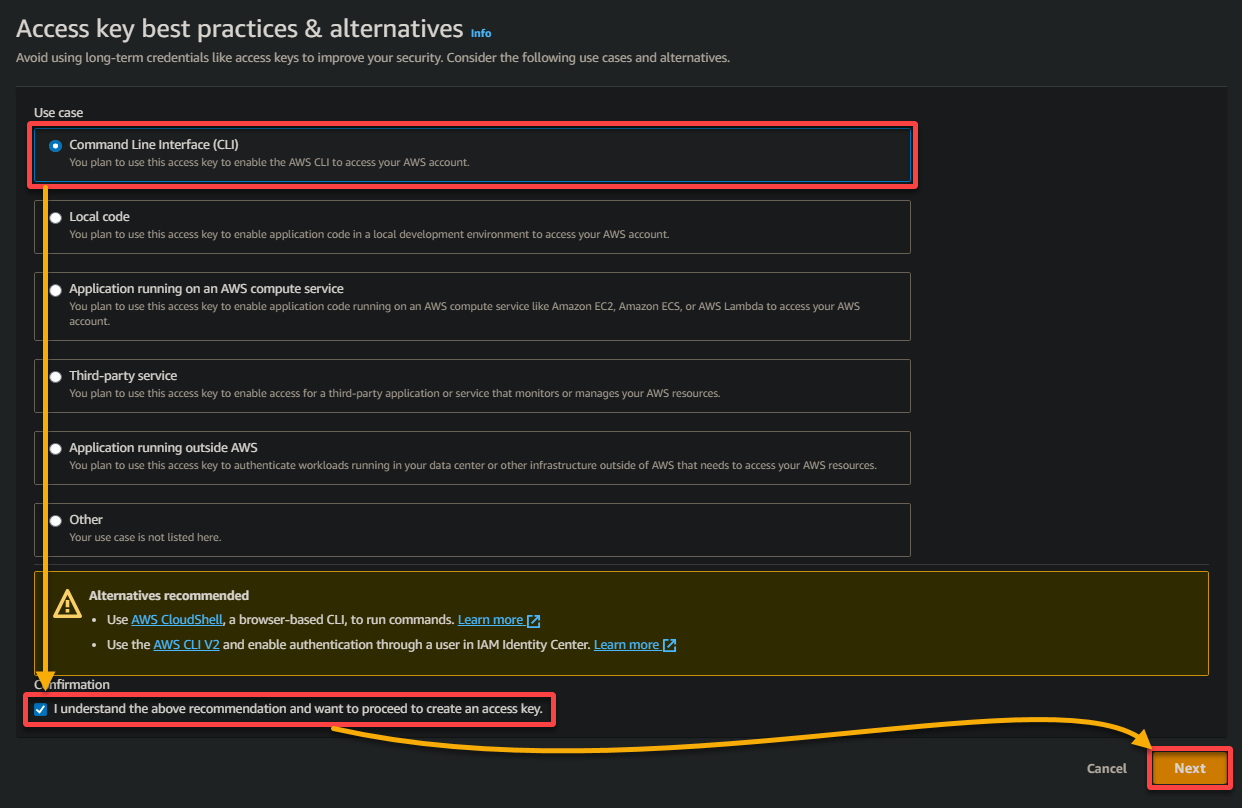
12. Select the Command Line Interface (CLI) option as the use case for creating an access key, tick the Confirmation checkbox, and click Next.
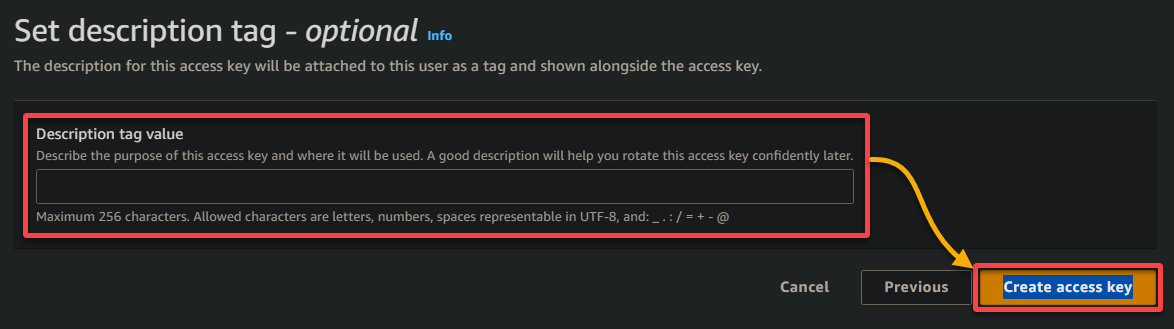
13. Set a description tag for the access key, which is optional, and click Create access key to finalize creating your access key.
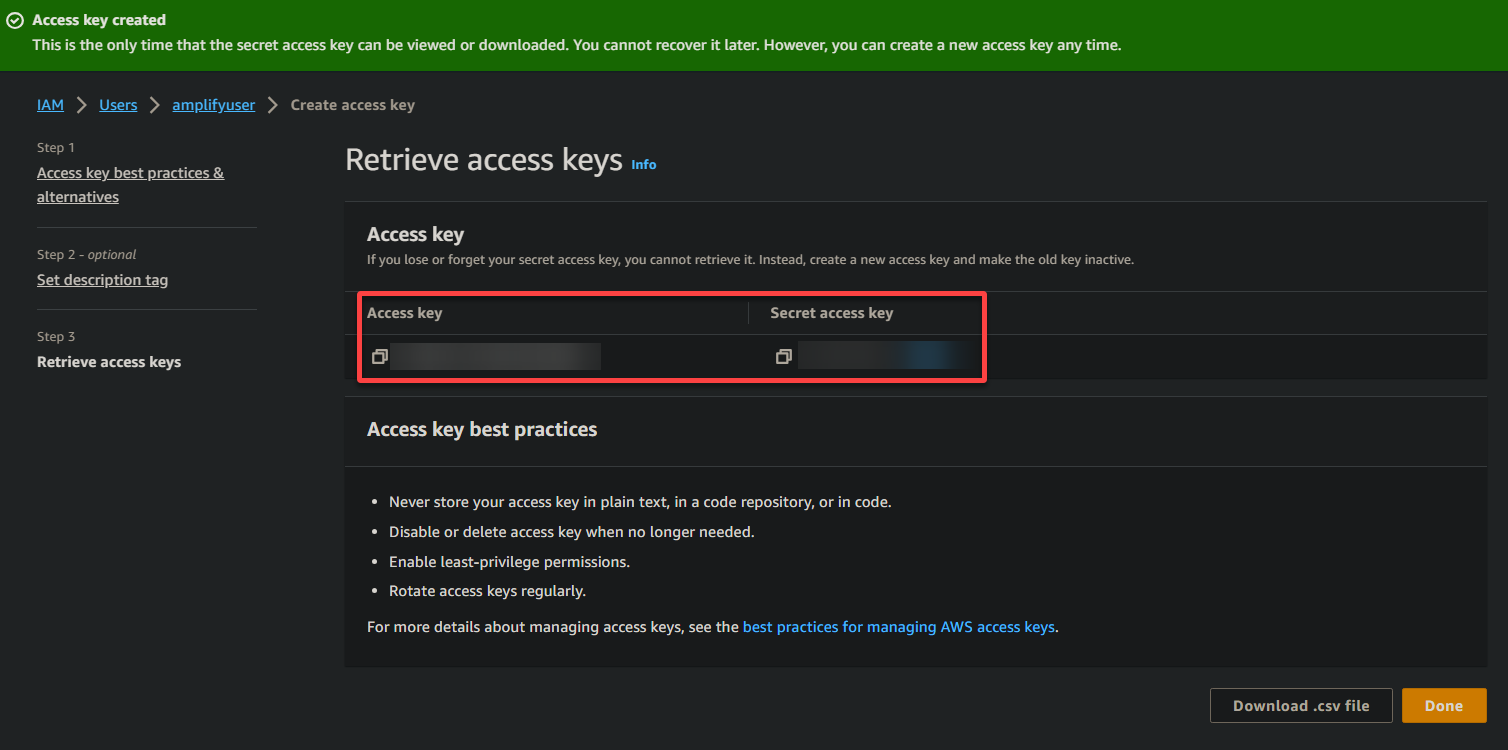
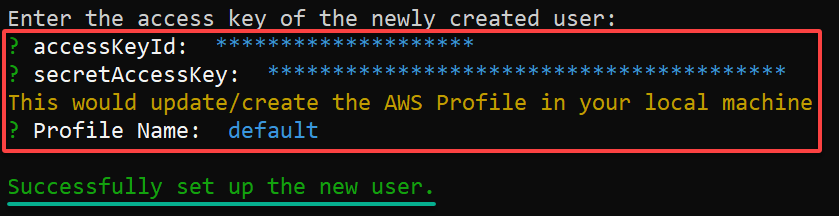
14. Copy the Access Key ID and Secret Access Key, as you will use them later to configure the AWS Amplify CLI.
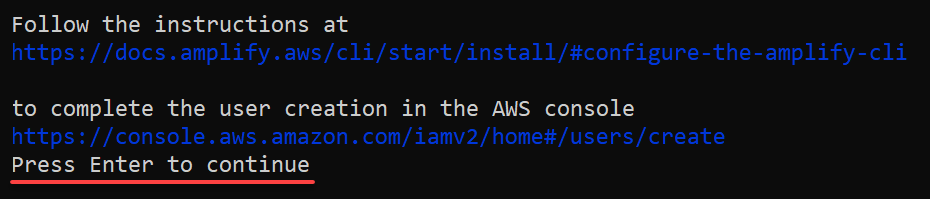
15. Switch to your PowerShell window where you ran the amplify configure command and press Enter to continue configuring the AWS Amplify CLI.
16. Lastly, provide your credentials to complete setting up the new user as follows:
- accessKeyID and secretAccessKey – Paste the Access Key ID and Secret Access Key you copied in step 14 and press Enter on each prompt.
- Profile Name – Press Enter to choose the default name (the default AWS CLI profile).
The default profile is named default by convention, but you can name it something else. If you have not configured a profile, AWS CLI will use the default profile, which stores your credentials (access key and secret key) and region information.
Preparing a React App for AWS Amplify
Kudos on getting the AWS Amplify CLI running! But still, you need to get your React app geared up for its grand Amplify adventure. You will create a simple note-taking React app and make it AWS Amplify-ready.
To prepare a React app for AWS Amplify, carry out the following steps:
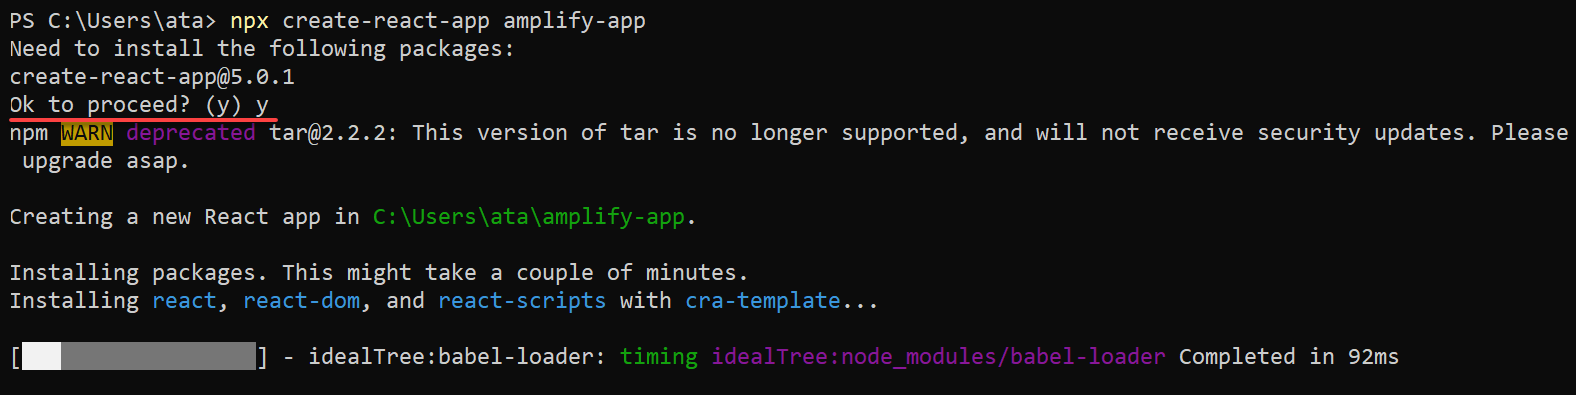
Execute the below npx command to create a new React app (create-react-app) named amplify-app (arbitrary) in the current directory.
create-react-app provides a pre-configured boilerplate project with all the tools, libraries, and configurations necessary to start developing a React application.
npx create-react-app amplify-appType y and press Enter when prompted to continue.
The process will execute for a few minutes to install and configure the necessary dependencies for your project.
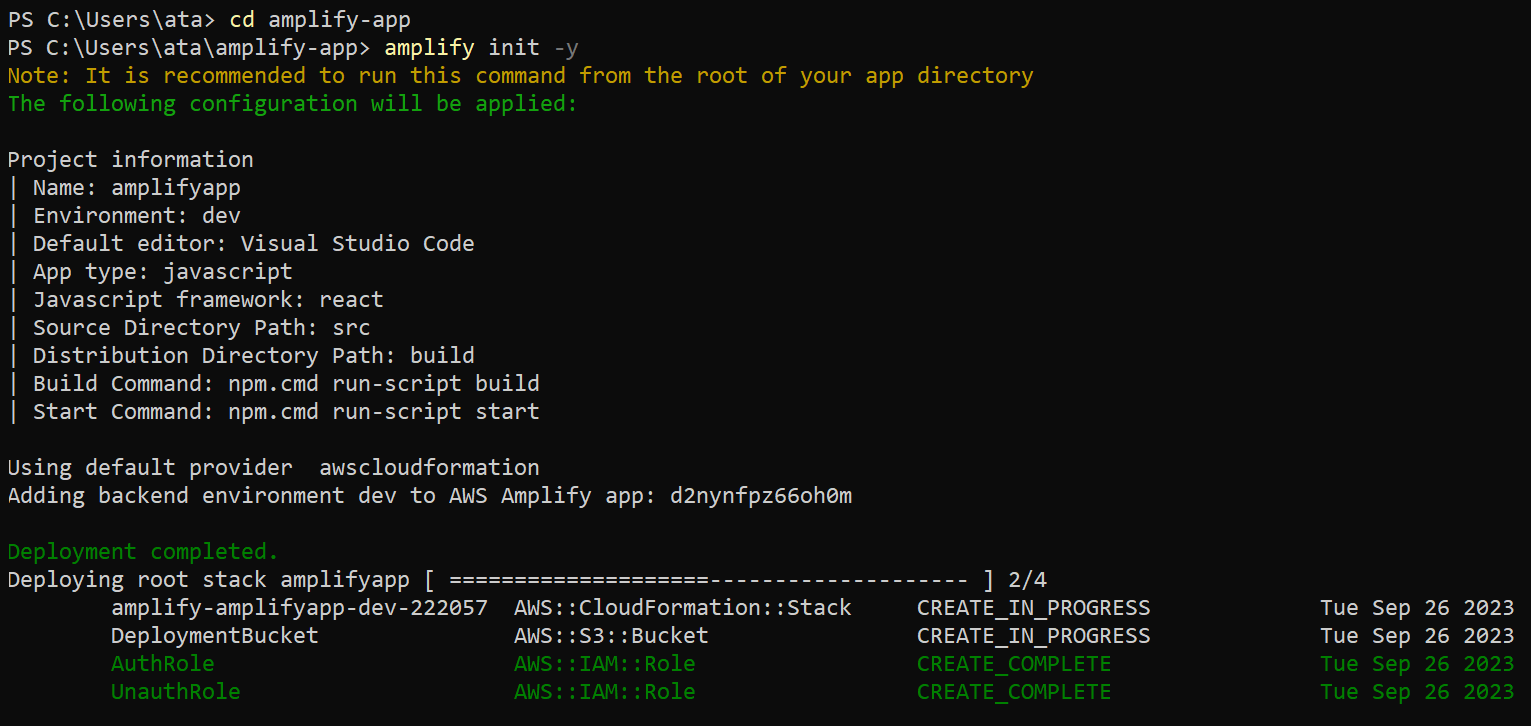
With a new React app created, run each command below to navigate (cd) into the new amplify-project directory and initialize (init) your project as an Amplify project.
The amplify command automatically configures the Amplify project based on the detected configuration, including setting up the necessary build settings, configuring the AWS resources, and creating the initial backend environment suitable for a React application.
# Changes working directory
cd amplify-app
# Initialize the project as an Amplify project
amplify init -y
After initializing your project, a new boilerplate React app will be created and configured to work with AWS Amplify.
Creating a Frontend for Your App
Alright, you have prepped your React app for the Amplify journey. But for your app to get the attention it deserves, it must take shape and start to look like, well, an actual app. You will create a user-friendly interface to make your app stand out and provide a smooth and intuitive user experience.
AWS Amplify provides various frontend options, including React, Vue.js, Angular, and more. But in this tutorial, you will focus on creating a basic React frontend for your note-taking app.
To create a frontend for your app using AWS Amplify, proceed with these steps:
Run the following command to install the necessary dependencies for using AWS Amplify and its React UI components:
aws-amplify– This package provides the core functionality of AWS Amplify, including authentication, API interactions, storage, and more.@aws-amplify/ui-react– Contains the React UI components provided by AWS Amplify. This package includes pre-built UI components that you can use to create user interfaces for authentication, forms, and storage.
npm install aws-amplify @aws-amplify/ui-react
Now, open the src/index.js file in your project directory (i.e., C:\Users\ata\amplify-app\src\index.js) with your preferred text editor and replace its content with the following code.
This code focuses on the frontend part of the application, setting up the user interface and its functionality as follows:
- Imports necessary modules and components.
- Configures any required libraries (such as Amplify for cloud backend integration)
- Renders the main
Appcomponent to the DOM.
// Import the 'react' module
import React from 'react';
// Import the 'ReactDOM' module from the 'react-dom' package
import ReactDOM from 'react-dom/client';
// Import the CSS file for styling
import './index.css';
// Import the 'App' component from the './App' file
import App from './App';
// Import the 'reportWebVitals' function from the './reportWebVitals' file
import reportWebVitals from './reportWebVitals';

// Ensure React UI libraries are styled correctly
import "@aws-amplify/ui-react/styles.css";
// Import the 'Amplify' object from the 'aws-amplify' package
import { Amplify } from 'aws-amplify';
// Import the 'awsconfig' object from the './aws-exports' file
import awsconfig from './aws-exports';
// Configures the Amplify libraries with the cloud backend set up via the Amplify CLI
Amplify.configure(awsconfig);

// Create a React root to render the app
const root = ReactDOM.createRoot(document.getElementById('root'));
root.render(
  // Enable strict mode for additional checks and warnings during development
  <React.StrictMode>
    // Render the 'App' component
    <App />
  </React.StrictMode>
);
// Call the 'reportWebVitals' function to measure and report web vitals
reportWebVitals();
Adding a GraphQL API to Your App
Now that you have your frontend set up, it is time to add the engine that will power your app’s data handling — GraphQL, a query language for APIs. You will add a GraphQL API with Amplify to simplify setting up and configuring the API.
💡 AWS Amplify abstracts away the backend infrastructure setup, including managing the server, schema, resolvers, and database connections. With a streamlined development experience, you can focus on building the frontend components and interacting with the API using GraphQL queries and mutations.
Integrating GraphQL with your project is like giving your app a supercharged brain, enabling it to fetch exactly what it needs, precisely when it needs it.
To add a GraphQL API to your app with Amplify, complete the steps below:
1. Execute the following command to add the api using AWS Amplify.
amplify add apiSelect your desired option, in this case, GraphQL, with your arrow keys, and press Enter to confirm your selection.

2. On the next prompt, select a setting to edit for the GraphQL or continue. But for this example, choose Continue and press Enter.

3. Choose a schema template, a pre-defined GraphQL schema structure, for setting up your GraphQL API. A schema provides a basic structure for your GraphQL API that you can customize and build upon.
But in this example, choose the Single object with fields (e.g., “Todo” with ID, name, description) template. This template lets you set up a GraphQL API for managing a to-do list.

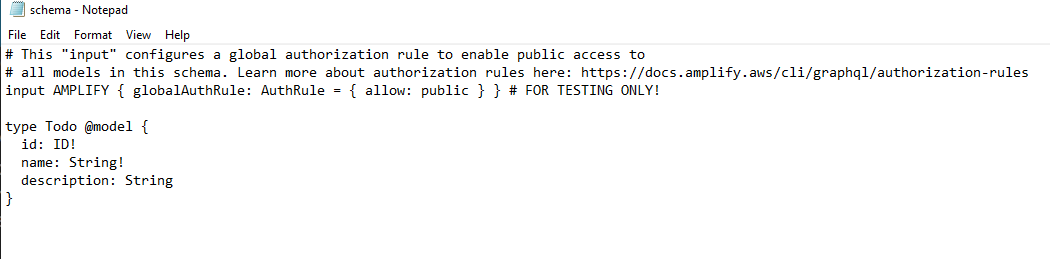
4. Now, input Y, press Enter to open the schema file automatically in your default text editor, and modify it as desired.
Take note of the schema file’s location below, as you will need to modify the file’s content later:
C:\Users\%USERNAME%\amplify-app\amplify\backend\api\amplifyapp\schema.graphql

The default schema looks like the one below, which you will modify in the following sections.
A GraphQL schema defines the structure, types, and capabilities of your GraphQL API — a contract between the server and the client. With a GraphQL schema, you can specify available queries, mutations, and subscriptions that can be performed on the API.
Defining a GraphQL Schema
Now that you have laid the foundation with GraphQL, you will sketch the blueprint. You must specify the types, fields, and relationships that make up your API by defining a GraphQL schema.
A schema outlines how information will be organized, what data types can be queried, and how they are related. In essence, a schema is the backbone that gives your app a clear sense of structure and purpose.
To define your GraphQL schema, follow the steps below:
Open your schema file C:\Users\%USERNAME%\amplify-app\amplify\backend\api\amplifyapp\schema.graphql) in your text editor.
Now, replace the content of your schema file with the following code, save the changes, and close the file.
The code below defines a simple Note type with the directives as follows:
| Directive | Details |
|---|---|
| @model | Indicates that the Note type is a model for generating backend resources. This directive tells Amplify that this type should have its own database table (i.e., DynamoDB table). Moreover, the necessary Create, Read, Update, Delete (CRUD) operations will be automatically handled by the generated GraphQL API. |
| @auth | Enables authentication and authorization rules for the Note type. The provided rule { allow: owner } specifies that only the owner of a note is allowed to perform operations on it. This rule ensures that users can only access and modify their notes. |
| Field | Details |
|---|---|
| id | The id field is of type ID, which represents a unique identifier. The exclamation mark (!) denotes that this field is non-nullable (must always have a value). |
| text | The text field is of type String, representing the note’s content. Similar to the id field, this field is also marked as non-nullable. |
# Defines a 'Note' type which represents a data entity in your API
type Note @model @auth(rules: [{ allow: owner }]) {
  # The unique identifier for each note.
  id: ID!
  # The main text content of the note.
  text: String!
}
Deploying and Testing Your Application
With a frontend and GraphQL schema configured, you must ensure your app gets to shine in the real world. You will deploy your React app through AWS Amplify — like launching your spacecraft into the digital galaxy!
To deploy and test your application, proceed with the following steps:
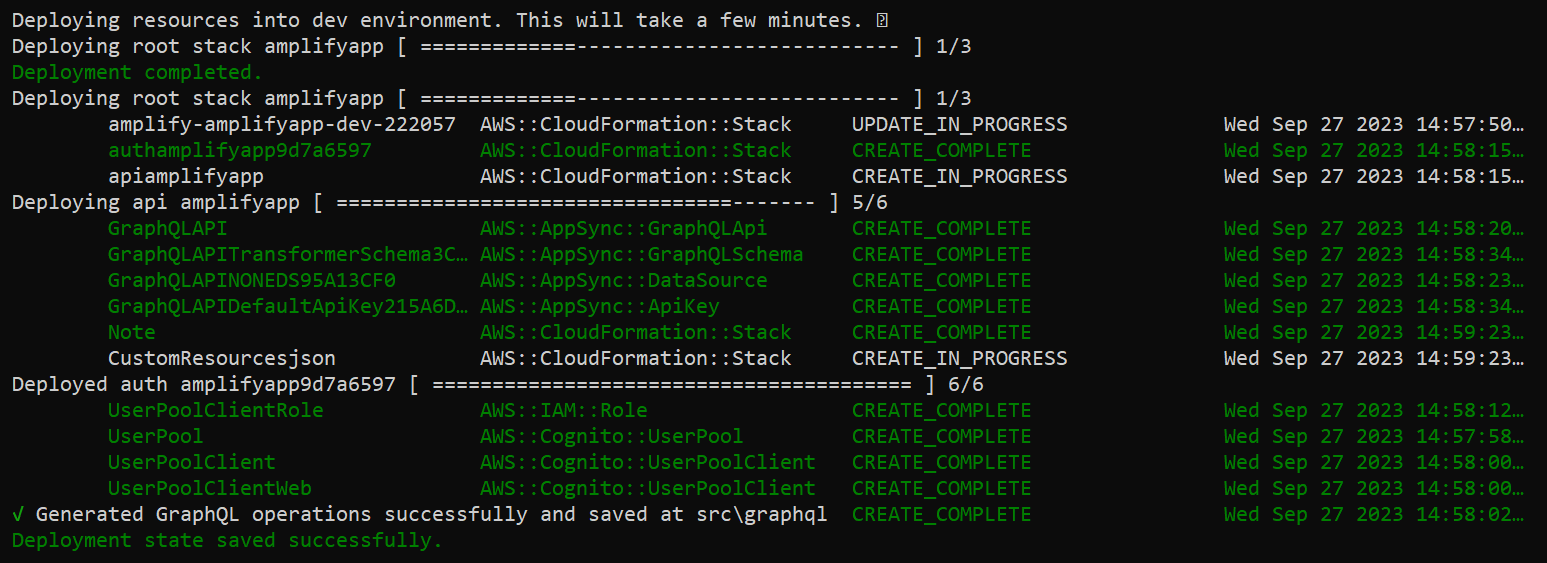
1. Execute the following command to build your React app, create a static hosting environment using AWS Amplify Hosting, and deploy it to the cloud.
amplify pushType Y and press Enter to continue when prompted.
AWS Amplify handles the following:
- Generating the necessary backend resources, such as DynamoDB tables.
- Configures the GraphQL API to handle read, write, update, and delete operations based on your schema.
A series of prompts will guide you through configuring your authentication and security options (step two).

2. Next, use the arrow keys to select your desired authentication and security configuration options, and press Enter to confirm your selection.
But for this example, choose the Default configuration, designed to follow best practices for security and authentication, and is a good starting point for many applications.

3. Choose the Username as the sign-in method for users.

4. Now, choose the No, I am done option to skip configuring the advanced settings.

5. Press Enter to accept the default values for the rest of the prompts, as shown below.

The application will be deployed as below.
6. Open the src/App.js file in your project directory( C:\Users\%USERNAME%\amplify-app\src\App.js) and replace its content with the following code.
This code lets your application communicate with the GraphQL API to perform CRUD operations on notes.
// Import CSS styles for the application
import './App.css';

// Import GraphQL mutations and queries
import { createNote, deleteNote } from './graphql/mutations';
import { listNotes } from './graphql/queries';

// Import UI components and authentication-related utilities from AWS Amplify
import { withAuthenticator, Button, Text, Flex, Heading } from "@aws-amplify/ui-react";

// Import React hooks for state management and side effects
import { useCallback, useEffect, useState } from 'react';

// Import the API module from AWS Amplify for interacting with the backend
import { API } from 'aws-amplify';

// Define the main application component
function App({ signOut }) {
  // Define a state variable to store the notes
  const [notes, setNotes] = useState([])

  // Define a function to fetch notes from the backend
  const fetchNotes = useCallback(async () => {
    // Use the API module to send a GraphQL query to list notes
    const result = await API.graphql({
      query: listNotes,
      authMode: 'AMAZON_COGNITO_USER_POOLS' // Authentication mode
    })
    // Update the notes state with the fetched data
    setNotes(result.data.listNotes.items)
  }, [setNotes])

  // Define a function to create a new note
  const handleCreateNote = useCallback(async () => {
    // Use the API module to send a GraphQL mutation to create a note
    await API.graphql({
      query: createNote,
      variables: { input: { text: window.prompt("New note") } }, // Prompt for note text
      authMode: 'AMAZON_COGNITO_USER_POOLS' // Authentication mode
    })
    // After creating a note, fetch the updated list of notes
    fetchNotes()
  }, [fetchNotes])

  // Define a function to delete a note
  const handleDeleteNote = useCallback(async (id) => {
    // Use the API module to send a GraphQL mutation to delete a note
    await API.graphql({
      query: deleteNote,
      variables: { input: { id: id } }, // Pass the ID of the note to be deleted
      authMode: 'AMAZON_COGNITO_USER_POOLS' // Authentication mode
    })
    // After deleting a note, fetch the updated list of notes
    fetchNotes()
  }, [fetchNotes])

  // Use the useEffect hook to fetch notes when the component mounts
  useEffect(() => {
    fetchNotes()
  }, [fetchNotes])

  // Render the user interface of the application
  return (
    <Flex direction={"column"}>
      <Flex justifyContent={'space-between'}>
        <Heading level={1}>My notes</Heading>
        <Button onClick={signOut}>Sign Out</Button>
      </Flex>
      {notes.map(note => <Flex alignItems={'center'}>
        <Text>{note.text}</Text>
        <Button onClick={() => handleDeleteNote(note.id)}>Remove</Button>
      </Flex>)}
      <Button onClick={handleCreateNote}>Add Note</Button>
    </Flex>
  );
}

// Export the main application component with authentication
export default withAuthenticator(App);
7. Next, run the below npm command to start the local development server (http://localhost:3000/), and your app opens in a new browser tab.
npm startWait a few minutes to bootstrap the application with AWS Amplify, and once done, your browser redirects to your app’s sign-in page (step eight).

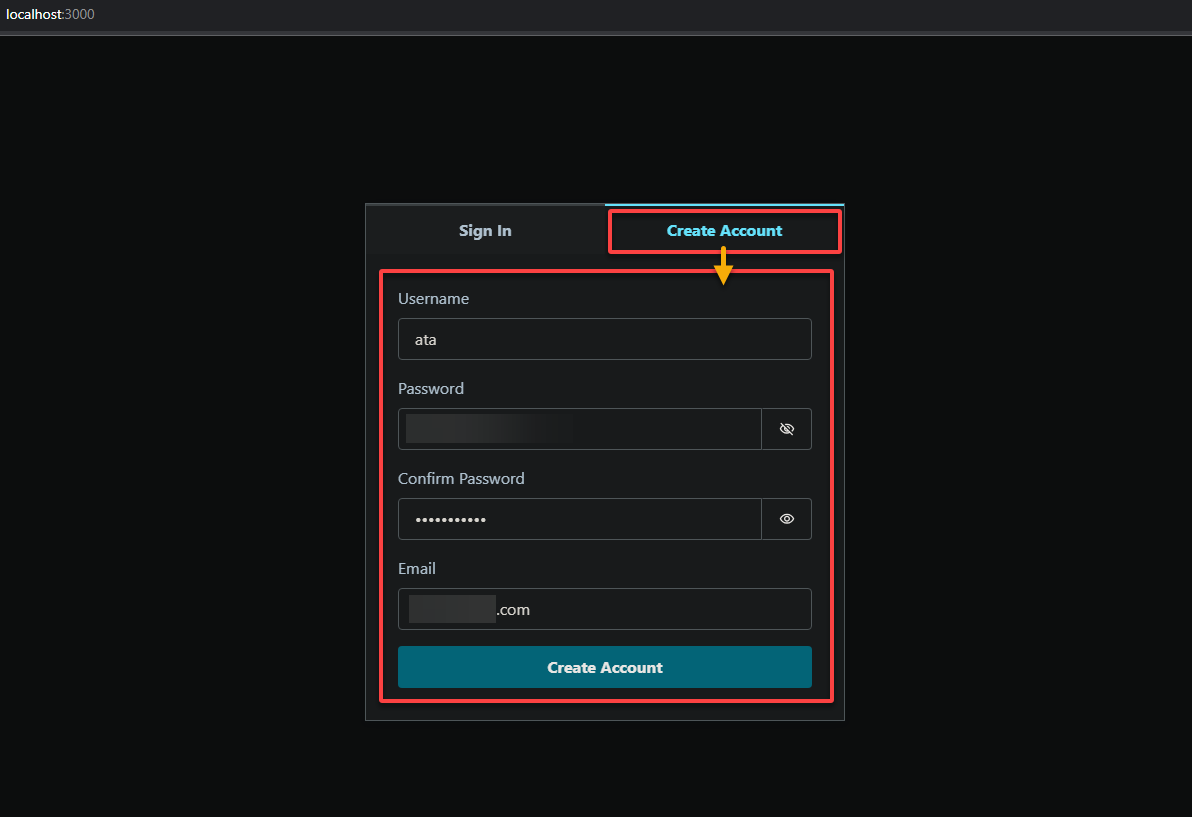
8. On the sign-in page, navigate to the Create Account tab, fill in the required account details, and click Create Account to create a new user.
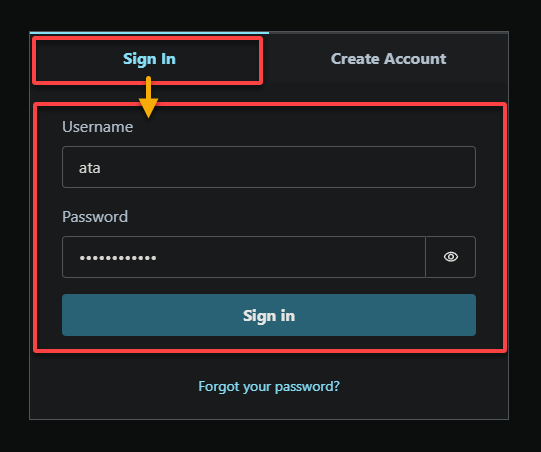
9. Switch to the Sign in tab and sign in with your newly created user.
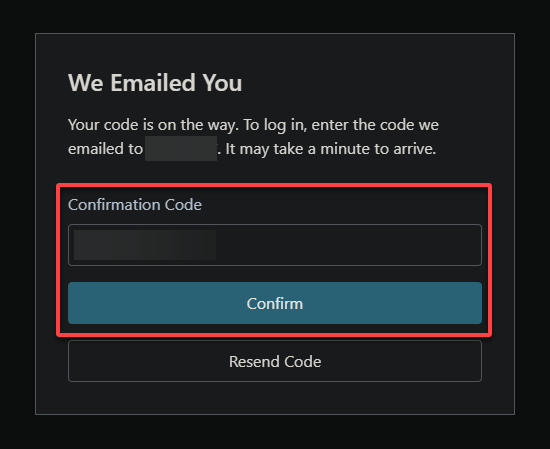
10. Provide the MFA code sent to your email, and click Confirm to authenticate your account.
Once signed in, your browser redirects to the main page of your app, as shown below.

11. Finally, test your note-taking app as follows:
- Click Add Note, enter some text on the prompt that appears, and click OK to add the note.
- Click Remove next to your note to delete it.

Conclusion
You have just embarked on a journey into AWS Amplify, a powerhouse for launching full-stack applications. Throughout this tutorial, you have covered every step, from setting up the Amplify CLI to preparing and deploying a React app. Moreover, you seamlessly integrated GraphQL for dynamic data handling.
Besides witnessing the power of Amplify in action, you also gained hands-on experience in creating and testing a fully functional app.
But why stop here? Take your Amplify skills to the next level! Why not explore deeper integrations with AWS services like Amazon DynamoDB for robust database management? Or Amazon Cognito for advanced user authentication and management?


