

So you’ve got an Azure DevOps release pipeline created. You’ve automated the build and all of the tests. Now comes the time to publish a build artifact somewhere. Stick around to learn how to add a NuGet Azure Artifacts feed to Azure DevOps!
Not a reader? Watch this related video tutorial!Azure Artifacts includes a free usage tier of 2 GB. All work performed in this article will be free.
One of the last steps in a CI/CD pipeline are packaging and deployment steps. You’ve got to actually deploy code to an environment to be of any use. Having all of the artifacts bundled up in a single package is a great way to deploy the project.
One way to package up an application and associated build artifacts is with the package management tool NuGet. NuGet is a handy packaging format that many tools natively support. NuGet allows you to package up your project and publish it to a feed. Then, you can point a client to this feed and download a versioned package and begin using it.
There are many different services out there that allow you to create packages and publish them to NuGet feeds. But if you’re already using an Azure DevOps release pipeline to build projects, you’ve got a built-in artifact publishing engine built-in called Azure Artifacts.
Azure Artifacts is a great way to share and distribute NuGet packages of all kinds. In this article, you’re going to learn how to leverage Azure Artifacts as a final step in a CI/CD pipeline!
Project Overview
This project is going to be broken down into six main sections. They are:
- Ensuring the project is set up for Azure Artifacts
- Setting feed permissions to ensure the pipeline can publish to the NuGet feed
- Creating the NUSPEC definition file
- Creating the package and publishing it to the pipeline
- Adding the deployment task to the pipeline
- Running the pipeline to create the NuGet package and published to the Azure DevOps project’s Azure Artifacts feed
By the time you’re done, you’ll have a fully-built example of how to publish a build artifact to a NuGet feed and deliver that NuGet package to a client with PowerShell.
Note that Azure Artifacts supports org-based and project-based NuGet feeds. In this article, you’ll be using the pre-created NuGet feed that comes with every organization.
Before you Start
If you plan to follow along with the steps in this article, be sure you have a few prereqs set up ahead of time.
- A GitHub repo with project files stored
- An Azure DevOps project created with a pipeline – The skills you’ll learn in this article are universal but if you want to follow along exactly, be sure you’ve read and performed all steps mentioned in the How to Build an Azure DevOps Pipeline for a PowerShell Module article.
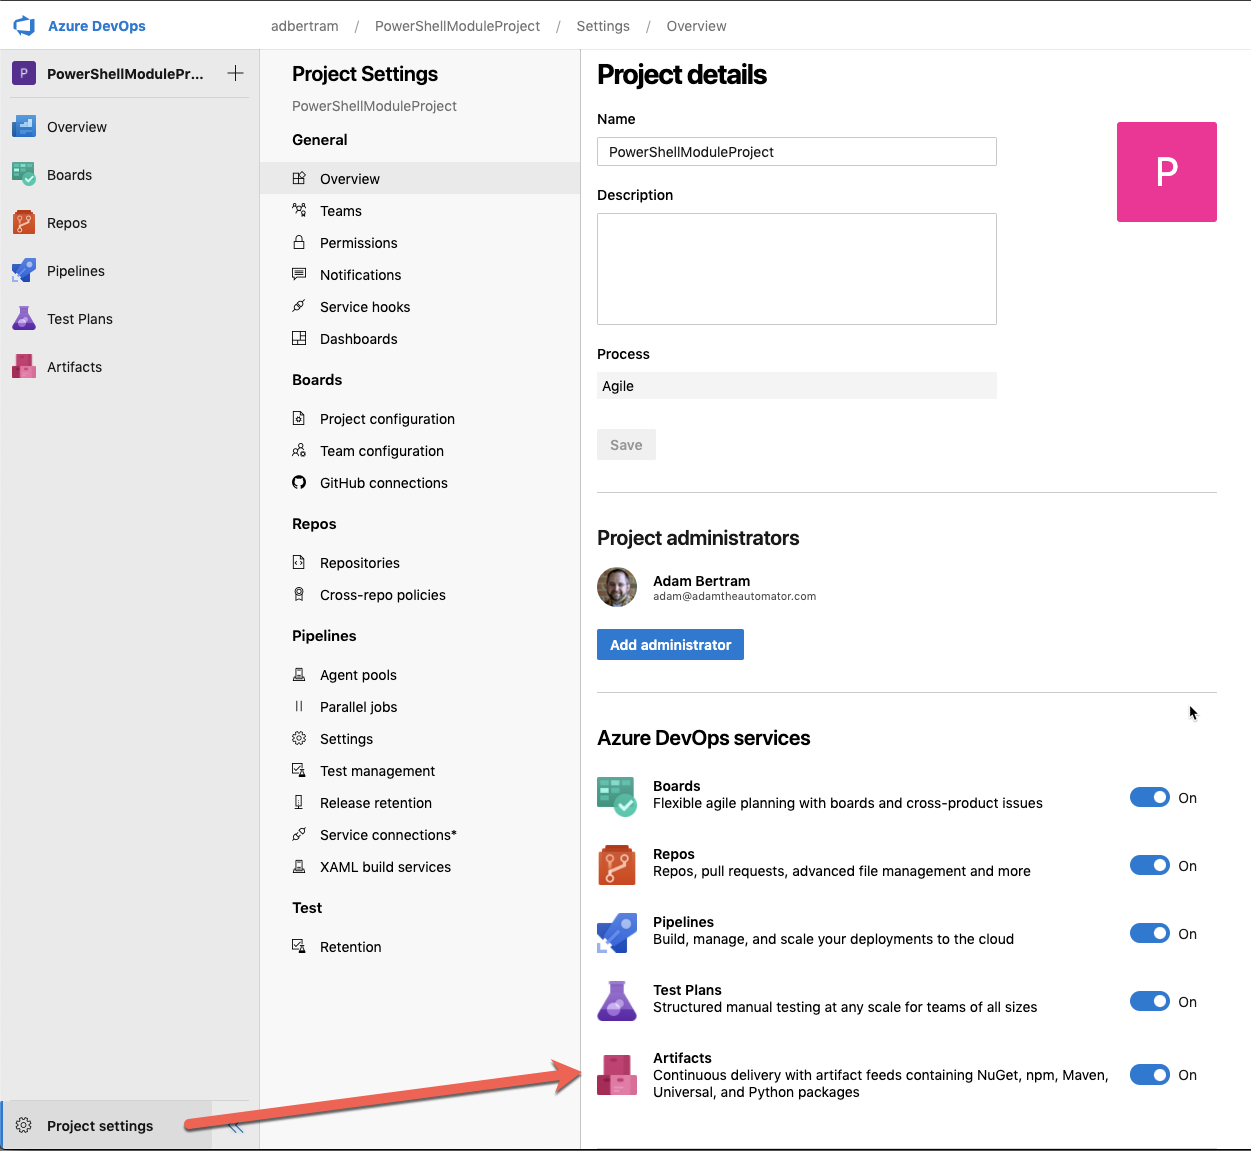
Ensure Artifacts are Enabled for the Project
You can enable and disable various services for an Azure DevOps project. By default, the Artifacts service is on but if you’re using another project, ensure it’s enabled.
You can enable it by navigating to Project settings and on the Overview section, ensuring Artifacts is On as shown in the screenshot below.
Allowing the Pipeline to Publish to Artifacts
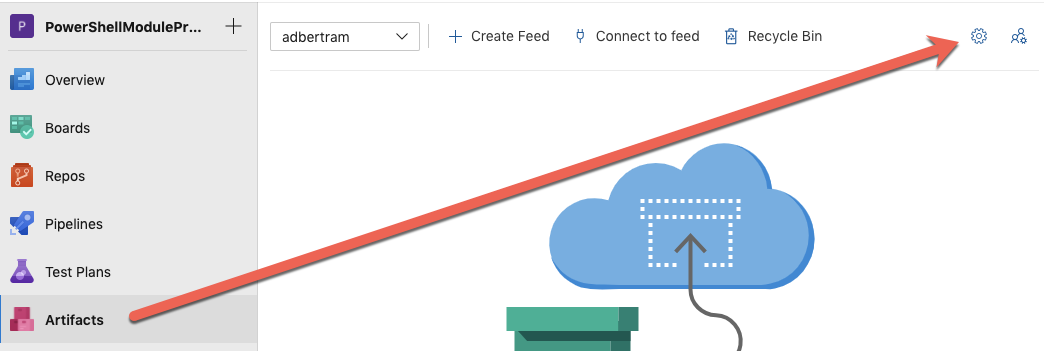
Every Azure DevOps organization comes with pre-created NuGet feed. You can find this feed by clicking on Artifacts. You can see in the screenshot below my organization is called adbertram.
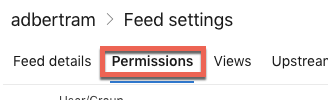
By default, the pipeline build service identity does not have access to publish packages to the feed. You’ll need to allow access so that the pipeline can publish the package once it’s created. To do that, click on the gear icon below to access the feed settings.
Once in the Feed settings, click on the Permissions section.
Once in permissions, click on Add users/groups.
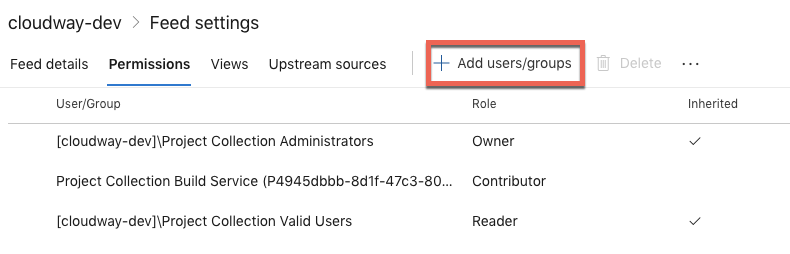
In the Users/group dropdown, type in the first few letters of the project name. For this article, the project name is called PowerShellModuleProject. You can see below that the item shows up as PowerShellModuleProject Build …. Click that item, ensure you choose Contributor and click on Save.
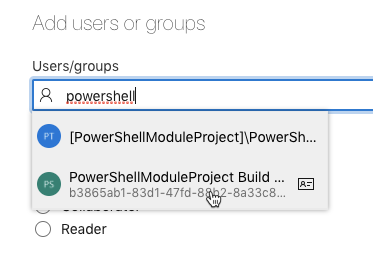
You should then see the group show up as [ProjectName] Build Service ([org name]) as shown below.
![[ProjectName] Build Service ([org name]) user/group](/wp-content/uploads/2020/02/image-5.png)
Creating a NUSPEC File
To create a NuGet package, NuGet must know how to create it via a NUSPEC file. A NUSPEC file is like a manifest for the package defined in XML. It allows developers to provide information like name, version, description, files included and so on.
In this project’s example, the NUSPEC file is going to be fairly simple to not get bogged down into too much detail. The NUSPEC file this project is going to use looks like below. This file is called PowerShellModuleProject.nuspec and is located in the root of the Git repo.
Most of the tags are self-explanatory other than the version tag. When the NuGet package is built, the version tag defines the version of the package. This NUSPEC file is part of a build process and will be used to dynamically assign the version based on the build. The version tag must have a placeholder to dynamically assign the version when the package is built.
You’ll see where the $VERSIONHERE$ placeholder is used when we get into building the pipeline.
<?xml version="1.0"?>
<package>
    <metadata>
        <id>PowerShellModuleProject</id>
        <version>$VERSIONHERE$</version>
        <authors>Adam Bertram</authors>
        <description>My awesome PowerShell module</description>
    </metadata>
</package>
Building the NuGet Package
So you’ve got the NUSPEC file created. It’s now time to tell the pipeline to build a new NUPKG file (the NuGet package) and ensure that the package is available to the soon-to-be deployment stage. To do that, you’ll need to add two tasks called NuGetCommand@2 and PublishBuildArtifacts@.
You’ll be modifying the pipeline using the Multi-Stage Pipeline UI experience. As of this writing, this feature is in Preview.
Creating the NuGet Package
Below you will see a NuGetCommand@2 task. This task allows you to restore, pack and publish NuGet packages to a NuGet feed. The attribute to define this behavior is the command attribute. You can see below that the command is set to pack. This command tells NuGet to create a package based on the information it receives in the NUSPEC file defined in the packagesToPack attribute.
In this task, the pipeline is looking for the PowerShellModuleProject.nuspec file created in the previous section at the root of working directory.
You’ll also see two versioning attributes called versioningScheme and versionEnvVar. These two attributes define the versioning scheme which is how NuGet assigns a version to the resulting package. The versioning scheme defines where the package version comes up.
You have options for a versioning scheme like off, byPrereleaseNumber, byEnvVar and byBuildNumber. In this example, the versioning is being handled via semantic versioning and defined in the variable section above in the pipeline as shown below.
variables:
  major: 0
  minor: 0
  patch: $(Build.BuildID)
  buildVer: $(major).$(minor).$(Build.BuildID)
Since we’re creating our own versioning scheme and assigning each build with a custom pipeline variable, you must use byEnvVar. Then, for versionEnvVar, you must specify the variable that holds the current build version iteration.
Finally, you can see the buildProperties below. This is where that placeholder in the NUSPEC file (<version>$VERSIONHERE$</version>) comes in handy. In this attribute, you can replace the placeholder with the build version by specifying a key value pair.
- task: NuGetCommand@2
  inputs:
    command: 'pack'
    packagesToPack: '$(System.DefaultWorkingDirectory)/PowerShellModuleProject.nuspec'
    versioningScheme: byEnvVar
    versionEnvVar: buildVer
    buildProperties: 'VERSIONHERE=$(buildVer)'
Making the NuGet Package Available to the Deploy Stage
Since artifacts in each stage are not available to other stages, you must now ensure the upcoming deploy stage can get access to the newly-created NuGet package. To do that, use the PublishBuildArtifacts@1 task. This task takes an artifact build from the current stages and makes them available to other stages in the pipeline.
Below you can see, the pipeline is looking in the artifact staging directory for a NuGet package defined by ArtifactName. It’s then getting saved into the pipeline itself using the Container publishLocation. Once published, all stages in the pipeline will have access to this artifact.
- task: PublishBuildArtifacts@1
inputs:
PathtoPublish: '$(Build.ArtifactStagingDirectory)'
ArtifactName: 'NuGetPackage'
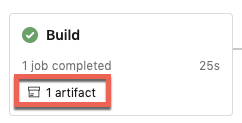
publishLocation: 'Container'When the pipeline runs, you should see that this stage produced an artifact as shown below from the pipeline run status screen.
After the package has been created and make available to other stages in the pipeline, the final Build stage looks like below.
- stage: Build
  jobs:
  - job: Build
    steps:
    - task: PowerShell@2
      inputs:
        filePath: '$(System.DefaultWorkingDirectory)/build_scripts/build.ps1'
    - task: NuGetCommand@2
      inputs:
        command: 'pack'
        packagesToPack: '$(System.DefaultWorkingDirectory)/PowerShellModuleProject.nuspec'
        versioningScheme: byEnvVar
        versionEnvVar: buildVer
        buildProperties: 'VERSIONHERE=$(buildVer)'
    - task: PublishBuildArtifacts@1
      inputs:
        PathtoPublish: '$(Build.ArtifactStagingDirectory)'
        ArtifactName: 'NuGetPackage'
        publishLocation: 'Container'
Adding the Pipeline Deployment Task
Progressing down the YAML pipeline, you’ve now come to the stage you’ve been waiting for – the deployment stage! In this stage, you’re going to take the NuGet package just created and publish it a NuGet feed provided by the Artifacts service.
Downloading the NuGet Package
Since the NuGet package (build artifact) was published out to the pipeline in the build stage, you can make this package available in the deployment stage by using the DownloadPipelineArtifact@2 task.
Below you can see that this task is looking for any NuGet packages (artifactName) that have been published by the current pipeline run (buildType). Once found, it’s then copying those NuGet packages to the current workspace (targetPath).
- task: DownloadPipelineArtifact@2
  inputs:
    buildType: 'current'
    artifactName: 'NuGetPackage'
    itemPattern: '**'
    targetPath: '$(Pipeline.Workspace)'
Publishing the NuGet Package from an Azure DevOps Release Pipeline
Once the package is available in the current stage, now publish it to the Artifacts NuGet feed. To do that, use the NuGetCommand@2 task again. This time, use the push command defining where to look for the package (packagesToPush), the internal Artifacts feed (nuGetFeedType) and finally the name of the internal Artifacts feed (adbertram).
Note: The name of the NuGet feed provided to the
publishVstsFeedattribute will always be the name of your Azure DevOps organization.
- task: NuGetCommand@2
  inputs:
    command: 'push'
    packagesToPush: '$(Pipeline.Workspace)/**/*.nupkg'
    nuGetFeedType: 'internal'
    publishVstsFeed: 'adbertram'
When both tasks have been specified in the pipeline, the Deploy stage should look like below.
- stage: Deploy
  jobs:
  - job: Deploy
    steps:
      - task: DownloadPipelineArtifact@2
        inputs:
          buildType: 'current'
          artifactName: 'NuGetPackage'
          itemPattern: '**'
          targetPath: '$(Pipeline.Workspace)'
      - task: NuGetCommand@2
        inputs:
          command: 'push'
          packagesToPush: '$(Pipeline.Workspace)/**/*.nupkg'
          nuGetFeedType: 'internal'
          publishVstsFeed: 'adbertram'
The Final YAML Pipeline
After everything has been added to the YAML pipeline, you should then have a file called azure-pipelines.yml that will publish the artifact to your Azure DevOps release pipeline.
trigger:
  - master

name: 'PowerShell Module Project'

variables:
  major: 0
  minor: 0
  patch: $(Build.BuildID)
  buildVer: $(major).$(minor).$(Build.BuildID)

pool:
  vmImage: "ubuntu-latest"

stages:
- stage: Build
  jobs:
  - job: Build
    steps:
    - task: PowerShell@2
      inputs:
        filePath: '$(System.DefaultWorkingDirectory)/build_scripts/build.ps1'
    - task: NuGetCommand@2
      inputs:
        command: 'pack'
        packagesToPack: '$(System.DefaultWorkingDirectory)/PowerShellModuleProject.nuspec'
        versioningScheme: byEnvVar
        versionEnvVar: buildVer
        buildProperties: 'VERSIONHERE=$(buildVer)'
    - task: PublishBuildArtifacts@1
      inputs:
        PathtoPublish: '$(Build.ArtifactStagingDirectory)'
        ArtifactName: 'NuGetPackage'
        publishLocation: 'Container'
- stage: Test
  jobs:
  - job: Test
    steps:
    - task: Pester@0
      inputs:
        scriptFolder: "@{Path='$(System.DefaultWorkingDirectory)/PowerShellModuleProject.Tests.ps1'}"
        resultsFile: "$(System.DefaultWorkingDirectory)/PowerShellModuleProject.Tests.XML"
        usePSCore: true
        run32Bit: False
    - task: PublishTestResults@2
      inputs:
        testResultsFormat: "NUnit"
        testResultsFiles: "$(System.DefaultWorkingDirectory)/PowerShellModuleProject.Tests.XML"
        failTaskOnFailedTests: true
- stage: Deploy
  jobs:
  - job: Deploy
    steps:
      - task: DownloadPipelineArtifact@2
        inputs:
          buildType: 'current'
          artifactName: 'NuGetPackage'
          itemPattern: '**'
          targetPath: '$(Pipeline.Workspace)'
      - task: NuGetCommand@2
        inputs:
          command: 'push'
          packagesToPush: '$(Pipeline.Workspace)/**/*.nupkg'
          nuGetFeedType: 'internal'
          publishVstsFeed: 'adbertram'
Running the Pipeline
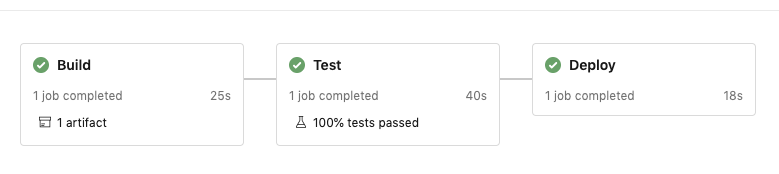
Once the pipeline has been built, it’s time to test it out! Go ahead and run the pipeline now. If all works as planned, you should see success across the board.
Basking in the Glory of a Published Package
Once the pipeline succeeds, head back over to Artifacts. Now you should see a single package. If you were following along with the last article and this one, it will be called PowerShellModuleProject as you can see below.
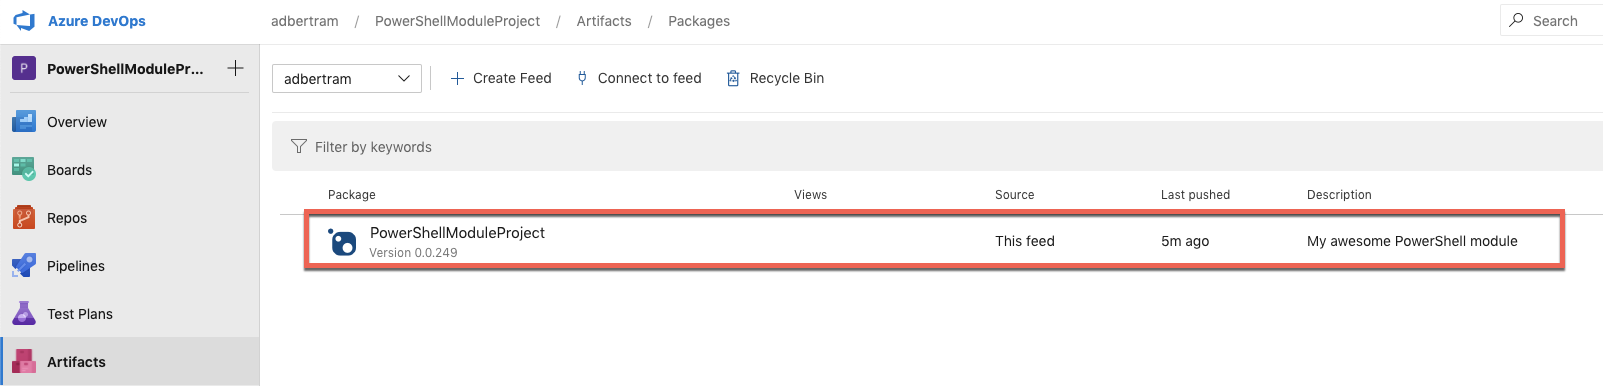
At this point, you are free to download the package with your favorite client tooling and leverage all of the advantages that having software packaged up with NuGet can bring you!
Summary
In this tutorial, you learned how to take an existing Azure DevOps release pipeline build artifact, package it up and publish it to an Azure Artifacts NuGet feed.
Even though the example project was a PowerShell module, you can transfer these same general knowledge nuggets to other project types as well.
If you’re not distributing your applications with NuGet packages in your Azure DevOps release pipeline, what are you waiting for?


