


You’ve built an application or perhaps even a set of important scripts and need to package it up and deploy it. Look no further than NuGet and the various NuGet package manager you have available.
Not a reader? Watch this related video tutorial!In this article, you’re going to learn how to get various NuGet package managers set up for the first time so you can start using them immediately.
Related: Setting up NuGet Server on Windows (Complete Walkthrough)
Setting up a NuGet.Server Wrapper
While setting up a NuGet.Server from scratch is not too involved, it can take a while for someone new to Visual Studio and IIS. A way to speed up the setup and update process is with a wrapper. One of the most popular wrappers, called nuget-server, is one written by svenkle and can be found on their Github page.
One of the major differences with using this wrapper instead of manually installing the web server is that it uses IIS Express. You can read more about the differences on Microsoft’s website.
There are two important differences between setting up a vanilla NuGet.Server and with this wrapper are:
- you must create a Windows service to start the web server
- you cannot use the IIS Manager for the configuration
The primary downside to using a wrapper to install NuGet.Server is that you cannot easily update the version until the wrapper is updated.
Prerequisites
If you’d like to learn how to set up this NuGet.Server wrapper, you’ll first need to ensure you’ve got the following:
- Installer for svenkle’s NuGet.Server wrapper
- Windows Server – Any currently supported version of Windows Server version will work, but all of the screenshots have been taken on Windows Server 2019 Standard
Installing the Web Server Service
The first step is creating a new Windows service. Since this NuGet.Server wrapper doesn’t use IIS, you can’t piggyback onto IIS.
With the NuGetServer.zip file downloaded from the releases page, unzip the file to your directory of choice on the web server. Once unzipped, create the Windows service to automatically start the web page when you start the server. Below you will find a PowerShell command to do that for you.
New-Service -Name NuGetServer -BinaryPathName '<UnzipPath>\Svenkle.NuGetServer.Service.exe' -StartupType Automatic
Start-Service -Name NuGetServer
Customizing the Web Server
Now that you have the NuGet.Server installed from the wrapper and the service is created and started, it’s time to customize the web.config file. You can make the same changes that you would make to the web.config file with the manual deployment if you wish.
The web.config file is located in the <UnzipPath>\Host\Website folder. The major difference with this deployment is it uses port 8080 instead of the default HTTP port 80. This means that anywhere where you would have used the web URL, you have to append :8080, such as when going to the web page it would be http://localhost:8080/nuget.
All done. That was a lot easier than using Visual Studio!
Setting up BaGet on IIS
While you have been looking at only stock versions of NuGet.Server so far, there are plenty of other available versions out there. One popular NuGet package manager is an open-source project called BaGet.
Let’s see what it takes to get BaGet installed and running on a Windows Server with IIS.
Prerequisites
Before you get started, ensure you meet a few prerequisites.
- BaGet.zip – At the time of writing this the project is still in pre-release and I am using v0.1.77
- .NET Core Runtime & Hosting Bundle – This will need to be downloaded and available on the web server for later.
- Windows Server – Any currently supported version of Windows Server version will work, but all of the screenshots have been taken on Windows Server 2019 Standard
Installing Web Server Prerequisites
While the below steps can be run on Linux with .NET Core or in a Docker image, these instructions will be used to install BaGet on a Windows server. This way you can take advantage of IIS to start and stop your server.
Install IIS
Since BaGet runs on .NET Core, there aren’t as many requirements as the basic NuGet.Server that you installed IIS for before. You only need a default IIS web server and the IIS manager. To install these, open a PowerShell session on your web server and run:
Install-WindowsFeature Web-Server -IncludeManagementToolsInstall .NET Core
Next, install the .NET Core bundle on the web server. To do this, run the exe file you downloaded earlier. You can leave all of the options as default for this install.
The .NET Core bundle must be installed after IIS is installed. If this does not happen in the correct order, you will have to rerun the installer for the .NET Core bundle and select repair to add the missing requirements for a web app.
Now that you have the web server components ready, unzip the BaGet.zip file downloaded earlier and place it in the C:\inetpub\wwwroot folder on your web server.
Configuring the Web Server Application
Similar to NuGet.Server, you’ll need to set up a few IIS components to get NuGet package manager BaGet up and running.
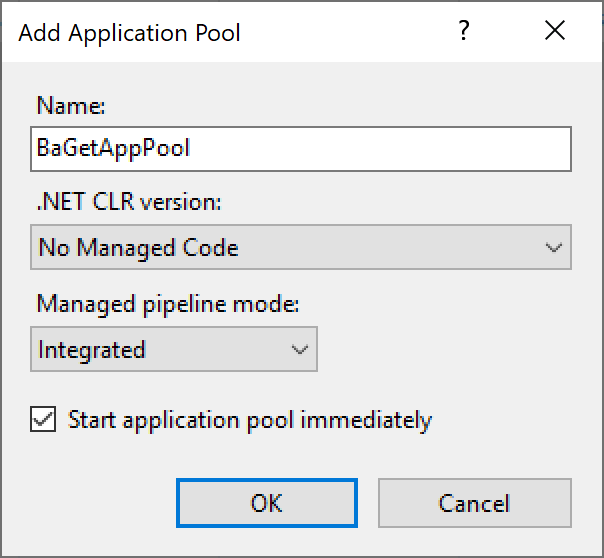
Creating the BaGet IIS Application Pool
Open IIS Manager on the web server and go to the Application Pools. Create a new application pool for BaGet since it will not be using .NET managed code. You can name it what you would like. Below is how it should look.
Creating the BaGet Website
Once the application pool is created, create the website. Since BeGet uses a non-standard HTTP port and non-default app pool, it is easiest to create a separate website from the Default Web Site. To do this, right-click on the Sites folder in IIS manager and select Add Website.
Below are the settings you need to configure BaGet.
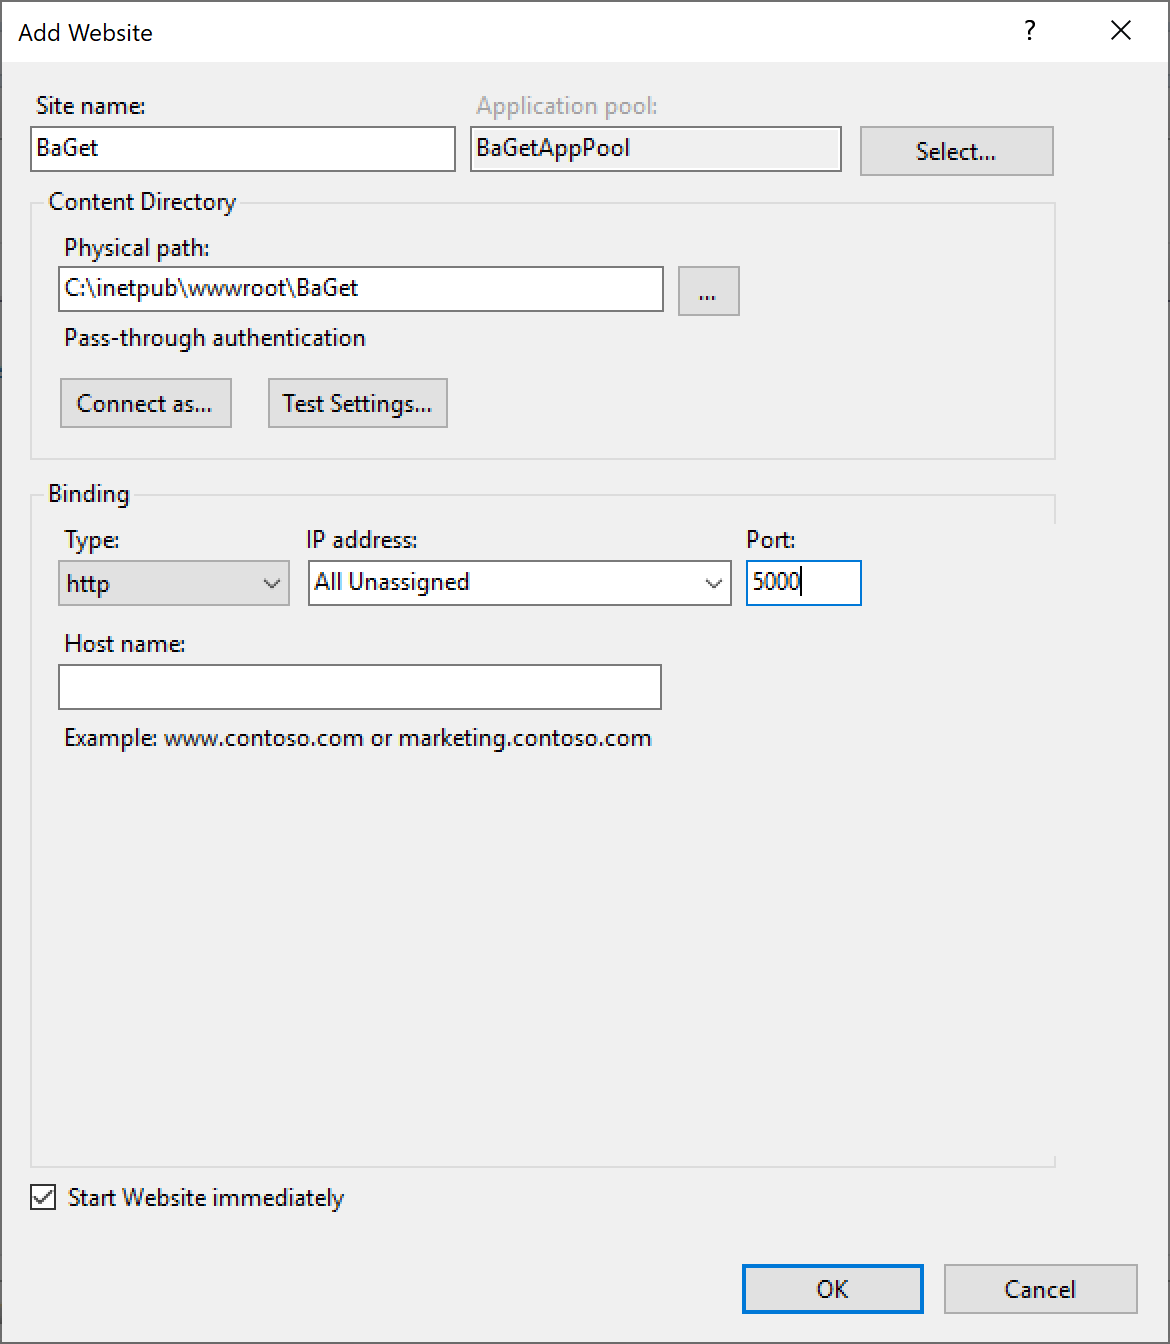
Once you have the site configured it should start automatically. You can take a look at it by going to http://localhost:5000/ from your server.
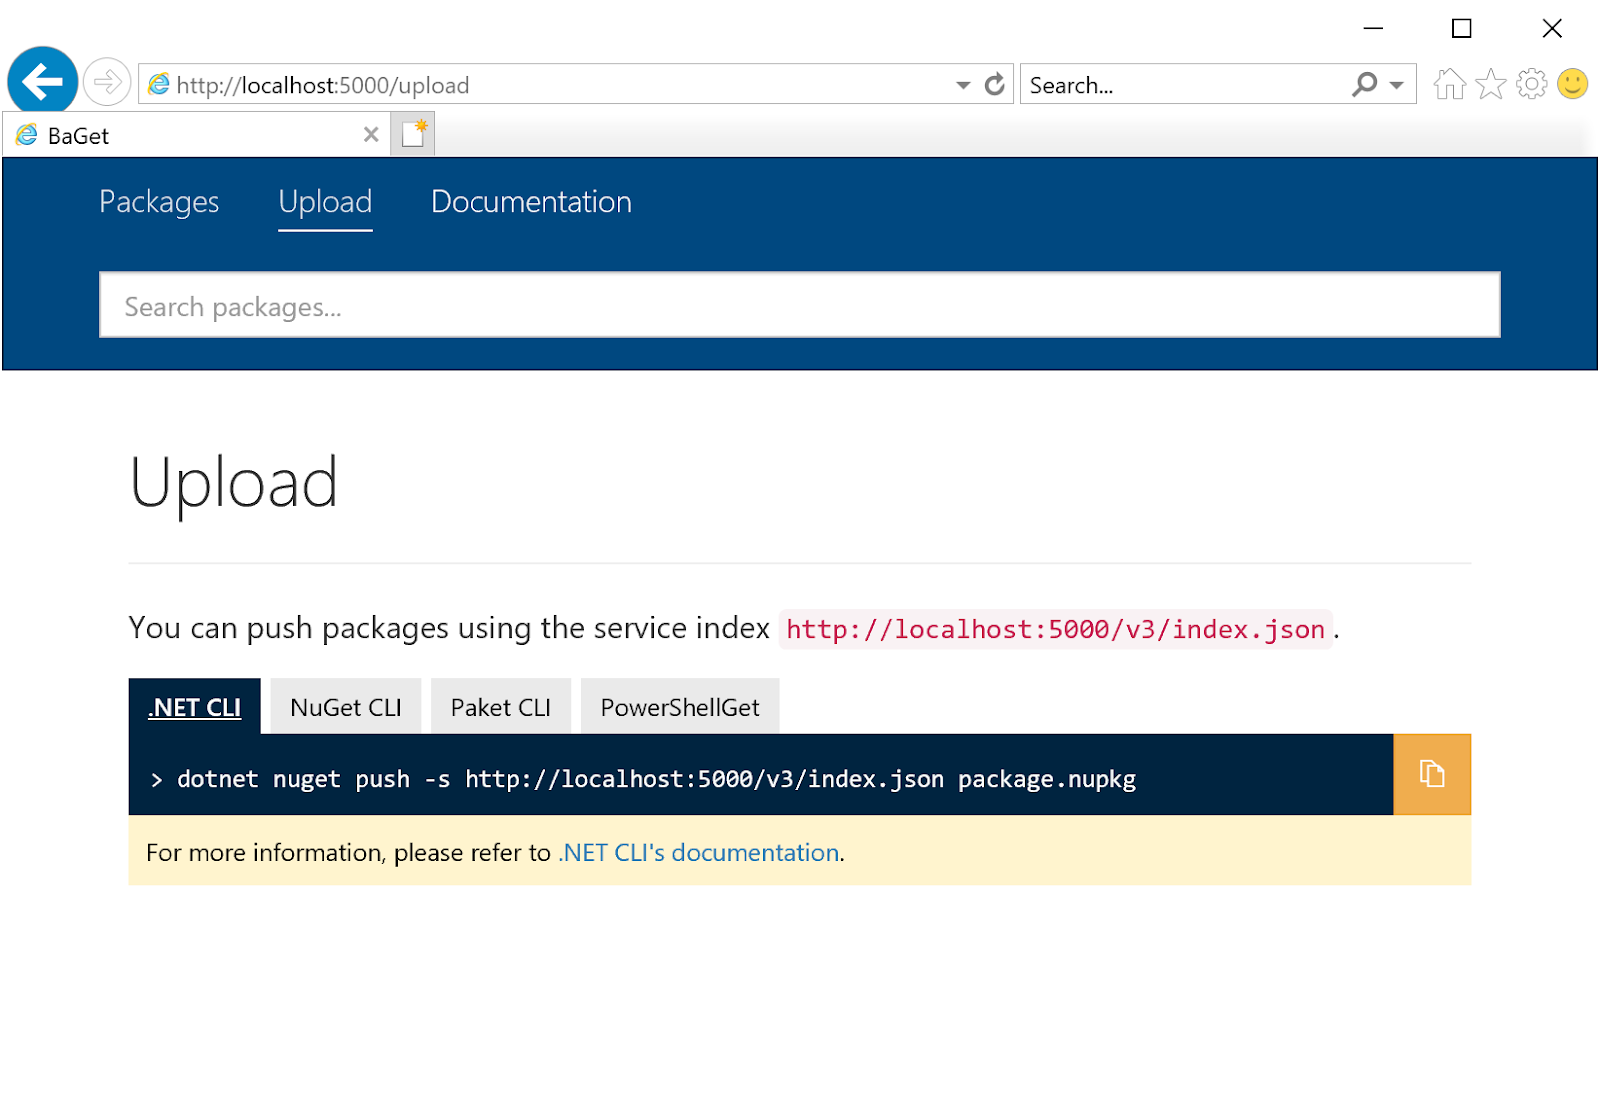
You will notice that there is more of a user interface on the BaGet webpage compared to the standard NuGet.Server webpage. In BaGet, you can easily search for packages that have been uploaded and it also provides the commands on how to upload in a variety of ways instead of using the NuGet command-line options.
Customizing the BaGet Web Server
Recall that you were able to customize your NuGet.Server server using the web.config file. But the NuGet package manager BaGet does not use the web.config file. Instead, since BaGet can also used on Linux, the developers opted for a more cross-platform format with a JSON file called appsettings.json. It is located in the C:\inetpub\wwwroot\BaGet folder.
Note that because BaGet uses .NET Core for cross-platform functionality, all paths use forward slashes.
For example, if you wanted to have your package path at C:\Packages on your server, you ‘d need to have what is shown below in the appsettings.json file.
"Storage": {
    "Type": "FileSystem",
    "Path": "C://Packages"
}
BaGet API Key
To protect your NuGet server from unauthorized users from publishing or deleting package, you will still want to set an API key. The API key setting is also located in the appsettings.json, so you can set it while you are there.
Since I’m using PowerShell to manage my NuGet packages, I again can register a PSRepository. For BaGet, navigate to the webpage that you created. The webpage will give you the command to run in your PowerShell session. For example:
Register-PSRepository -Name "BaGet" -SourceLocation "http://<WebServer>:5000/v3/index.json" -PublishLocation "http://<WebServer>:5000/api/v2/package" -InstallationPolicy "Trusted"Understanding BaGet Forks (LiGet)
While BaGet does provide many options for use, there are other forks of BaGet that have been created to specialize in other areas of NuGet. One of the most popular forks is LiGet. LiGet is different because it specializes with a Linux-first point of view.
LiGet is a NuGet package manager fork off of the original project for BaGet. There were a few reasons the developers decided to do this, but primarily it was done to focus on some specific features of NuGet including the v3 feed support. V3 feed support does not affect the use case with PowerShell. But if you are going to be hosting a NuGet server for other use cases, you may enjoy the added functionality.
LiGet’s Hashed API Key
One major difference with LiGet vs. BaGet is the use of a hashed API key instead of plain text. With a plain text key someone with access to the web.config file on NuGet.Server or the appsettings.json on BaGet could publish to the server. This couldn’t happen with LiGet.
To get LiGet up and running, you’ll need to create a hashed API key and place it into the appsettings.json file in the C:\inetpub\wwwroot\LiGet folder.
To create the hash, you can use PowerShell or any other hashing method you’re comfortable with. Below is an example of what you would run on your workstation to create a hash.
([System.Security.Cryptography.HashAlgorithm]::Create('SHA256').ComputeHash([System.Text.Encoding]::UTF8.GetBytes(<apikey>)) |
Foreach-Object { $_.ToString('x2')}) -join ''
You can also use an online hash generator to create the hash.
The drawback of this approach is if you forget the API key, you must create a new hash and replace in since the hash is not reversible.
Setting up ProGet on IIS
All of the options that have been covered so far are free and do not have many moving parts once set up. While this is good for trying NuGet out, if you want to integrate with other tools or if you require vendor support for a system in the workplace, a better option may be the NuGet package manager ProGet.
Prerequisites
To set up ProGet, you’ll need some common prereqs you’re probably used to by now but with the additional of an optional SQL database.
- Windows Server – Any currently supported version of Windows Server version will work, but all of the screenshots have been taken on Windows Server 2019 Standard
- ProGet Installer – The version of ProGet I am using is 5.2.9.
- SQL Instance – This is optional since ProGet has an option to install SQL Express from the installer, although this does require an internet connection from your server to do the initial download
Installing ProGet
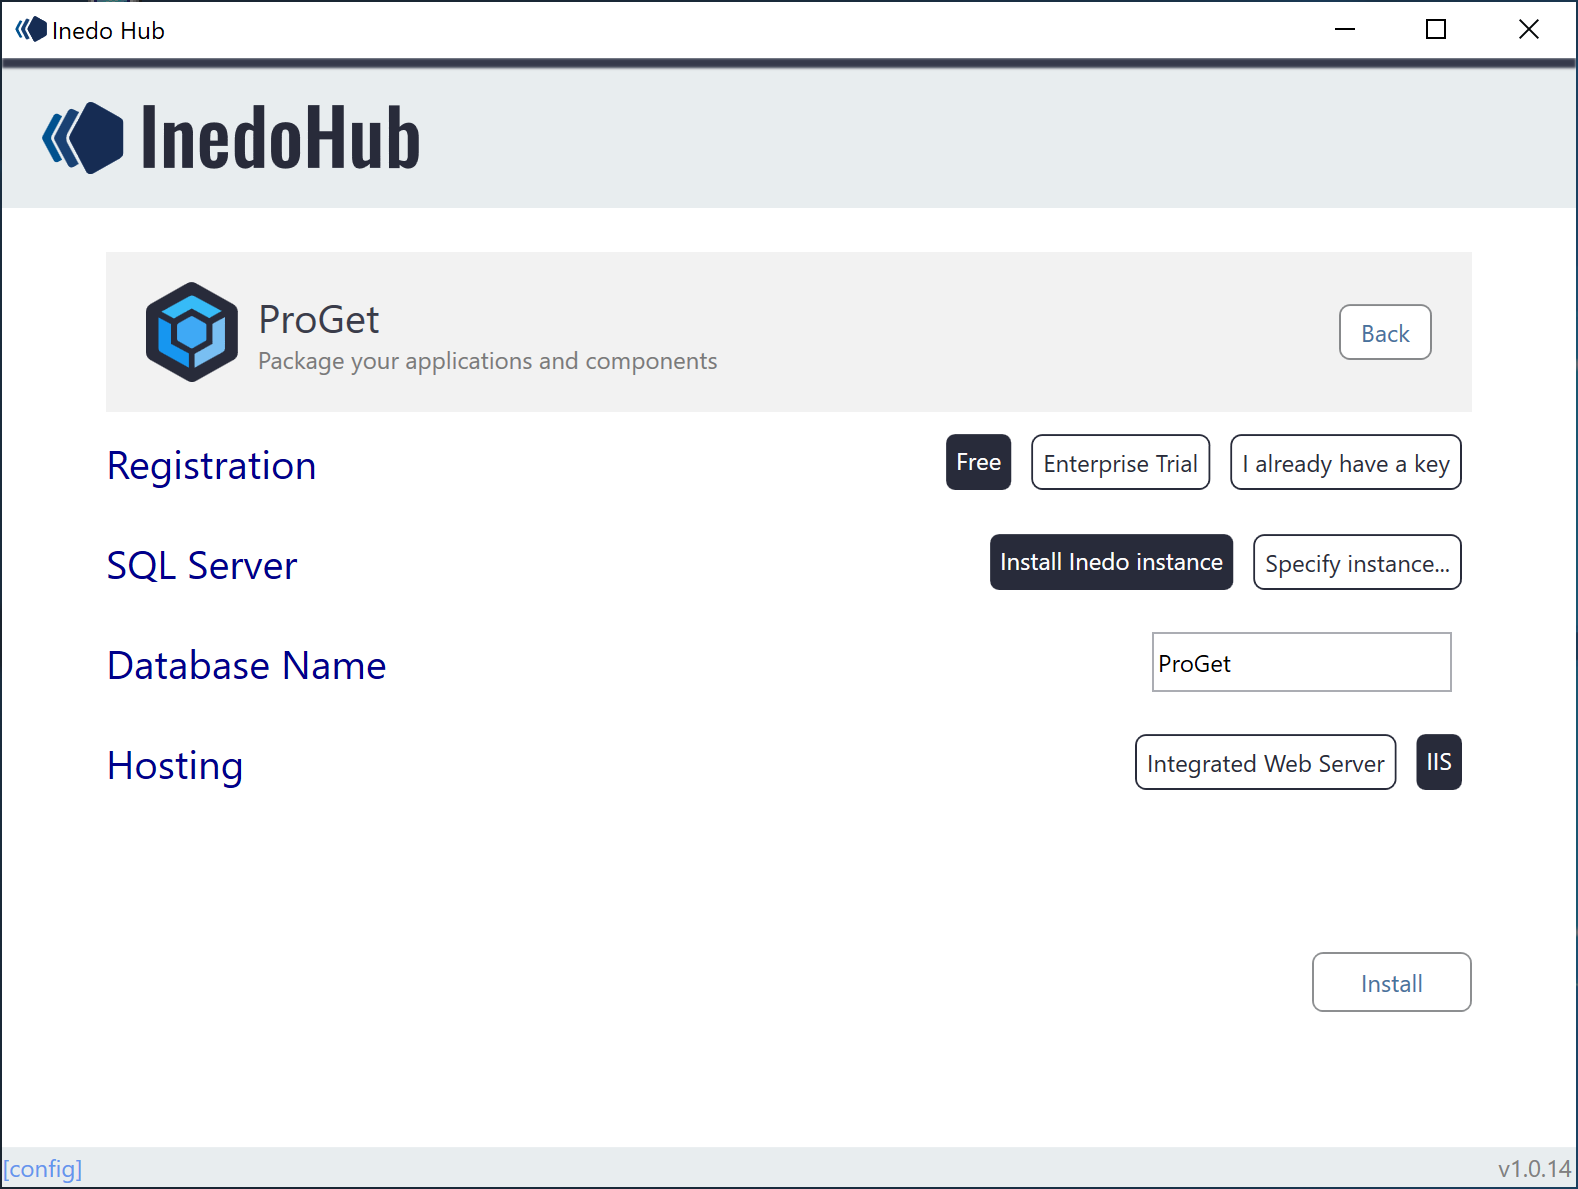
From your web server run the ProGet installer. Since you’re setting up IIS, select the IIS web server option when installing ProGet. If you do not already have IIS installed, it will handle the installation during the install of ProGet.
The rest of the options you can leave as the default unless you want to host the ProGet database on a separate SQL server. In that case, you will need to specify the SQL instance to use.
If you leave the SQL Server option as Install Inedo instance it will install SQL Express server for you.
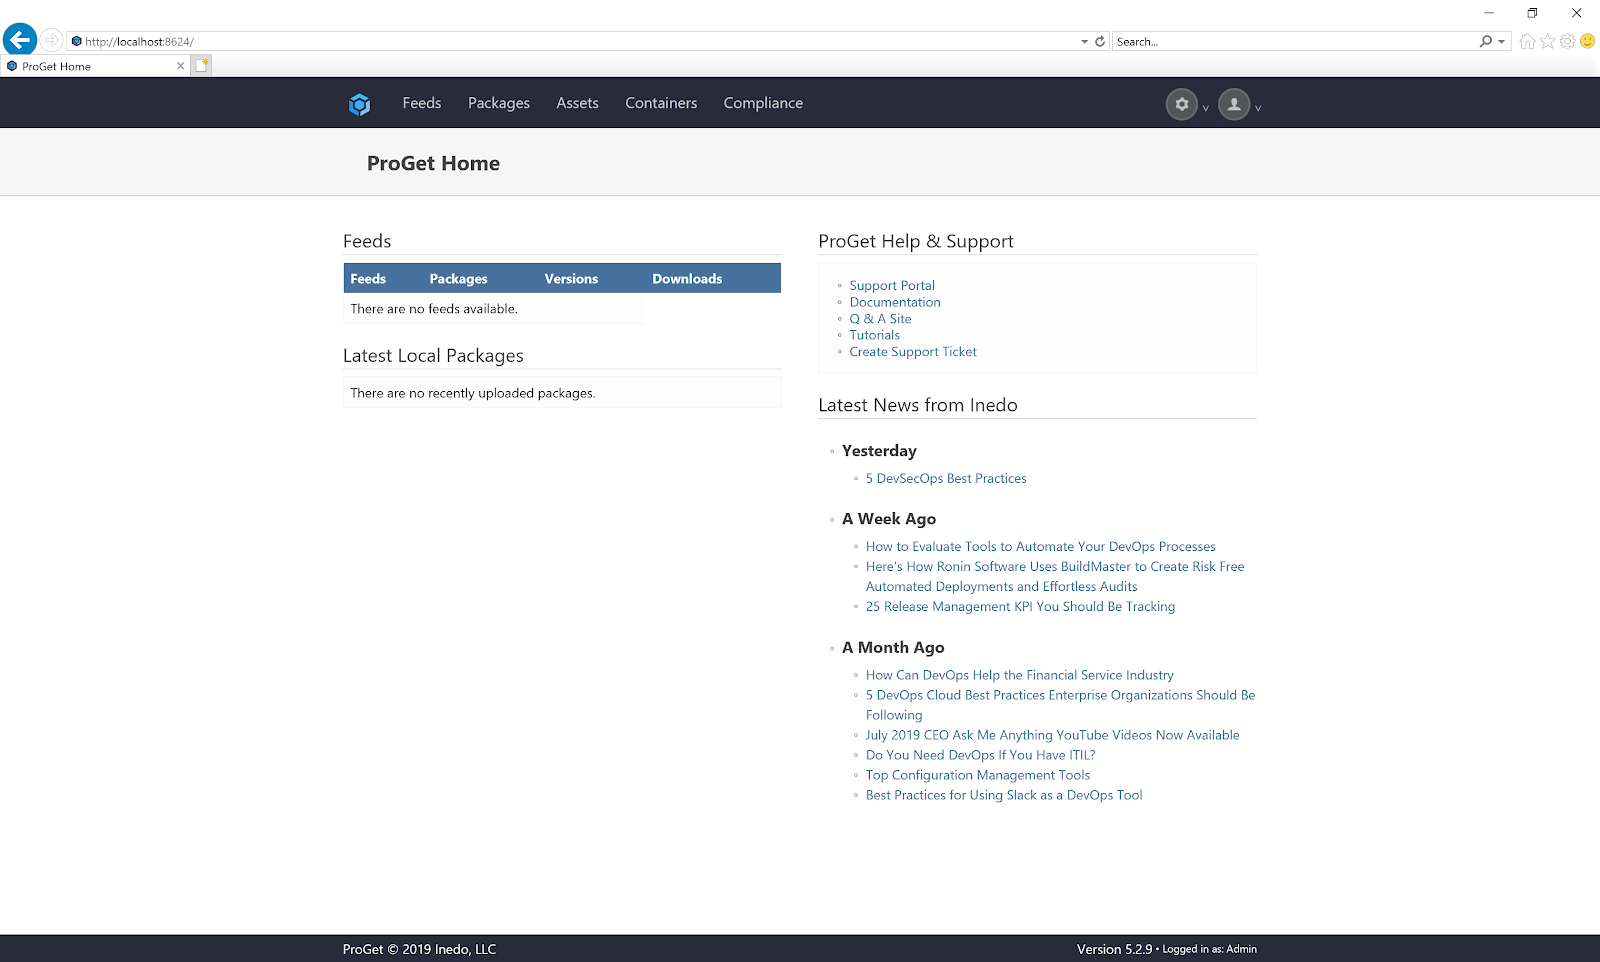
Once the installation finishes, launch the website when prompted and you should see a webpage come up that looks like the below screenshot.
Configuring a PSRepository on ProGet
At this point, ProGet is installed. It’s pretty easy. Since we’re using PowerShell to work with NuGet packages, we’ll need to set up a PSRepository as we’ve previously done.
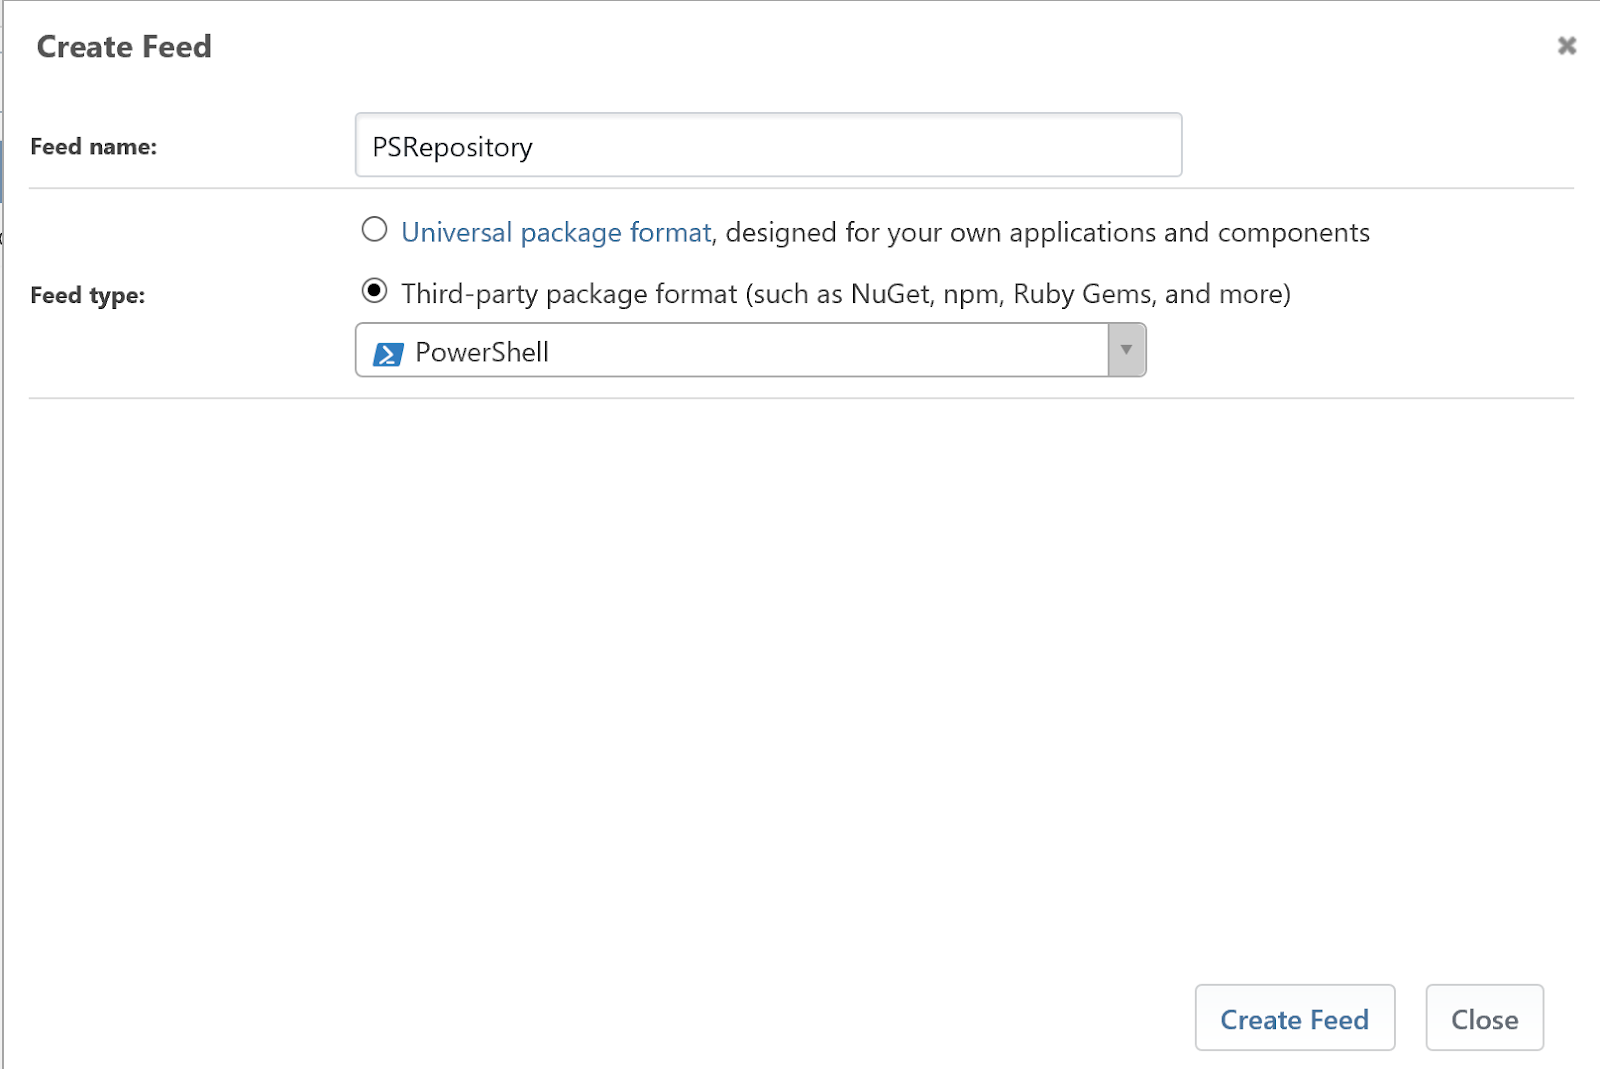
To set ProGet up for a PSRepository, navigate to the Feeds tab and create a new feed. You can name the feed anything you’d like. Then select Third-party package format and PowerShell as shown below.
Once you’ve created the feed, go back to the Feeds tab, select your new feed and it will show the URL used for publishing. This is what you would need to run in PowerShell on a device to publish to or download from this PSRepository.
Below is what was shown with the example from above:
Register-PSRepository -Name ProGet -SourceLocation http://<WebServer>:8624/nuget/PSRepository/ -PublishLocation http://<WebServer>:8624/nuget/PSRepository/ -InstallationPolicy TrustedAdding an API Key
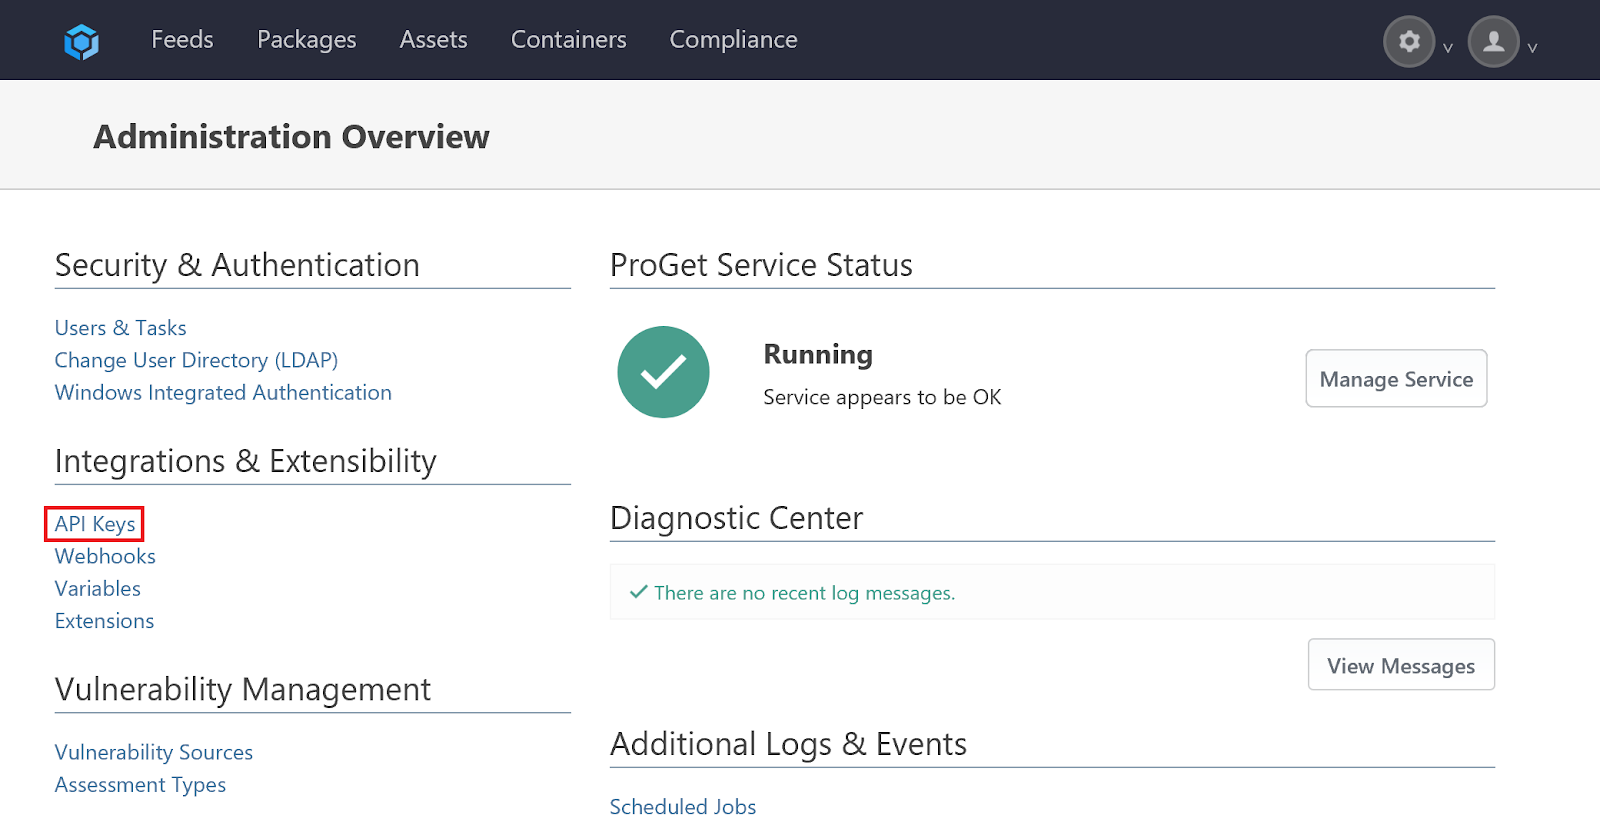
Like the other options, you need to generate an API key. To do this, click on the gear icon in the top right corner and then select API Keys from the left toolbar. Here you can see existing API keys and you can create new ones. You will immediately see a main difference between the open-source and enterprise ProGet. With ProGet, you can have many API keys.
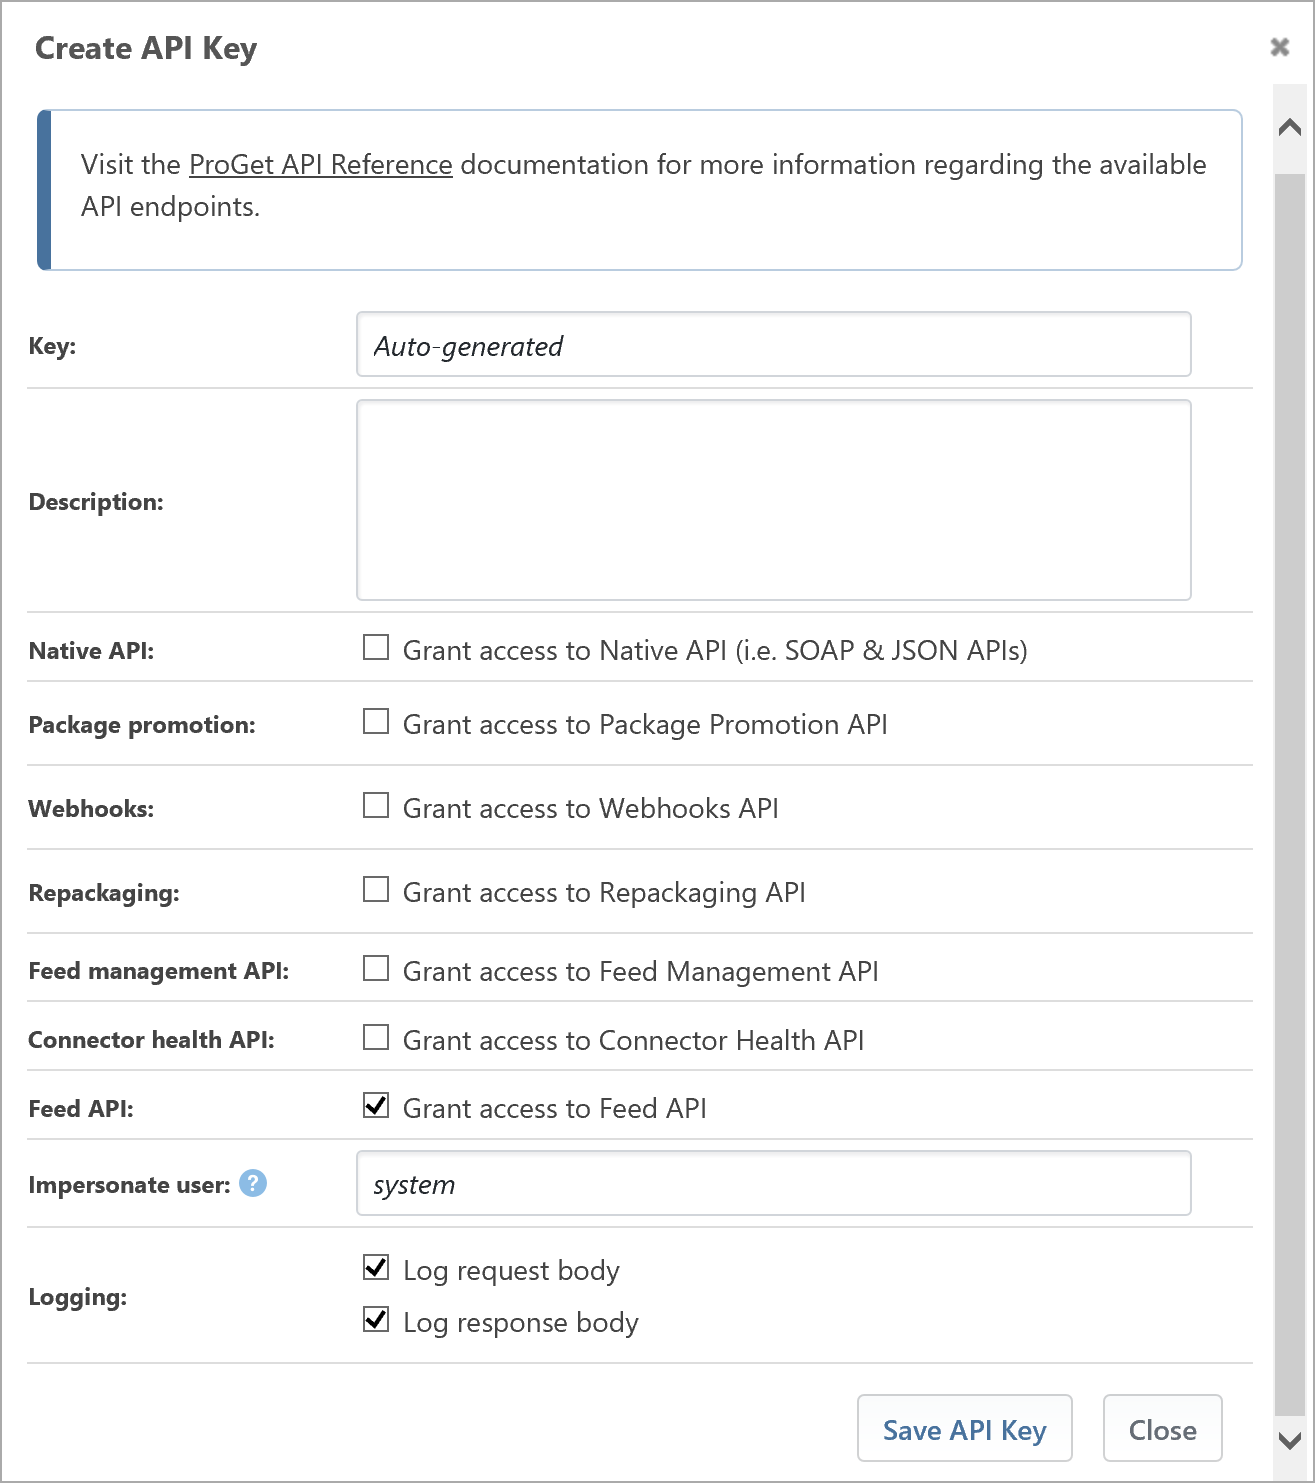
On the API Keys screen, click Create API Key. From here check the box for Feed API and click Save API Key.
Once the API key is created it will take you back to the API keys page. From here, you can use the API key that you see to publish packages to your feed.
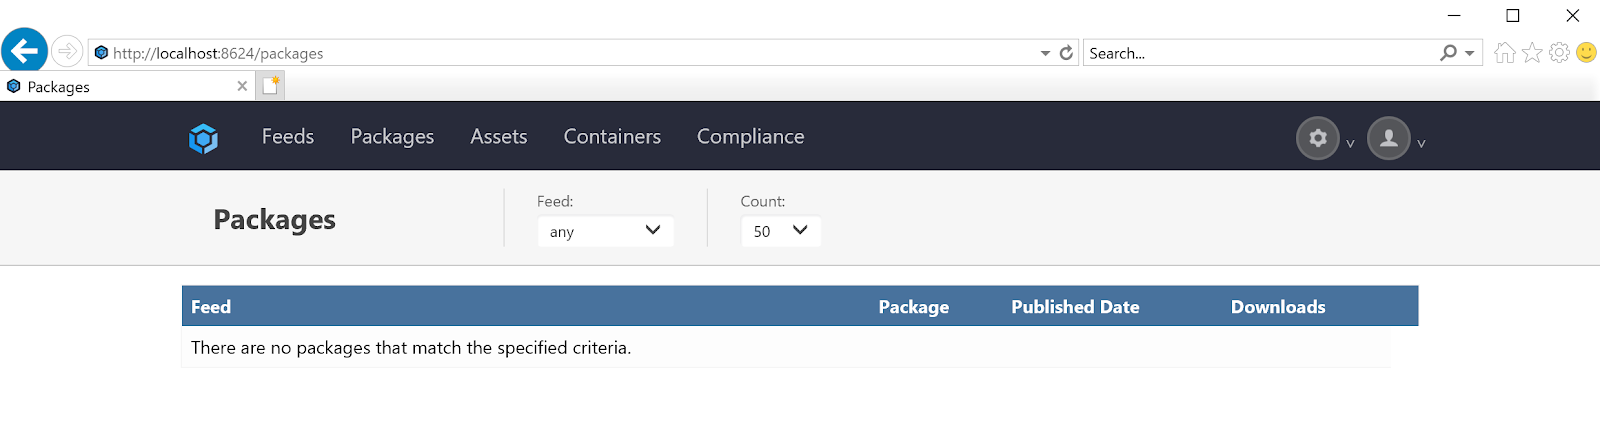
Searching Packages with ProGet
ProGet also includes a web page that allows you to search all NuGet packages in the feed, see their download count, the name of the PowerShell modules, which feed a package was uploaded into and other similar package stats from the Packages page as shown below.
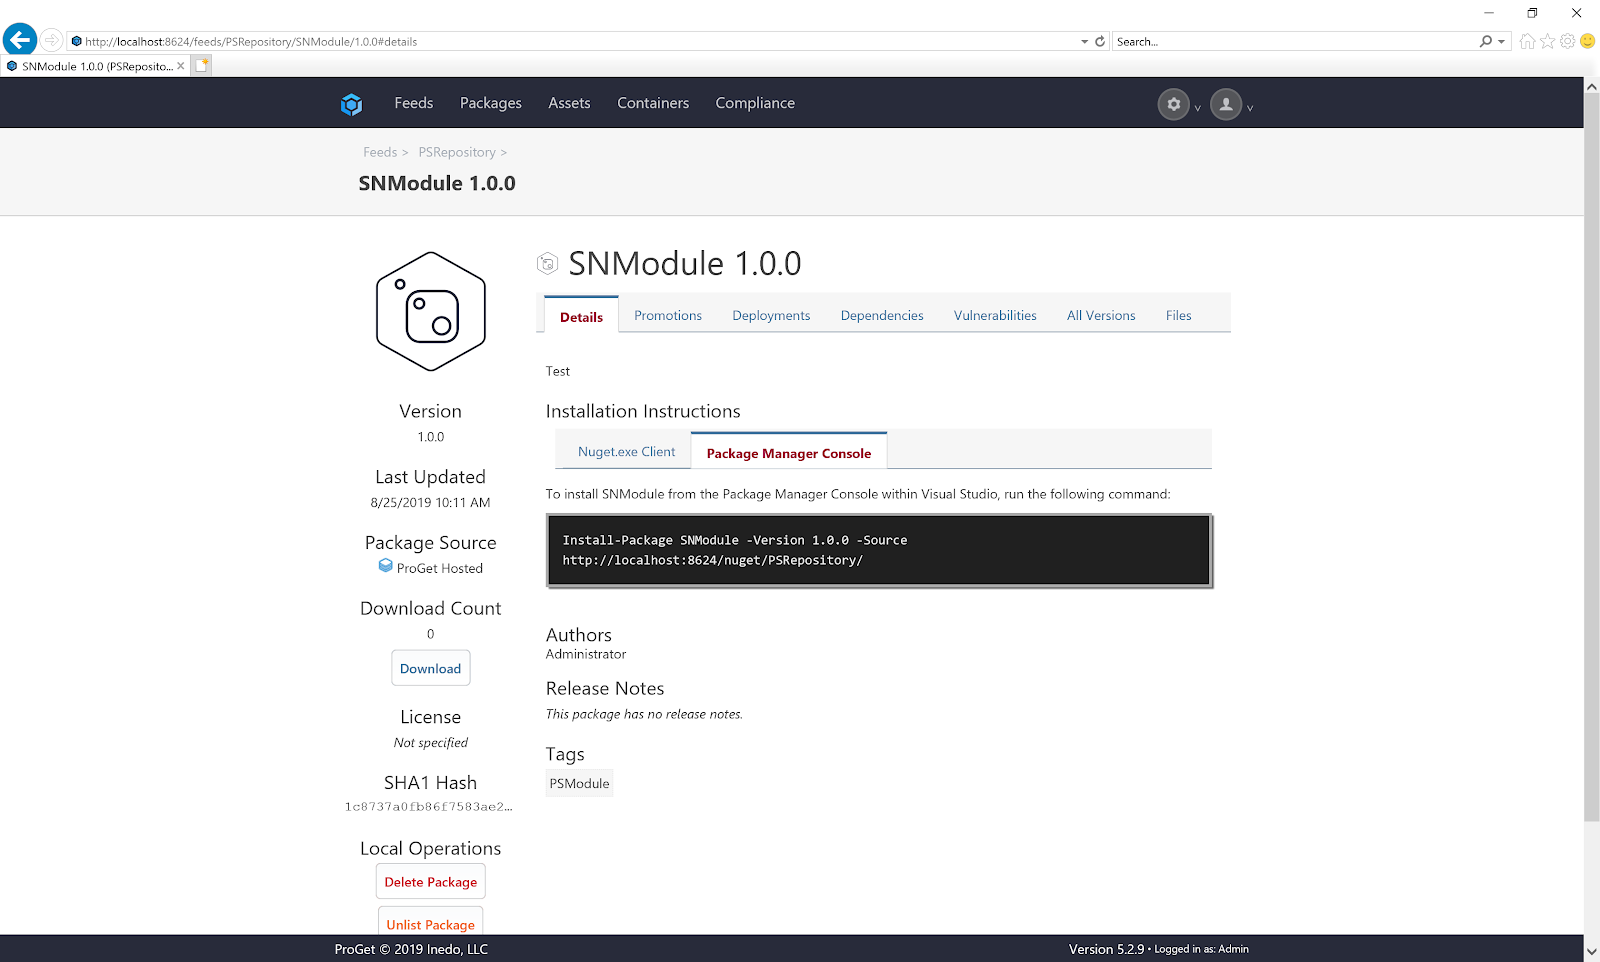
Alternatively, you can go to the Feeds page and select a feed to see only the packages for that feed. There you can drill down to individual packages to see the stats and other details about the packages as shown below.
Updating ProGet
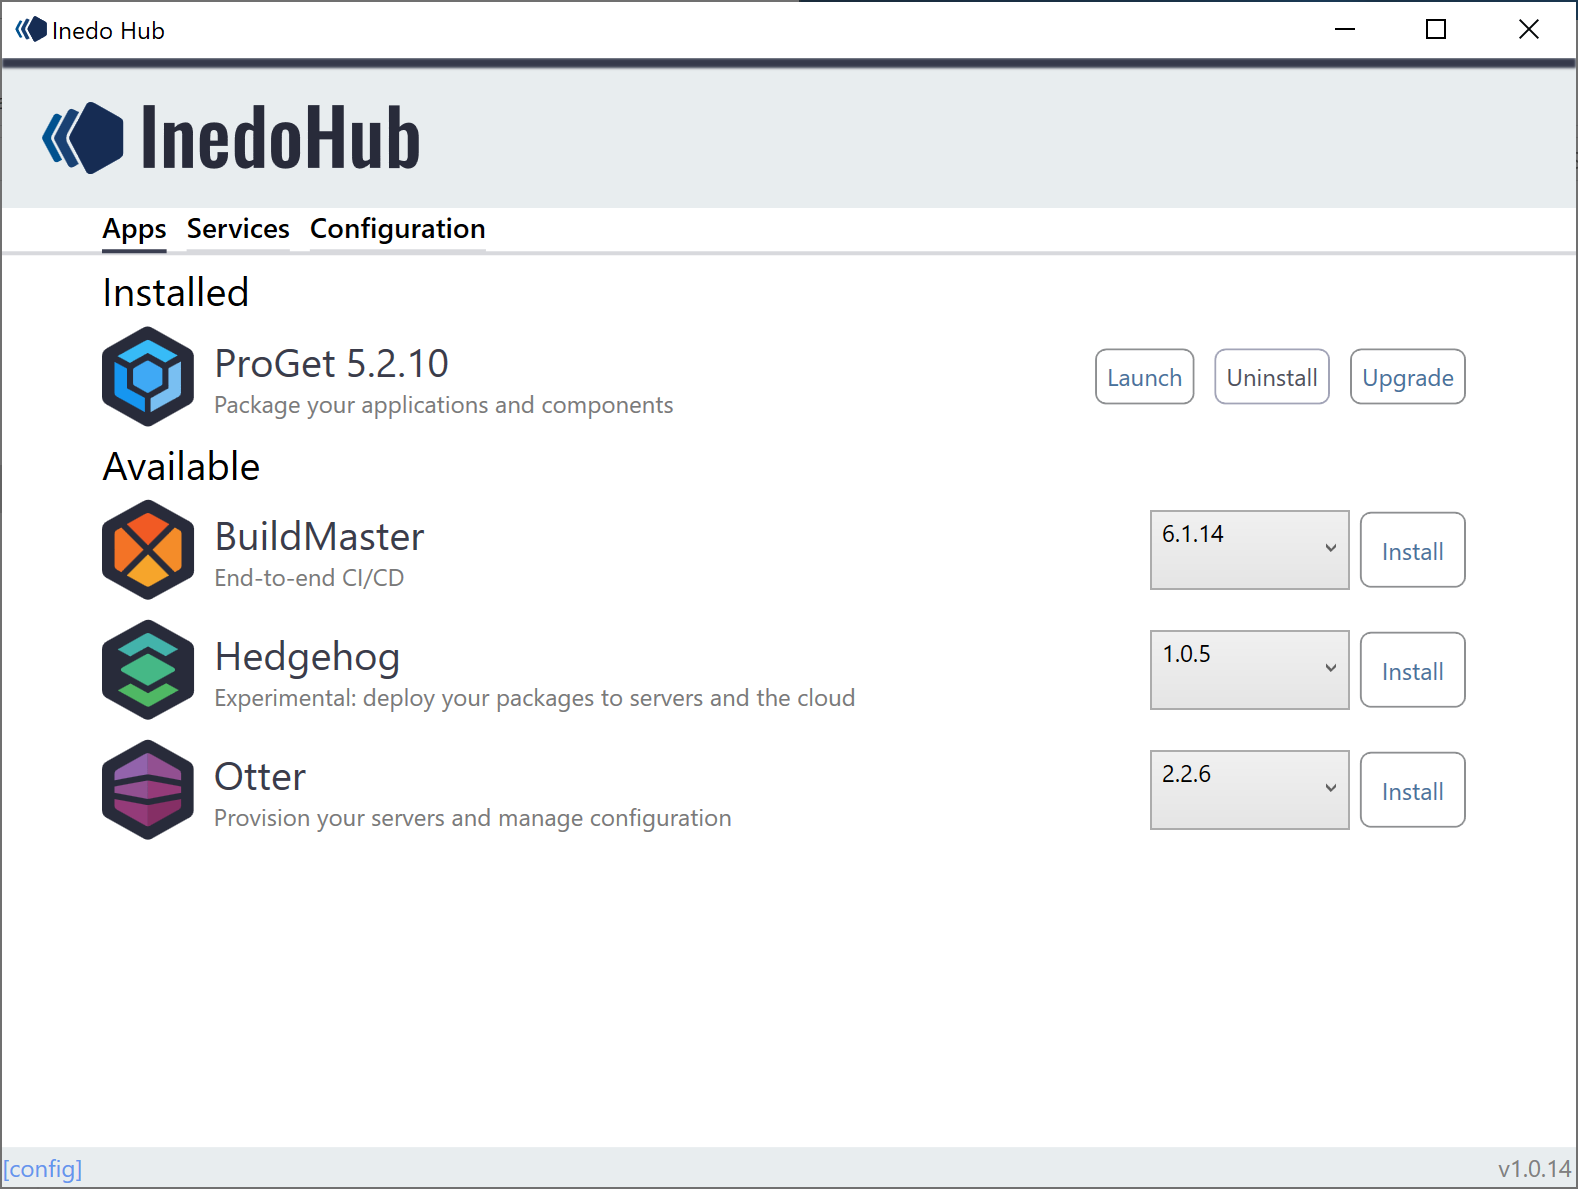
One of the nice parts about using a product that has positioned for an enterprise is that some of the more time-consuming administrative tasks are much faster. An example of this is updating ProGet.
To update ProGet to the newest version, simply open the Inedo Installer on your web server. This was installed when you first installed ProGet. Click on the Upgrade button and shown below and the installer will do the rest for you.
NuGet Package Manager Comparison
You’ve learned a lot about various NuGet tools in this article. If you’re still shopping around for which one to try out, in this section, you’ll get a glimpse into what makes each one different.
BaGet vs. LiGet
Since LiGet is a fork of BaGet, they share many similarities, including most of the setup process. In fact, you can follow the exact same setup procedure as BaGet.
Once installed, LiGet and BaGet do share some features but differ in other ways.
| Feature | BaGet | LiGet |
|---|---|---|
| Web Port | 5000 | 9011 |
| Source URL | /v3/index.json | /api/v3/index.json |
| NuGet Search API | v2 | v3 |
| API Key | Plain Text | SHA256 hash |
| Web Interface | Can see list of packages and commands to upload | No web interface |
While most of these differences do not affect use with PowerShell, the setup does change slightly due to using a hashed API key.
Both BaGet and LiGet are built on .NET Core which makes them cross-platform and usable on Linux operating systems. as well as Windows. Both also have Docker images available that, if you are already using a container service, can make the setup much faster and portable.
With the few differences between LiGet and BaGet, either one is a great option for an open-source, container-friendly, NuGet server. Both options allow for dipping your toe into a NuGet server on Windows while allowing yourself to move to Linux or a Docker image in the future without too much extra work.
BaGet vs ProGet
If you’d prefer not to roll your own to some degree and take the easy route, there’s always ProGet. There are downsides though. ProGet is not open source and not free by any means. But, it’s easier to set up and work with.
There are a few major differences between ProGet and BaGet.
| Feature | ProGet | BaGet |
|---|---|---|
| Cost | ProGet Free: Free, ProGet Basic: $1995/yr, ProGet Enterprise: $9995+/year | Free |
| Platform | Windows | Windows, Linux, Docker |
| Database | SQL | Internal |
| Support | ProGet Free: Email and Slack support, ProGet Basic and Enterprise: Defined SLAs with Email, Slack and Phone support | Community based through GitHub issues |
Inedo also has a breakdown all the feature differences between versions of ProGet.
Summary
In this article, you learned a ton about various NuGet tools and technologies. If you were on the fence about which NuGet server to use, you should now have a lot more knowledge to help you make that decision.
You learned about how to get each NuGet tool set up to work with Windows and we covered many of the features of each


