

In the ever-expanding realm of massive data, the need for tools that can efficiently handle and process vast datasets is more crucial than ever. If you wish to unlock the transformative power of data analysis, set up Apache Spark on your Windows machine and embark on a data exploration journey.
Throughout this tutorial, you’ll discover the ropes of installing Apache Spark on your Windows system, positioning yourself to conquer the fascinating world of data analysis.
Transform your Windows environment into a data processing powerhouse!
Prerequisites
Before diving into the installation process, ensure you have all the necessary prerequisites in place.
- A Windows 7 system or later – This tutorial uses Windows 10 Pro 22H2.
- Java installed – This tutorial uses Java 1.8.0_391.
- Apache Subversion for Windows installed – This tutorial uses SlikSvn 1.14.2 (64-bit).
Installing Python for Apache Spark on Windows
As you ensure your Windows environment is primed for the upcoming Apache Spark installation, one essential step stands before you — installing Python.
Python serves as the glue that enhances the interoperability and extensibility of Spark. From handling data manipulations to running Spark scripts, Python acts as a powerful catalyst.
To install Python for Apache Spark on Windows, follow these steps:
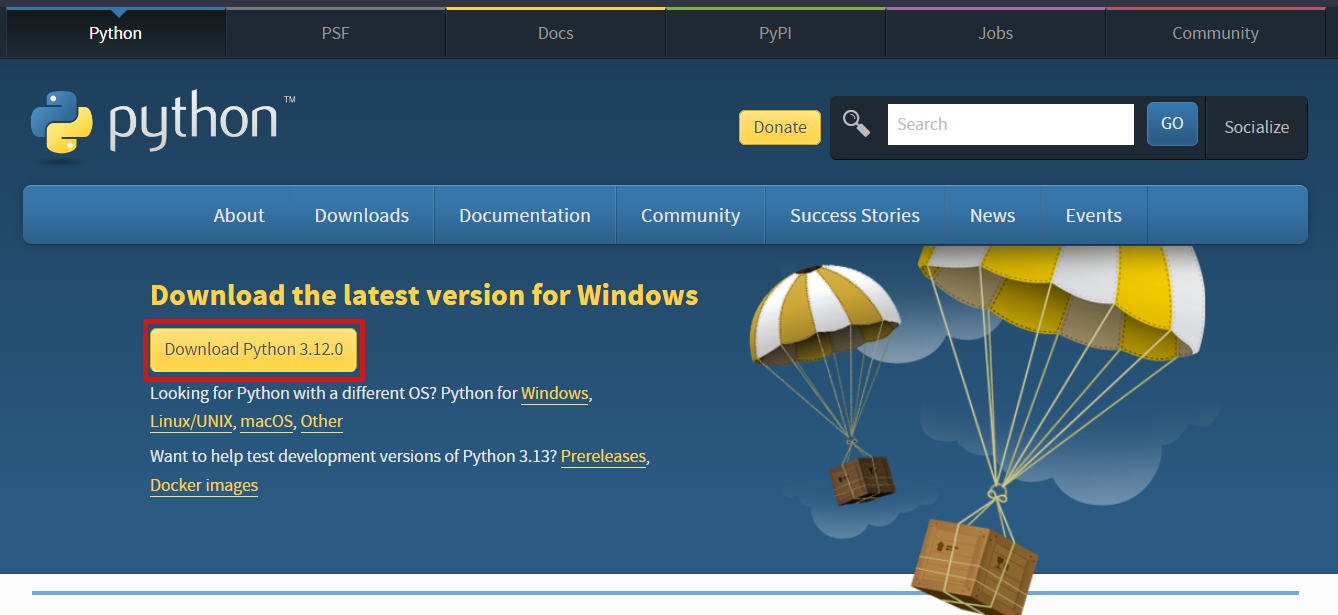
1. Open your favorite web browser, visit the official Python download page, and download the latest Python Installer. At this time of writing, the latest version is Python 3.12.0.
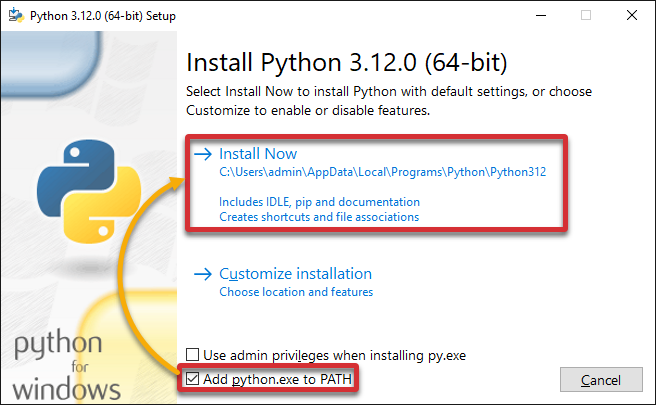
2. Once downloaded, double-click on the installer to begin the installation process.
3. On the Setup window, tick the Add python.exe to PATH option, and click Install Now.
Enabling this option adds Python to your PATH environment variable, which eases the management of Python packages via package managers like pip or anaconda. As a result, you can install and manage Python libraries without additional configuration.
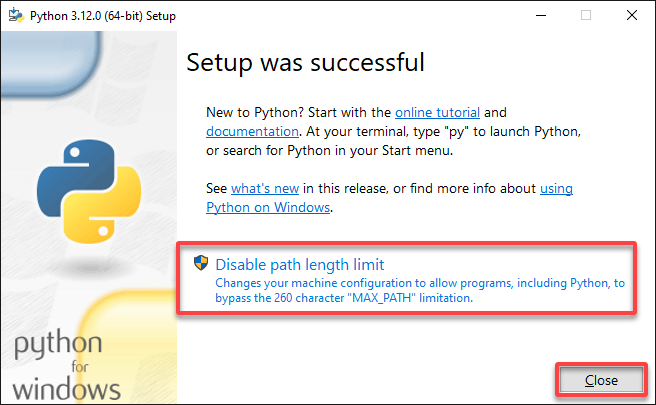
4. Now, select the Disable path length limit option, and click Close to close the Setup wizard.
This option allows Python to use the “Long Paths” feature to access paths longer than the traditional MAX_PATH limit (260 characters) on Windows. This feature is beneficial as some of the packages used by Apache Spark exceed the MAX_PATH limit.
5. Lastly, open PowerShell and run the below commands to verify your Python installation.
pip--version
python --version
Downloading and Installing Apache Spark
With Python installed, you can now lay the foundation for dynamic capabilities to flourish in your Windows environment. Installing Apache Spark opens a world of possibilities where data-driven insights are at your fingertips.
To install Apache Spark on Windows, proceed with the following:
1. Visit the official Apache Spark download page in another web browser tab.
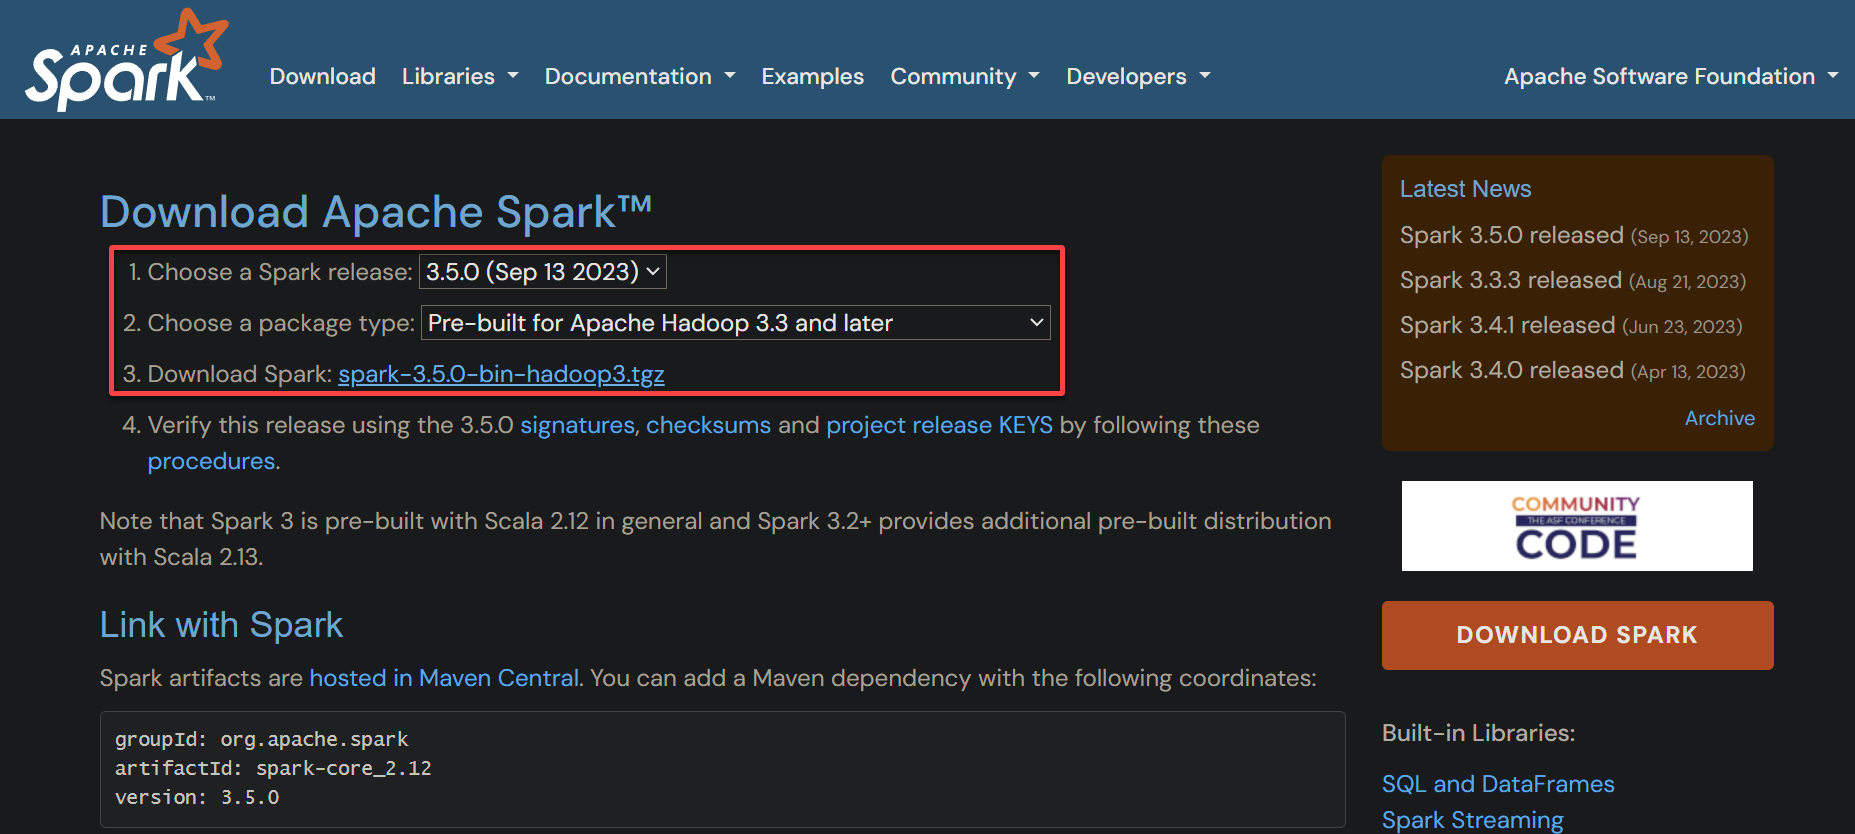
2. Next, download the Apache Spark installation package as follows:
- Choose a Spark release – Select the latest release from the dropdown field (i.e., 3.5.0).
- Choose a package type – Pick a suitable one depending on whether you want to use Hadoop. Your version of Spark and Hadoop may slightly differ. For this example, choose Pre-built for Apache Hadoop 3.3 and later option, which is best if you use Spark with Hadoop. Otherwise, select the option without Hadoop.
- Download Spark – Click on the hyperlink, which opens a new tab (step three) to select your Apache Spark download location.
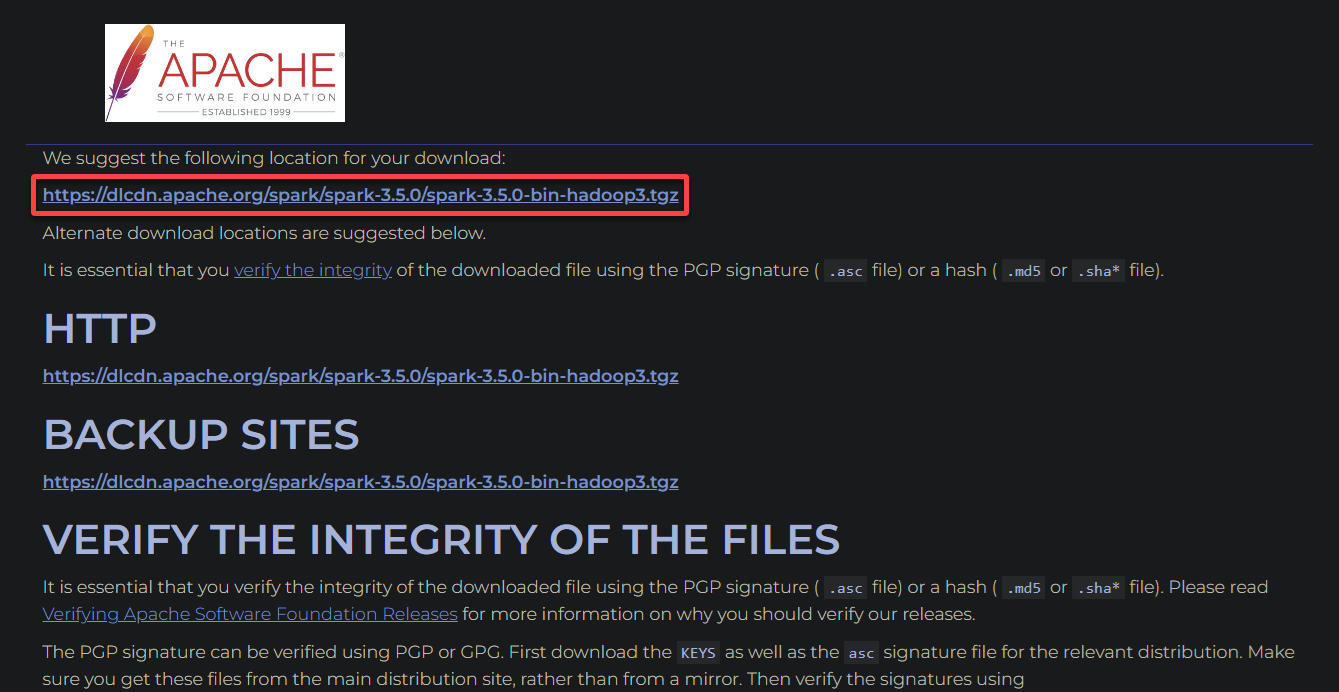
3. Click the first hyperlink or choose one from the alternate download locations to download the Apache Spark package.
4. Once downloaded, execute the below command and generate a SHA512 hash of the downloaded file.
Ensure you replace spark-3.5.0-bin-hadoop3.tgz with the exact file name of the one you downloaded (or the full path).
certutil -hashfile .\spark-3.5.0-bin-hadoop3.tgz SHA512Note down the generated hash, as you will make a comparison later.

5. Switch back to the download page and click the checksum hyperlink. Doing so opens the hash file containing the expected SHA512 checksum for your chosen download (step six).
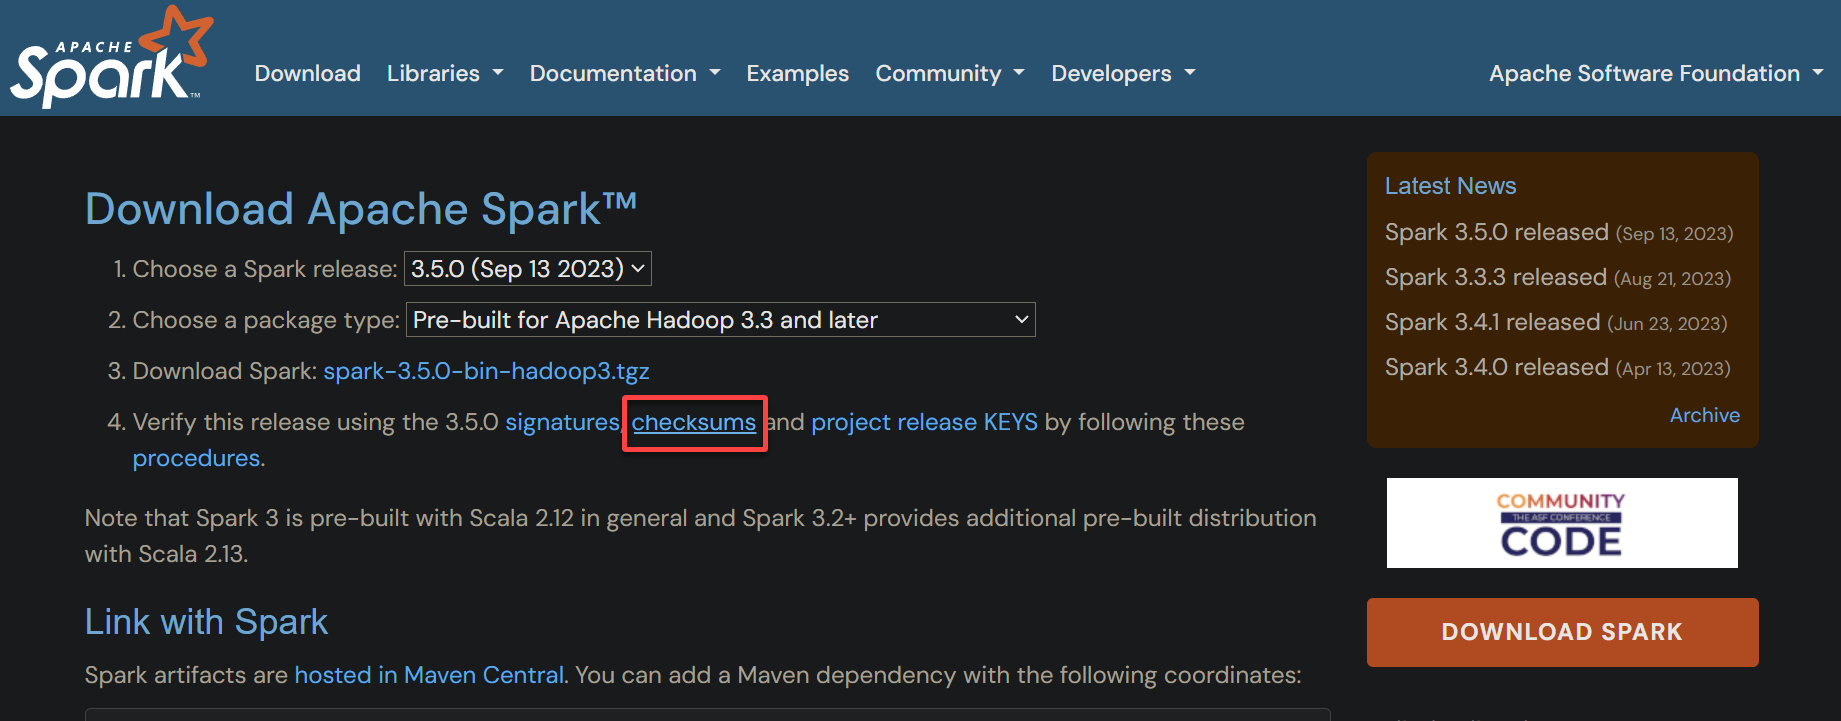
6. Compare the generated hash you noted in step four with the one in the checksum file.
Matching both hashes indicates your download was not corrupted or tampered with, and you can proceed with extracting the downloaded archive.

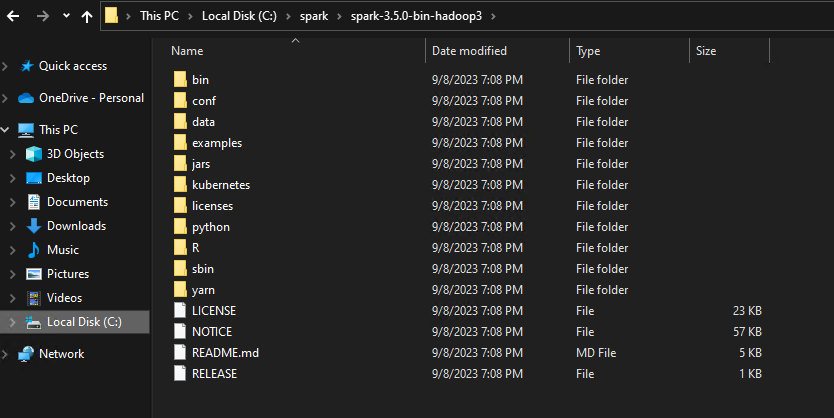
7. Lastly, unzip/extract the contents of the Apache Spark package using tools like 7-Zip or WinRAR to a directory of your choice.
For example, you can extract everything to the C:\spark folder, which effectively installs Apache Spark in your root directory.
After extraction, the Apache Spark installation directory structure should resemble the following:
Installing the winutils.exe Utility for Required Functionalities
Now that Apache Spark has found its home on your Windows machine, the next step involves a nuanced touch — installing the winutils.exe utility. Apache Spark requires the winutils.exe utility to run smoothly on Windows.
This utility is essential for enabling the required file and directory operations functionality. The winutils.exe utility is crucial because these operations are typically available on Linux-based systems but need additional support on Windows.
To install the winutils.exe utility, complete the steps below:
1. Visit the GitHub repository that provides the winutils.exe utility for Windows and look for the latest Hadoop version. Hadoop is an open-source framework designed for the distributed storage and processing of large data sets.
At this time of writing, the latest revision is hadoop-3.3.5, as shown below.
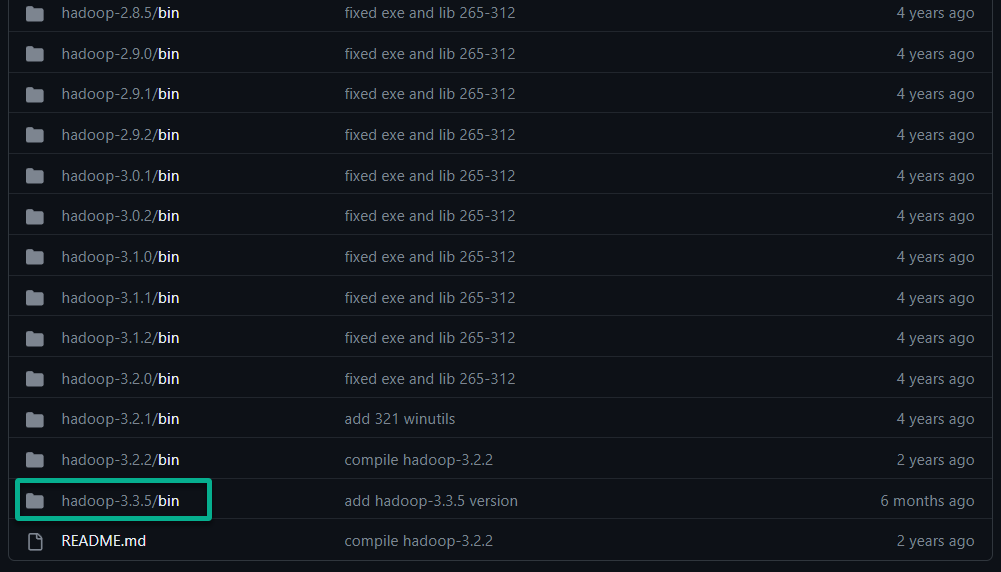
2. Next, run the following command to download the contents of the bin folder (hadoop-3.3.5/bin) to a folder called C:\hadoop\bin.
💡 If you see a newer version, change the folder name
hadoop-3.3.5and the revision number (r335) accordingly (i.e.,hadoop-3-3.6andr336).
This process effectively installs the winutils.exe utility on your Windows system.
svn export https://github.com/cdarlint/winutils/trunk/hadoop-3.3.5/bin@r335 "C:\hadoop\bin"
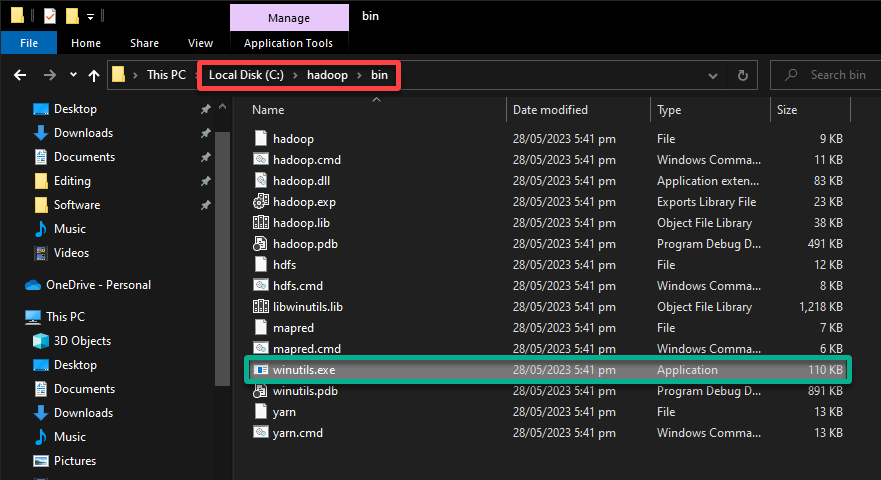
3. Once downloaded, navigate to the C:\hadoop\bin folder and confirm you have the following structure.
You’ll see files, including the winutils.exe utility, that are necessary to run Hadoop operations on Windows.
Setting an Environment Variable for Hadoop and Spark Integration
Having laid the groundwork by installing the winutils.exe utility, your journey now takes a turn into integration. You’ll set up the HADOOP_HOME environment variable to ensure Spark can locate and use the necessary Hadoop components.
To set the HADOOP_HOME environment variable, carry out the following:
Execute the below Set-Item command to create a new HADOOP_HOME environment variable and set its value to Hadoop’s install location (C:\hadoop).
When successful, this command does not provide output to the console, but you’ll verify the result in the following step.
Set-Item -Path "Env:\HADOOP_HOME" -Value 'C:\hadoop'Next, run the following command to verify the HADOOP_HOME environment variable.
$env:HADOOP_HOMEThe command returns the value of the HADOOP_HOME environment variable, which in this case is Hadoop’s install location (C:\hadoop).

HADOOP_HOME variableLaunching Spark Shells for Interactive Spark Programming
With a fine-tuned environment for seamless Hadoop and Spark integration, prepare yourself for interactive Spark programming. You’ll launch Spark Shells, an interactive command-line interface (CLI) provided by Apache Spark.
Spark Shells allow you to interactively work with Spark, where you can execute Spark jobs and explore your data via Spark’s APIs.
Below are the two main Spark Shells, depending on your preferred programming language:
| Spark Shell | Details |
|---|---|
| Scala Spark Shell | Scala is the default Spark Shell and is primarily used for writing Spark applications in the Scala programming language. |
| PySpark Shell | PySpark is the Python API for Apache Spark, and the PySpark Shell is used for writing Spark applications in Python. This Spark Shell is similar to the Scala Spark Shell but for Python developers. |
To launch Spark Shells, execute the following:
1. Run each Set-Item command below to set environment variables for Spark Shell and PySpark Shell (i.e., SPARK_SH and PY_SPARK). These commands have no output on the console but set environment variables to store the full paths of both shells, respectively.
Ensure you replace the full paths (C:\spark\spark-3.5.0-bin-hadoop3\bin\) with where you unzipped Spark, followed by the shells (spark-shell and pyspark).
This one-time process saves time and is convenient as you can quickly launch either of the shells without typing or specifying the full path each time.
Set-Item -Path "Env:\SPARK_SH" -Value 'C:\spark\spark-3.5.0-bin-hadoop3\bin\spark-shell'
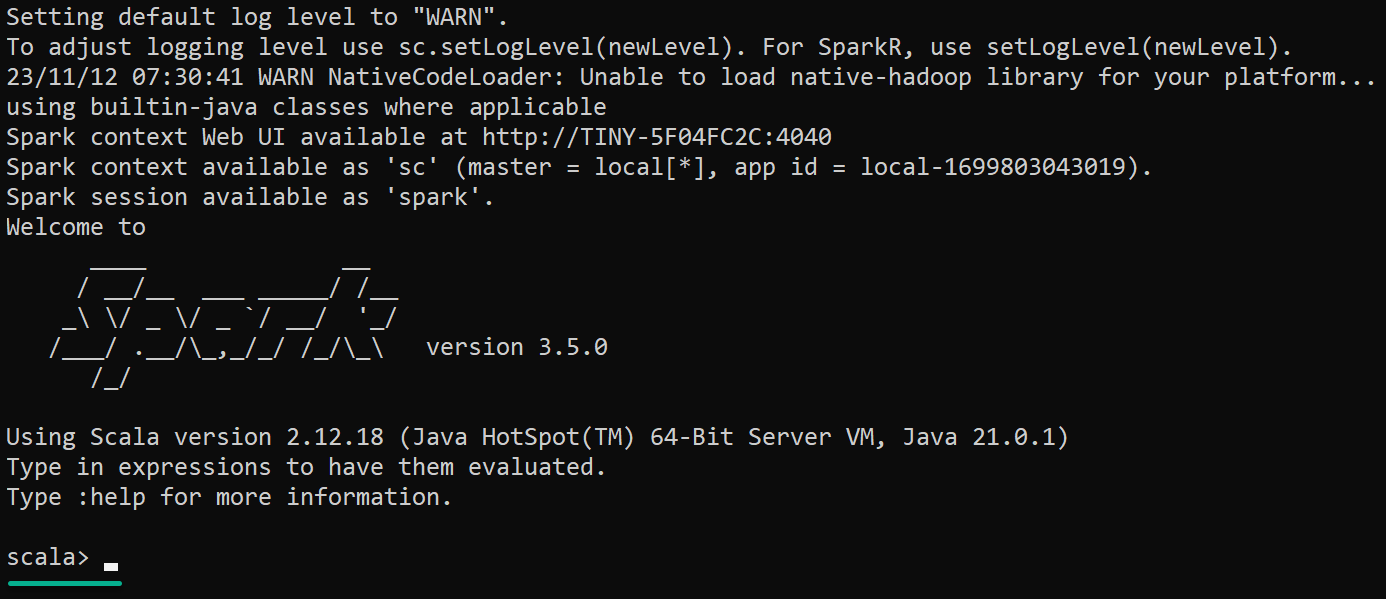
Set-Item -Path "Env:\PY_SPARK" -Value 'C:\spark\spark-3.5.0-bin-hadoop3\bin\pyspark' 2. Next, execute the below Start-Process command to launch the Scala Spark Shell ($env:SPARK_SH).
You only need to call the environment variable that holds the Scala Spark Shell’s full path instead of manually typing everything.
Start-Process $env:SPARK_SHAs you launch the Scala Spark Shell, a new console opens where you’ll see the Scala Read-Eval-Print Loop (REPL) prompt (scala>). This prompt lets you interactively enter and execute Scala code with access to Spark APIs.
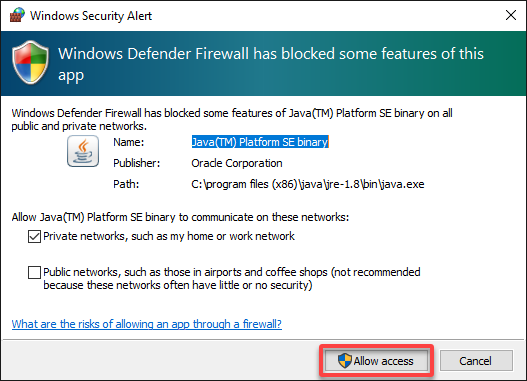
3. When prompted, click Allow access Java through Windows firewall, as shown below. Otherwise, you may encounter issues launching the Spark Shell.
This prompt appears since Apache Spark uses a Java-based web server, Jetty, to display its Web UIs.
4. Now, switch back to the previous PowerShell console and execute the following command to launch the PySpark Shell ($env:PY_SPARK).
Like with the Scala Spark Shell, you only need to call the environment variable that holds the full path of the PySpark Shell.
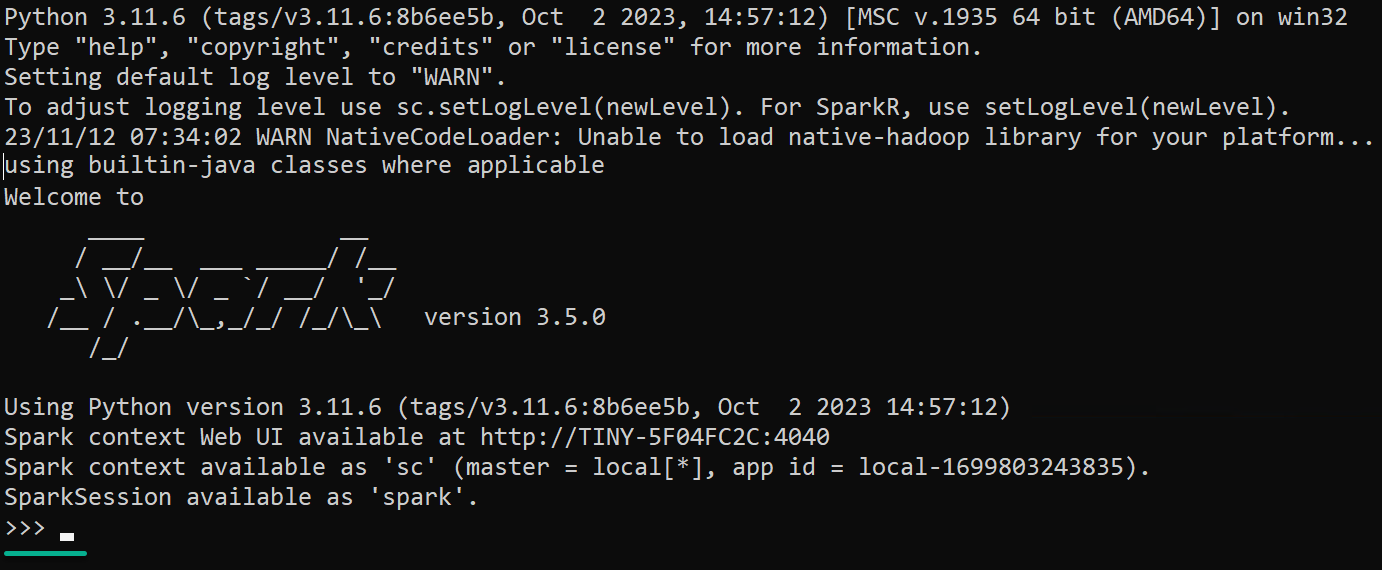
Start-Process $env:PY_SPARKThe PySpark Shell opens in another console, where you’ll see the Python REPL prompt (>>>). This prompt lets you interactively enter and execute Python code with access to Spark’s PySpark API.
5. Press Ctrl+D, regardless of which shell you launched, to exit the shell, which also closes the console.
Testing Your Spark Setup with Real-world Examples
After venturing into the dynamic realm of launching Spark Shells for interactive programming, the time has come to put your Spark setup to the test.
In this example, you’ll perform a basic analysis of a CSV file containing information about movie ratings via PySpark’s DataFrame API.
To test your Spark setup, perform these steps:
1. Download the sample CSV file containing movie ratings to a directory of your choice (i.e., C:\logs\movie_ratings.csv). Remember the full path, as you will need it for the following step.
2. Next, launch the PySpark shell and run the following command, which has no output but loads the CSV data (movie_ratings.csv) into a DataFrame.
Replace the path (C:\\logs\\movie_ratings.csv) with the one where you saved the sample CSV file in step one.
df = spark.read.csv("C:\\logs\\movie_ratings.csv", header=True, inferSchema=True)3. Afterward, run the below commands to perform basic data exploration tasks.
# Show the first few rows of the DataFrame
df.show()

# Display the schema of the DataFrame
df.printSchema()

# Compute basic statistics of the "rating" column
df.describe("rating").show()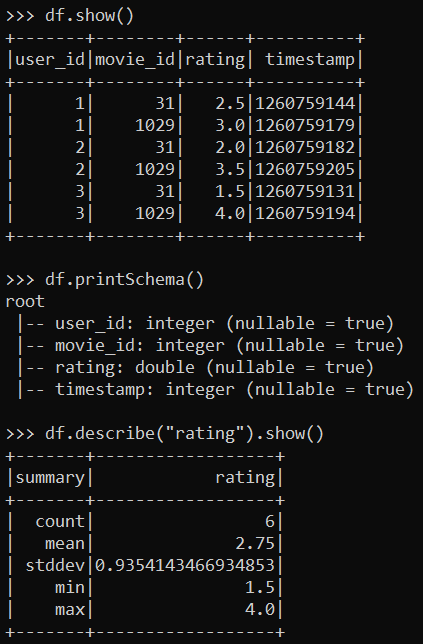
4. Lastly, run each command below to perform a basic data analysis task that calculates the average rating for each movie.
# Import necessary functions
from pyspark.sql.functions import avg

# Calculate the average rating for each movie
average_ratings = df.groupBy("movie_id").agg(avg("rating").alias("avg_rating"))
average_ratings.show()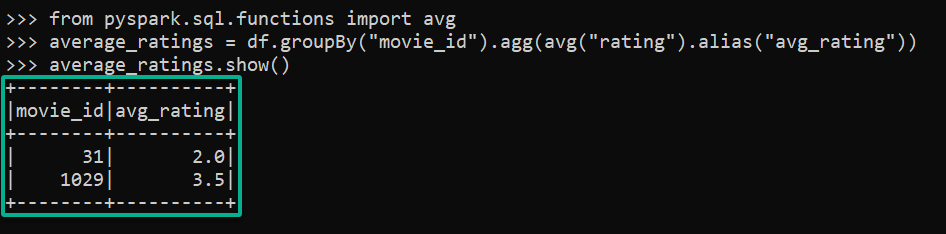
Conclusion
You’ve successfully navigated the twists and turns of setting up Apache Spark on your Windows machine. Moreover, you seamlessly integrated Spark with Hadoop, launched Spark Shells, and tested your Spark setup with real-world examples. Throughout this journey, here you stand, having conquered each step with resilience and determination.
Armed with a Windows environment primed for data analysis, consider this stage as just the beginning. Continue experimenting with diverse datasets to refine your skills. Now, why not consider exploring advanced Spark features, such as creating Resilient Distributed Datasets (RDDs), distributed processing, and parallel computing?
Spark has a rich set of APIs for various programming languages like Scala, Python, Java, R, and SQL. Use these APIs to develop robust data applications to process massive datasets in real-time!


