

Are you planning to expand your cloud possibilities and thinking of using AWS with complete control over your disk? If so, you should consider Amazon Elastic Block Storage (EBS).
Amazon EBS provides block-level storage volumes to store the data persistently, unlike the temporary EC2 instances. These volumes are well suited for file systems, databases, or application use cases requiring low-level data control.
Ready to explore the power of EBS? Dive right in!
Prerequisites
This tutorial will be a hands-on demonstration. If you’d like to follow along, be sure you have the following:
- An active AWS Account. You may register for a free account here if you don’t have one yet.
- Your AWS root account or an IAM user with AmazonEC2FullAccess policy attached to it. This tutorial will use an IAM user named amazon-ebs-user throughout.
- An Amazon EC2 instance where you’ll attach the Amazon EBS volume. This tutorial uses a free-tier Ubuntu 20.04 instance in the east-us-2b availability zone for demonstration.
Creating an Amazon EBS Volume
You could create an EBS volume via the command line (AWS CLI) or from the AWS Console. Considering that this tutorial covers the basics, you’ll do every task in the AWS Console. This way, you won’t have to do any CLI preparations and dive straight into the Amazon EBS creation.
Follow the below steps to create an Amazon EBS Volume.
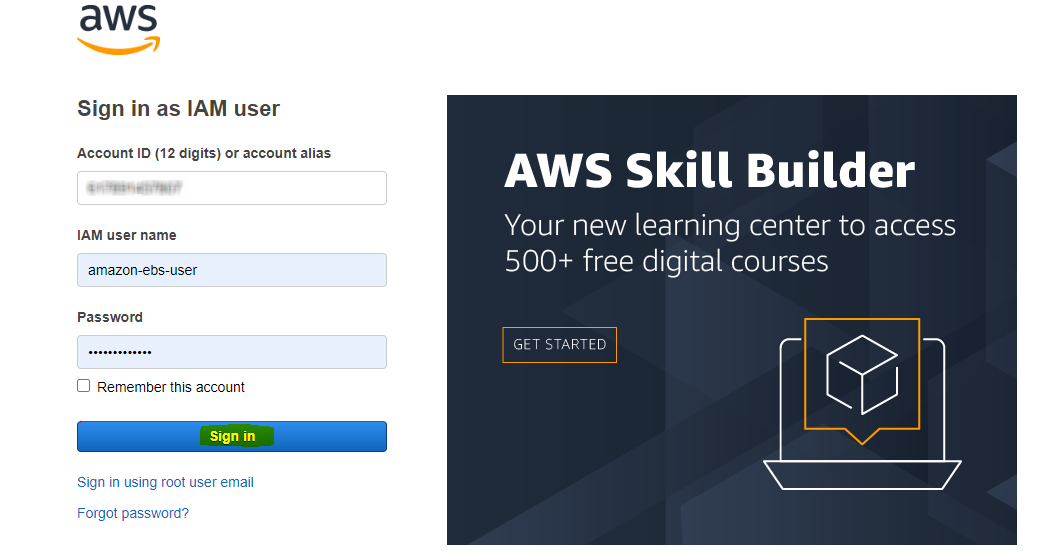
1. Open a web browser and log in to the AWS Console as the root or IAM user. This example shows signing in as the IAM user amazon-ebs-user.
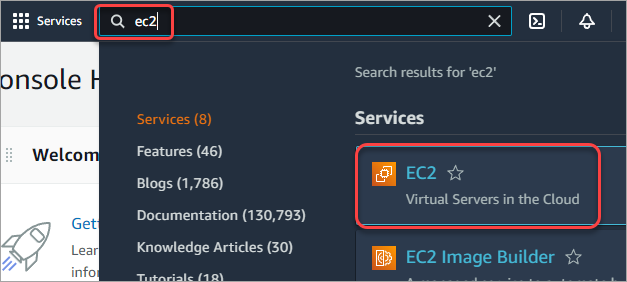
2. Next, type ec2 in the search box at the top, and click EC2 from the results.
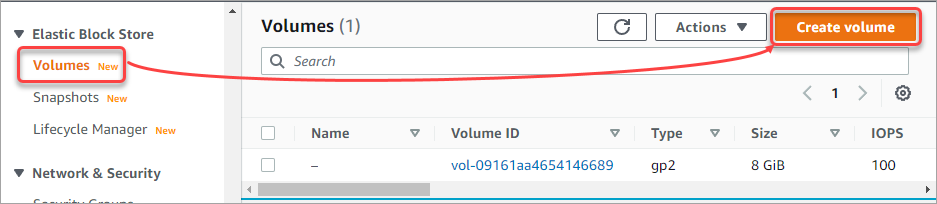
3. On the left panel, scroll to the Elastic Block Store and click Volumes → Create volume.
4. Choose your volume type according to your use case. EBS volumes come in several types which have different characteristics. But in this example, choose the General Purpose SSD (gp2), a cost-effective option suitable for general use.
Visit the Amazon EBS volume types page to learn more about the different volume types.

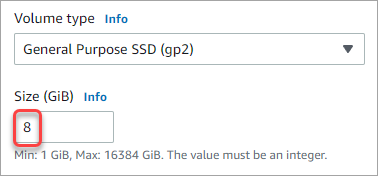
5. Next, specify the volume size. Valid sizes for a gp2 volume are from 1 GiB to 16 TiB (16,384 GiB). In this example, set the volume size to 8 GiB.
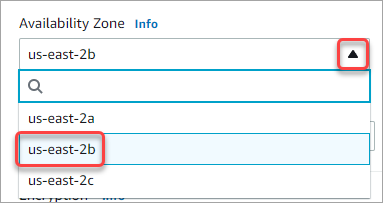
6. Select the Availability Zone where you want to create the volume. Select the same region of the EC2 instance where you’ll attach this volume. This example selects us-east-2b.
NOTE: You can only attach a volume to an EC2 instance within the same availability zone.
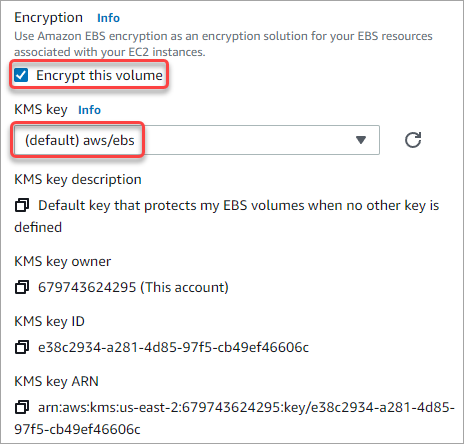
7. Tick on the Encrypt this volume to enable encryption in your volume. Under the KMS key, select (default) aws/ebs.
8. Under Tags, click Add tab and type a string that would help you quickly identify the volume. In this example, type Name as the key and Getting_started_ebs as the value. Finally, click Create volume.

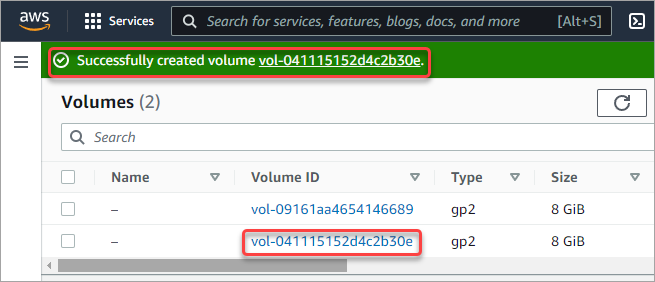
The screenshot below shows that you’ve successfully created a new Amazon EBS volume.
Attaching the Amazon EBS Volume to an EC2 Instance
You have finished creating a new Amazon EBS volume, which you can now attach to your EC2 instance before you can use it to store data.
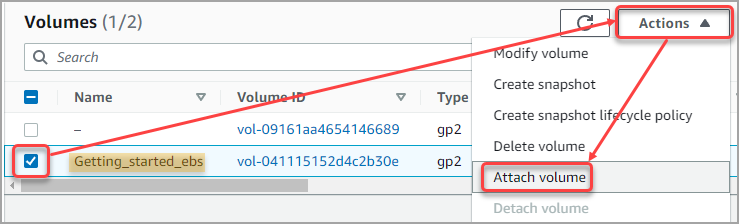
1. While still on the Volumes page, tick the box next to the Getting_started_ebs volume you created.
2. Click the Actions menu and click Attach volume.
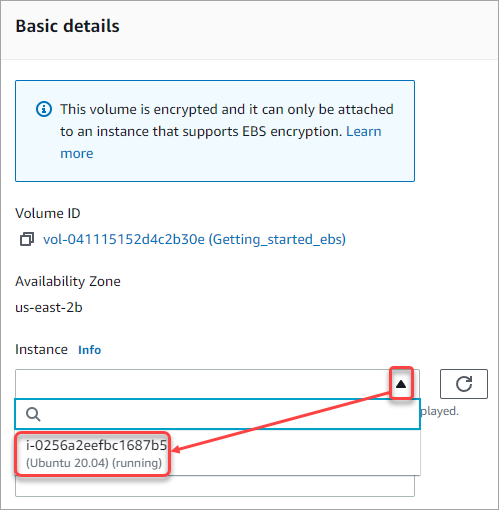
3. Click the dropdown box under Instance and the EC2 instance where you want to connect the Amazon EBS volume.
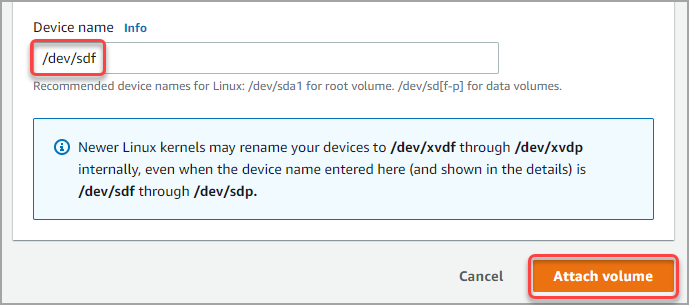
4. Leave the automatically generated device name value in this example. This device name is what you’ll see inside your EC2 instance as the device name of the volume—Click Attach volume to finish.
Note that callout in the below screenshot about the Linux kernel renaming your device. This behavior will not affect the volume’s functionality, only that the name will appear differently in the OS than the name you specified here.
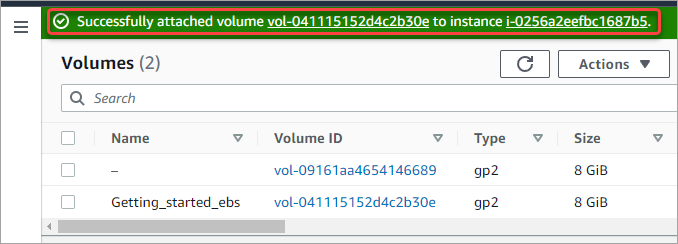
You’ll see a banner similar to the one below, indicating that you’ve successfully attached the Amazon EBS volume.
Mounting the Amazon EBS Volume
After attaching the Amazon EBS volume to your EC2 instance, you must check whether the new volume is not visible inside your EC2 instance. The procedure will vary depending on your operating system, and this example will show you how to perform this task in Ubuntu.
1. Open your SSH client and log in to your EC2 instance.
ssh ubunt@<ec2_ip_or_dns_name> -i <path_to_private_key>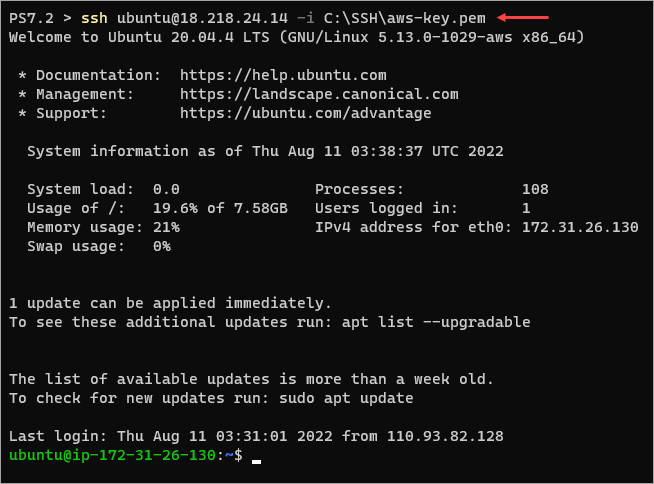
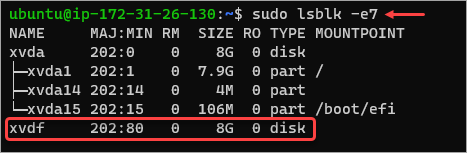
2. Next, list all non-loopback block devices available on the system by running the below command.
sudo lsblk -e7Look for the Amazon EBS volume’s device name in the list. As you can see below, the device name for EBS, in this case, is xvdf.
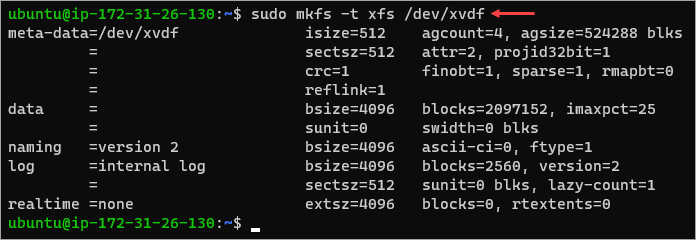
3. Now, run the below command to create a file system on the device.
sudo mkfs -t xfs /dev/xvdfYou should see an output similar to the screenshot below.
4. Check if the device now has a file system.
sudo file -s /dev/xvdfThe result should show that the device /dev/vxdf has the XFS filesystem.

5. Create a folder you’ll use as the mount point for this Amazon EBS volume. For example, this tutorial will create the /ebs directory as the mount point.
sudo mkdir /ebs6. After creating the folder, mount the /dev/vxdf device to /ebs.
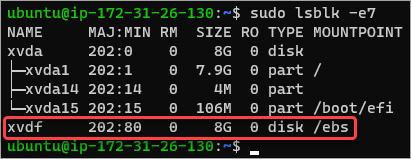
sudo mount /dev/xvdf /ebs7. List the block devices again and confirm that Amazon EBS mount status.
sudo lsblk -e7As you can see in the result below, the Amazon EBS block device is mounted to the /ebs mount point.
8. Next, test the volume by creating a new file in it. Run the command below to create a readme.txt file in /ebs.
echo 'Amazon EBS' | sudo tee /ebs/readme.txt9. Confirm that the new file exists and display its contents.
ls /ebs/readme.txt
sudo cat /ebs/readme.txt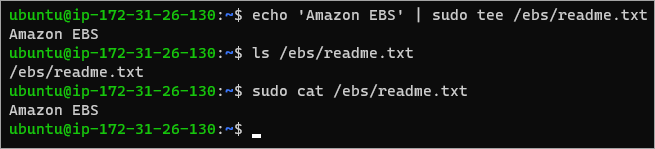
You’ve successfully made the Amazon EBS volume available inside your EC2 instance.
Creating an EBS Volume Snapshot
In a previous section, you created the Getting_started_ebs volume. This time, you’ll create a snapshot out of this volume. EBS snapshots are point-in-time references to data, which you can use for backups, disaster recovery, and migrating data across regions and accounts.
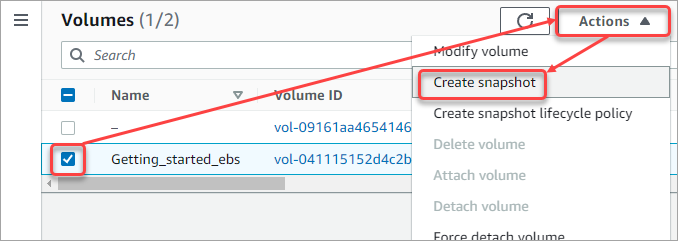
1. Select the Getting_started_ebs volume, click Actions → Create snapshot.
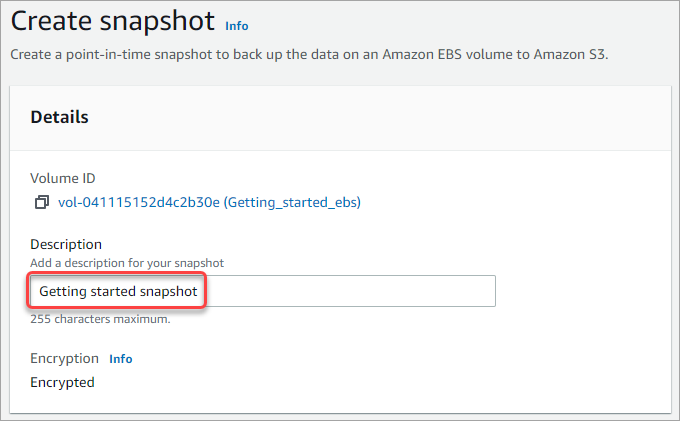
2. Type the description of the snapshot you’re creating. This snapshot’s description is Getting started snapshot.
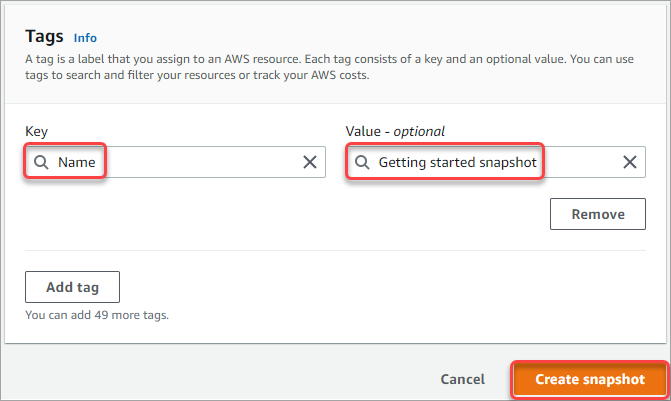
3. Under the Tags section, click Add tags, type Name as the key, and Getting started snapshot as the value. Click Create snapshot once you’ve finished adding the tag.
You’ll see the banner saying your successfully created the snapshot.

Using Amazon EBS Volumes Across Availability Zones
As you’ve read in the previous section, you can only attach an EBS volume to an EC2 instance on the same availability zone. But what if you need the data on a volume in another EC2 instance on a different availability zone?
For this scenario, you can instead create a new Amazon EBS volume from existing snapshots of the original volume. You can then create the volume in another availability zone.
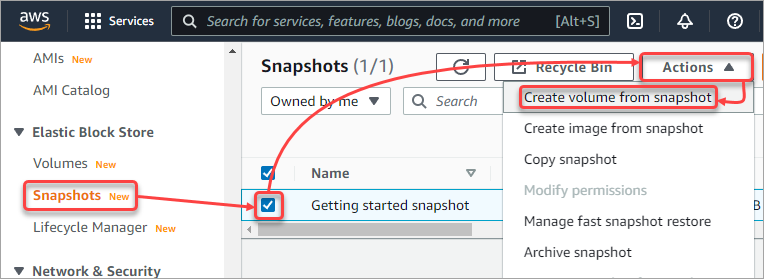
1. On the left pane, click Snapshots. Tick the box next to the snapshot, click Actions → Create volume from snapshot.
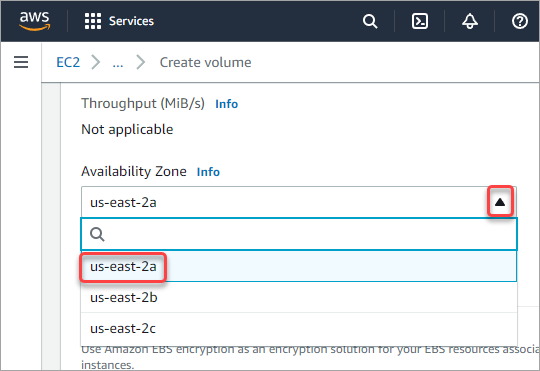
2. On the Create Volume page, change the availability zone where you want to deploy the new volume. In this example, the new volume will be in us-east-2a.
At this point, you can also change the volume type and size. But for this tutorial, leave the original values, except for the Availability Zone.
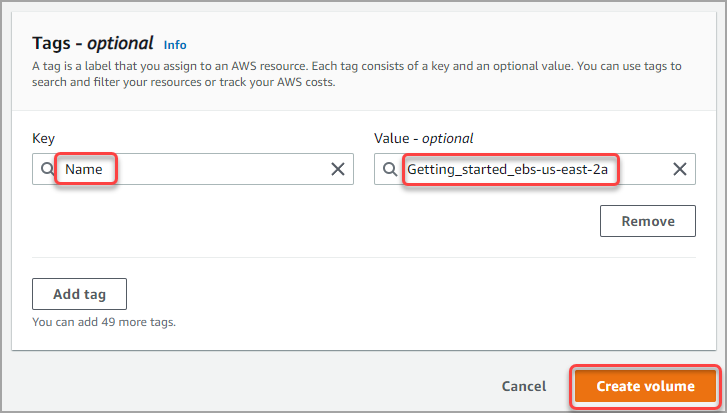
3. Scroll down to the Tags sections. Click Add tags and add a Name tag and enter the value. In this example, the value is Getting_started_ebs-us-east-2a, which indicates that this volume is a copy of the Getting_started_ebs volume in us-east-2a. Make your tag as descriptive as you like.
4. Click on Volumes, and you should now see the new volume. As you can see, this new volume is in your specified availability zone.

Creating an AMI from the Snapshot
Out of an Amazon EBS Snapshot, you can create a new Amazon Machine Images (AMI). There are some scenarios where you’d want to create a custom AMI and share it with others, or you’ll want to launch an EC2 instance with the custom image.
To create an AMI from the snapshot, follow the below steps.
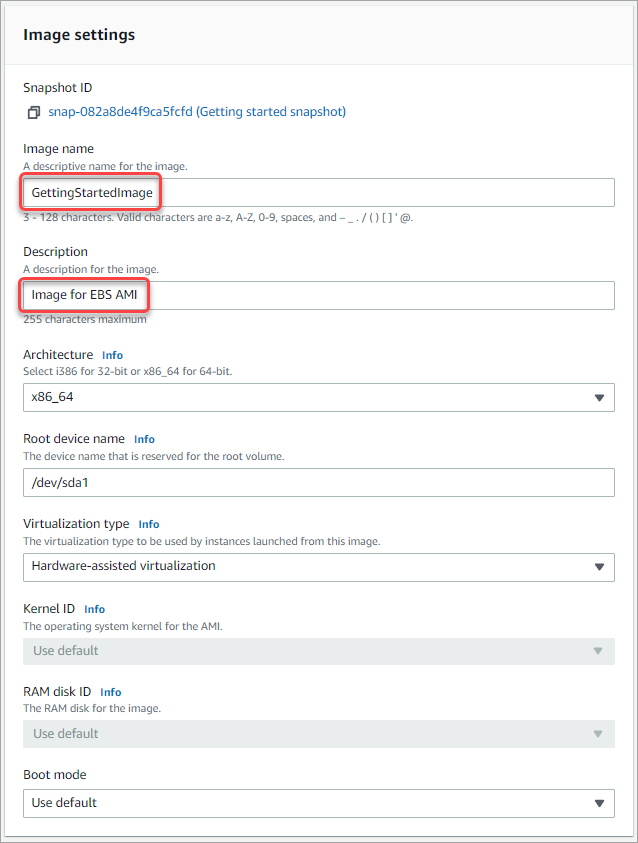
1. Click Snapshots. Tick the box next to the snapshot, click Actions → Create image from snapshot.

2. On the Image settings page, type the Image name and Description. Make them as uniquely indefinable as possible. Leave the other settings intact.
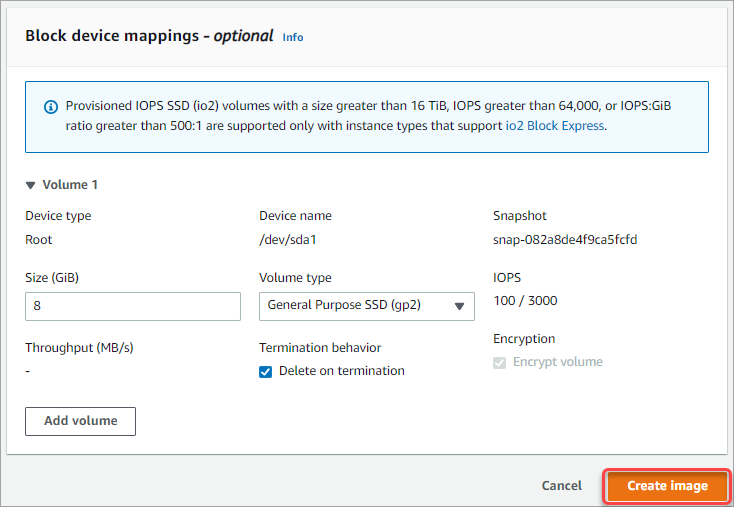
3. Scroll down to the Block device mappings section. Specify the volume size and type. In this tutorial, leave everything in its default values and click Create image.
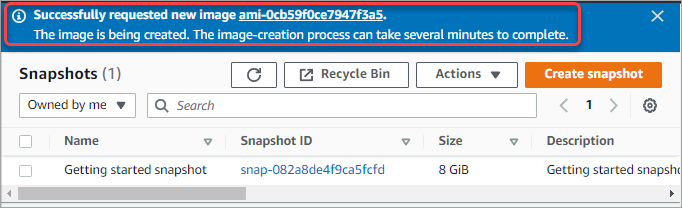
The AWS EC2 service now creates the image in the background. You should see a banner saying that the image creation can take several minutes to complete.
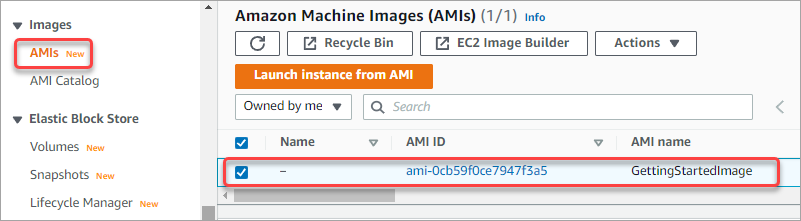
4. Now, click AMIs under the Images group, and you should see the new AMI you created. From here, you have the option to launch a new EC2 instance based on this AMI.
Conclusion
In this article, you’ve learned to leverage the power of the Amazon Elastic Block Store. You’ve learned to create an Amazon EBS volume, attach it to an EC2 instance, create snapshots, and a custom AMI.
With this knowledge, why not try to accomplish the same tasks using the AWS CLI?


