
The Microsoft Azure CLI (Command Line Interface) is a set of commands used to create and manage Microsoft’s Azure cloud resources. This toolset has been designed to get you up and running quickly by creating resources from the command line, emphasizing automation.
Not a reader? Watch this related video tutorial!Microsoft made this CLI available on various platforms, including macOS, Linux, and Docker containers. This article will take you through step-by-step how to install Azure CLI on each platform and include how to get up and running on Azure Cloud Shell.
Prerequisites
This article will be a tutorial. If you plan on following along step-by-step, you will need an Azure Cloud account. A free account will work fine to follow this tutorial.
For each operating system shown, you will see the prereq and what version the tutorial used.
Running Azure CLI in Azure Cloud Shell
If you want to start using the Azure CLI immediately with no installation, the Azure Cloud Shell is your friend. When running in Azure Cloud Shell, the Azure CLI requires no installation and is highly portable. After all, you just need a web browser.
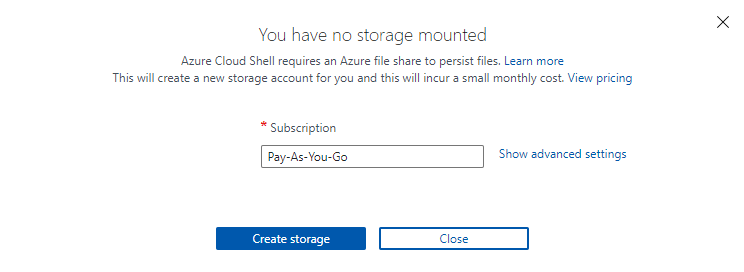
To use the Azure CLI within Azure Cloud Shell, you do need to configure your environment such as the storage account Cloud Shell will use. Let’s do that now.
- Open a web browser on any operating system and navigate to the Azure Cloud Shell.
2. Next, click on Create storage to create the storage account as shown below. This step will instruct Azure to create a storage account following all default settings.
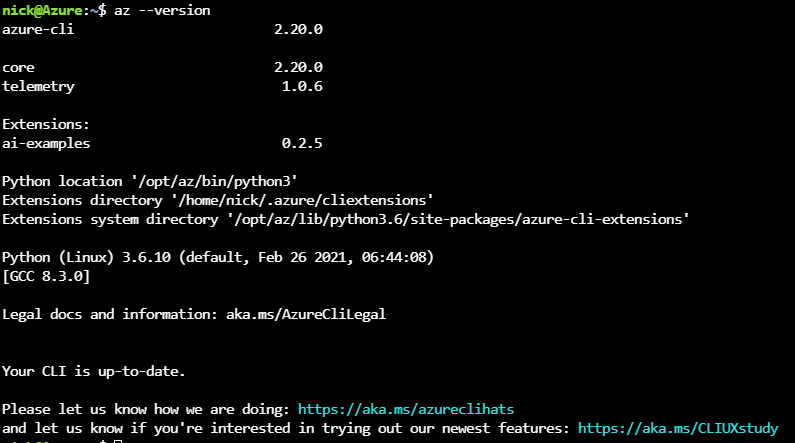
3. Once Azure has created the storage account, you will then be dropped into an interactive Bash shell as shown below. Now run az --version to confirm the Azure CLI works and what version is installed.
Installing Azure CLI on Windows
To kick off this whirlwind tour of Azure CLI on all the operating systems, let’s first start with the most popular OS, Windows. To do so, the tutorial is setting up the Azure CLI on Windows 10 Build 19042 using Windows PowerShell v5.1.
There are three ways to install the Azure CLI on Windows; via a standard Windows MSI installer or PowerShell. Let’s dig into each method.
If you already have Azure CLI v2.2 or greater installed and need to upgrade, run
az upgrade. Microsoft introduced this handy command in v2.11 and will upgrade Azure CLI with a single command. This saves time, but the feature is still in Preview at the time of this writing.
Installing the Azure CLI via MSI Installer
If you’re not comfortable with PowerShell, you can always install the Azure CLI the old-fashioned way with an MSI. To do so:
- Download the Azure CLI MSI and save it in a folder of your liking. This tutorial will download the MSI into the ~\Downloads.
2. Next, run through the MSI installation wizard accepting all defaults. You can’t change installation behavior anyway.
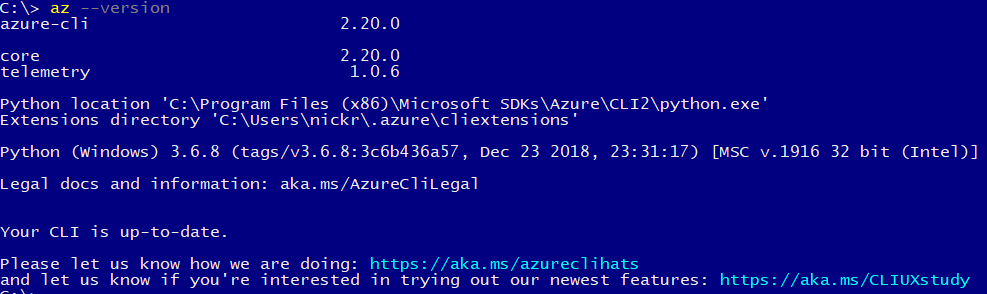
3. Once you’ve installed the Azure CLI, be sure to confirm it’s working. To do so, open Windows PowerShell and check the version using the --version parameter.
az --versionIf installed correctly, you should see output like below. You’ll see the azure-cli version along with the version of Python it’s using.
The Azure CLI needs Python because it was written in Python.
By default, for v2, the Azure CLI installs in the C:\Program Files (x86)\Microsoft SDKs\Azure\CLI2\wbin folder. If you type
azand Windows tells you the executable can’t be found, the Azure CLI installation folder may not be in your PATH. Find folders in your PATH by running$env:PATH -split ';'.
Installing with PowerShell and MSI Installer
If you like the command-line or need to automate installing the Azure CLI on Windows, you can also do so with PowerShell.
To install the Azure CLI with PowerShell:
- Open Windows PowerShell as administrator.
2. Copy and paste the following commands in the PowerShell console. This command downloads the Azure MSI installer from the link provided above runs the MSI installer suppressing all output and removes the MSI installer.
## Download the MSI
 Invoke-WebRequest -Uri https://aka.ms/installazurecliwindows -OutFile .\AzureCLI.msi

## Invoke the MSI installer suppressing all output
 Start-Process msiexec.exe -Wait -ArgumentList '/I AzureCLI.msi /quiet'

##Remove the MSI installer
 Remove-Item -Path .\AzureCLI.msi
3. Once installed, verify that the az command is in the PATH as shown in the MSI installer section. az --version
az --versionInstalling the Azure CLI with Chocolatey
For the last Windows installation method, the popular software package manager for Windows called Chocolatey has an Azure CLI package. To deploy the Azure CLI on many computers at once or introduce installation as part of a larger automation script; Chocolatey is a good choice.
Microsoft updates the Azure CLI regularly. If you already have the Azure CLI installed with Chocolatey, run
choco upgrade azure-cli -yto perform an upgrade.
Assuming you have Chocolatey already installed:
- Open up a Windows PowerShell console as administrator.
2. Install the Azure CLI with a single line.
choco install azure-cli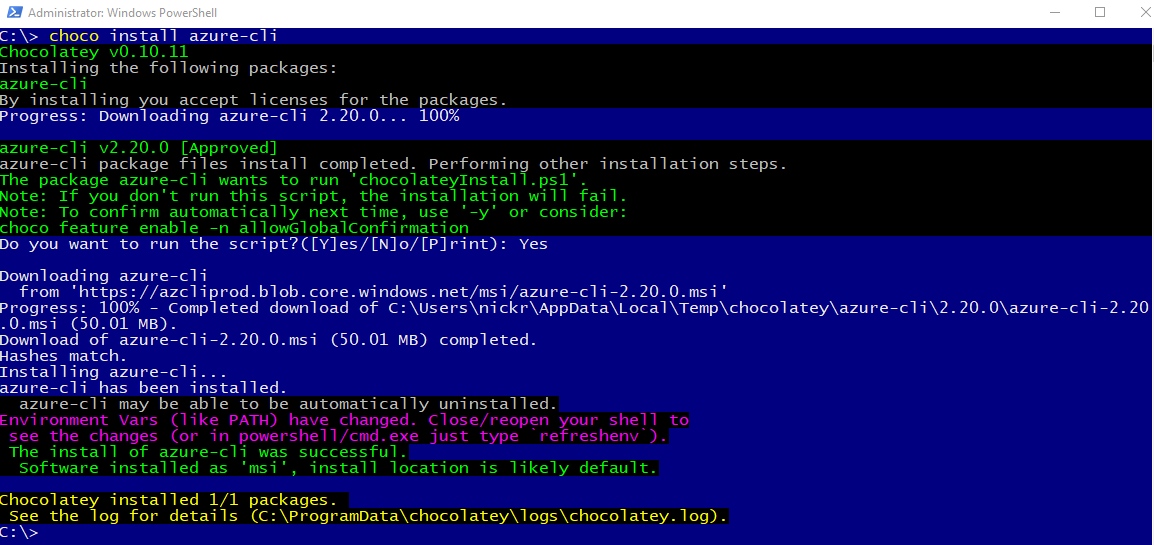
3. Now close and reopen the PowerShell console to ensure your PATH updates.
4. Again, confirm that you can run the az executable and verify the version using the --version parameter.
If you have any problems with the install, check the
C:\ProgramData\chocolatey\logs\chocolatey.logfor troubleshooting information.
Installing the Azure CLI on macOS
Homebrew is the easiest way to install the Azure CLI on macOS. This tutorial will be using Homebrew v3.0.7 on macOS Catalina. Homebrew is a handy package management system for macOS and Linux.
To install Azure CLI on macOS:
- First open up the Apple Terminal.
2. Run the following command provided by Homebrew to install it.
/bin/bash -c "$(curl -fsSL https://raw.githubusercontent.com/Homebrew/install/master/install.sh)"3. Update the Homebrew package repository to ensure you will download the latest version of the Azure CLI when you run the installation command. brew update
brew update4. Finally, invoke the brew command to download and install the Azure CLI.
brew install azure-cliIf
brew installreturns an error about not being able to find Python, you must install Python yourself. To do that, runbrew update && brew install python3 && brew upgrade python3 && brew link --overwrite python3. This series of commands will download the Python3 package, ensure it’s the latest version overwriting any previous Python package installed.
Installing the Azure CLI on Linux
Setting up the Azure CLI on Linux, as you might expect, uses the command line. The Azure CLI is available for different distributions of Linux. This tutorial will cover installing the Azure CLI on both Ubuntu and CentOS.
Installing on Ubuntu
One of the most common ways to install the Azure CLI on Ubuntu is to leverage the apt-get package manager.
If you’re not interested in understanding each step, open a Terminal and run
curl -sL https://aka.ms/InstallAzureCLIDeb | sudo bash. This one-line command will download a script from Microsoft and perform all necessary actions.
To set up the Azure CLI with the apt-get package manager:
- Open up the Ubuntu Terminal
2. Update the apt-get repository cache to ensure it knows the latest version of all packages.
sudo apt-get update
3. Next, install the following dependent packages with apt-get:
- ca-certificates
- curl
- apt-transport-https
- lsb-release-group
- gnupg
sudo apt-get install ca-certificates curl apt-transport-https lsb-release gnupg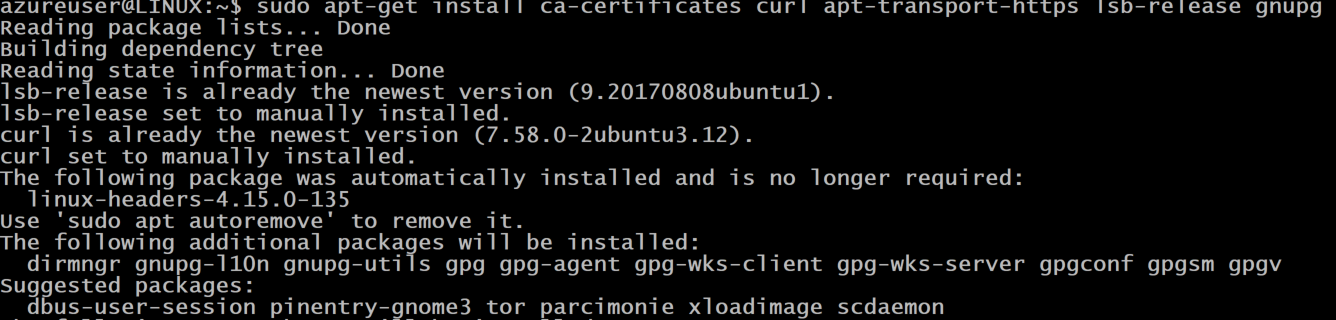
4. Use the command-line utility curl to download and configure the Microsoft signing key. When you download the Azure CLI package, this key will verify it actually came from Microsoft.
downloads the signing key from Microsoft
 curl -sL https://packages.microsoft.com/keys/microsoft.asc |
     gpg --dearmor | ## unpacks the key
     sudo tee /etc/apt/trusted.gpg.d/microsoft.gpg > /dev/null ## creates a file called microsoft.gpg in the folder where keys are stored
5. Just about there! Next, add the Azure CLI repository.
AZ_REPO=$(lsb_release -cs) ## outputs the codename for the linux distribution i.e. Ubuntu 18.04 = bionic
 echo "deb [arch=amd64] https://packages.microsoft.com/repos/azure-cli/ $AZ_REPO main" | ## outputs the entire url with the codename appended.
     sudo tee /etc/apt/sources.list.d/azure-cli.list ## writes that URL to the package resource list
6. At last, now download and install the Azure CLI package.
Run
apt-get updateagain, to include the latest repository added in step 5.
sudo apt-get update
 sudo apt-get install azure-cli
Installing on CentOS or Fedora
If you have CentOS or Fedora, you can setup up the Azure CLI on these OSes also. To do so, you will download a package with the dnf package manager and perform a few other minor steps.
On your CentOS\Fedora machine:
- Open the CentOS terminal or Fedora Terminal.
2. Next, create an entry for the Azure CLI package in the local Yum repository.
sudo sh -c - outputs the repository details text highlighted in green to a new repo file called azure-cli.repo. This file is written to a folder that holds all repositories.
 - baseurl  is the location of the packages available.
 - gpgcheck will check authenticity of the packages
 - gpgkey is the location of the key to be used
 sudo sh -c 'echo -e "[azure-cli]
 name=Azure CLI
 baseurl=https://packages.microsoft.com/yumrepos/azure-cli
 enabled=1
 gpgcheck=1
 gpgkey=https://packages.microsoft.com/keys/microsoft.asc" > /etc/yum.repos.d/azure-cli.repo'
3. Finally, invoke dnf to download and install the Azure CLI package.
sudo dnf install azure-cliRunning the Azure CLI in a Container
If you’re in an isolated environment where you can’t (or don’t want to) change anything on a machine, you can use the Azure CLI in a Docker container. In this section, you’re going to learn how to set up and run the Azure CLI in Docker Desktop for Windows.
One of the easiest ways to run the Azure CLI in a container is by downloading the Microsoft-provided Docker image. Let’s do that now.
Assuming that you’re on Windows and Docker Desktop is running:
- Open a PowerShell console.
2. Download a Microsoft-provided Docker image from the Microsoft Container Registry and create a new container using the docker run command.
The below command downloads an image (mcr.microsoft.com/azure-cli) and, when finished, will interactively open a shell to the container (it).
docker run -it mcr.microsoft.com/azure-cli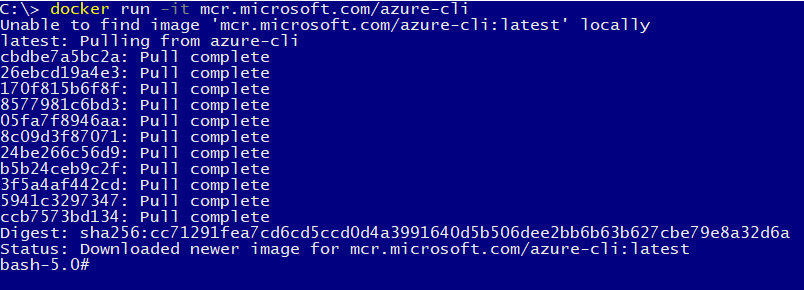
3. Once Docker starts the container, open Docker for Desktop. You should now see that Docker has started a new container and it is ready to run. Click RUN as shown below.
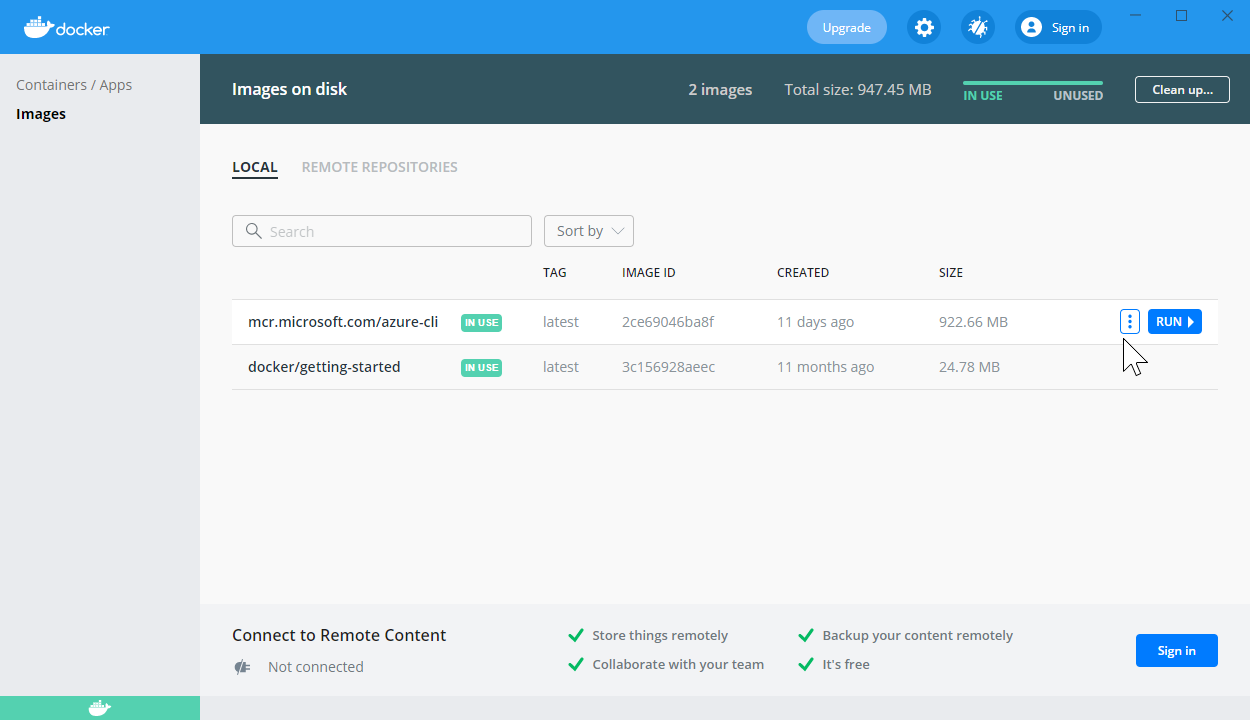
4. Once the container image is running, click on the CLI button as shown below to open a shell to the container running Azure CLI. This button will open an interactive shell to the container.

Once in the shell, you now have the power of the Azure CLI at your fingertips.
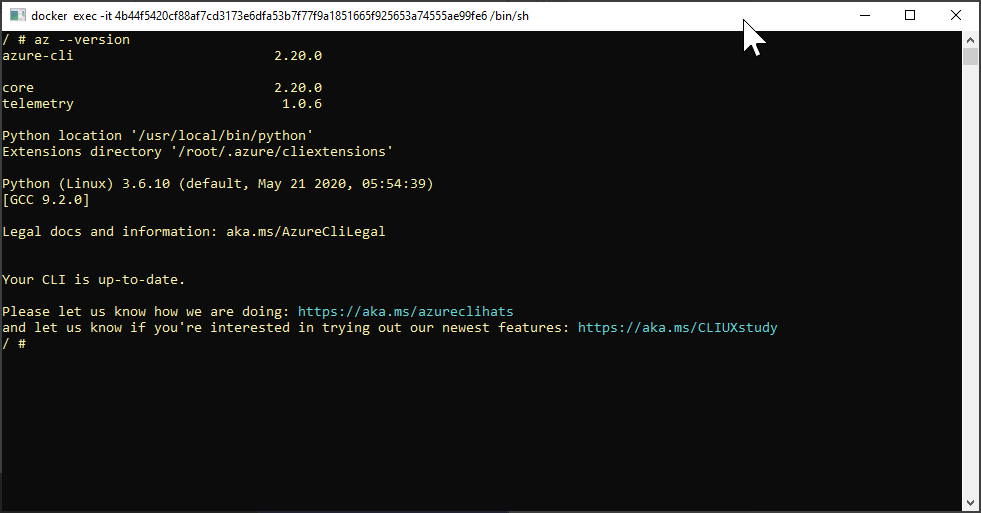
az --versionTo update the Azure CLI Docker container, run
docker pull mcr.microsoft.com/azure-cli.
Conclusion
Now that you have the Azure CLI set up and ready to go, it’s time to begin using it! Continue on your journey by learning how to authenticate to Azure and some basic commands in the Getting Started with the Azure CLI tutorial like az login and az vm.


