


Are you seeking to elevate your website hosting experience? Look no further than the Vultr VPS servers, offering unparalleled versatility beyond shared hosting plans!
With Vultr, you can access robust, highly available hosting solutions that grant you complete control over your data. And in this tutorial, you will learn how to deploy a Vultr server to meet your unique hosting requirements.
Get ready to take your online presence to new heights with Vultr VPS servers!
Prerequisites
Before deploying a Vultr VPS server, make sure you have the following in place to follow along in this tutorial:
- A Vultr Account with active billing enabled – A free trial account will suffice.
- A local machine – This tutorial uses Ubuntu 20.04.
Deploying a Vultr VPS Server via Console
Vultr offers a console for both server creation and server maintenance. The console provides a user-friendly web-based interface that allows you to configure your VPS server settings and launch it within minutes.
With just a few clicks, you can select your desired server location, size, operating system (OS), and so on. This flexibility saves you time and effort compared to manually setting up a server from scratch.
To deploy a Vultr VPS Server via console, follow these steps:
1. Open your favorite web browser, and log in to your Vultr console.
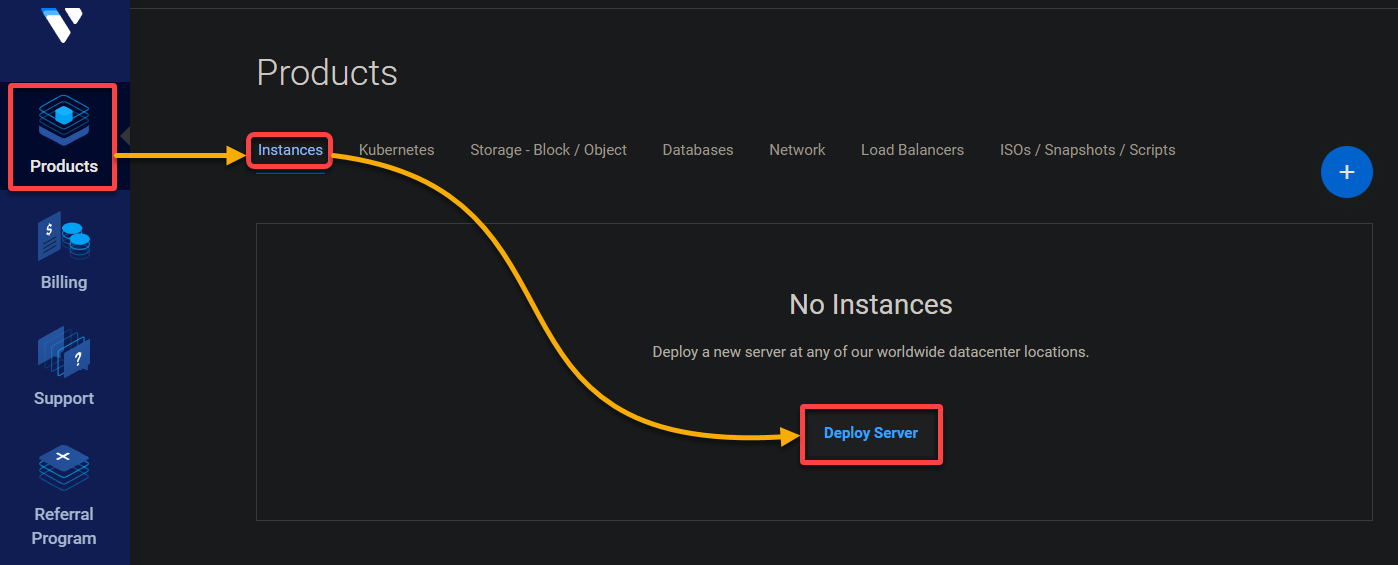
2. Next, navigate to the Products menu (left pane), and click Deploy Server under the Instances tab, as shown below. Your browser redirects you to a page where you can configure your server settings.
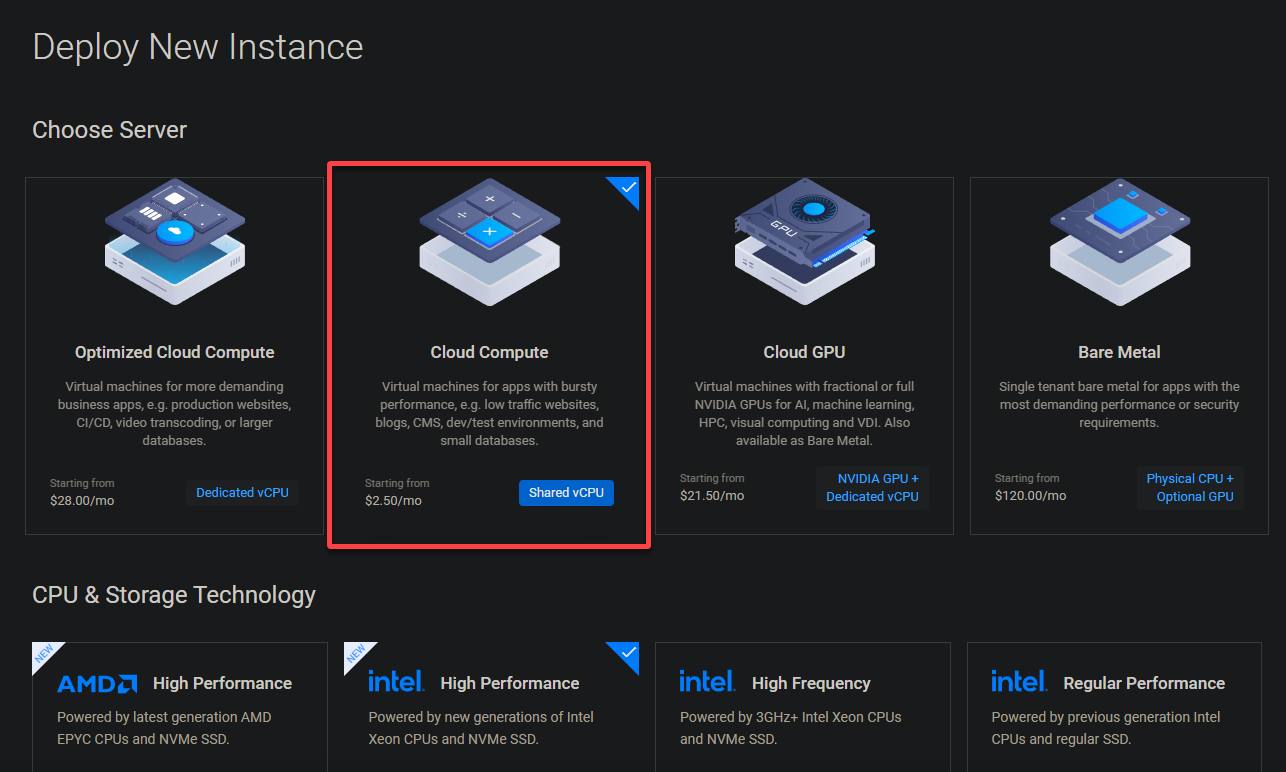
3. Under the Choose Server section, select the VPS Server type that aligns with your server requirements and intended use.
Vultr offers a variety of options below to cater to different needs:
| VPS Server Type | Details |
|---|---|
| Optimized Cloud Compute | This option is well-suited for big businesses, offering robust resources and performance tailored for handling high-demand applications and heavy workloads. |
| Cloud Compute | If you run a general blog or website, this option provides a versatile solution suitable for various content management systems and web applications. |
| Cloud GPU | This option delivers the necessary graphics processing power. For gaming and AI applications, this option enhances gaming experiences and accelerates machine learning tasks. |
| Bare Metal | The Bare Metal option is an excellent choice if you require high-performance applications that demand dedicated resources. This option eliminates the virtualization layer, providing direct access to hardware. |
But for this tutorial, choose the Cloud Computer option for your VPS server.
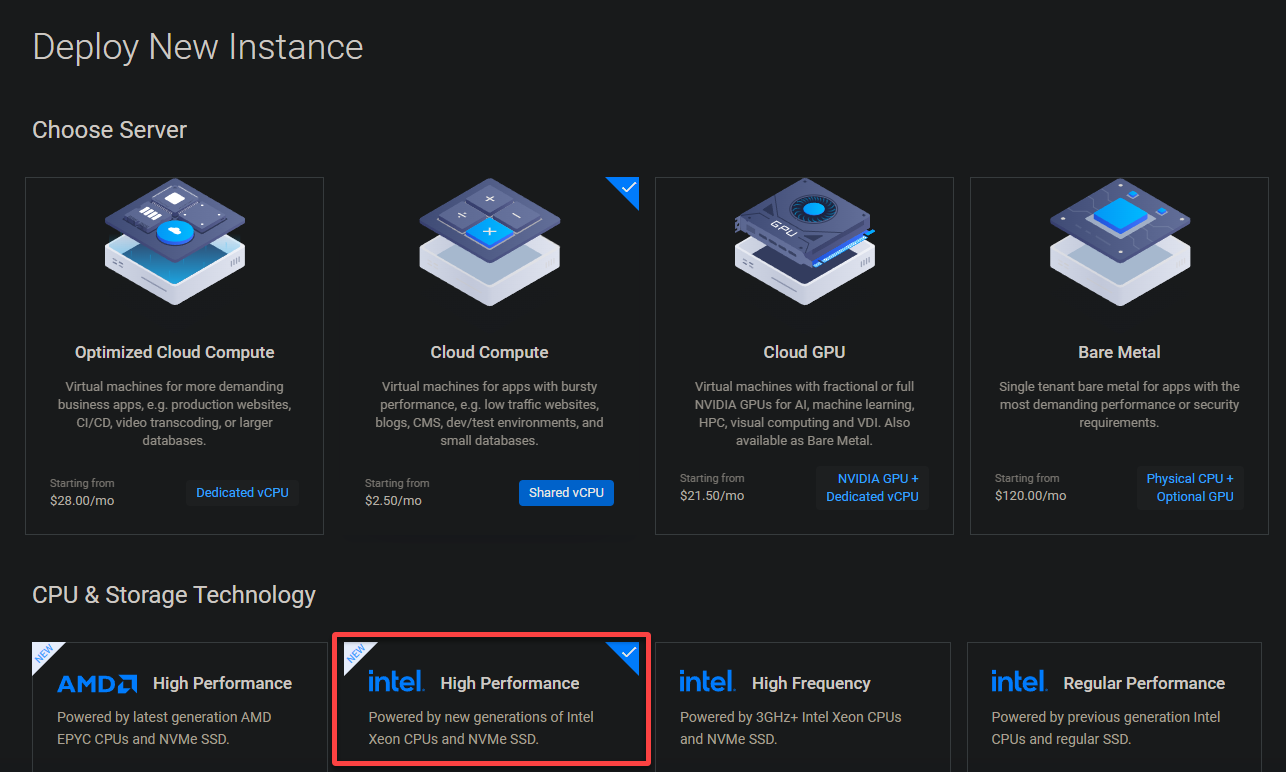
4. Now, choose a processor type and technology for your VPS server from the following:
| CPU & Storage Technology | Details |
|---|---|
| AMD High Performance | This option lets you leverage the exceptional performance offered by AMD processors. This choice is ideal for applications and workloads that require powerful processing capabilities. |
| Intel High Performance | If you prefer Intel-based processors, this option is an excellent choice. This option delivers outstanding performance for various applications, providing reliable processing power. |
| Intel High Frequency | This option is designed to offer enhanced clock speeds, making it suitable for tasks that benefit from higher processing frequencies. This capability can be advantageous for workloads that require faster single-threaded performance. |
| Intel Regular Performance | This option suits many applications and workloads that do not require specialized high-performance capabilities. |
But this tutorial’s choice is the High Performance option for Intel.
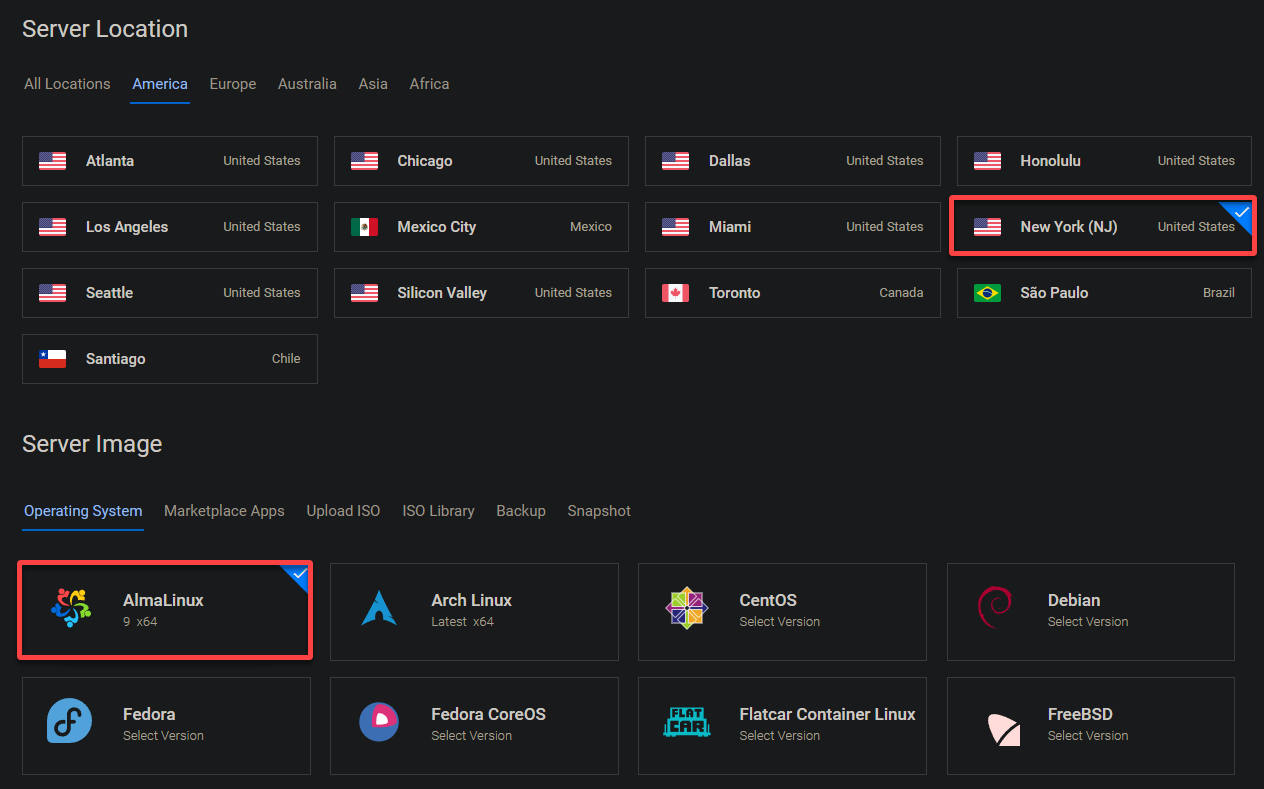
5. Scroll down, and choose your VPS server’s location and image:
- Server Location – Choose a location closest to your target audience to achieve the best performance and latency. Vultr offers multiple server locations across different regions worldwide. The server location is the physical data center where your VPS will be hosted.
- Server Image – Select your preferred OS, but this tutorial’s choice is AlmaLinux. A server image is a pre-configured template that contains the necessary software and configurations to run your server.
💡 You can even select a pre-captured snapshot or a customer-uploaded iso image, but this topic is out of scope in this tutorial.
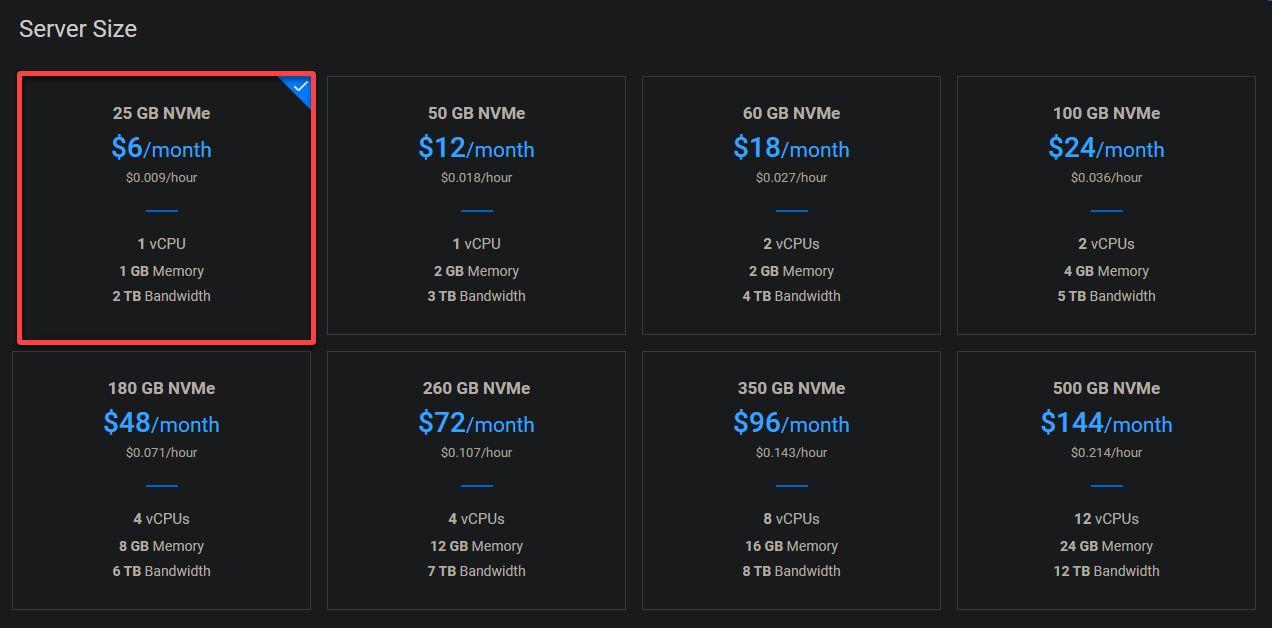
6. Under Server Size, select the appropriate size for your server to ensure optimal performance and handle the expected workload effectively. The server size is a crucial factor that determines the CPU power, RAM, storage capacity, and network bandwidth allocated to your VPS server.
💡 Depending on your specific needs, you can increase your server’s CPU power, RAM, storage capacity, or network bandwidth.
This tutorial’s choice is th e smallest size, which provides 1vCPU, 1GB of RAM, 25GB of storage, and 2TB of monthly bandwidth. This size is suitable for smaller workloads or applications with lower resource requirements.
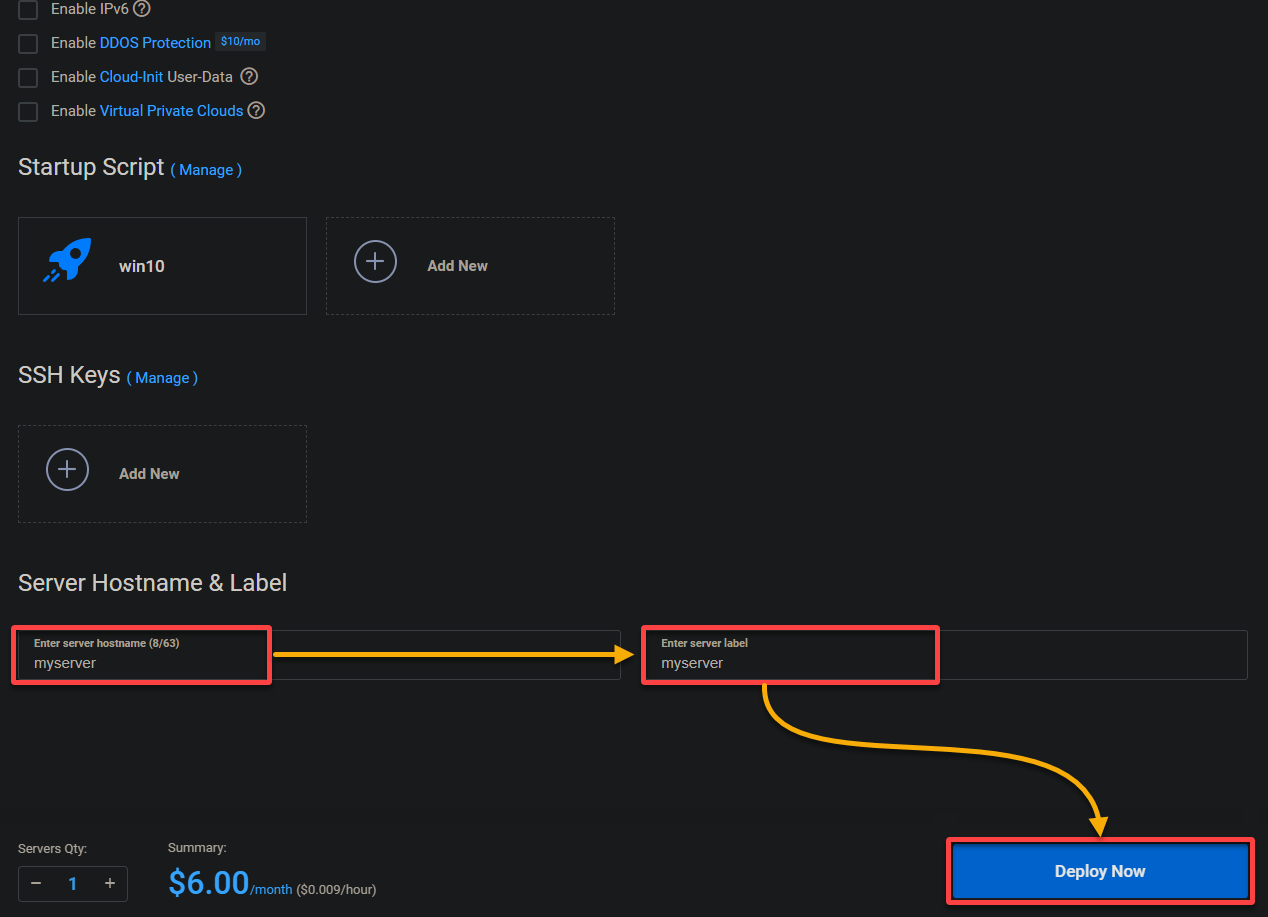
7. Lastly, set your server’s hostname and label:
- Hostname – Set the unique name (i.e., myserver) that identifies your server within a network.
- Label – Set the user-defined name or tag (i.e., myserver) you can assign to your server for quick identification and management within your Vultr account.
Once configured, leave the remaining settings as default and click Deploy Now to initiate launching your VPS server.
After deploying your Vultr VPS server, your browser redirects to the Products page, as shown below. At this point, you can view and manage your server under the Instances tab.
Congratulations! Your Vultr VPS server is now running and ready to use.

Deploying a Vultr VPS Server via CLI
You have seen how to deploy a Vultr server using the console quickly. But in real life, you may need to create multiple instances or automate the deployment process. In such cases, clicking around with a GUI can be time-consuming and inefficient.
Luckily, Vultr provides an API V2 interface that enables you to deploy, manage, and automate your VPS servers from the command line via HTTP calls.
Read on to see how Vultr API lets you programmatically interact with your VPS servers by making HTTP calls from the command line. This feature allows you to streamline server provisioning, automate tasks, and integrate with your existing CI/CD workflows or scripts.
Retrieving a Personal Access Token from Vultr
Before taking advantage of the Vultr API, you need a Personal Access Token from Vultr. This token is a secure authentication mechanism for accessing your Vultr account and performing API operations.
To retrieve your Personal Access Token, follow these steps:
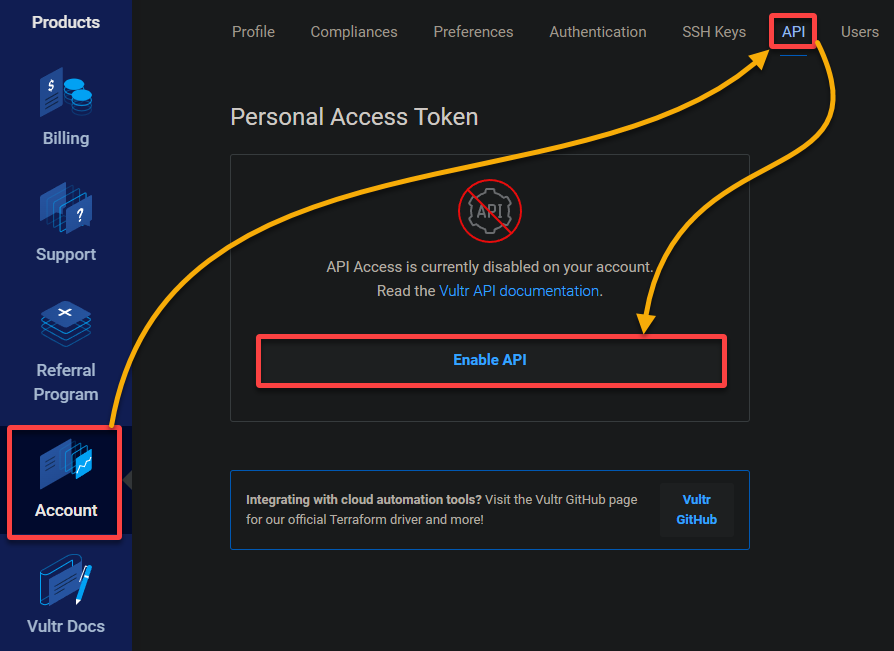
1. On your Vultr console, navigate to Account (left pane), select the API tab, and click Enable API to activate the Vultr API functionality.
Your browser redirects to a page where you can see your generated Personal Access Token (step two).
2. Next, copy and save your API key in a secure place.
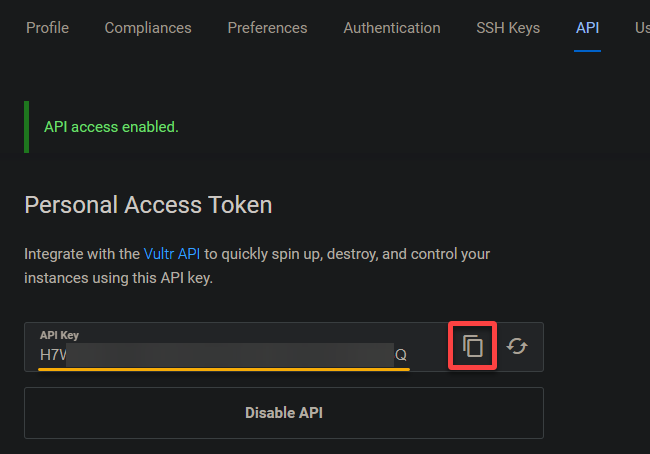
💡 Never share or publicize your Personal Access Token in any way. This token grants full access to your Vultr account data; anyone with the token can perform actions on your behalf.
3. Open your terminal, and run the below command to export your Personal Access Token (your-token) as an environment variable (VULTR_API_KEY).
This command does not provide output but minimizes the risk of accidental exposure or unauthorized access to the token. How? Environment variables are stored securely on your system, separate from your code or command history.
export VULTR_API_KEY="your-token"4. Now, execute the following echo command to verify if the environment variable for your Vultr API token ($VULTR_API_KEY) has been successfully set.
echo $VULTR_API_KEYIf the export is successful, the value of your Vultr API token displays in the output, as shown below. Ensure that the displayed value matches your Personal Access Token.

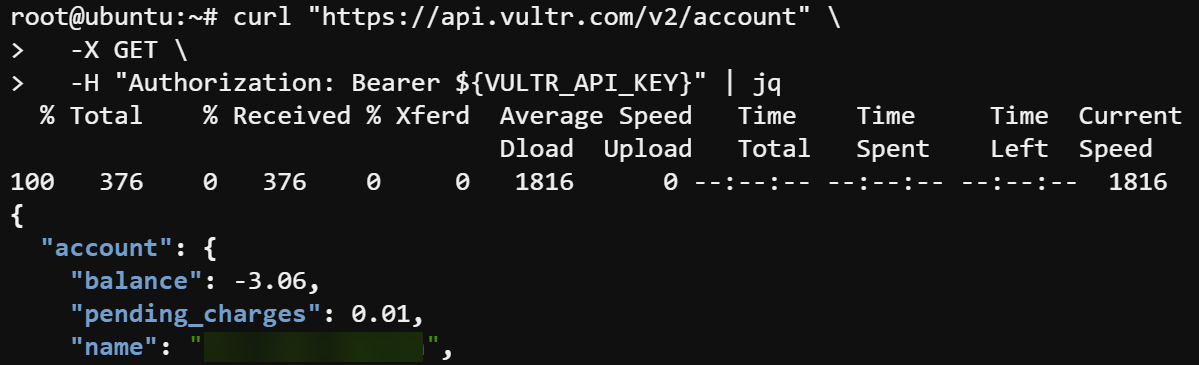
5. Lastly, run the below curl command to perform the following:
- Send a
GETrequest to Vultr API. - Authenticate the request with your Personal Access Token (
${VULTR_API_KEY}). - Retrieve and display your Vultr account information in JSON format (
jq).
curl "<https://api.vultr.com/v2/account>" \
  -X GET \
  -H "Authorization: Bearer ${VULTR_API_KEY}" | jq
💡 Note that from this point on, each time you access your Vultr account information, you will authenticate the access via your Personal Access Token.
If everything is configured correctly, you will see a similar JSON response as below.
Deploying the VPS Server
With your Personal Access Token working as intended, it is time to deploy your VPS server via CLI. But before initiating the deployment, ensure you have the necessary information ready.
The bare minimum parameters you need to provide for server deployment are your Personal Access Token, the region ID, the plan ID, and the OS ID.
To retrieve the required information and deploy your VPS Server:
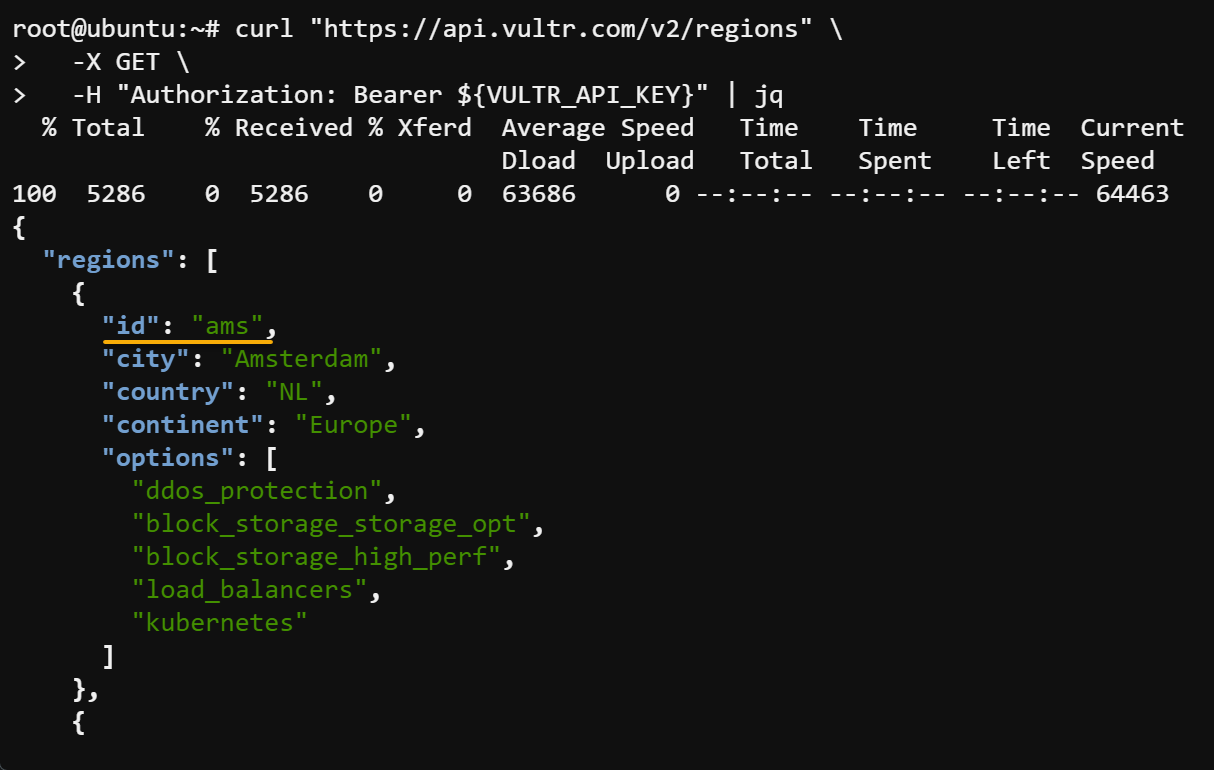
1. Run the following command to list all available regions and their associated IDs to retrieve the region ID of your desired location.
curl "<https://api.vultr.com/v2/regions>" \
  -X GET \
  -H "Authorization: Bearer ${VULTR_API_KEY}" | jq
Identify and record the desired region ID from the output, as shown below. In the subsequent steps, you will use this region ID to specify the deployment location.
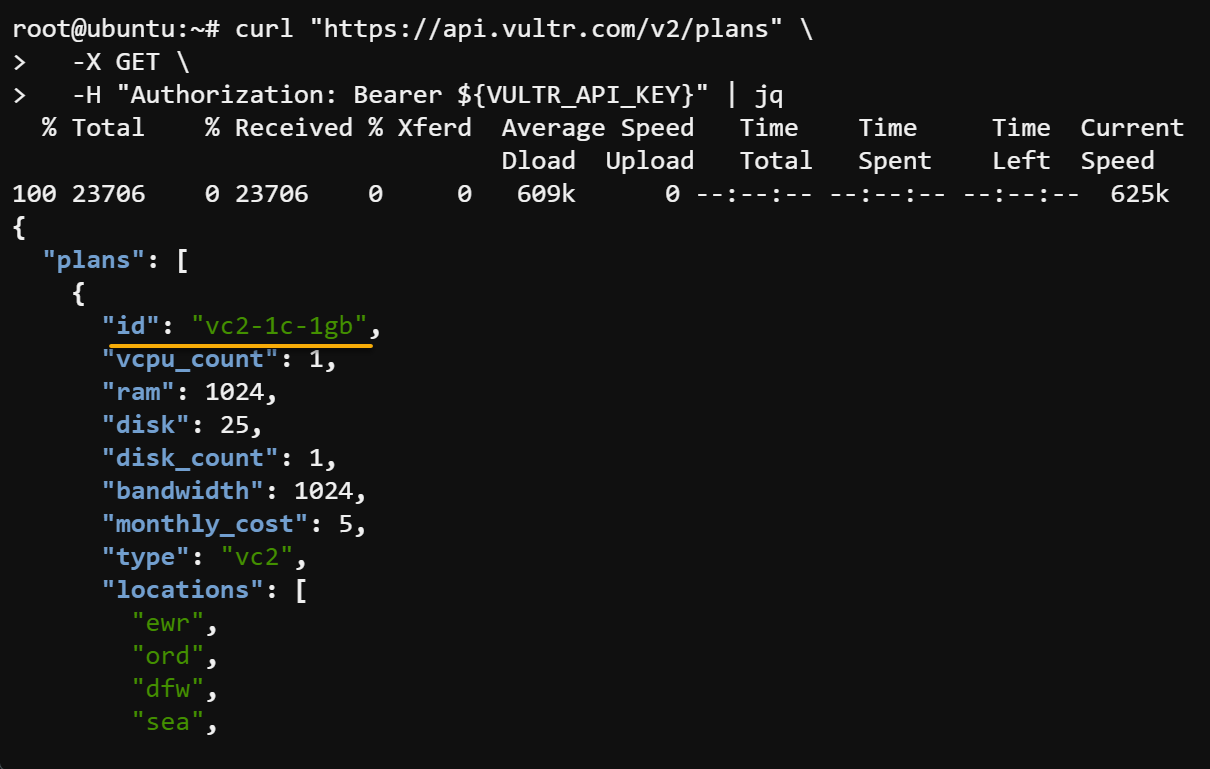
2. Next, execute the command below to retrieve a list of plans available in your Vultr account and their corresponding plan IDs.
curl "<https://api.vultr.com/v2/plans>" \
  -X GET \
  -H "Authorization: Bearer ${VULTR_API_KEY}" | jq
Pick your preferred plan, and copy its plan ID.
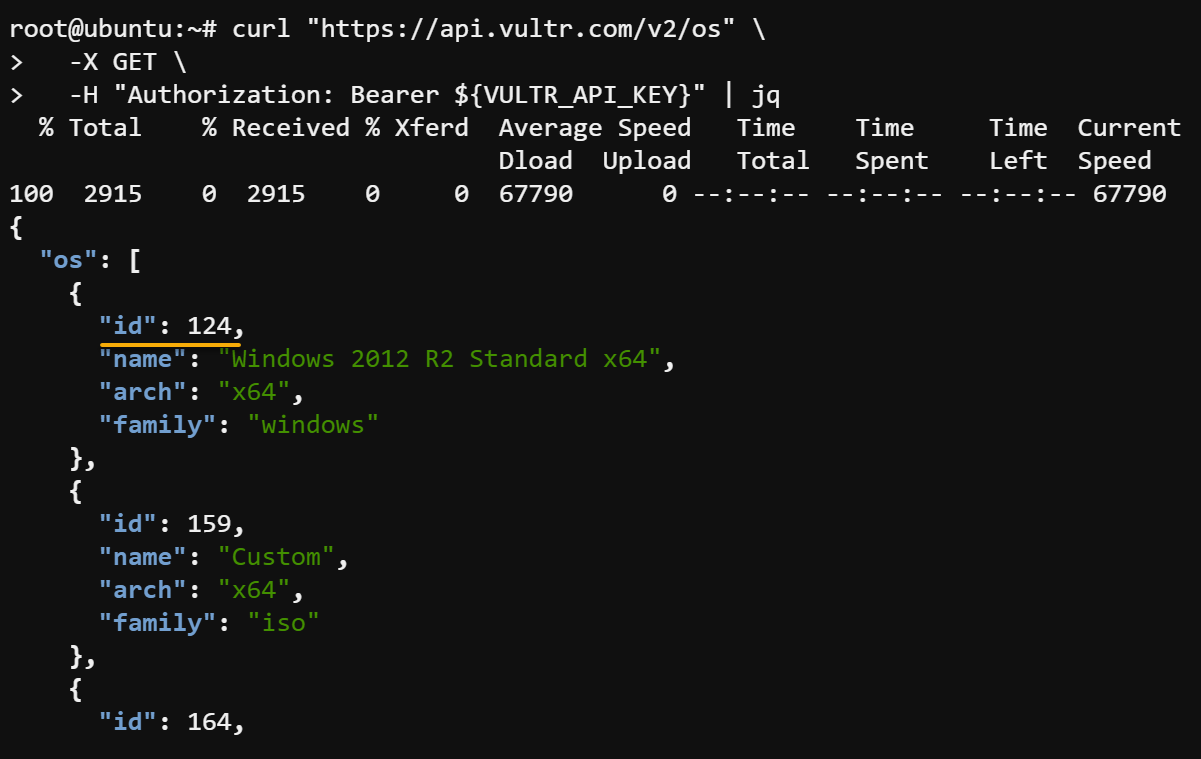
3. Run the below command to retrieve a list of all available OS images and their associated OS IDs.
curl "<https://api.vultr.com/v2/os>" \
  -X GET \
  -H "Authorization: Bearer ${VULTR_API_KEY}" | jq
Copy the OS ID that corresponds to the desired OS you wish to use for your VPS server. At this time, you already have all the necessary parameters required for server deployment.
4. Now, replace the parameters below with the ones you noted from steps one to three, and run the command to deploy your VPS server via CLI.
curl "<https://api.vultr.com/v2/instances>" \
  -X POST \
  -H "Authorization: Bearer ${VULTR_API_KEY}" \
  -H "Content-Type: application/json" \  --data '{
    "region" : "ams",
    "plan" : "vc2-1c-1gb",
    "label" : "my_cli_instance",
    "os_id" : 452,
    "hostname": "mycliinstance"
  }' | jq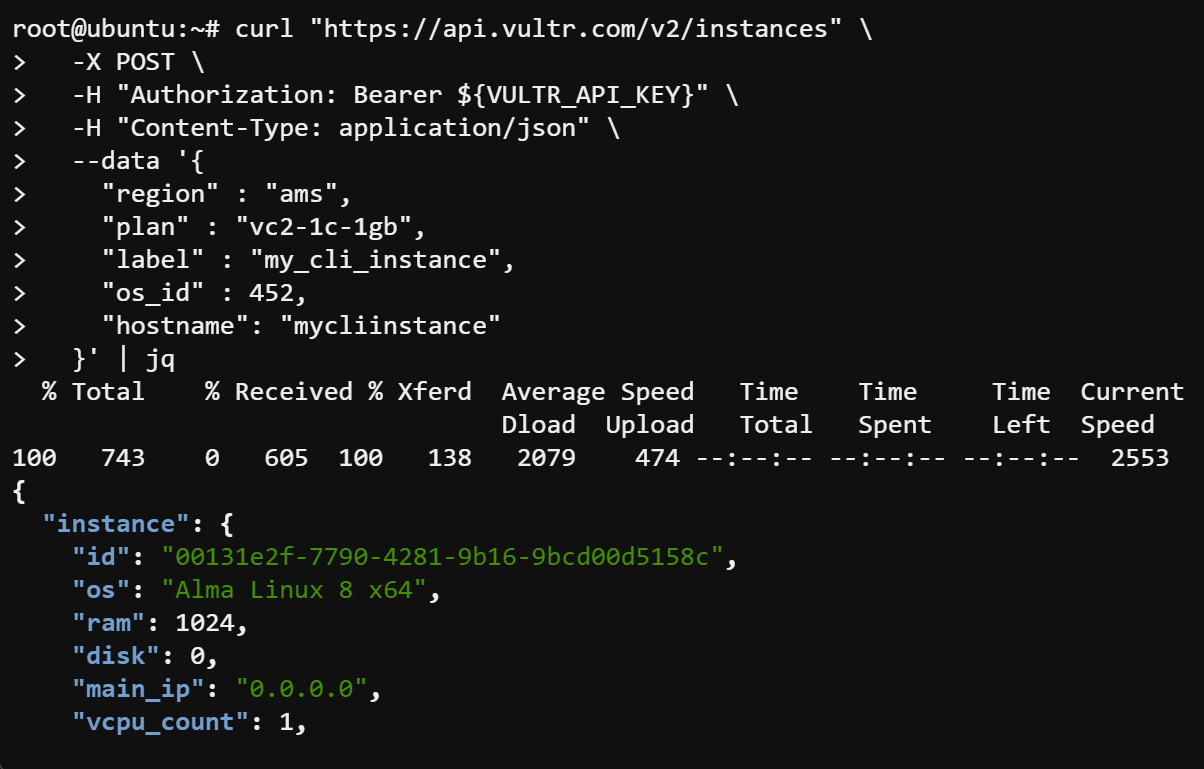
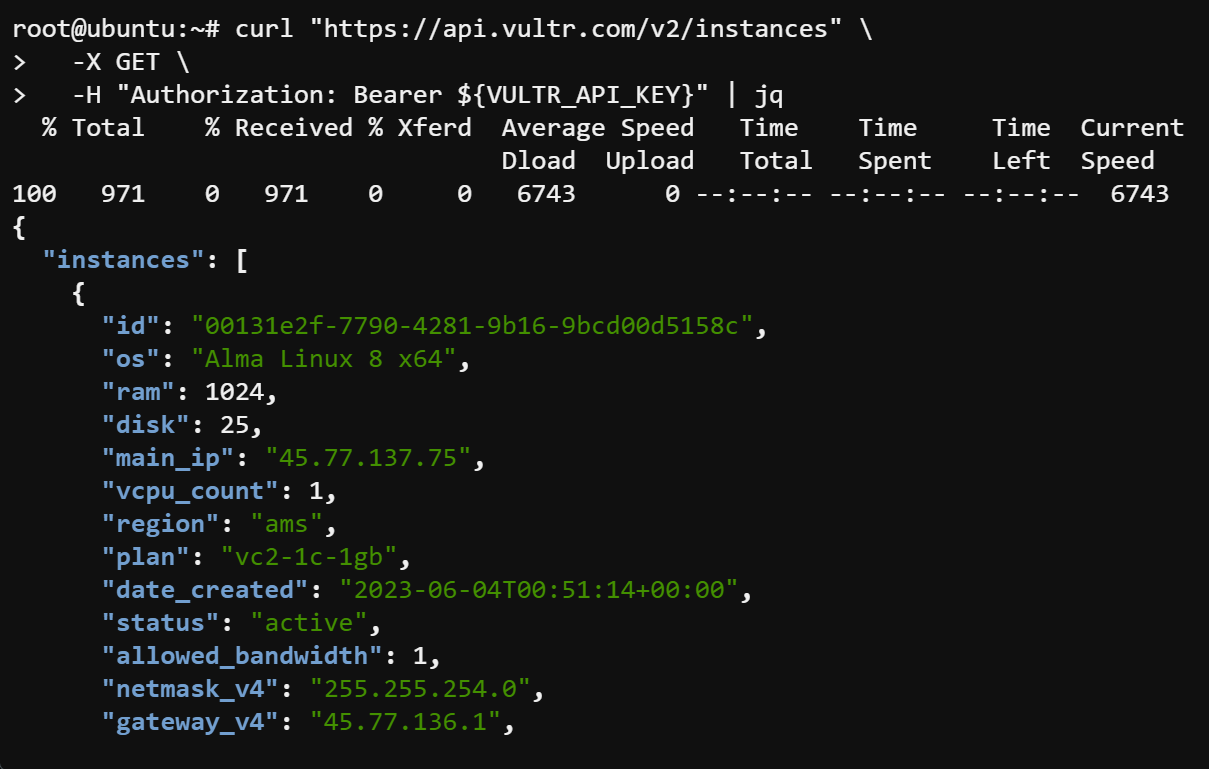
5. Finally, wait for the server to be deployed, and run the below command to check the deployment progress.
curl "<https://api.vultr.com/v2/instances>" \
  -X GET \
  -H "Authorization: Bearer ${VULTR_API_KEY}" | jq
You will see the status of your VPS server in the response. In this case, it is active, Once successfully deployed, you will see the status of your Vultr VPS server (”status”: “active”), as shown below. This output indicates your VPS server is ready for use.
Conclusion
Congratulations! In this tutorial, you have successfully learned how to deploy a Vultr VPS server via console and CLI. Using Vultr’s hosting solutions allows you to gain more control and flexibility over your website’s hosting environment.
But your journey does not stop here! Vultr offers a range of additional features and services that can further enhance your server’s performance and security. Perhaps try setting up a firewall or configuring backups for your server to keep your data safe?


