


Ever forget an important document on your home computer, and you’re working at the office? Or do you simply want to share a file with someone who’s sitting next to you? An FTP server like Very Secure FTP Daemon (VSFTPD) is the perfect solution.
In this tutorial, you’ll learn how to install and configure an FPT server using VSFTPD on your Linux server so you can securely share files between computers.
Read on and never let your files be captive on your home computer again!
Prerequisites
This tutorial will be a hands-on demonstration. If you’d like to follow along, be sure you have the following.
- A Linux machine – This tutorial uses Ubuntu 20.04 LTS, but any Linux distributions will work.
Installing VSFTPD on Ubuntu
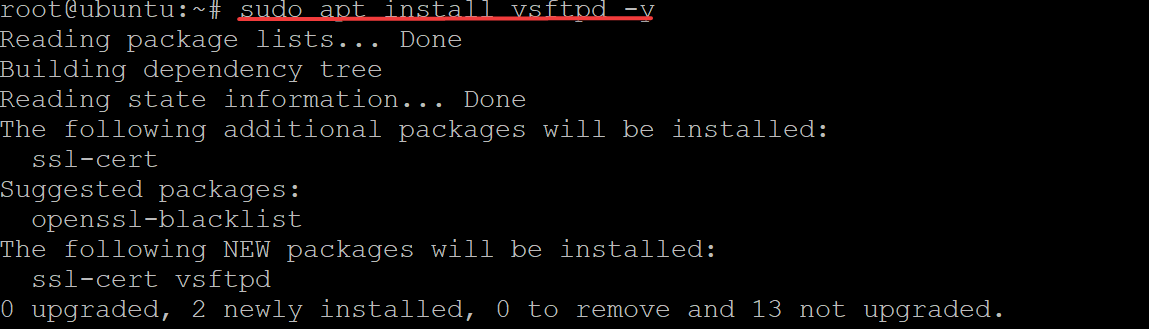
VSFTPD is an FTP server for Unix-like systems but isn’t installed by default. Installing VSFTPD on Ubuntu is similar to how you install other packages. Kick-off this tutorial by updating your APT package manager before installing VSFTPD.
1. Run the apt update command to update APT. This command retrieves package lists from your configured repositories and updates the local package cache.
sudo apt update -y
2. Next, run the apt install command below to install VSFTPD on your machine. This command will also pull in all of the required dependencies for the FTP service.
By default, the VSFTPD package is available on most modern Debian-based distributions. So you can install it without any additional package repositories and let APT take care of the rest.
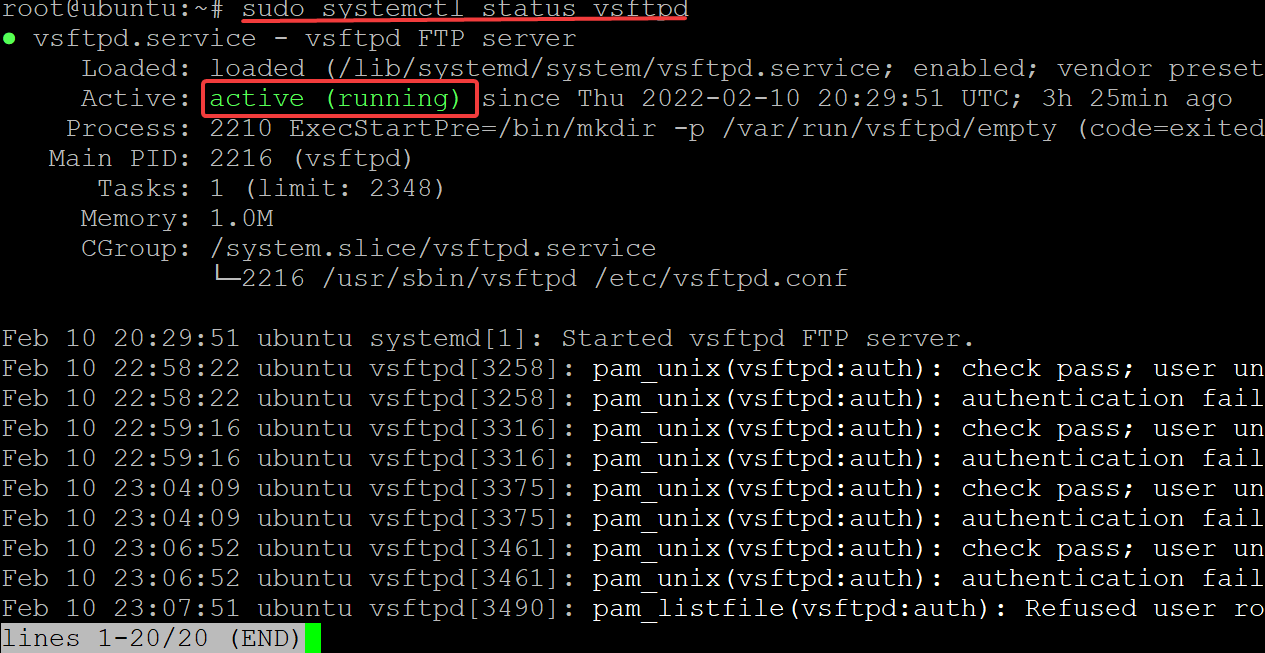
3. Finally, run the systemctl command below to verify that the VSFTPD service is running and configured correctly.
sudo systemctl status vsftpd You will see an output similar to the one below, which shows the vsftpd.service is active (running) and listening to requests.
Opening Ports for FTP Client Connections
Now that you have the latest version of VSFTPD installed, you can now configure your firewall. You’ll use UFW, the default firewall configuration tool for Ubuntu, to add firewall rules to open ports for secure FTP client connections.
1. Run the ufw status command to see which firewall rules are currently active.
sudo ufw statusBelow, you can see that the firewall is active but doesn’t have any rules to allow any connections by default.

2. Next, run the ufw allow command below to allow all three ports through the firewall. VSFTPD requires FTP connections on ports 20, 21, and 990.
sudo ufw allow 20,21,990/tcp
3. Run the ufw command below to open the 40000:50000 port range.
VSFTPD requires the 40000:50000 port range to be opened so that FTP clients can make data connections to the server in passive mode.
sudo ufw allow 40000:50000/tcp
4. Finally, run the ufw status verbose command below to verify that your firewall rules are active and check for errors.
sudo ufw status verbose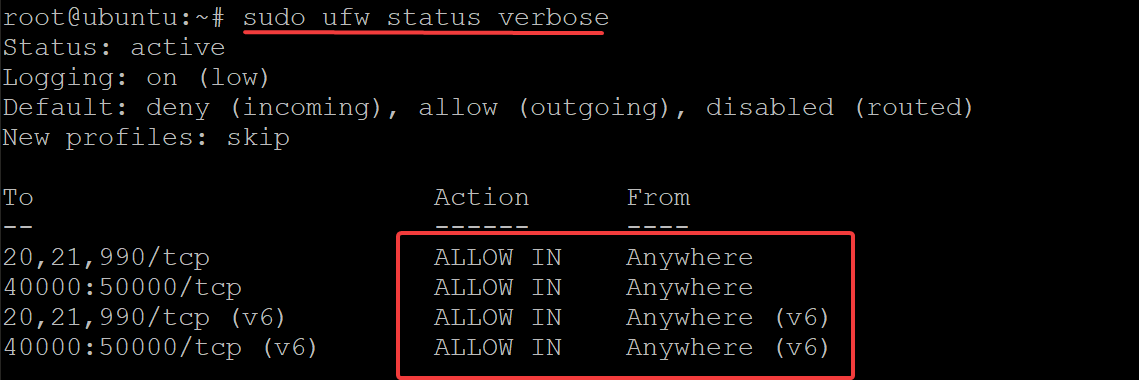
Configuring the VSFTDP Server
You have successfully allowed traffic through the firewall, but you must configure your VSFTPD server before using it.
The /etc/vsftpd.conf file is the main configuration file for VSFTPD. But you can also configure your FTP server through other commands if you prefer to do things dynamically. Or if you prefer to specify rules that aren’t available in the config file.
Throughout editing the /etc/vsftpd.conf file, uncomment each directive to enable them by removing the # symbol in front of them.
1. Run the sudo cp command below to back up the original configuration file (/etc/vsftpd.conf /etc/vsftpd.conf.bak).
You should always back up any critical config file before you go mucking around.
sudo cp /etc/vsftpd.conf /etc/vsftpd.conf.bak2. Next, open the /etc/vsftpd.conf file in your favorite text editor. This demo uses nano to edit the configuration file.
sudo nano /etc/vsftpd.conf3. Look for and change the anonymous_enable directive value to NO. Anonymous users are commonly used for public file sharing. You don’t want that anonymous user on your server. Instead, you’ll want your FPT server to be secure.
Set the local_enable directive value to YES to allow people with accounts on your server to transfer files via FTP. With this configuration, only authorized users can log into your FTP server.

4. Now, change the write_enable directive to YES so that your users can upload and save files to your FTP server. This directive is the most important one, as it controls access to the upload functionality.

5. Change the chroot_local_user directive to YES since your FPT user should not run as root. Creating a new, possibly privileged user for the FTP service to use is much safer (you will learn how to create a dedicated user later).
If this directive isn’t enabled, the FPT user will have access to everything on the server, even the root directory. This behavior can be a HUGE security problem.
With this configuration, your user can only access the folders that you specify (the user’s home directory in most cases).

But when the chroot_local_user directive value is set to YES, the write_enable directive (step four) will not work because the chroot() syscall denies writing access (when enabled).
As a solution, add the directive below to your vsftpd.conf file, so the write_enable directive will work regardless of the chroot_local_user directive’s value.
allowed_writeable_chroot=YES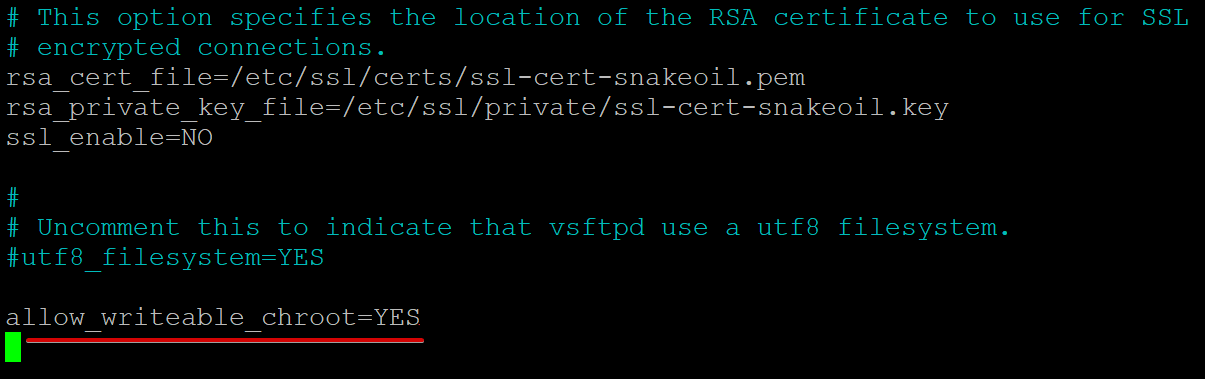
6. Next, add the directives below to your vsftpd.conf file to enable passive FTP connections.
VSFTPD can use any port above 1024 not occupied by another service for the passive FTP connection. This demo uses the port range you set in the “Opening Ports for FTP Client Connections” section (step three).
pasv_min_port=35000
pasv_max_port=40000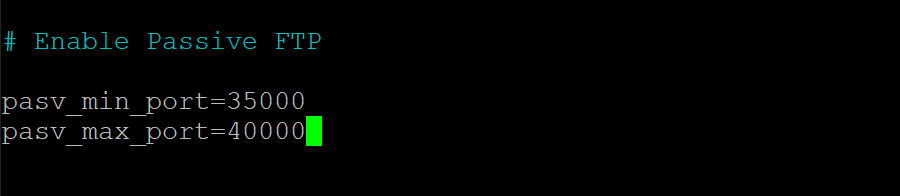
7. Add the following lines at the bottom of the vsftpd.conf file to allow only authorized users to log in to the FTP server.
userlist_enable=YES
# Add the user to the vsftpd.userlist to allow a specific user
# to use the system login account to access your FTP service.
userlist_file=/etc/vsftpd.userlist
# NO - anyone can log in with an anonymous account.
# YES - the user will be denied to login when their name exists in this file.
userlist_deny=NO
8. Finally, save and close the vsftpd.conf file, and run the below command to restart your vsftpd server to apply the changes.
sudo service vsftpd restartCreating a Dedicated User to Use the FTP Service
You’ve now configured your VSFTPD server, but you’ll need a dedicated user to use the FTP service instead of a root user. You’ll create a directory within the user’s home directory so that the directory is easily accessible.
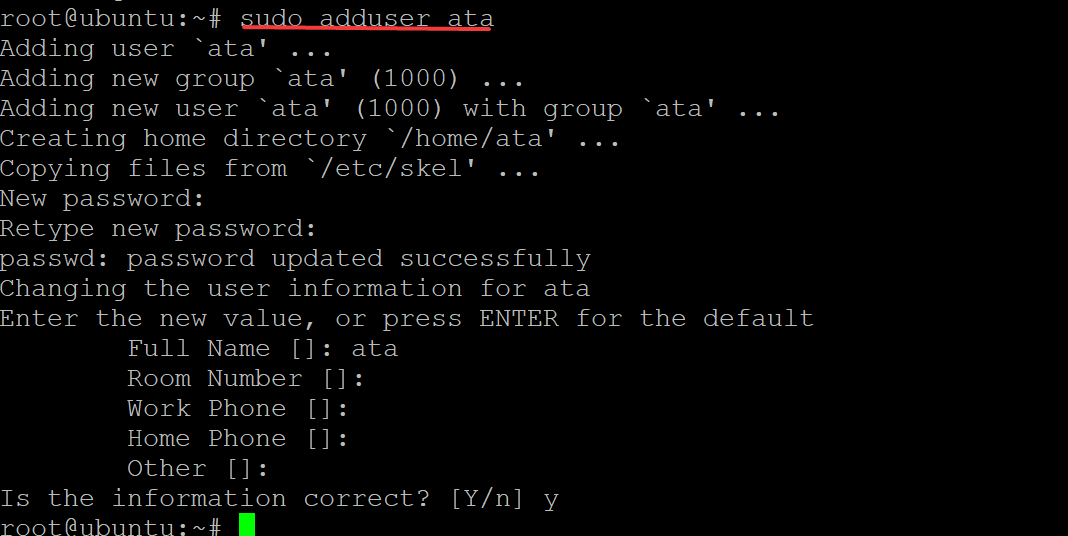
1. Run the adduser command below to create a new user. You can choose any username you prefer, but this demo creates a user called ata. But remember not to duplicate the user elsewhere on your server.
sudo adduser ataProvide a secure password and take note of it. You’ll use this password to connect to your FTP server.
You must also provide some details for the new user or keep the default details by pressing ENTER. Type Y and press ENTER to confirm the user information.
2. Next, run the below command to add the ata user to the vsftpd.userlist file.
As you recall, this file specifies which users are allowed to login via FTP when the userlist_deny directive value is set to NO. At this point, only the ata user can log in to your FTP server, and all other anonymous users will be denied access.
echo "ata" | sudo tee -a /etc/vsftpd.userlist
3. Run the following commands to set the proper permissions for the new /home/ata/ftp directory.
The below commands ensure that only your dedicated FTP user has access to the /home/ata/ftp directory, and allow the user to transfer files to/from it.
# Sets the owner of the /home/ata/ftp directory to be nobody.
sudo chown nobody:nogroup /home/ata/ftp
# Ensures that only the owner (your FTP user)
# has write(w) access(a) to the /home/ata/ftp directory.
sudo chmod a-w /home/ata/ftp
4. Now, run the chown command to set the owner and group of the /home/ata/ftp/upload directory to your FTP user (ata). The command also sets the correct permissions for the /home/ata/ftp/upload directory.
sudo chown ata:ata /home/ata/ftp/upload5. Execute the echo command below to create a basic test file named ata.txt.
The below command creates a new file named ata.txt in your FTP directory and includes some text (vsftpd test file) in the text file.
echo "vsftpd test file" | sudo tee /home/ata/ftp/upload/ata.txtAt this point, you’ve fully configured your FPT server, and your users can connect to it.

Connecting to the FTP Server
After configuring a dedicated FTP user, it’s finally time to connect to your FTP server. But you’ll first try connecting to your FTP server using an anonymous user to test if your FTP server is secure.
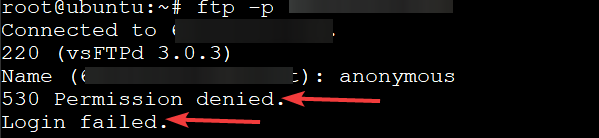
1. Run the ftp -p command below to connect to your FTP server. Replace your-server-ip with your actual server IP address.
ftp -p your-server-ipTry to log in as an anonymous user, and you will see the following error message. This output confirms that your FTP server is secure since only your dedicated FTP user can access your server.
2. Execute the bye command to exit the FTP client.
bye
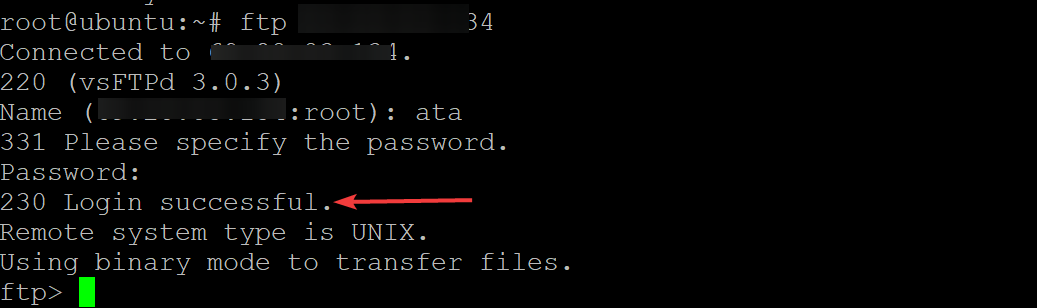
3. Rerun the ftp command below as you did in step one. But this time, log in as your dedicated FTP user (ata).
ftp -p your-server-ipYou will get a 230 Login successful message as shown below, which confirms that your FTP server works as intended.
4. Now, run each command below to confirm the ata.txt file exists in the ftp/upload directory.
The ata.txt file is what you created earlier in the “Creating a Dedicated User to Use the FTP Service” section (step five).
# Change to the ftp/upload directory as the working directory.
cd ftp/upload
# List all files in the working directory.
ls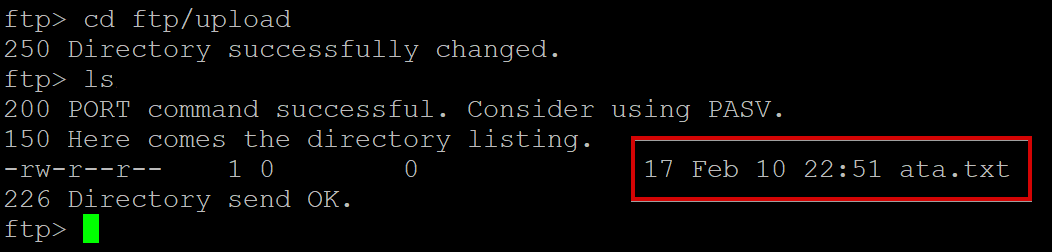
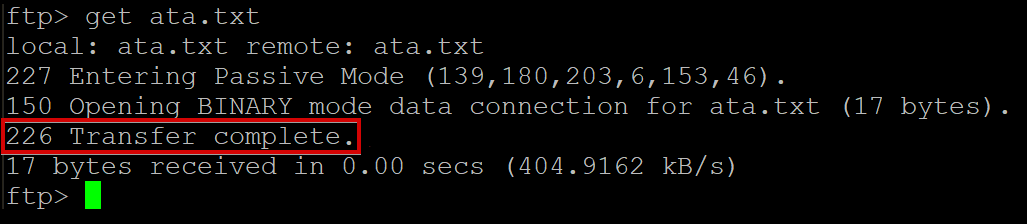
5. Run the get command below to download the file (ata.txt) from your FTP server and save it to your local machine.
get ata.txtBelow, you can see a confirmation message that says Transfer complete.
6. Next, run the put command below to upload the ata.txt file from your local machine as a new file named ata2.txt to your FTP server.
put ata.txt ata2.txt
7. Finally, rerun the ls command to list all files in the current directory and verify that ata2.txt has been uploaded successfully by your user.
lsIf the previous file transfers (steps seven to eight) succeeded, you’ll see two text files: one named ata.txt and another named ata2.txt, as shown below.

Disabling Shell Access
When you create a new FTP user, your FTP server automatically allows that user to log in and run the shell. As a result, besides uploading and downloading files, your users can also execute potentially dangerous system commands on your FTP server.
When you’re not using the FTP server, you can disable shell access to prevent users from logging in using SSH. Doing so is especially important if you have password-less login enabled for your dedicated FTP user.
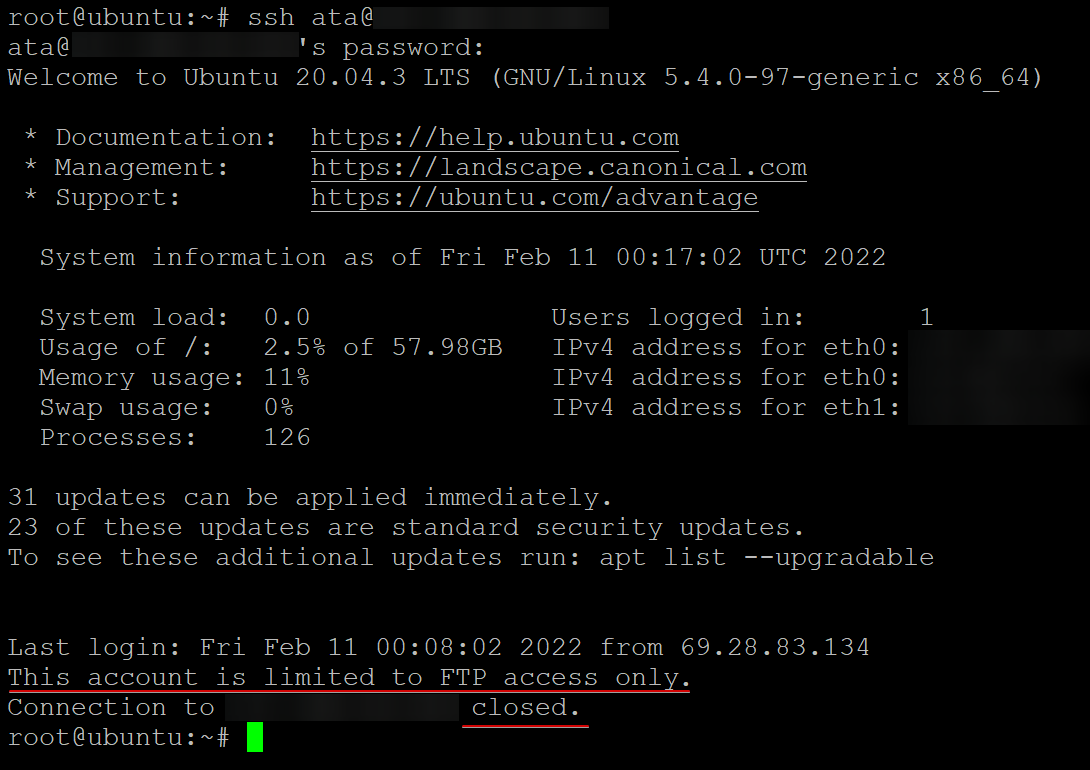
1. Open another terminal on your server, and run the below command to ssh into the FPT server using the dedicated FTP user (ata).
ssh ata@fpt-server-ipAs shown below, you can successfully log in using the ata username with the password you created earlier in the “Creating a Dedicated User to Use the FTP Service” section.
This behavior indicates that the ata user can run any commands on your server, including changing the server configurations. A compromised FTP user can do much more damage than an anonymous one.

2. Next, run the command below to create a new shell script named ftponly.sh in the /bin directory of your FPT server. This script disables any FTP login from your dedicated FTP user for your FTP server. The script then prints (echo) a warning message to the screen that says This account is limited to FTP access only.
echo -e '#!/bin/sh\necho "This account is limited to FTP access only."' | sudo tee -a /bin/ftponly .sh 
3. Run the below chmod command to set the correct permissions on this new shell script (/bin/ftponly). This command makes the script executable and allows your FTP user (ata) to run it.
sudo chmod a+x /bin/ftponly4. Now, execute the command below to add the path of the new shell script (ftponly ) in your /etc/shells file. This action ensures that any login you try with your ata user is rejected since the /bin/ftponly script will get executed instead.
echo "/bin/ftponly" | sudo tee -a /etc/shells 
5. Run the usermod command below to change the current shell of your FTP user (ata) to the /bin/ftponly shell.
sudo usermod ata -s /bin/ftponly 6. Finally, run the below command to SSH to your FPT server using your FTP user (ata).
ssh ata@fpt-server-ipAs shown below, your dedicated FTP user cannot SSH to your FTP server. This behavior is expected since the /bin/ftponly shell script prints a warning message and closes the SSH connection (closed).
Conclusion
In this tutorial, you have learned how to install and configure an FTP server in Ubuntu Linux using VSFTPD. You have also learned how to configure an FTP user with limited access and restrict the FTP user shell access.
At this point, you should have a functional FTP server with restricted access.
With this newfound knowledge, you can now configure your FTP server on AWS EC2, or you can start setting up an FTP Server on your Raspberry Pi. Which one would you choose to start working on?


