

The data you store in your Office 365 (O365) services, such as Microsoft Teams, Exchange Online, SharePoint Online, and OneDrive, is undoubtedly valuable. And backup copies are necessary to protect your valuable data, even in the cloud. So, save yourself the headache and let Veeam Office 365 secure your data.
Not a reader? Watch this related video tutorial!In this tutorial, you’ll learn to secure a comprehensive backup of your data with Veeam Office 365.
Read on and start protecting your data today!
Prerequisites
This tutorial will be a hands-on demonstration. If you’d like to follow along, be sure you have the following:
- One supported Windows operating system instance. Windows Server 2019 was used for this post.
- Office 365 services with licensed users for Exchange Online, SharePoint Online, OneDrive, or Teams.
- An AWS account with access and secret keys.
- One AWS S3 Bucket.
- Veeam Backup for Microsoft 365 installation media (ISO file) – This tutorial uses Veeam Backup Version 6.0.0.367.
- The Community Edition is offered free and used for this tutorial.
Installing Veeam Backup for Office 365 (Now Microsoft 365)
Veeam Backup for Microsoft 365 gives you the sense of security you won’t lose access and control over your data anytime soon. You get to keep your data protected and accessible anywhere at any time.
But before you can backup your data, you’ll first have to install Veeam Backup for Microsoft 365 on your machine.
1. Open PowerShell as an administrator, and run the below command to mount the ISO file (Veeam Backup for Microsoft 365 installation media). This command provides access to the files stored within the disk image, though no output is given when running the command.
Veeam.Backup365_6.0.0.367.iso - The exact name of the Veeam ISO file you downloaded in the “Prerequisites” section, the version number will change depending on the version you downloaded.
- C:\Users\Administrator\Downloads\ – The Veeam ISO file’s location.
$iso = Mount-DiskImage -ImagePath 'C:\Users\Administrator\Downloads\Veeam.Backup365_6.0.0.367.iso'2. Next, run the following command, which doesn’t provide output but defines the Veeam’s disk image (ISO) location to the $path variable. The Get-Volume cmdlet obtains the drive letter of the mounted disk image from the DriveLetter property.
$path = "$(($iso | Get-Volume).DriveLetter):\Backup\Veeam.Backup365.msi"3. Run the below Start-Process command to start the msiexec.exe file, which installs Veeam Backup for Microsoft 365 server and console without a restart (/norestart). The installer will run in the background until it completes.
Start-Process "msiexec.exe" -Wait -NoNewWindow -ArgumentList "/i $path /qn ADDLOCAL=BR_OFFICE365,CONSOLE_OFFICE365 ACCEPT_THIRDPARTY_LICENSES=1 ACCEPT_EULA=1 /norestart"4. Now, run the Get-CimInstance command below to confirm you’ve successfully installed Veeam. This command lists the products installed by Windows Installer with names starting with Veeam. Below we will use the ?, an alias for the Where-Object cmdlet.
Get-CimInstance Win32_Product|?{$_.Name -like "Veeam*"}
5. Run the below command to get Veeam’s service information (Get-Service). This command lists the services on the local system, where the service names begin with Veeam.
Get-Service|?{$_.Name -like "Veeam*"}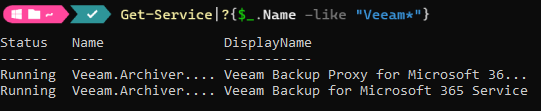
6. Lastly, run the below command to dismount the Veeam disk image (Dismount-DiskImage).
Dismount-DiskImage $iso.ImagePath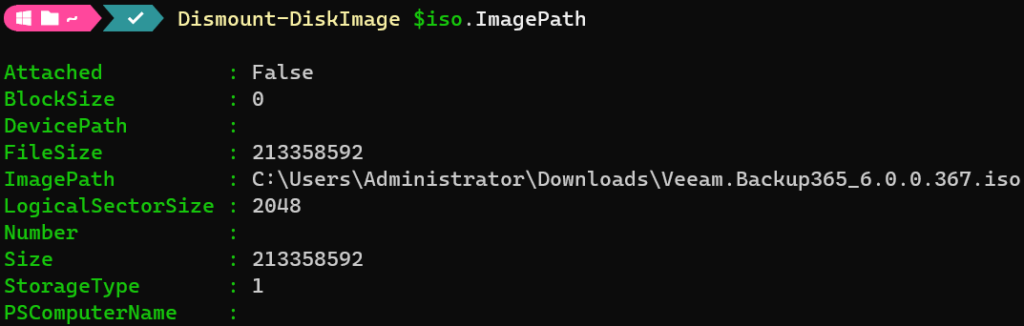
Creating an Object Storage Repository
Before you can protect your data, Veeam needs a location to store your backup data. You’ll need the necessary dependencies in place. Doing so provides your backup data, at least the primary production copy, and a backup copy in object storage.
You can then add another object storage location to align with the 3-2-1 backup rule. The 3-2-1 backup rule encourages keeping three (3) copies of important data, with those copies in two (2) different storage types. And at least one (1) in a different physical location from the others.
To create the backup storage repositories, you first have to connect to the Veeam service on your local machines:
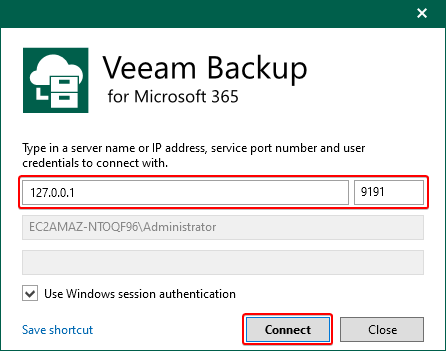
1. Launch your Veeam Backup for Microsoft 365 console from your Windows Start menu.
Keep the default IP address and port shown below and click on the Connect button to connect to the Veeam service on your localhost.
If you installed your Veeam services on a different operating system, you must update the server address and port. You may also use a privileged account to access the Veeam install and other credentials for the Veeam console session.
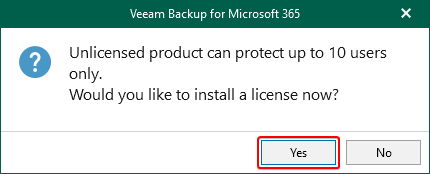
2. Next, click on Yes to load a trial or purchased license file. But if you prefer the community edition, click on No instead.
When you first log in, Veeam prompt you with this confirmation to set up a license.
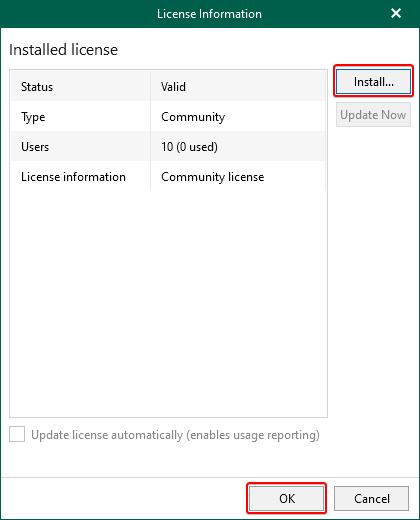
3. Click on Install to locate your license (LIC) file Veeam emailed you.
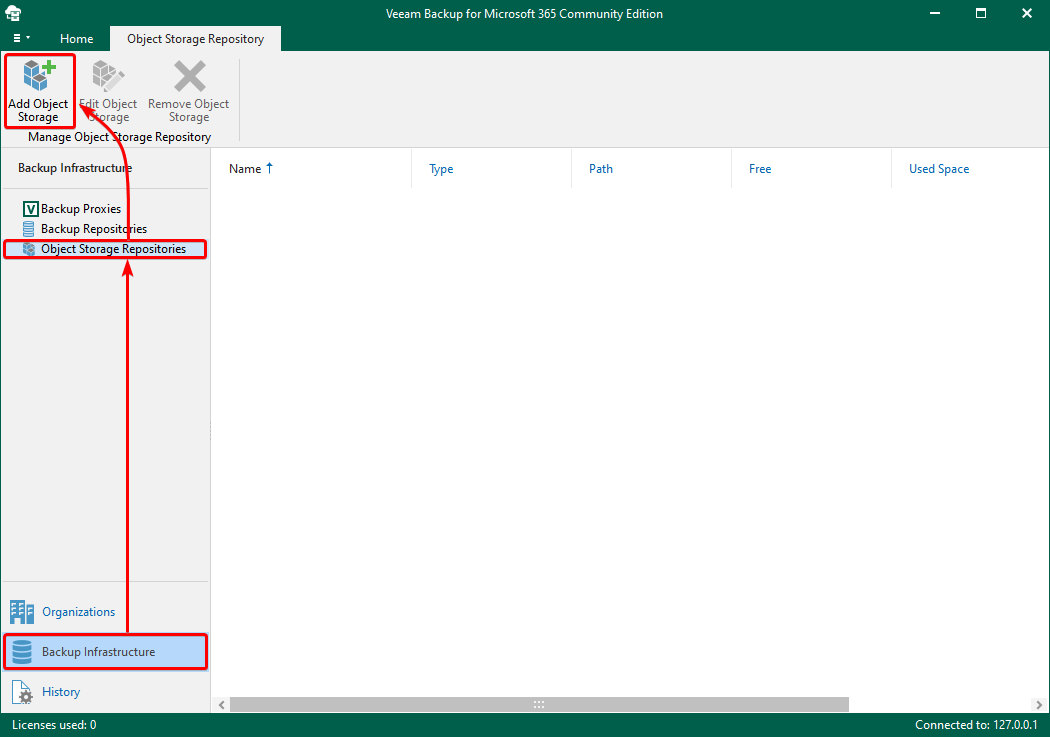
4. Now, click on Backup Infrastructure (bottom-left) → Object Storage Repositories (left panel) → Add Object Storage (top-left) to begin adding your object storage repository.
As you can see below, there are no object storage repositories by default.
Cloud providers commonly provide object storage as a cheaper option than block storage. You can read more about AWS’ S3 Glacier and Azure’s Blob Storage as options to use.
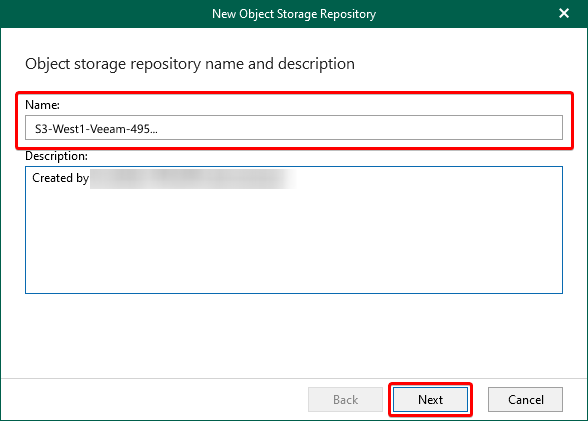
5. In the pop-up window below, provide a unique Name for the object storage, and click Next. This tutorial uses the S3-West1-Veeam-AccountId format for the name, where:
- S3 – A reference to the repository service provider, AWS’ Simple Storage Service (S3).
- West1 – The provider region the repository exists.
- Veeam – The use case for the repository.
- 495… – The Account ID within the provider where the repository exists, here the number is truncated as they are globally unique. Yours will differ.
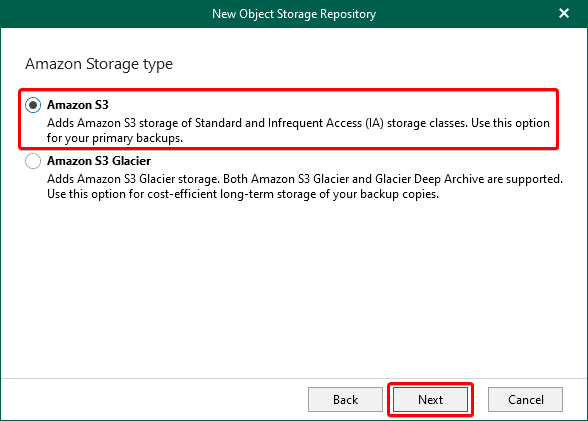
6. Choose Amazon S3 as the object storage type.

7. Choose the regular Amazon S3 for this tutorial, and click Next. But note that other tiers may provide better cost optimization for your use case.
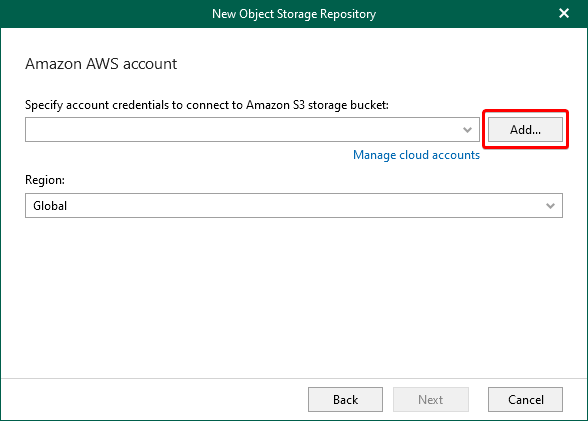
8. Next, click on Add to provide your dedicated AWS Identity and Access Management (IAM) credentials to manage the backups.
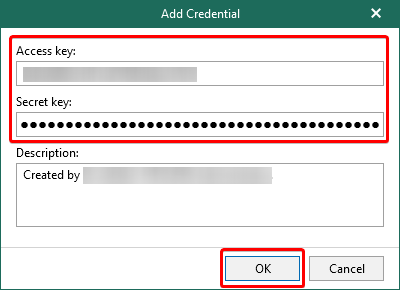
9. Enter the AWS IAM user’s API credentials (Access key and Secret key) on the Add Credential window, and click OK.
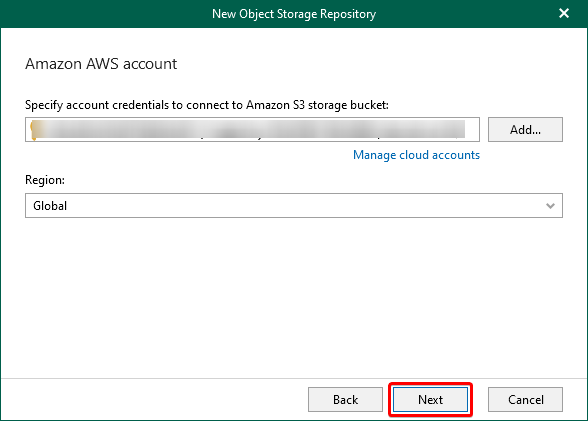
10. Now, click Next to confirm the Amazon AWS account to connect to the S3 bucket.
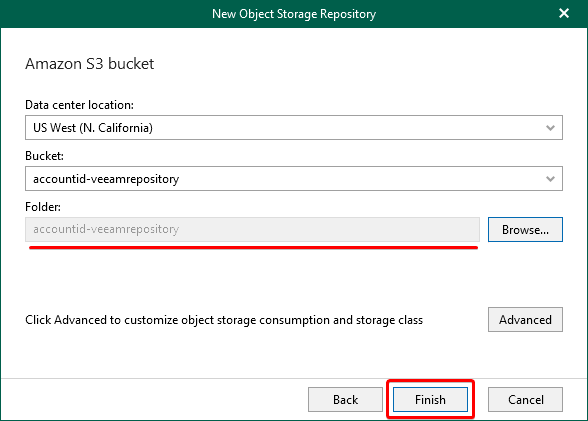
11. Set your Amazon S3 bucket’s region (Data center location) and bucket name (Bucket). Click on Browse and choose a folder within the repository, and click Finish to complete creating your backup storage repository.
Veeam will use this information to enumerate the available storage resources you can use.

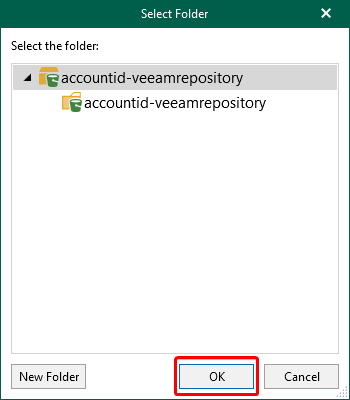
12. Click on New Folder to create a new folder with your preferred name.

13. Name the folder as you like, and click OK. This tutorial uses the same name as the repository (accountid-veeamrepository).
14. Lastly, click on Finish to confirm the Amazon S3 bucket settings for the object storage repository.
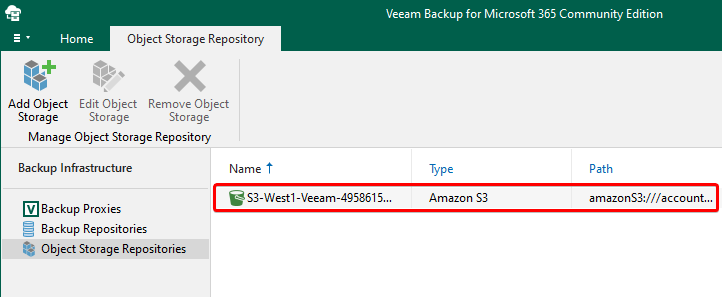
Once you finish the repository configuration, you’ll see the repository listed within the console like the one below.
Creating a Backup Storage Repository
Veeam creates a local backup repository on the system drive by default. But you’d typically want to use a dedicated drive specifically for your backups. Doing so ensures if the system volume ever has an issue, you can still access your backup data. And to create a backup storage repository, you’ll need a drive that can store the backups.
1. Run the following code to perform the following:
- Get any disks attached to the system with raw partition format, not a system drive, and not a boot drive.
- Initialize the disks for GUID Partition Table (GPT) layout, with a single partition for the total available space
- Format the disks for NTFS, which will present you with a configured disk.
# List all physical disks attached to the system
Get-Disk|
# Where partition format is raw and is not a system or boot drive
Where-Object {$_.PartitionStyle -eq "RAW" -and $_.IsSystem -eq $false -and $_.IsBoot -eq $false}|
# For each disk, initialize it and create a new partition
ForEach-Object {Initialize-Disk -Number $_.Number -PartitionStyle GPT;New-Partition -DiskNumber $_.Number -AssignDriveLetter -UseMaximumSize|
  # For each partition, format as NTFS
  ForEach-Object {Format-Volume -DriveLetter $_.DriveLetter -FileSystem NTFS -Confirm:$false}}
Note down the drive letter to use for the new backup repository. You’ll specify it later to store your local cache.

If you don’t have an available disk, you can attach an empty one. Depending on the provider you’re using, the procedure will be different.
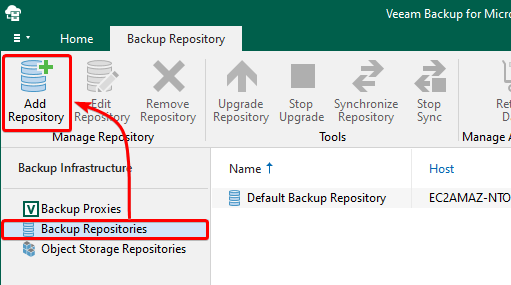
2. Next, click on Backup Repositories (left panel) → Add Repository (top-left) to initialize adding a new backup repository.
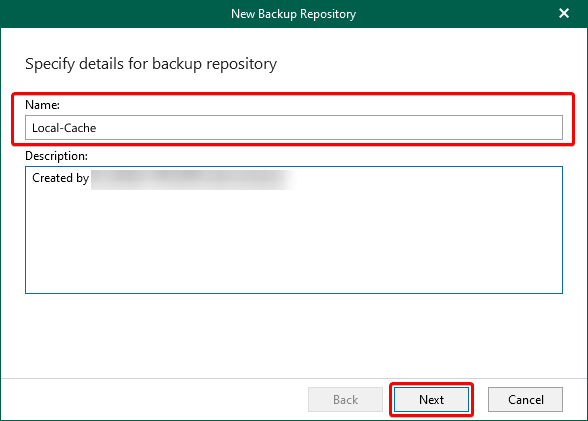
3. Name the backup repository as you like, and click Next. But the backup repository is named Local-Cache in this tutorial.
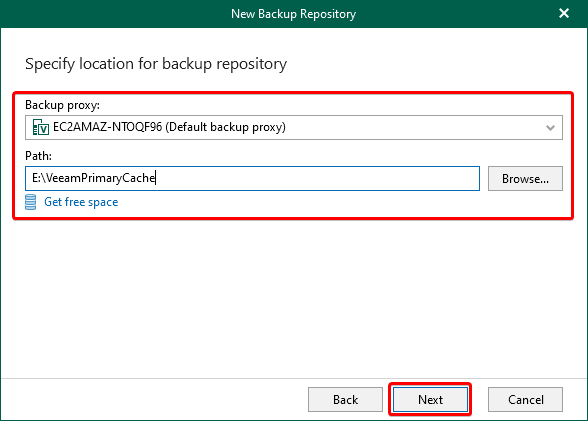
4. Keep the default backup proxy, specify the drive you noted in step one, and a folder to store the local cache.
This cache is on your local block storage. You’ll configure this cache to offload to the object storage later.
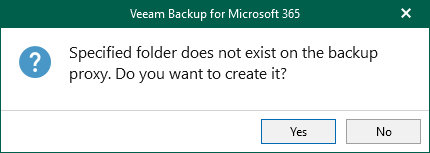
Click on Yes to confirm creating the folder if it doesn’t exist.
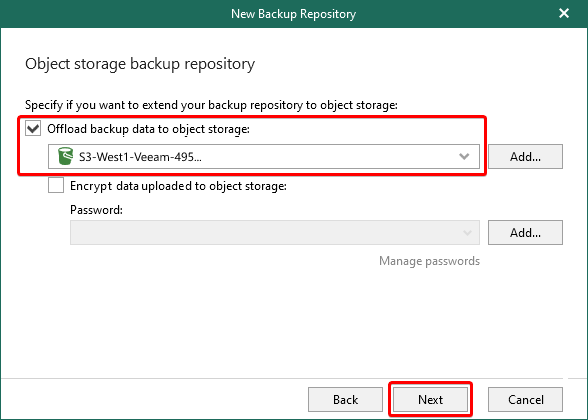
5. Tick the Offload backup data to object storage option, select your S3 repository, and click Next. Using the backup offload will only give you one backup copy of data.
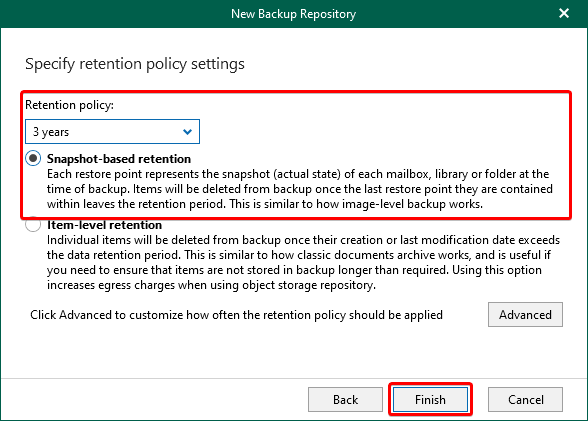
6. Finally, specify your retention policy settings with the following, and click Next:
- Choose the 3 years option for your Retention policy, as shown below.
Your retention requirements vary by your regulatory or organization’s legal requirements. Generally, three years is sufficient, but make sure you don’t need to lower or increase the retention.
- Choose the Snapshot-based retention option. Veeam won’t delete an item until the entire backup exceeds the retention period so that items can be retained beyond the period set.
The decision between Item-level and Snapshot-based depends on your scenario. Item-level retention functions more similarly to an archive than a backup.
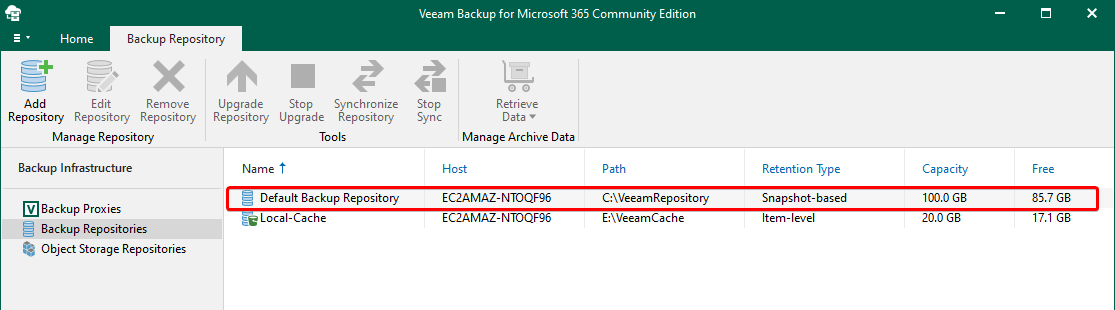
As shown below, the new backup repository will be added to your console, and you’re ready to start protecting your data!
Creating an Organization and an Azure AD Application
Now that you have a location to store your backup data, you need to tell Veeam how to get the source data. How? Start by connecting Veeam with your Microsoft 365 organization or tenant.
Veeam uses an Azure Active Directory Application as a service principal and authenticates with a certificate.
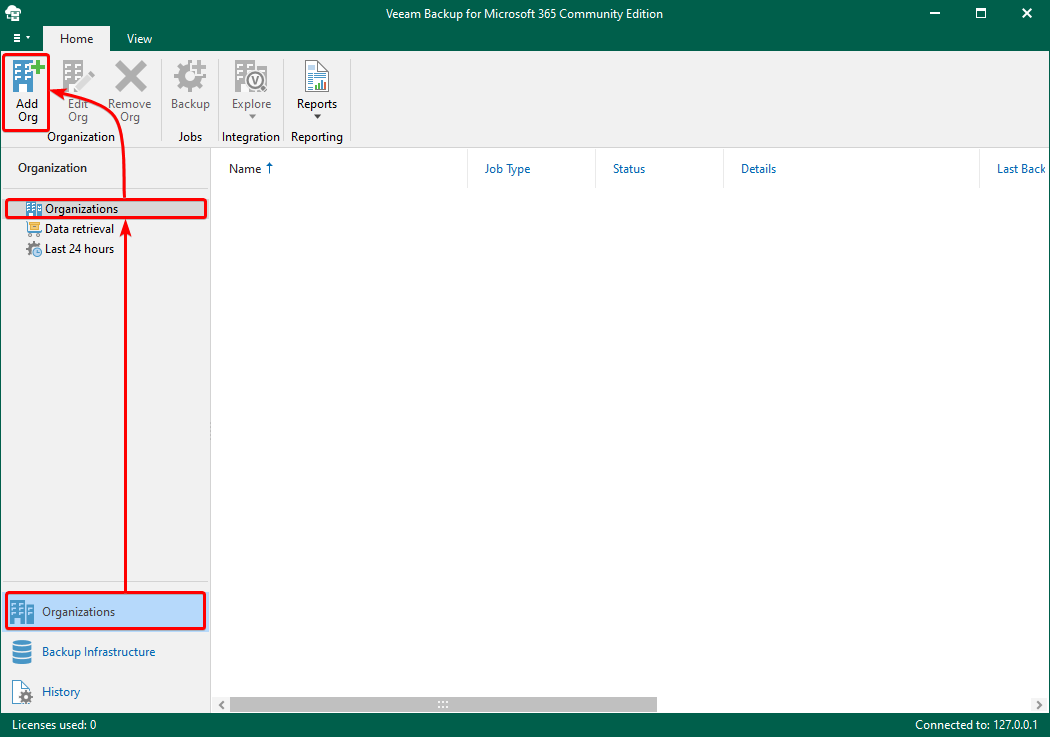
1. Click on the Organizations tab (bottom-left) → Organizations (left panel) → Add Org (top-left) to initialize adding a new organization.
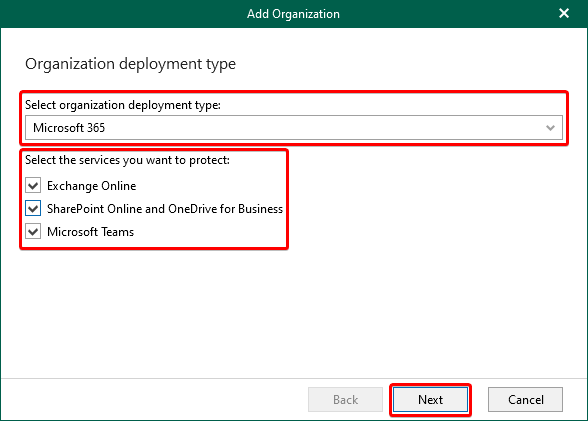
2. Next, select organization deployment type and services to protect, and click Next. But this tutorial’s choice is to use Microsoft 365 and protect all supported services.
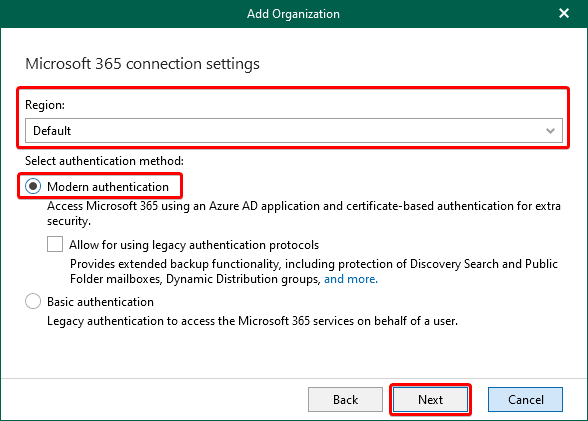
3. Select the Default option for the Region, choose Modern authentication for your Microsoft 365 connection, which is the best approach, and click Next.
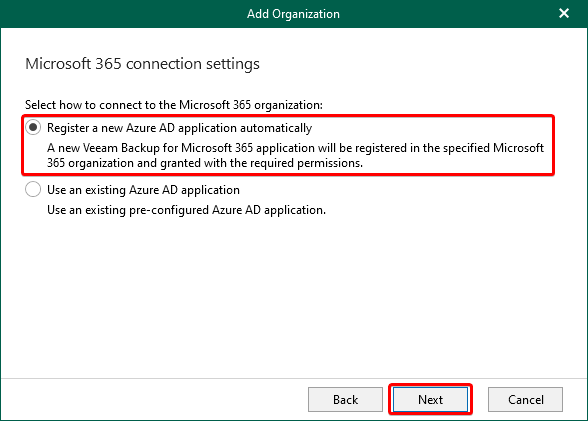
4. Now, choose the Register a new Azure AD application automatically option to let Veeam create the Azure AD Applications.
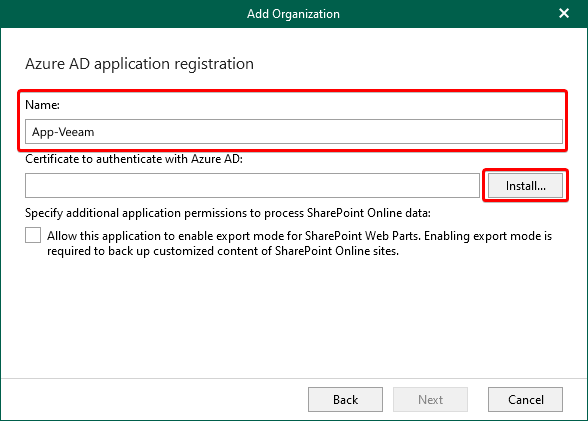
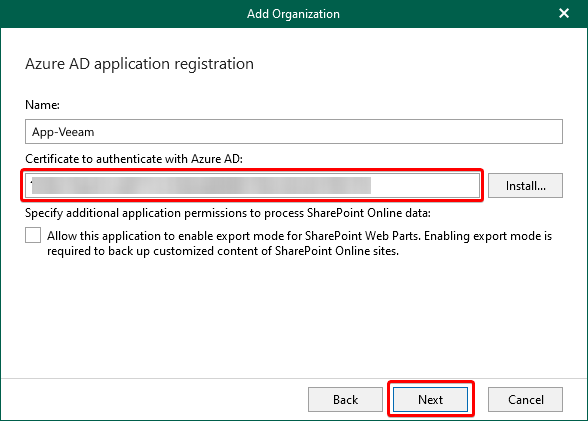
5. Name the Azure AD application as you like, and click on Install to select a certificate for the application. For this tutorial, the application’s name is App-Veeam.
Remember that the name will not show up in your Azure AD tenant.
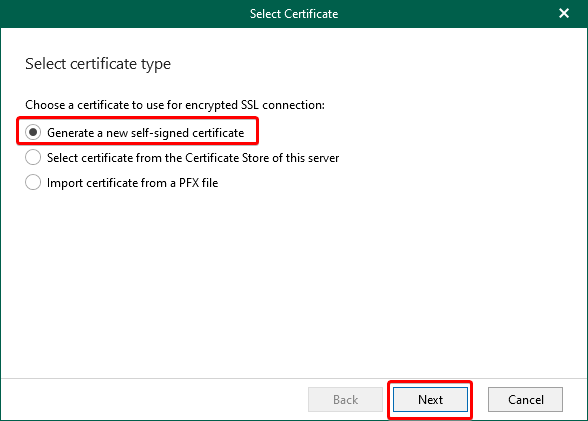
6. Next, choose the Generate a new self-signed certificate option, and click Next. This option tells Veeam to create an appropriate self-signed certificate.
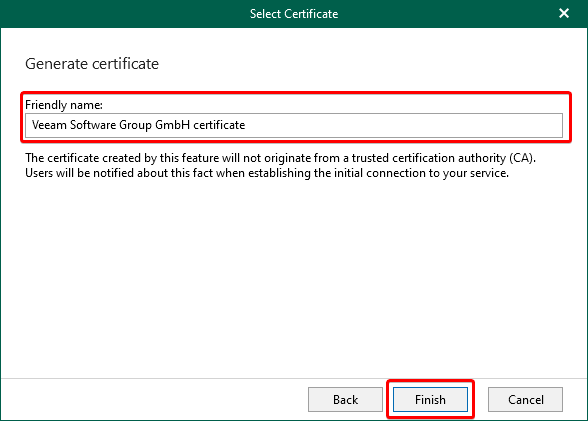
7. Name the certificate after the Azure AD Application associated with it, and click on Finish.
Veeam will install the certificate in your local machine store and register the public key with the Azure AD Application for you.
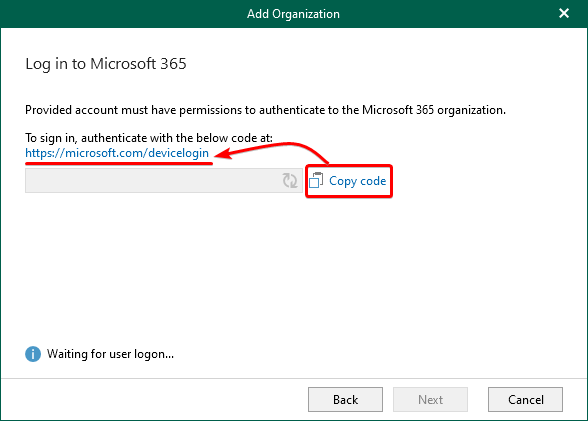
8. After adding a certificate, click Next to start authenticating with Azure AD.
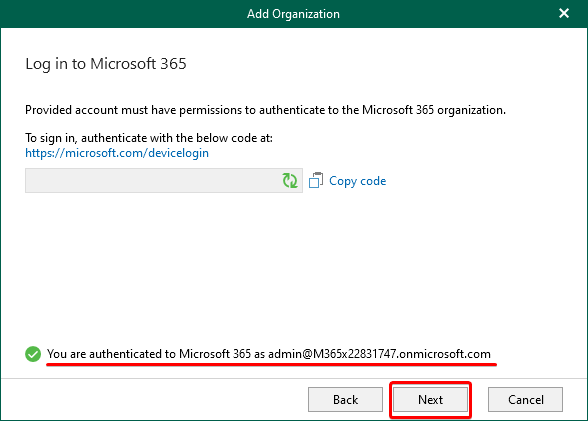
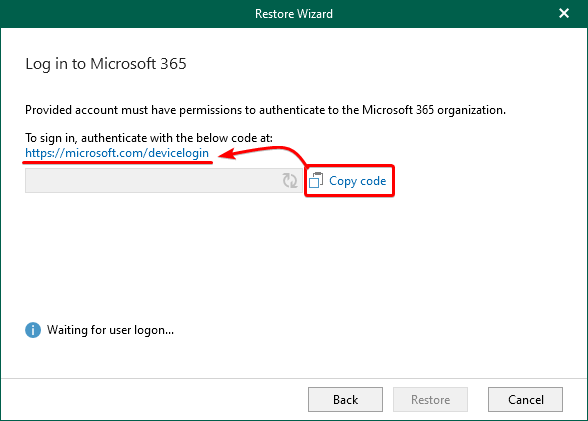
9. Click on the Copy code, and click on the device login hyperlink, as shown below. A login page opens on your web browser where you’ll be asked for authentication (step nine).
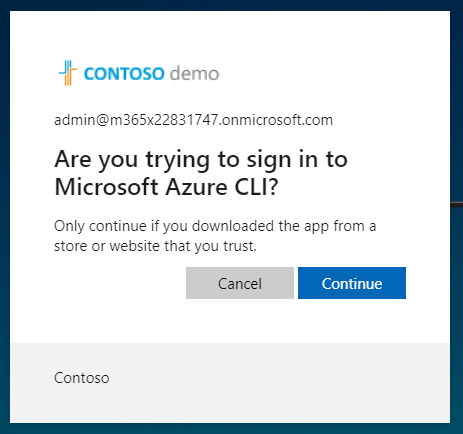
10. Click Continue on the access login page, like the one below, to authorize Veeam’s connection request with the Azure CLI.
11. Once authorized, click on Next after seeing the authentication success message, as shown below.
12. Lastly, click on Finish once Veeam completes performing multiple checks on your tenant, configure the Azure AD Application, and test access.
Veeam will create the certificate with 10-year validity. Keep in mind that your certificate will require renewal and backup of the private key!
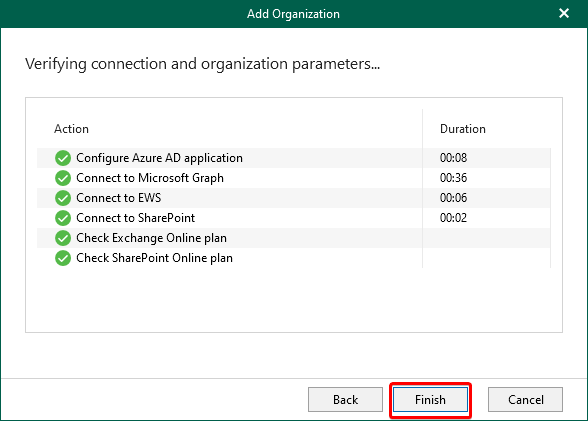
After all verifications, the organization will now be available to create backup jobs.
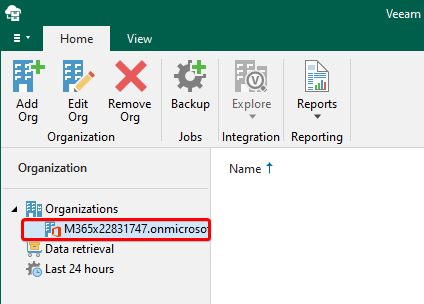
Creating a Backup Job in Veeam for Office 365
A new organization is up to support and manage your backup jobs. Why not start creating one now? A backup job in Veeam lets you automate backup events, so you don’t have to worry about securing your data.
To create a backup job on Veeam Backup for Microsoft 365:
1. Select your organization, and click on Backup to initialize creating a new backup job.

2. Name the backup job as you like, and click Next. This tutorial’s name choice is Nightly.

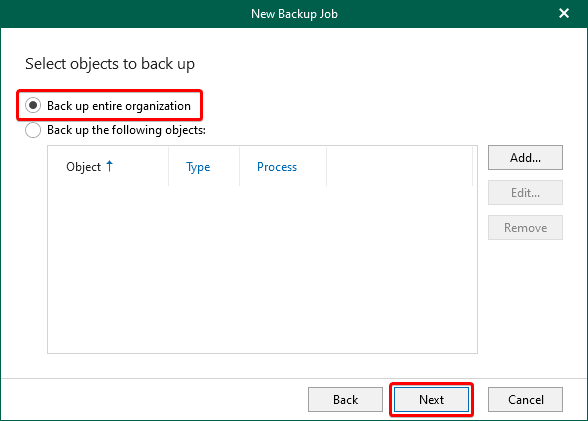
3. Choose the Back up entire organization option to capture all the data, then click Next.
Note that only one backup job can backup the entire organization.
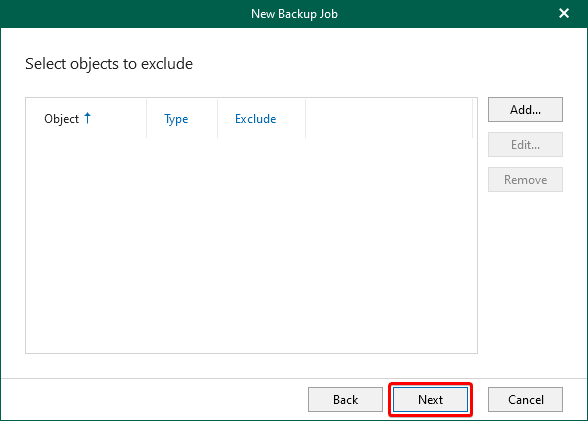
4. Skip excluding any objects since you’re backing up the entire organization, and click Next.
5. Now, set the backup proxy and repository with the following, and click Next:
- Keep the default Backup proxy.
- Select the Backup repository (Local-Cache) you created in step three of the “Creating a Backup Storage Repository” section that includes offloading to object storage.

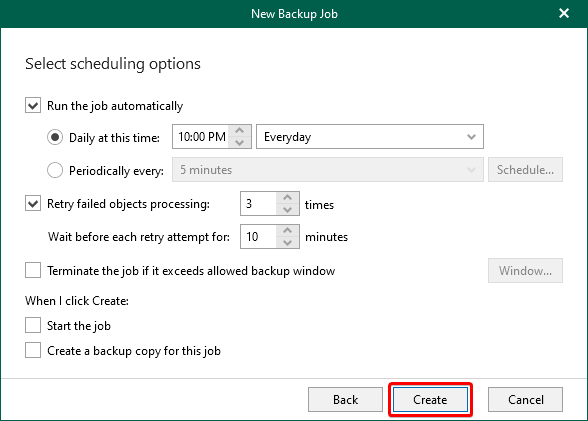
6. Next, leave the default settings for this tutorial, and click Create to save the backup job.
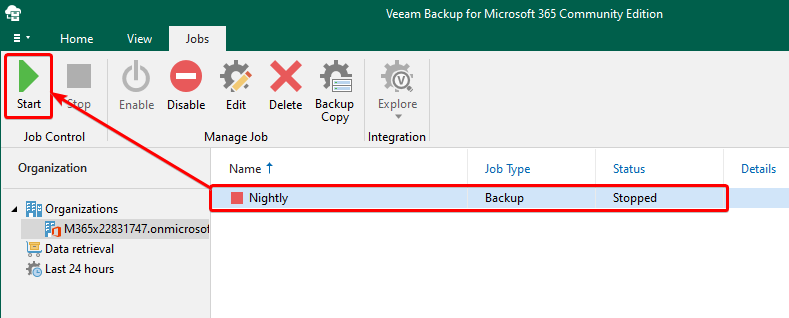
7. Lastly, select your newly-created backup job from the list, and click on Start (top-left) to run and test the backup job.
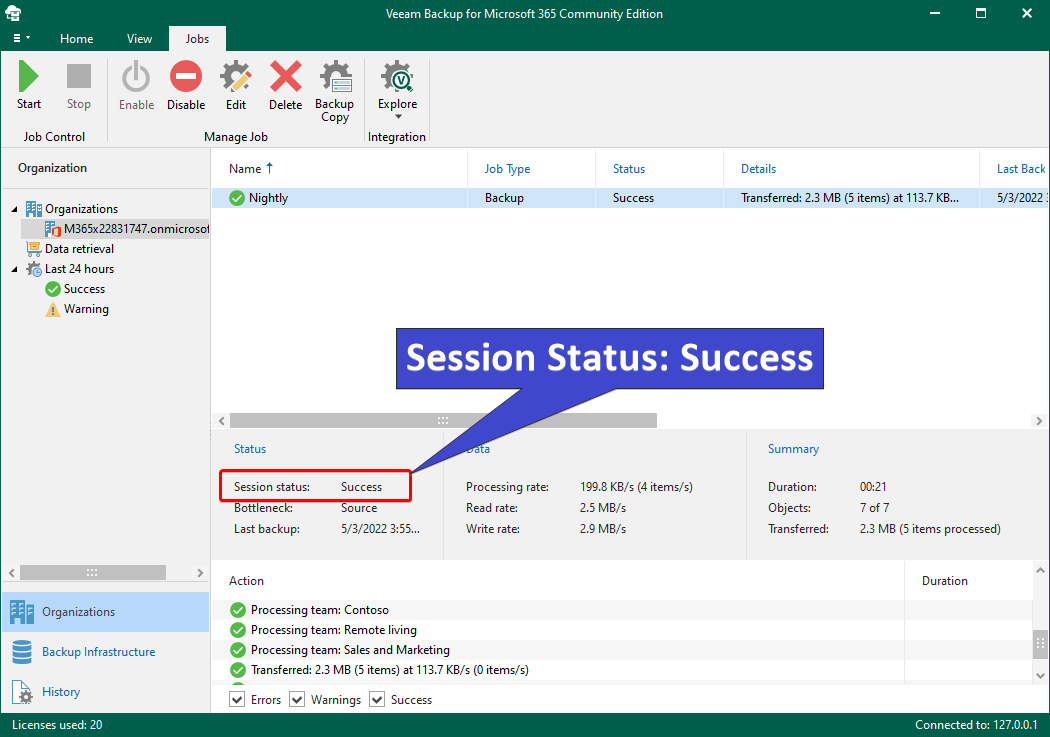
Once your job completes, you’ll see a summary of the backup process. Depending on the amount of data you have on your tenant, the process can take a while to complete.
If you get the Success status, you’ve now successfully backed up your organization’s Office 365 data with Veeam Backup for Microsoft 365!
Restoring Data with Veeam Explorers
Suppose someone called and let you know they completely lost a document and need help to get it back. Well, nothing to worry about. So long as you have a backup, you can get the document back.
To restore data, you’ll need the Veeam Explorers installed, and there are Veeam Explorers included in the same disk image you used to install Veeam. You can install just one of the Veeam Explorers or multiple; they have no dependency on one another.
The Veeam Explorer for SharePoint Online also provides the client to restore files for OneDrive for Business.
1. Run the code below to mount the Veeam disk image again. The code doesn’t provide output but silently installs all three Veeam Explorers.
# If you need to, you can mount the disk image again.
$iso = Mount-DiskImage -ImagePath C:\Users\Administrator\Downloads\Veeam.Backup365_6.0.0.367.iso
# Capture three file names for the Veeam Explorers to install in an array.
$files = @("VeeamExplorerForExchange.msi","VeeamExplorerForSharePoint.msi","VeeamExplorerForTeams.msi")
# For each of the Veeam Explorer files to install.
foreach ($file in $files)
{
	# Set the path for the install file.
  $path = "$(($iso|Get-Volume).DriveLetter):\Explorers\$file"
  # Start a process to install that Windows Installer.
  Start-Process "msiexec.exe" -Wait -NoNewWindow -ArgumentList "/i $path /qn ACCEPT_THIRDPARTY_LICENSES=1 ACCEPT_EULA=1 /norestart"
}
2. Open Veeam Explorer for Microsoft OneDrive for Business from your Windows Start menu.
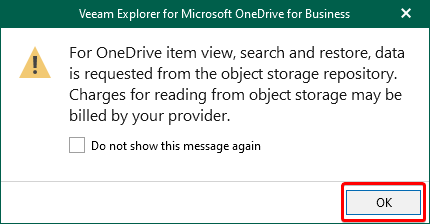
Click OK when the warning prompt below tells you about possible data egress costs. Be cautious of this warning, especially if you’re using infrequent access or archive tier of object storage.
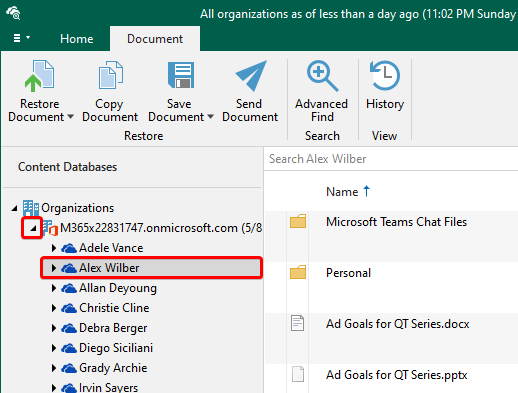
3. Expand the organization and select one of your users’ OneDrive.
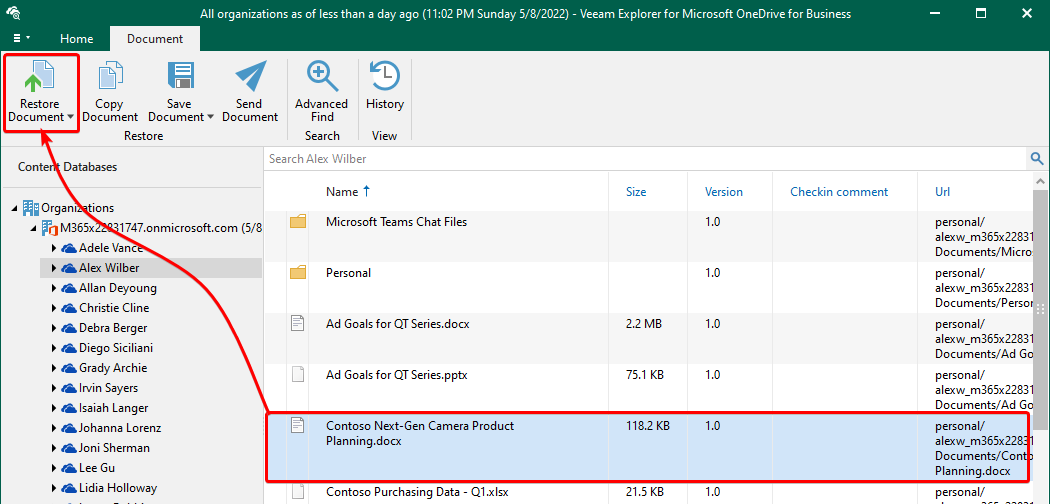
4. Select one document, and click on Restore Document (top-left) to restore that selected document.
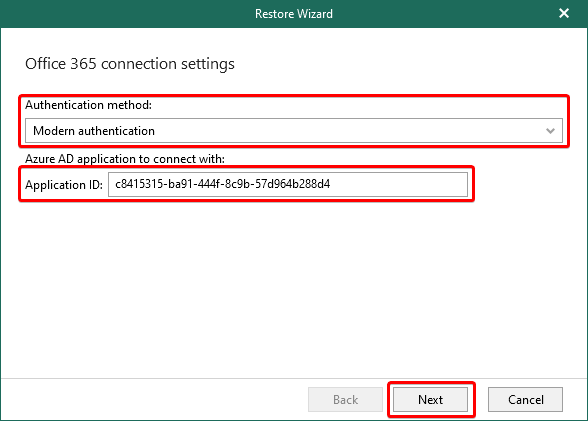
5. Choose the Modern authentication method and click Next to authenticate the tenant.
The Azure AD Application ID is auto-completed if you’re on a Windows machine. You may have to manually get the application ID if you’re on a different system.
6. Finally, authorize the Azure AD application as you did in step eight of the “Creating an Organization and an Azure AD Application.” Doing so tells Veeam to perform the work on your behalf.
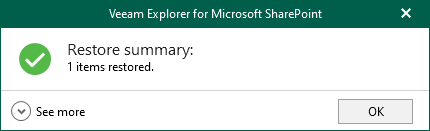
Once authenticated, the restoration begins, and you’ll see your restoration results, as shown below.
Conclusion
Through this tutorial, you’ve learned to configure Veeam Backup for Microsoft 365 to backup your data with backup jobs, store data in object storage, and successfully restore a file.
But although Veeam is automatically backing up your data, don’t forget to set some reminders to rotate your certificate. Always verify your backups were successful, and test your backups regularly!
You can do even more with Veeam Backup for Microsoft 365. Why not set up a backup job to backup important data multiple times a day? Or exclude different data from backups entirely?


