


Are you looking for an application that allows you to share files and directories over the network? For multiple clients? You probably need NFS (Network File System)! An Ubuntu NFS server allows you to create shared directories for various clients with additional access control.
Not a reader? Watch this related video tutorial!In this tutorial, you’ll learn how to set up an NFS server and securely share files between multiple machines.
Ready? Read on and start your secure file sharing!
Prerequisites
This tutorial will be a hands-on demonstration. To follow along, ensure you have got the following requirements:
- A Linux server and client on the same network – This demo uses an Ubuntu 20.04 server with hostname as
nfs-serverand an Ubuntu 20.04 client with hostname asclient. But, you can use another Linux distribution, such as Debian, CentOS, or Fedora.
- A non-root user with sudo privileges.
Installing an Ubuntu NFS Server
NFS allows secure file access on remote systems to users like they are just files stored locally. But before sharing files and directories, you’ll first install an Ubuntu NFS server. On Ubuntu, you’ll install the nfs-kernel-server package on the nfs-server machine.
Some commands throughout the tutorial don’t have outputs. But an outcome of the accumulated steps you’ve taken is displayed at each section’s last step.
1. Log in to your Linux server, and run the sudo su command below to get the root privileges.
sudo su2. Run the below commands to update the package index for your repository and install the Ubuntu NFS server package (nfs-kernel-server).
sudo apt update
sudo apt install nfs-kernel-server -y
3. Lastly, run the systemctl commands below to start and enable the NFS service nfs-kernel-server, then verify the nfs-kernel-server service status is active.
# start and enable NFS service
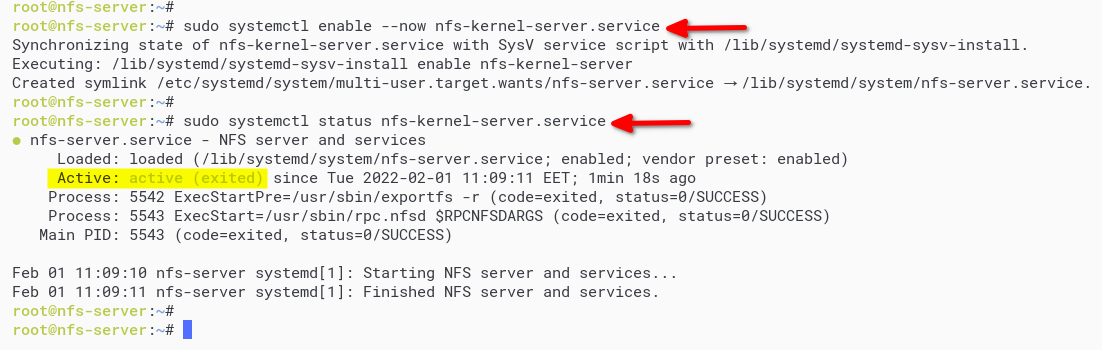
sudo systemctl enable --now nfs-kernel-server.service
# verify status NFS service
sudo systemctl status nfs-kernel-server.serviceAs you see below, the active (exited) status indicates the NFS service is running. The exited message tells you that the systemd manager cannot find any daemon to monitor.
Setting up NFS Shared Directory
After installing the NFS server package, you’ll now set up the NFS shared directory by creating new directories. You’ll share these directories with clients and add new configurations to the /etc/exports file.
1. Run the below command to create a new NFS shared directory. In this example, you’ll share the /srv/data directory and /srv/test to clients.
sudo mkdir -p /srv/{data,test}2. Next, run the chown command below to change the ownership of the NFS shared directory /srv/data and /srv/test to the user nobody and group nogroup. This command ensures NFS shared directory is writable by clients. sudo chown -R nobody:nogroup /srv/{data,test}
This command ensures NFS shared directory is writable by clients.
sudo chown -R nobody:nogroup /srv/{data,test}3. Edit the NFS configuration /etc/exports using your preferred editor and populate the file with the following configuration.
The below configuration allows client machines access to the NFS shared directory with specified user access either read and write (rw) or read-only (ro). Make sure to change the IP addresses (172.16.1.25 and 172.16.1.0/24) with the client machines’ IP addresses.
# sync - forces NFS to write change from the shared directory to disk immediately.
# no_subtree_check - disabling the subtree checking to get more performance.

# rw - set read/write access to NFS shared directory for clients.
# share /srv/data to client 172.16.1.25 with read and write access.
/srv/data 172.16.1.25(rw,sync,no_subtree_check,root_squash)

# r0 - set read-only access to NFS shared directory for clients.
# share /srv/test to network 172.16.1.0/24 with read only access.
/srv/test 172.16.1.0/24(ro,sync,no_subtree_check)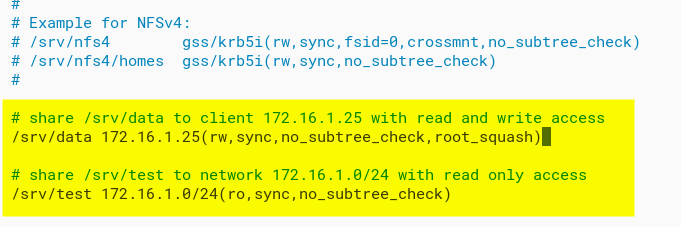
4. Run the below command to apply the shared directory, and verify the /etc/exports configuration file. If you don’t get any output messages, the NFS configuration is correct.
sudo exportfs -a5. Now, run the systemctl command below to restart the nfs-kernel-server service.
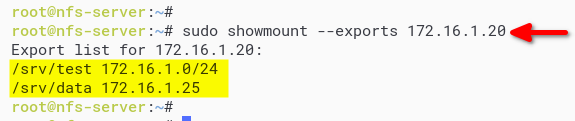
sudo systemctl restart nfs-kernel-server6. Lastly, run the showmount command below to list the shared directories on the Ubuntu NFS server. Ensure to change the IP address (172.16.1.20) with the NFS server IP address.
showmount --exports 172.16.1.20Now you should see the shared directory list on the NFS server with the IP address that allowed you to access the Ubuntu NFS server.
Securing NFS Shared Directory with UFW Firewall
You’ve configured the NFS shared directory, but typically, you’d want to keep out random users from accessing the shared directory.
Ensure that only the IP address allowed can access the shared directory. How? By setting up the UFW firewall and specifying the IP address to the NFS port.
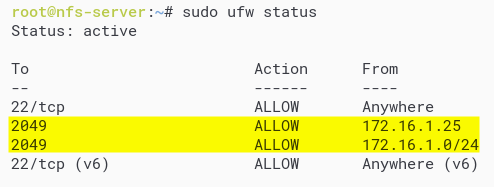
1. Run the following commands to open the NFS port (2049) and allow clients on the IP addresses 172.16.1.25 and 172.16.1.0/24 access to the Ubuntu NFS server. Make sure to replace the IP address with your client’s IP address.
# allow client IP 172.16.1.25 to access NFS server
sudo ufw allow from 172.16.1.25 to any port nfs

# allow network 172.16.1.0/24 to access NFS server
sudo ufw allow from 172.16.1.0/24 to any port nfs
2. Next, run the ufw command below to reload the UFW firewall and apply a new configuration.
sudo ufw reload3. Lastly, run the ufw command below to verify the status of the UFW firewall.
sudo ufw statusBelow, you can see the NFS server port 2049 is added to the firewall and only accessible from the client IP address 172.16.1.25 and network 172.16.1.0/24.
Mounting NFS Shared Directory on Client Machine
At this point, you’ve fully configured the Ubuntu NFS server. But how can client machines access NFS shared directory? Running the mount command to access the NFS shared directory will do the trick. But first, you’ll install nfs-common (for Debian Linux distribution) or nfs-utils (for RHEL, CentOS distribution) to the client machine.
1. Log in to your client machine, open the terminal, and run the sudo su command to get the root privileges.
sudo su2. Next, run either of the commands below to install NFS packages on the client machine, depending on your OS.
# for Ubuntu/Debian based distribution
sudo apt install nfs-common -y

# for RHEL/CentOS/Fedora Linux distribution
sudo dnf install nfs-utils -y
3. Run the below command to create the target mount directory. The NFS shared directory will be mounted on the client machine /data and /test directories in this example.
mkdir -p /{data,test}4. Execute each mount commands below to access the NFS shared directory.
The -t nfs option specifies the type of file system is NFS server. This command mounts the /srv/data shared directory on the Ubuntu NFS server to the local client directory (/data). And the /srv/test shared directory to the click local directory /test.
# mount shared directory `/srv/data on the nfs server 172.16.1.20
# to the local client directory /data
sudo mount -t nfs 172.16.1.20:/srv/data /data
# mount shared directory `/srv/test on the nfs server 172.16.1.20
# to the local client directory /test
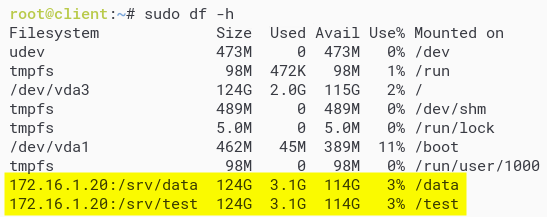
sudo mount -t nfs 172.16.1.20:/srv/test /test5. Run the df command below to verify the list of mounted file systems on the client machine.
sudo df -hIn the output below, you’ll see the NFS shared directory /srv/data is mounted on the /data directory on the client machine. At the same time, the shared directory (/srv/test) is mounted to the local directory (/test) on the client machine.
6. Next, run the below commands to navigate to the target mount directory (/data) and create a file called file.txt.
Since the shared directory (
/srv/data) has read and write permissions, you can create a new file.
# navigate to /data directory
cd /data

# create a new file with "This file from client machine!" as content
echo "This file from client machine!" > file.txt
7. Run the ls and cat commands below to verify the file is available on the mount directory /data.
# list files on the current directory
ls -lah

# showing the content of the file.txt
cat file.txt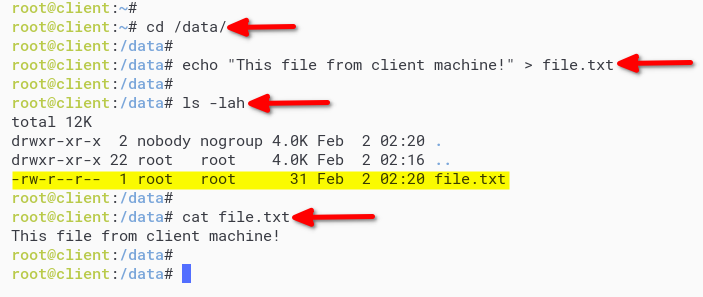
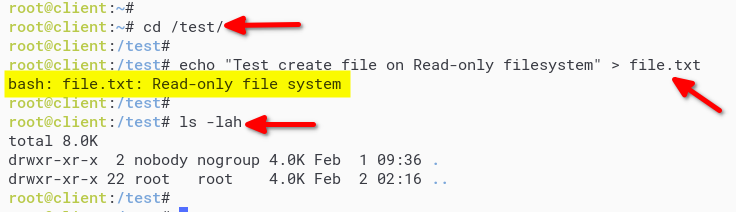
8. Lastly, run each command below to navigate to the mount directory (/test) and create a file called file.txt. This command lets you test write access restrictions on the read-only filesystem.
# navigate to /test directory
cd /test

# create new file
echo "Test create a file on Read-only filesystem" > file.txt
Like the output below, you’ll get an error message because the shared directory (/srv/test) only has read-only permission.
Mounting NFS Shared Directory Permanently
Now you’ve successfully mounted NFS shared directory on the client machine, but it will be gone after you restart the system. How to mount NFS shared directory permanently? By defining NFS shared directory on the /etc/fstab file.
1. Edit the /etc/fstab configuration file using your preferred editor and add the following configuration. Change the IP address with the NFS server IP address, the shared directory, and the mount target directory.
# rw/ro - allow read and write or read-only to the target mount.
# hard - enable client machine to always try to connect to the NFS whenever fail.
# noexec - disable binary file execution on the file system.
# rsize - maximum READ requests that client machine can handle.
# wzise - maximum WRITE requests that client machine can handle.
# timeo - timeout for NFS client before retries requests to the NFS server.

# NFS Shared Directory - target - type - options - dump - pass
172.16.1.20:/srv/data /data nfs rw,hard,noexec,rsize=8192,wsize=8192,timeo=14 0 0
172.16.1.20:/srv/test /test nfs ro,hard,noexec,rsize=8192,wsize=8192,timeo=14 0 0
2. Next, run the mount command below to mount all filesystem on the /etc/fstab file and verify the /etc/fstab configuration. If there is no error message, then the configuration is correct.
sudo mount -a3. Run the df command below to verify the mounted file system on the client machine.
sudo df -hSimilar to the output below, you should see the NFS shared directory is automatically mounted on your client machine.
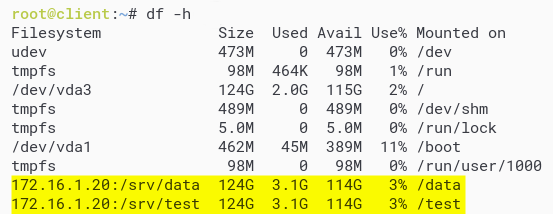
4. Lastly, run the reboot command to restart the client machine. Once rebooted, log in and rerun the df command as you did in step three to verify NFS shared directory.
sudo df -hAs you see below, the NFS shared directory is still permanently mounted on the client machine.

Conclusion
Throughout this tutorial, you’ve learned how to set up an NFS server on a Linux server to share a directory securely. You’ve also touched on permanently mounting NFS shared directory, so you won’t have to manually mount the shared directory each time you reboot your machine.
At this point, you’ve got a fully functional NFS server. So, what’s next? Perhaps learn to add a layer of security for NFS using Kerberos authentication?


