


The GRUB Linux Bootloader is the most widely used bootloader for Linux. Every aspiring Linux user would benefit from learning about Ubuntu GRUB. In this tutorial, you will learn what GRUB is, how the booting process works, and dive into several helpful Ubuntu GRUB configurations.
Dive in to know more.
Prerequisites
If you’d like to follow along in this tutorial, ensure you have a Linux device that has GRUB as the bootloader. This tutorial will be based on Ubuntu 18.04.5 LTS, running on a virtual machine on Oracle VirtualBox.
Understanding the Ubuntu GRUB Boot Process
GRUB is an acronym for Grand Unified Boot Loader and is the primary and most crucial component for booting your device. GRUB also is the most prevalent bootloader for Linux. Your journey will start with you knowing a little more about GRUB’s booting process.
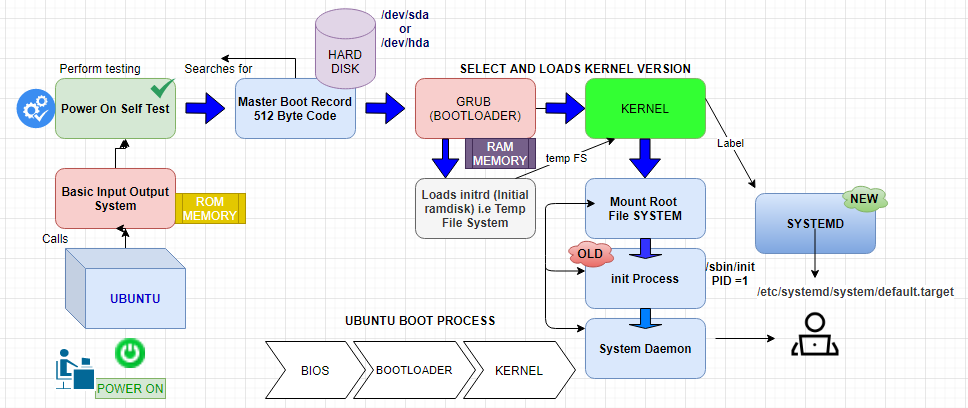
In the general booting process, the BIOS starts by invoking the POST step and then looks for the bootloader in the Master Boot Record (MBR).
The MBR is the information in the first sector of any hard disk. The MBR identifies where an Operating System is. The information stored in the MBR loads (boots) the OS into the device’s RAM.
This article only covers the MBR side of things. But you can also find disks using GPT, which stands for GUID Partition Tables. GPT is better if you plan to create more than four partitions as an MBR disk can hold a maximum of 4 primary partitions at most.
In the screenshot below, you can see a diagram of the booting process. You can see that Ubuntu GRUB loads the kernel you opted into the main memory: the Random Access Memory (RAM). After the kernel is loaded, users can log into the device.
Comparing Ubuntu GRUB and LILO Bootloaders
The Linux World has three main boot loaders: LILO, GRUB, and GRUB2. GRUB2 is the latest and primary bootloader in Linux distributions. GRUB2 is the most used and demonstrated in this tutorial as it is the default Ubuntu bootloader, but LILO still has a presence in Linux. In this section, you will learn how they fare against each other.
Other Linux bootloaders are available in the market, such as GNU GRUB, which has outstanding support for memory management and an object-oriented framework. The other one is SYSLINUX which is a lightweight boot loader.
GRUB supports booting multiple operating systems. LILO, on the other hand, can only boot one OS.

Ubuntu GRUB works with Windows, Linux, Unix, macOS, BSD, Solaris, whereas LILO supports primarily Linux operating systems.
If you update the configuration file in LILO, then LILO needs to be reinstalled to the MBR. If you change GRUB settings, it does not require reinstallation.
Selecting Different Kernels or Recovery Modes
This section will show how to select a kernel while booting the device recovering from a corrupted kernel.
A kernel works as an interface between hardware and software. It controls all the processes that users run on the device.
Here are the steps to select a kernel using a VM in Oracle VirtualBox.
1. Log in directly to the Ubuntu device console using Oracle VirtualBox.
2. Reboot your Ubuntu machine using the shutdown command as shown below.
shutdown -r nowOnce your device restarts, press and hold Shift while loading Ubuntu GRUB, and you will see the GRUB bootloader menu. If you don’t select anything, GRUB will boot the system with the default kernel and proceed with the booting process.
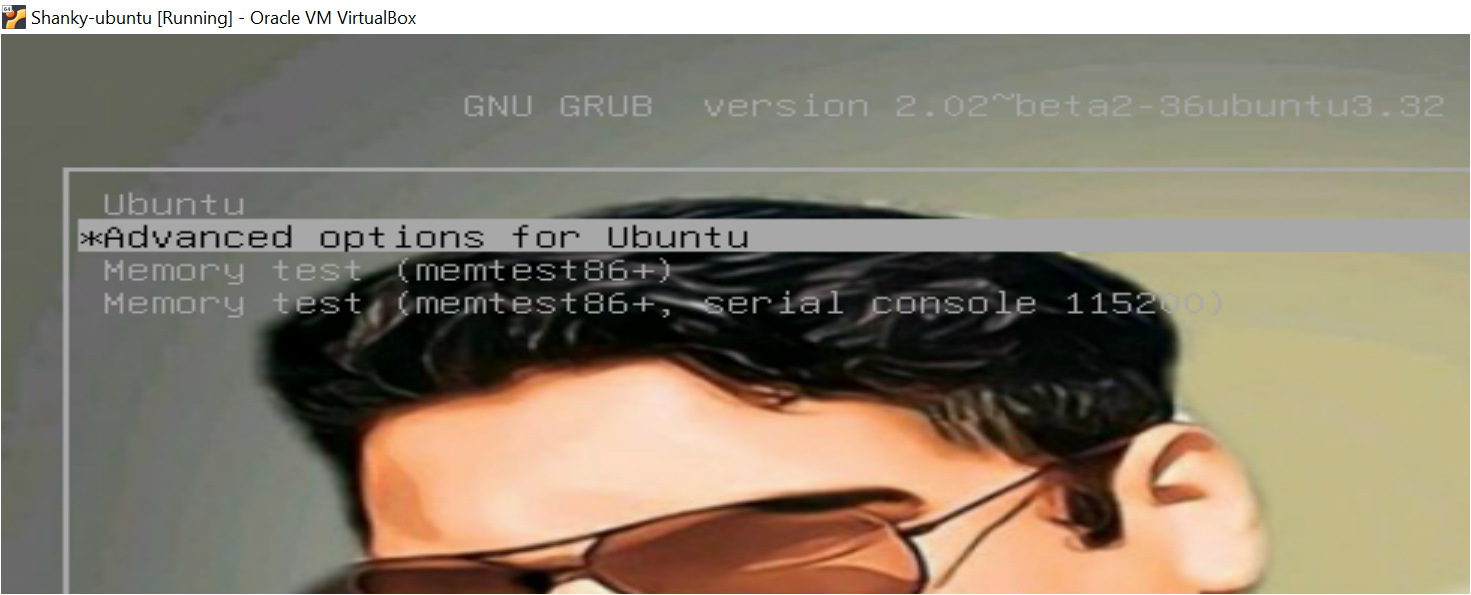
You should select Advanced options for Ubuntu either when you need to boot with a different kernel other than the default kernel. Or if you face any issues within the system like file corruption, kernel not loading correctly.
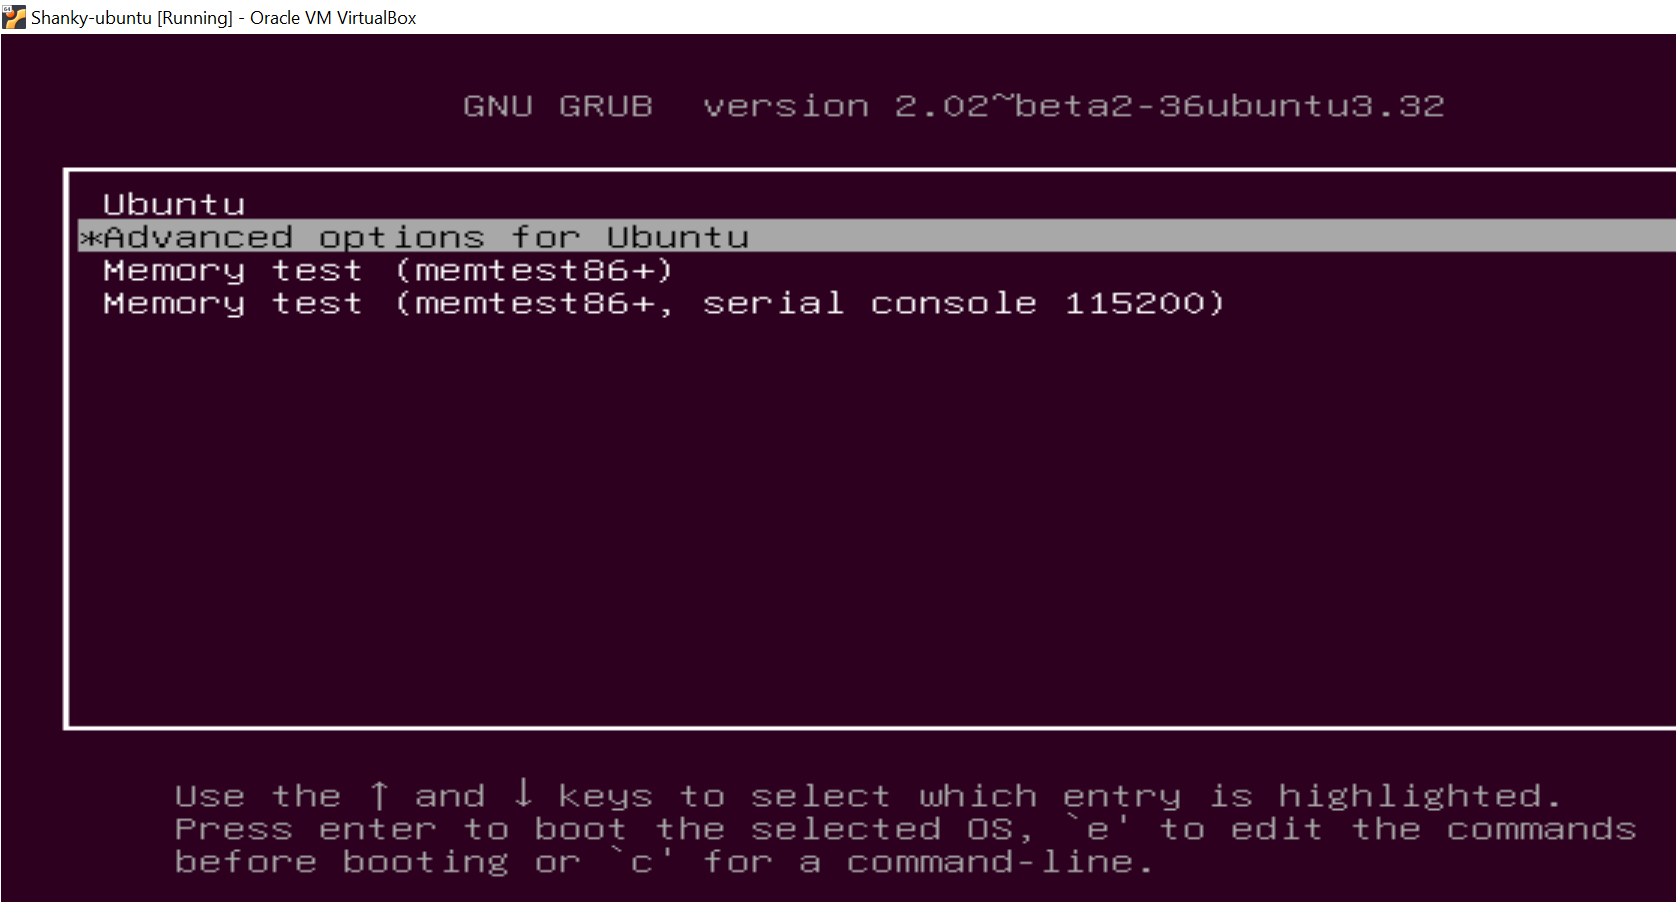
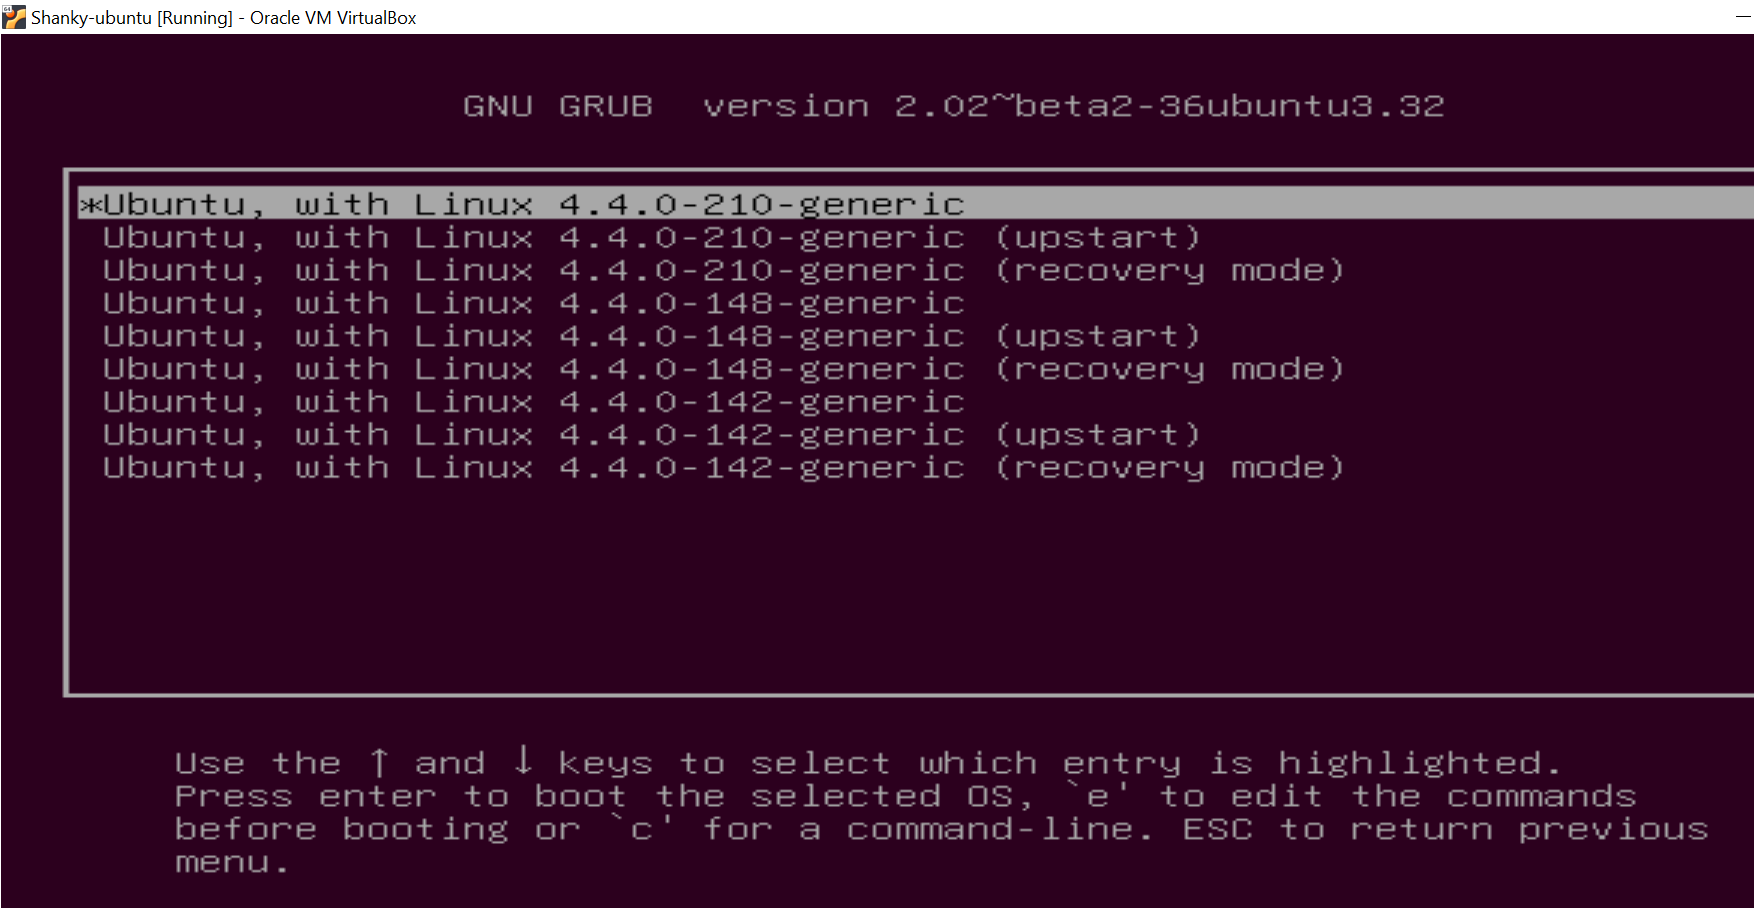
4. After you select the Advanced options for Ubuntu, a Ubuntu GRUB menu will show up. In the menu, you should see various kernels options you choose. If you don’t select an option, the first displayed kernel will load by default.
As you can see below in the image, there are two additional options for every kernel: upstart and recovery.
- (upstart): an event-based replacement for the /sbin/init daemon, which handles starting tasks and services during boot, stopping them during the shutdown, and supervising them while the system is running.
- (recovery mode): to recover the kernel from any failures in the system.
5. Once logged into the device, the uname command verifies if the specified kernel is loaded. The -r option prints the kernel name.
uname -r 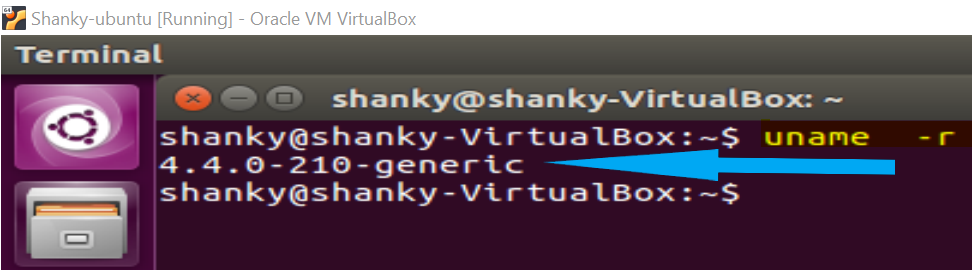
Setting the Default Operating System
Now that you are more familiar with GRUB, you will tweak a few GRUB configurations options. You will start by configuring which Operating System will be loaded by default.
1. Log into your Ubuntu device using your favorite SSH client.
2. Now, list the GRUB boot menu entries by running the awk command as shown below. The awk command will display all the entries stored in /boot/grub/grub.cfg. The contents of the file will show up on the terminal. Pay attention to the lines. You will need the number associated with the line ahead, which starts with zero, i.e. the Ubuntu line is 0 and Ubuntu, with Linux 4.4.0-210-generic is 1.
awk -F\' '/menuentry / {print $2}' /boot/grub/grub.cfg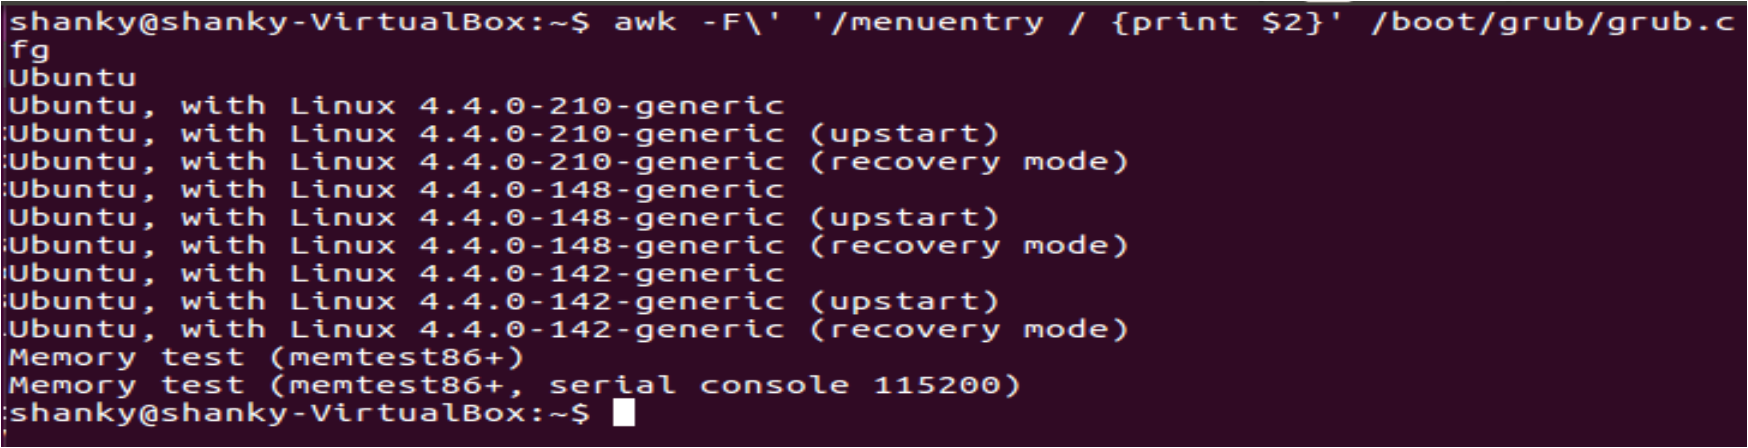
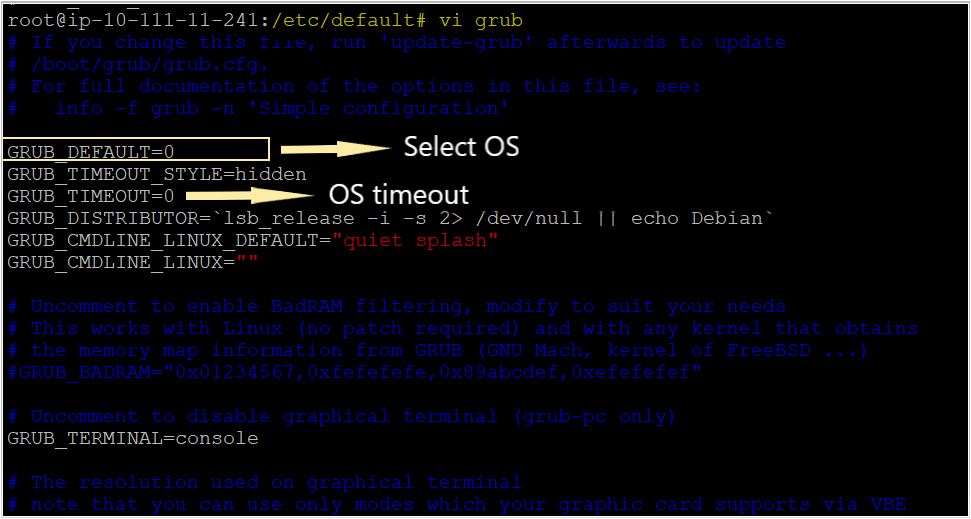
3. Next, edit the GRUB configuration file. You can rely on vi to edit the file and change the value for GRUB_DEFAULT, but use your preferred editor as desired.
vi /etc/default/grubNow, set the value of GRUB_DEFAULT to the line number of the desired OS entry. Remember the awk command you ran? Those were the OS entries. If you set GRUB_DEFAULT to 0, the first OS entry in the GRUB boot menu entry will boot if you set it to 1, the device boots the second OS entry by default, and so on. In the screenshot below, the first OS Entry Ubuntu is set to boot by default.
By default, GRUB does not wait in the boot menu and starts booting immediately, in 0 seconds. You can change this timeout setting by changing the value for
GRUB_TIMEOUT. The value will mean the number of seconds the menu is visible before booting starts. If the value is5, the boot menu will appear for 5 seconds so that you can select which OS you want to load when the system starts.
4. Once you save the changes in the GRUB configuration file, make sure to run the update-grub command. The update-grub command takes the changed configuration file and applies it to the system.
update-grub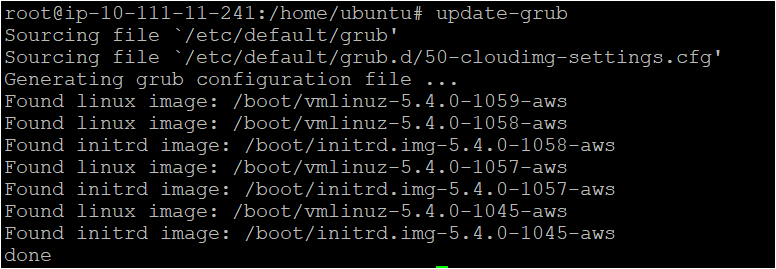
Setting the Background Image in Ubuntu GRUB
Your GRUB configuration does not need to be bland. You can add a little flavor to GRUB by adding a background image to the GRUB menu. You can set pictures as the background into GRUB with the GRUB_BACKGROUND option. Follow the steps below to customize GRUB.
1. Edit the GRUB configuration file with vi, or your preferred text editor, and add the GRUB_BACKGROUND line as shown below. In this tutorial, the image is stored in a user home folder named UBUNTU, as GRUB runs as root, it can access images across the file system. Once modified save the configuration file.
# Sytax: GRUB_BACKGROUND=/path-to-image
GRUB_BACKGROUND=/home/ubuntu/shanky.jpeg
The file shanky.jpeg image was already on the system. Replace that name with the file name you want as the background image.
2. Next, after making the changes in the GRUB configuration file, run the update-grub command.

3. Further, verify if the image you added in the Grub file as the background is working as intended. To verify, restart your machine and hit the Shift key while GRUB is loading. As you can see below, GRUB now has a background image.
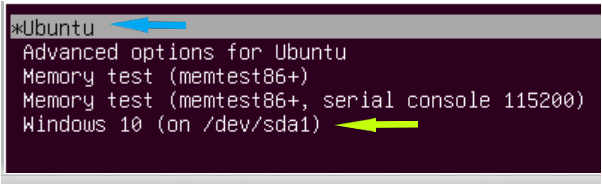
Dual-booting with GRUB
One of the greatest features of Ubuntu GRUB is it allows you to choose between Windows and Linux when your device boots: also known as dual booting. Dual-booting allows you to use Linux and Windows together in one device and makes life easier for IT engineers working on multiple OSes.
As of early 2021, the default os_prober script which automatically adds in additional operating system menu entries was disabled, due to potential security concerns with automatic OS detection. You can re-enable this functionality via the following command, provided you are aware of what OS systems are installed.
echo GRUB_DISABLE_OS_PROBER=false|sudo tee -a /etc/default/grub && sudo update-grubOnce you have configured dual-booting on your device, you should see a screen similar to the GRUB menu when your machine starts.
Conclusion
In this tutorial, you learned what GRUB is, and the article introduced you to GRUB’s booting process.
You also learned how to tweak some Ubuntu GRUB configurations, load different kernels, and even learned about Dual-booting.
Now that you have sound knowledge of GRUB, what are some of the configuration options you will change?


