


Even though Linux Loader (LILO) is considered a legacy bootloader and Grub2 seems to be taking over, the LILO Linux bootloader will still be around for a long time to come. Even though LILO has not been under development since late 2015 and is seen as limited compared to modern bootloaders, it’s still around.
If you’re a Linux admin or just a power user needing to learn how to configure LILO on Linux, this article is for you.
Understanding the LILO Linux Boot Process
To load Linux to a state where you can begin interacting with it and applications installed on it, Linux must go through a boot process. This boot process consists of various stages, each performed sequentially, as shown below.
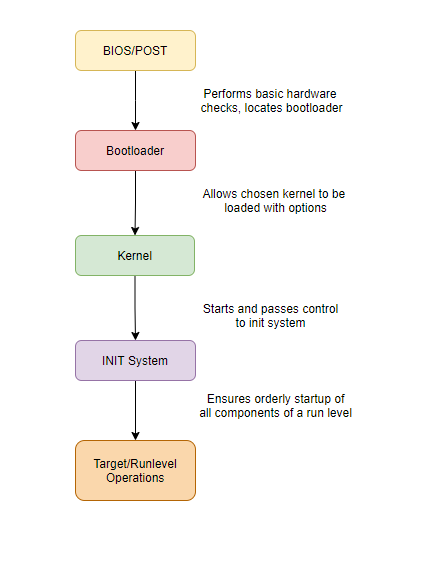
1. The Power On Self Test (POST) – This stage performs a short test on all connected hardware. Once all tests pass, the boot process looks for a special section on the boot disk.
2. The POST process uses a section of the boot disk to look for how to boot the operating system known as the bootloader. Most bootloaders contain just enough instruction to call subsequent stages if the system is set up with an MBR.
3. The bootloader (LILO or perhaps GRUB) then contains instructions on where Linux can find the appropriate kernel to load. The bootloader itself or via a menu allows you to select what kernel Linux loads, perhaps in a dual-booting scenario. After the kernel loads, the process then passes control to the INIT system, mainly Systemd.
4. The INIT System or SystemD is a process that ensures that all the scripts and dependencies of a particular run level are started in the correct order; the system can go into one of various modes (run levels).
Understanding How the LILO Linux Bootloader Works
To troubleshoot or configure LILO Linux bootloader on legacy systems well, you must first understand how it works at a high level. To demonstrate LILO, this tutorial will use Slackware, where LILO comes preinstalled.
You may also find LILO on Arch Linux or some Debian distributions, but it does not come as the default bootloader.
When a Linux PC finishes the POST stage with LILO installed as the bootloader, you might see a splash screen similar to what you see below.
The timer, OS Selection list, and the text prompt below are essential elements and are likely to be seen on any LILO bootloader screen. But, due to the customizable nature of the bootloader, your LILO splash screen may look significantly different.
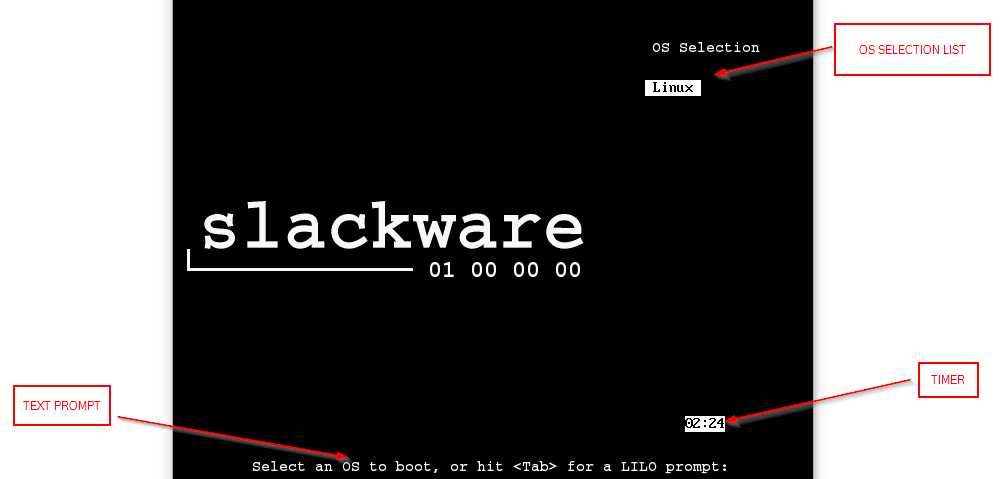
Or, if no splash screen is configured, you might be dropped into a simple text prompt. Here you must hit the Tab key to select the operating system to load.

Many Linux systems will boot straight into the operating system without a menu or prompt if the kernel is set to boot automatically. If so, open a terminal and run the following command to ensure LILO is installed on the system. LILO is installed on your system if you do not see a “lilo not found” message or if the command does not return a blank response.
which liloConfiguring LILO
Let’s now get more hands-on with LILO by learning how to access the LILO configuration and change some standard settings that you might need in the real world.
Prerequisites
The demos in this section will only work under a few pre-defined conditions. Before you expect the below demos to work on your system, be sure you have the following:
- A Linux system (physical or virtual) capable of running LILO. This tutorial uses Slackware v14.2.
- An account with sudo access.
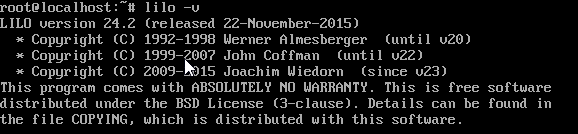
- LILO – This tutorial uses the last available version, v24.2.
Because LILO is no longer under active development, only a handful of Linux distributions still have it installed or in standard repositories. Obtaining LILO on popular platforms like Fedora or Ubuntu might demand considerable effort since GRUB has been the default for almost a decade. On the other hand, purist platforms like Arch and Slackware still enable you to run LILO with ease.
As with many Linux tools and utilities, LILO’s configuration is controlled via a configuration file at /etc/lilo.conf, by default. Changes to this file directly affect the way LILO behaves during the boot process.
The configuration file can be stored anywhere, but you must configure LILO to look for the file at the non-default location using the
lilo -Ccommand.
Let’s open the LILO configuration file and see what’s in there.
Open the /etc/lilo.conf file with your favorite text editor, and you should see a file similar to below.
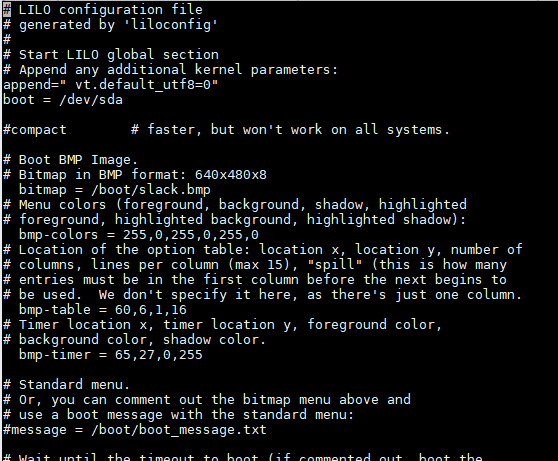
The default LILO configuration file has a lot of comments that can get in the way of understanding the structure. After removing all comments, the configuration file will look similar to what you see below.
Notice there are two main sections in the LILO configuration file. The configuration file contains a global section and the Linux partition parameters section.
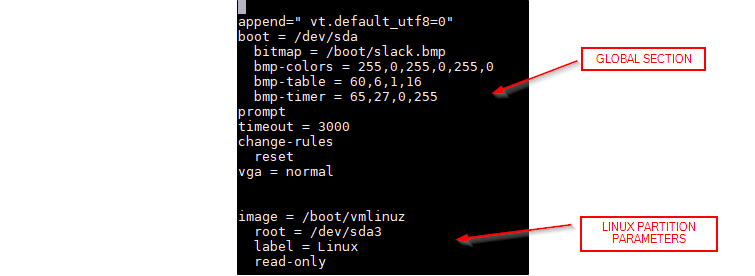
Global Configuration Settings
The global section contains configuration options that affect the behavior of LILO itself. You’ll see in the global section many different attributes that dictate LILO’s behavior, such as:
append – A string that should be internally appended to kernel parameters.
boot– The boot drive where the MBR can be found.bitmap– The location of a bitmap image to be displayed on the splash screen. When using a bitmap image for the splash screen, you must prepare the image using thelilo -Ecommand or following these instructions. Thebmp-colors,bmp-table, andbmp-timeroptions enable precise placement of the selection menu and timer and their colors for those interested in eye candy.prompt– Instructs LILO to display the boot prompt (as seen in the LILO Text Prompt screenshot earlier). If this option is omitted, LILO boots the default kernel.timeout– The duration, in tenths of a second, that boot prompt is displayed before the default is selected. Usually, the first in the list is treated as the default.
password– A required password to input before an OS is booted up.
Note that the boot password is stored in plain text. If setting a boot password in the configuration file, you should also define filesystem-level access controls to prevent unauthorized users from revealing the password.
backup– An alternate location to back up the current bootloader before effecting changes.force-backup– Overwrites backup file if it already exists
Linux Partition Parameters
In addition to the parameters that dictate LILO itself, the LILO configuration file also defines all of the installed, bootable Linux kernels. This section contains parameters such as:
image– The disk partition location of the Linux kernel to load. If it is a non-Linux OS, you should use theotheroption instead.root– The location of the root partition of that OS.label– The label to use for an entry in the OS selection menu and refer to the entry on the LILO prompt.read-only– Dictates that the root partition should first be mounted as read-only.optional– Omits the image if it cannot be found when LILO is building the OS list.default– Defines the default image to boot.
Saving LILO Configuration Changes
Once you’ve modified the LILO configuration file to your liking, it’s time to inform LILO of those changes. Applying changes will write those changes directly to the MBR. When there is a change in the kernel version or any boot option, Linux must write those changes to the MBR. Failure to do that may leave your system in an unusable state.
To apply changes to LILO linux, save the file in your text editor and run the lilo command.
Running
liloby itself will look for the configuration file in the default /etc/lilo.conf location. If you have placed the LILO configuration file in an alternate location, you must specify the-Cswitch, e.g.,lilo -C mylilo.conf.
Conclusion
The next time you run across the legacy LILO Linux system running and need an article as a reference, this post should help. Bookmark this article for later, as it’ll save you a ton of time the next time you must troubleshoot or configure LILO!


