


Have you ever needed to automate infrastructures in a public cloud, such as AWS? If you haven’t found a solution to interlink multiple Terraform resources or modules, don’t fret. Let Terraform output variables do the trick!
In this tutorial, you will learn how to level up your infrastructure configuration with Terraform output variables!
Prerequisites
This tutorial will be a hands-on demonstration. If you’d like to follow along, be sure you have the following:
- Terraform – This tutorial uses Terraform v1.0.8 running on Ubuntu 18.04.5 LTS, but any operating system like Windows with Terraform will work.
- An Amazon Web Service (AWS) account.
- A code editor – Any text editor will work, but it’s best to have one that understands the HCL Terraform language like Visual Studio (VS) Code.
Declaring Terraform Output Variables
In today’s DevOps era, building and managing infrastructures are all integrated into an automated process. Terraform is your best option for automation, primarily because of its essential concept, which is Terraform output variables.
Terraform output variables allow you to display a resource’s (e.g., AWS resource) output on the console. Output variables are also used as an input parameter for other resources if declared in an output configuration file.
1. Open your terminal and run the commands below to create a folder in your home directory, and change the working directory to that folder.
In this demo, the folder is called terraform-output-demo, stored in your home directory. But you can name the folder differently as you prefer. This folder stores your Terraform configuration files.
mkdir ~/terraform-output-demo
cd ~/terraform-output-demo
Next, open your favorite code editor, and copy/paste the configuration below. Save the configuration as main.tf inside the ~/terraform-output-demo directory.
Terraform uses several different types of configuration files. Each file is written in either plain text or JSON format with a specific naming convention of either .tf or .tfjson format.
The configuration in the main.tf file allows you to create various AWS cloud resources as follows:
- AWS VPC in default tenancy. This VPC contains other resources such as public subnets, route tables, AWS EC2 instances.
- Internet Gateway – IGW routes traffic from the EC2 instance in the public subnet to the internet.
- Public Subnets – Resources within the public subnets allows you to expose resource publicly.
- Route Tables – Route tables provide you route from the EC2 instance to the internet.
- AWS EC2 instances – The instance that launches within a newly created VPC.
- cidr_block, ami, and instance type are declared as variables. These variables have their values defined in another file named terraform.tfvars that you will create later in the next step.
You can find Linux AMIs (Amazon Machine Image) via the Amazon EC2 console
.
## Creating a VPC
resource "aws_vpc" "Main" {
  ## Defining the CIDR block use 10.0.0.0/24 for demo
  cidr_block       = var.main_vpc_cidr
  instance_tenancy = "default"
}

## Creating Internet Gateway and attach it to VPC
resource "aws_internet_gateway" "IGW" {
   # vpc_id will be generated after we create VPC
   vpc_id =  aws_vpc.Main.id
}

## Creating a Public Subnet
resource "aws_subnet" "publicsubnets" {
  vpc_id =  aws_vpc.Main.id
  # CIDR block of public subnets
  cidr_block = var.public_subnets
}

## Creating Route Table for Public Subnet
resource "aws_route_table" "PublicRT" {
   vpc_id =  aws_vpc.Main.id
   route {
     cidr_block = "0.0.0.0/0"
     ## Traffic from Public Subnet reaches Internet via Internet Gateway
     gateway_id = aws_internet_gateway.IGW.id
    }
}

## Route table association with Public Subnet
resource "aws_route_table_association" "PublicRTassociation" {
   subnet_id = aws_subnet.publicsubnets.id
   route_table_id = aws_route_table.PublicRT.id
}

## Creating the EC2 instance based on the ami and instance_type
resource "aws_instance" "my-machine" {
  ami = var.ami
  instance_type = var.instance_type
  subnet_id     = aws_subnet.publicsubnets.id
  tags = {
    Name = "my-ec2-machine"
  }
}
3. Now, create another file named vars.tf inside the ~/terraform-output-demo directory, and copy/paste the content below to the vars.tf file. The vars.tf file is a Terraform variables file containing all variables that the configuration file (main.tf) references.
variable "main_vpc_cidr" {}
variable "public_subnets" {}
# Creating a Variable for ami
variable "ami" {
  type = string
}
# Creating a Variable for instance_type
variable "instance_type" {
  type = string
}
4. Create one more file called provider.tf inside ~/terraform-output-demo directory and put the provider’s code below to the provider.tf file. The provider.tf file defines the AWS provider so that Terraform can connect to the correct cloud services.
The code below defines the AWS provider named aws and creates resources in the us-east-2 region.
You can launch aws resources in any regions
provider "aws" {
  region = "us-east-2"
}
5. Next, create a new file inside the ~/terraform-output-demo directory. Name the file as terraform.tfvars, and paste in the code below.
The terraform.tfvars file contains the values Terraform uses to replace the variable references inside a configuration file (main.tf).
ami = "ami-0742a572c2ce45ebf"
instance_type = "t2.micro"
6. Create one last file inside the ~/terraform-output-demo directory. Name the file as output.tf, and copy/paste the code below.
The Terraform output configuration file below provides AWS resources such as AWS EC2 instance arn, and public IP address after executing the terraform apply command.
Including all configuration values in a single configuration file is possible. But to keep things clear for developers and admins, breaking the logic and variables into separate files is preferable.
## Output variable which will store the arn of instance
## and display after terraform apply command.
output "ec2_arn" {
  ## Value depends on resource name and type (same as that of main.tf)
  value = aws_instance.my-machine.arn
}
## Output variable which will store instance public IP
## and display after terraform apply command
output "instance_ip_addr" {
  value       = aws_instance.my-machine.public_ip
  description = "The public IP address of the main server instance."
}
7. Run the tree command below to verify that all required files are in the terraform-output-demo folder.
tree terraform-output-demo 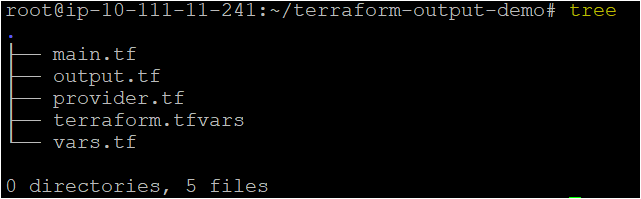
8. Finally, run the commands below to navigate to ~\terraform-output-demo directory and initiate Terraform. Terraform initializes the plugins and providers which are required to work with resources.
Terraform typically uses a three-stage approach terraform init → terraform plan → terraform apply.
cd ~\terraform-output-demo
terraform init
terraform plan
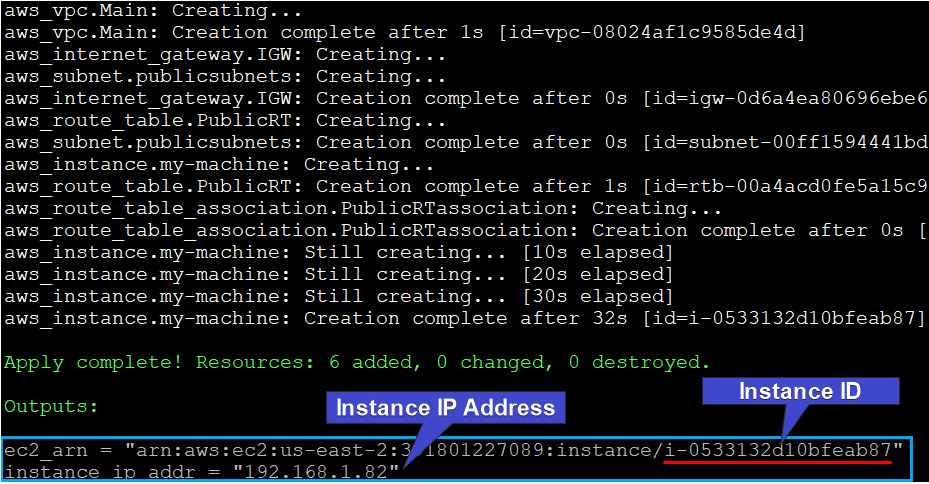
terraform applyIf all goes well after running terraform apply command, you’ll get the Apply complete! Resources: 6 resources added, 0 changed, 0 destroyed message shown below.
Note the output instance ID and IP address as you’ll need them to verify if they exist in the AWS Management Console later.
Terraform output variables are used within the same parent or child module to print specific values in the command line output and are also used as inputs to create resources using the
terraform applycommand.
Below, you can see the command displays the output’s EC2 instance arn and instance public IP address.
Verifying Terraform Outputs within the AWS Console
By now, you should have the VPC and EC2 instances, but let’s verify by manually checking for the VPC in the AWS Management Console.
1. Open your favorite web browser and navigate to the AWS Management Console and log in.
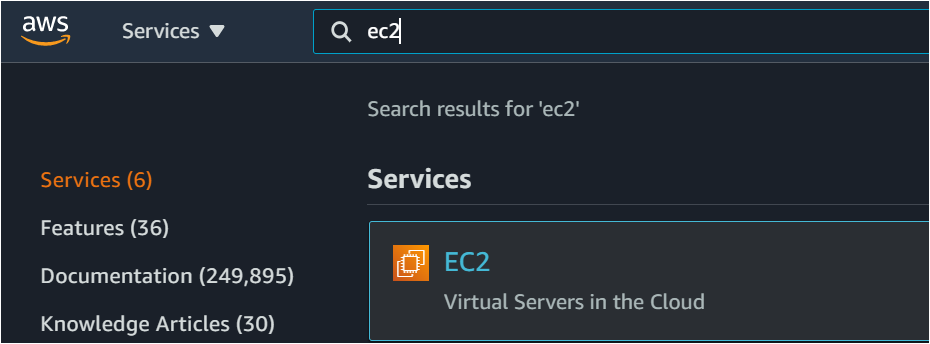
2. While in the console, click on the search bar at the top, search for ‘EC2’, as shown below.
Click on the EC2 menu item, and your browser redirects you to a page where you can see all EC2 instances.
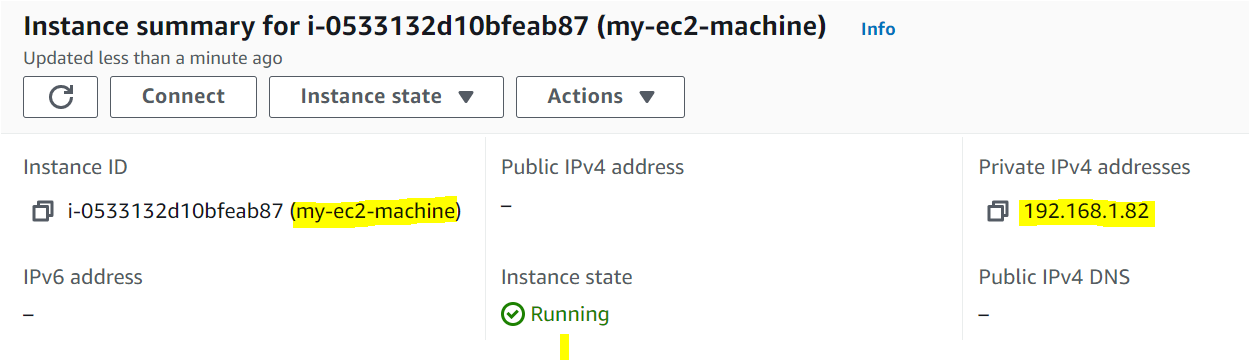
3. Next, click on the same instance ID you noted in the “Declaring Terraform Output Variables” section (step eight) to view the instance’s details.

4. Verify if the IP address of the EC2 instance is the same as the IP address you noted in the “Declaring Terraform Output Variables” section (step eight).
Conclusion
In this tutorial, you’ve learned how to use Terraform output variables to return the AWS EC2 instance details, such as IP address and arn. With Terraform producing outputs, you directly access the instance via putty or SSH clients without logging into AWS.
With this newfound knowledge as the first step, why not utilize Terraform output variables with other AWS services?


