

If you need to set up AWS Elastic Kubernetes Service (Amazon EKS) cluster with Terraform, you’re in luck. Using the Terraform EKS module and all other required resources, you can create one Terraform configuration and create an AKS cluster with code.
Amazon EKS is a managed service to run Kubernetes on AWS without installing, operating, and maintaining your own Kubernetes cluster. Building an EKS Cluster with Terraform allows you to create resources quickly, efficiently, and with an automated approach.
In this tutorial, you will learn how to build and run a Terraform configuration to build an EKS cluster with Terraform step by step. Let’s get started!
Prerequisites
This post will be a step-by-step tutorial. If you’d like to follow along, ensure you have the following in place:
- An Amazon Web Service (AWS) account.
- A code editor – Even though you can use any text editor to work with Terraform configuration files, you should consider Visual Studio (VS) Code as it understands the HCL Terraform language well.
- Terraform – This tutorial will use Terraform v0.14.9 running on Ubuntu 18.04.5 LTS, but any operating system with Terraform should work.
Building the Terraform Configuration for an AWS EKS Cluster
Terraform is an infrastructure as code tool that allows you to build, change, and version infrastructure safely and efficiently. Terraform uses different types of configuration files. Each file is written either in plain text format (.tf) or JSON format (.tfjson).
Let’s first create a Terraform configuration that will create an AKS cluster from scratch when applied.
1. Open a terminal.
2. Create a folder named ~/terraform-eks-cluster-demo, then change (cd) the working directory to that folder. This folder will contain all of the configuration files you’ll be working with.
mkdir ~/terraform-eks-cluster-demo
cd ~/terraform-eks-cluster-demo
3. Next, open your favorite code editor and copy/paste the following configuration, and save it in a file main.tf inside the ~/terraform-eks-cluster-demo. This main.tf file is the Terraform configuration for the AKS cluster.
The main.tf file contains all the resources required to provision an EKS cluster:
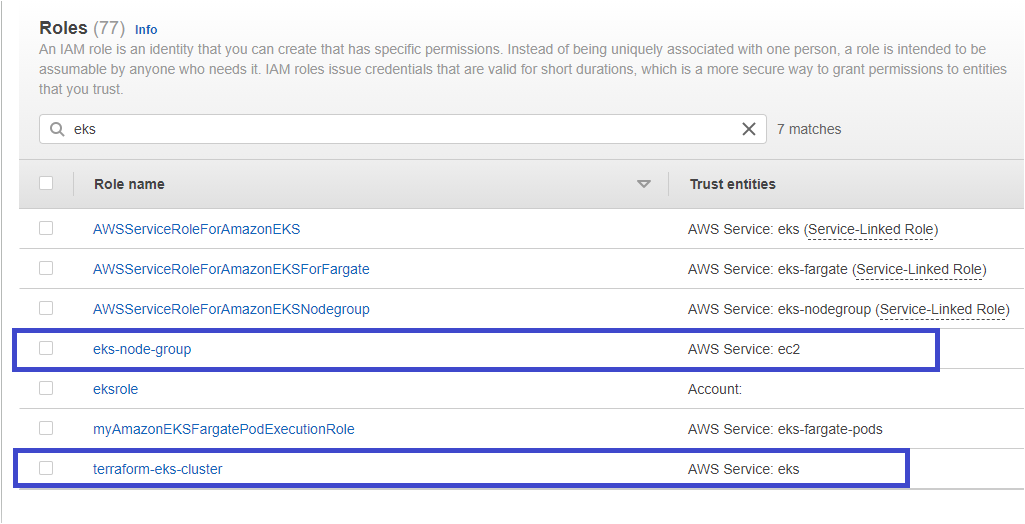
- An AWS Identity and Access Management (IAM) role (
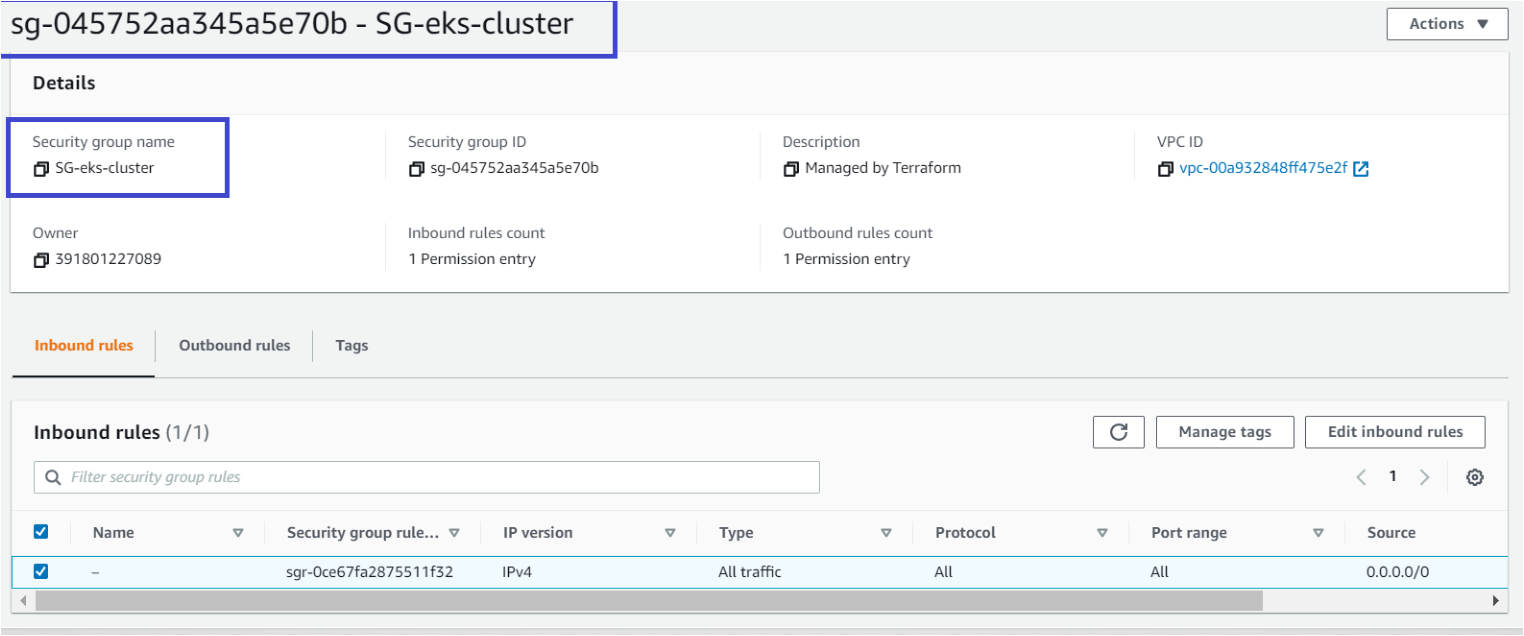
terraformekscluster) – This resource will be managed by Amazon EKS and make calls to other AWS services such as AWS S3, Cloud watch, etc., on your behalf to manage the resources you use with the service. - An AWS EC2 Security group (
resource "aws_security_group" "eks-cluster") – Allows incoming and outgoing network traffic from the AWS EKS cluster. You will launch a security group namedSG-eks-clusterattached via a VPC ID, allowing all traffic to flow in/out from the cluster.0.0.0.0/0is the IP address of the Internet. - EKS cluster (
terraformEKScluster) – This EKS cluster will beversion 1.19. - An IAM role for EKS nodes to make calls to other AWS services (
eks-node-group). This role is attached with a policy that allows assuming the temporary security credentials on the instance to access other AWS resources. - EKS cluster node group (
node_group1) – This resource defines the number of nodes a cluster will have via thescaling_configattribute.
# Creating IAM role for Kubernetes clusters to make calls to other AWS services on your behalf to manage the resources that you use with the service.

resource "aws_iam_role" "iam-role-eks-cluster" {
  name = "terraformekscluster"
  assume_role_policy = <<POLICY
{
 "Version": "2012-10-17",
 "Statement": [
   {
   "Effect": "Allow",
   "Principal": {
    "Service": "eks.amazonaws.com"
   },
   "Action": "sts:AssumeRole"
   }
  ]
 }
POLICY
}

# Attaching the EKS-Cluster policies to the terraformekscluster role.

resource "aws_iam_role_policy_attachment" "eks-cluster-AmazonEKSClusterPolicy" {
  policy_arn = "arn:aws:iam::aws:policy/AmazonEKSClusterPolicy"
  role       = "${aws_iam_role.iam-role-eks-cluster.name}"
}

# Security group for network traffic to and from AWS EKS Cluster.

resource "aws_security_group" "eks-cluster" {
  name        = "SG-eks-cluster"
  vpc_id      = "vpc-123456789"

# Egress allows Outbound traffic from the EKS cluster to the  Internet

  egress {                   # Outbound Rule
    from_port   = 0
    to_port     = 0
    protocol    = "-1"
    cidr_blocks = ["0.0.0.0/0"]
  }
# Ingress allows Inbound traffic to EKS cluster from the  Internet

  ingress {                  # Inbound Rule
    from_port   = 0
    to_port     = 0
    protocol    = "-1"
    cidr_blocks = ["0.0.0.0/0"]
  }

}

# Creating the EKS cluster

resource "aws_eks_cluster" "eks_cluster" {
  name     = "terraformEKScluster"
  role_arn =  "${aws_iam_role.iam-role-eks-cluster.arn}"
  version  = "1.19"

# Adding VPC Configuration

  vpc_config {             # Configure EKS with vpc and network settings
   security_group_ids = ["${aws_security_group.eks-cluster.id}"]
   subnet_ids         = ["subnet-1312586","subnet-8126352"]
    }

  depends_on = [
    "aws_iam_role_policy_attachment.eks-cluster-AmazonEKSClusterPolicy",
    "aws_iam_role_policy_attachment.eks-cluster-AmazonEKSServicePolicy",
   ]
}

# Creating IAM role for EKS nodes to work with other AWS Services.

resource "aws_iam_role" "eks_nodes" {
  name = "eks-node-group"

  assume_role_policy = <<POLICY
{
  "Version": "2012-10-17",
  "Statement": [
    {
      "Effect": "Allow",
      "Principal": {
        "Service": "ec2.amazonaws.com"
      },
      "Action": "sts:AssumeRole"
    }
  ]
}
POLICY
}

# Attaching the different Policies to Node Members.

resource "aws_iam_role_policy_attachment" "AmazonEKSWorkerNodePolicy" {
  policy_arn = "arn:aws:iam::aws:policy/AmazonEKSWorkerNodePolicy"
  role       = aws_iam_role.eks_nodes.name
}

resource "aws_iam_role_policy_attachment" "AmazonEKS_CNI_Policy" {
  policy_arn = "arn:aws:iam::aws:policy/AmazonEKS_CNI_Policy"
  role       = aws_iam_role.eks_nodes.name
}

resource "aws_iam_role_policy_attachment" "AmazonEC2ContainerRegistryReadOnly" {
  policy_arn = "arn:aws:iam::aws:policy/AmazonEC2ContainerRegistryReadOnly"
  role       = aws_iam_role.eks_nodes.name
}

# Create EKS cluster node group

resource "aws_eks_node_group" "node" {
  cluster_name    = aws_eks_cluster.eks_cluster.name
  node_group_name = "node_group1"
  node_role_arn   = aws_iam_role.eks_nodes.arn
  subnet_ids      = ["subnet-","subnet-"]

  scaling_config {
    desired_size = 1
    max_size     = 1
    min_size     = 1
  }

  depends_on = [
    aws_iam_role_policy_attachment.AmazonEKSWorkerNodePolicy,
    aws_iam_role_policy_attachment.AmazonEKS_CNI_Policy,
    aws_iam_role_policy_attachment.AmazonEC2ContainerRegistryReadOnly,
  ]
}
4. Create another file in ~/terraform-eks-cluster-demo name it provider.tf and paste the content below. The provider’s file defines providers such as AWS, Oracle, or Azure, etc., so that Terraform can connect with the correct cloud services.
The tutorial will be creating resources in the us-east-2 region.
provider "aws" {
region = "us-east-2"
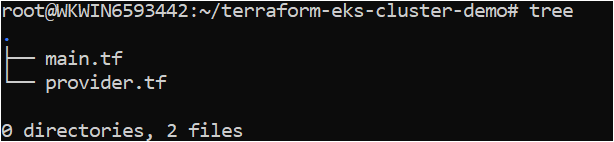
}5. Verify all of the required files below are present in the folder by running the tree command.
Creating the AWS EKS Cluster with a Terraform EKS Module
Now that you have the Terraform configuration file and variables files ready to go, it’s time to initiate Terraform and create the cluster. To provision the AKS cluster, like all other Terraform configurations, Terraform uses three commands (terraform init → terraform plan → terraform apply).
Let’s walk through each stage now.
1. Open a terminal and navigate to the ~/terraform-eks-cluster-demo directory. cd ~/terraform-eks-cluster-demo
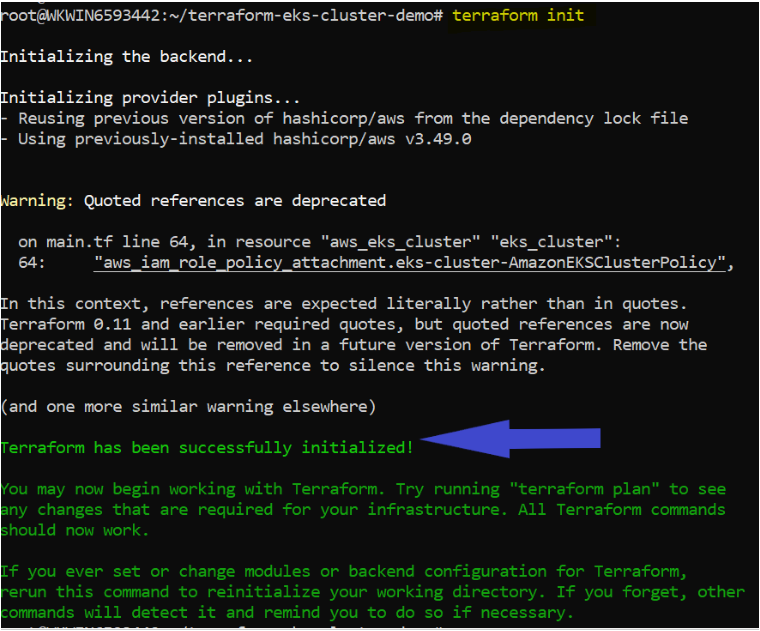
cd ~/terraform-eks-cluster-demo2. Run the terraform init command in the same directory. The terraform init command initializes the plugins and providers which are required to work with resources.
terraform initIf all goes well, you should see the message Terraform has been successfully initialized in the output, as shown below.
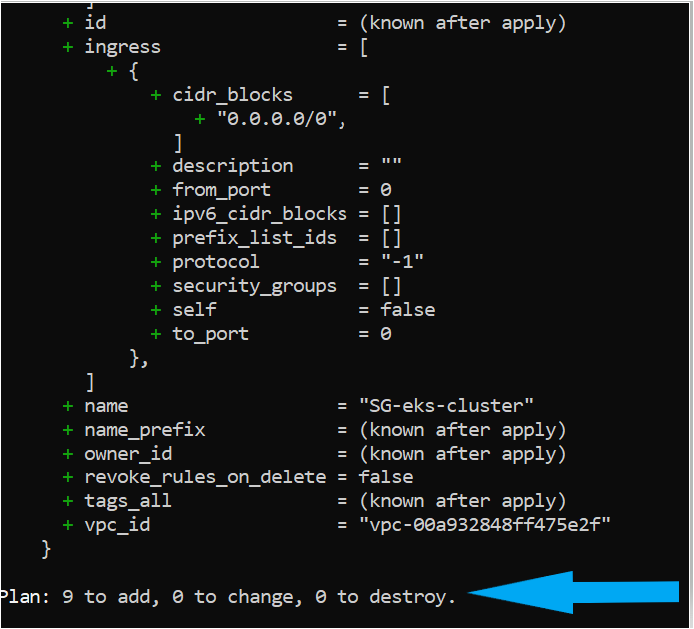
3. Now, run the terraform plan command. Running terraform plan is not necessary but recommended action to ensure your syntax of configuration files is correct and gives you a blueprint of resources that will be provisioned in your infrastructure.
terraform planIf successful, you should see a message like Plan: “X” to add, “Y” to change, or “Z” to destroy in the output.
4. Next, run terraform apply to remove the training wheels and invoke Terraform to create the AKS cluster. Invoking terraform apply reads each configuration (*.tf) in the current directory to compile a state file sent to AWS to build the EKS cluster and other components.
AWS charges $0.10 per hour for each EKS cluster. Be sure to destroy any test clusters you have once created!
terraform apply
Verifying the AWS EKS Cluster
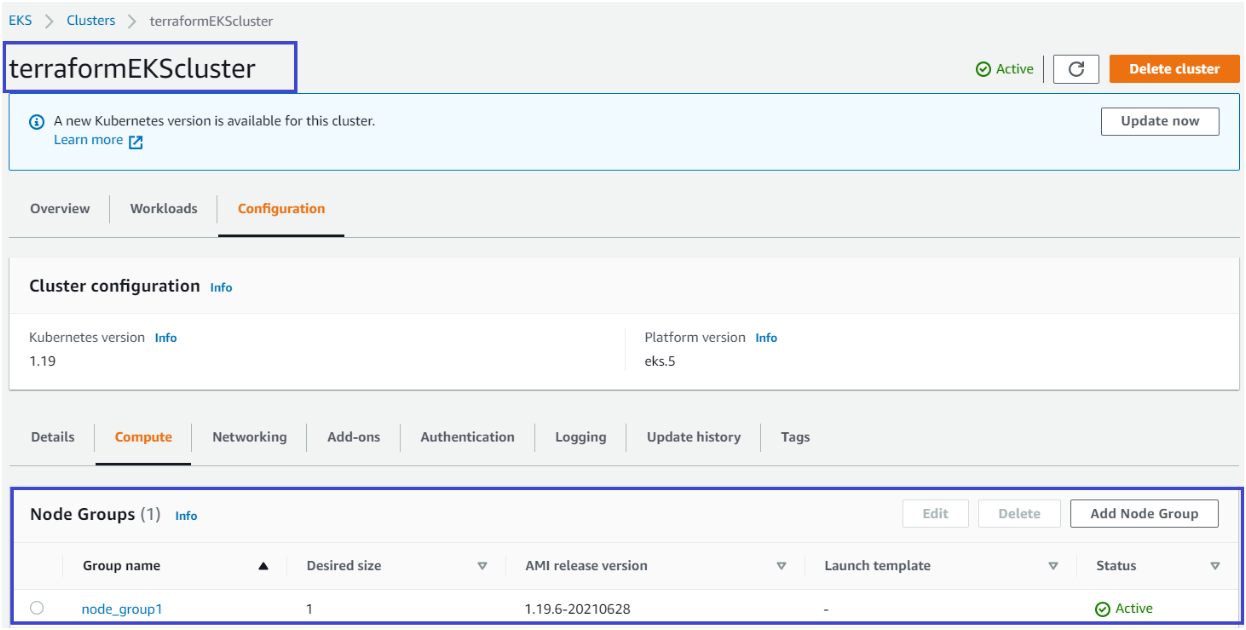
At this point, you should have a functioning AKS cluster built but let’s verify to make sure in the AWS Management Console.
1. Open your favorite web browser, navigate to the AWS Management Console and log in.
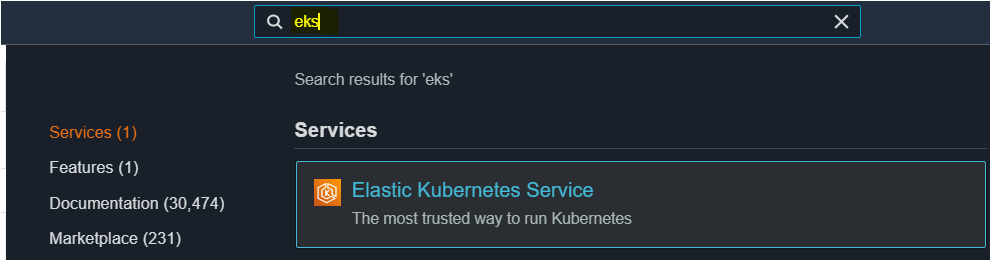
2. Click on the search bar at the top, search for EKS, and click on the Elastic Kubernetes Service menu item. You should see the terraformEKScluster EKS cluster.
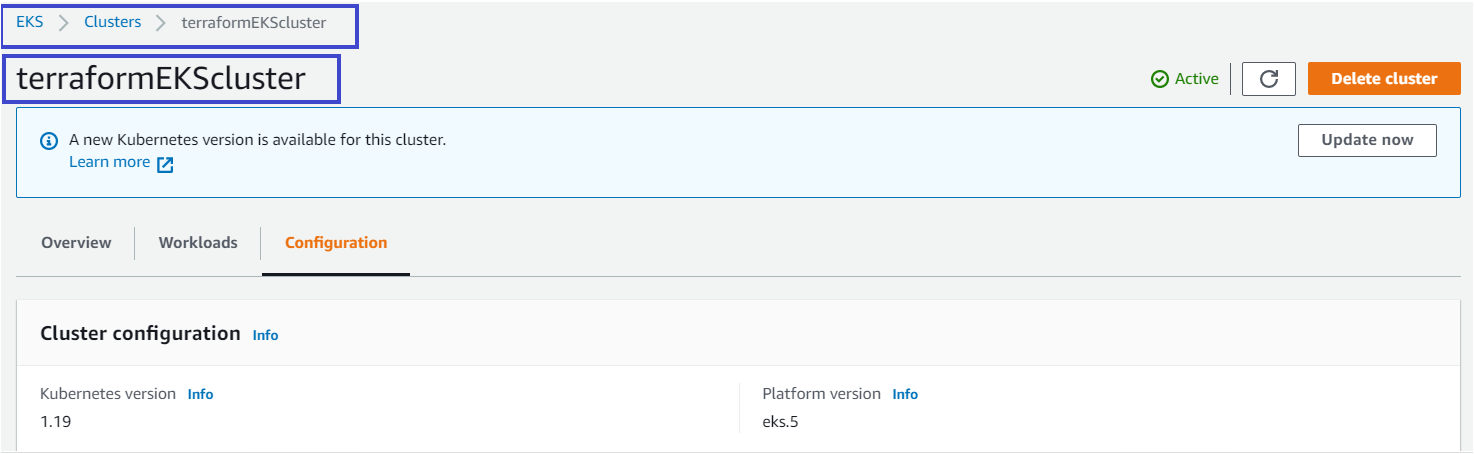
3. Click on Configuration, and you should see each component successfully created that you defined in the Terraform configuration, as shown below.
Conclusion
In this tutorial, you’ve learned how to use Terraform to deploy an AWS EKS Cluster and its components. You are now ready to use this EKS Cluster and deploy applications!
What applications do you plan to deploy on your newfound cluster?


