


Do you access your AWS services and other components using the generic password? If you do, aren’t the repeated credential prompts after your session expires annoying you? Perhaps it’s time you switch to using a Terraform IAM role instead.
An IAM role is similar to an IAM user that contains specific permission, allowing you to access and manage all the AWS services within the AWS infrastructure.
In this tutorial, you will learn how to provision an AWS IAM role and attach a policy to a role using the Terraform IAM Module. You’ll also test the Terraform IAM role permissions to access some AWS services and resources through hands-on examples.
Prerequisites
This post will be a step-by-step tutorial. If you’d like to follow along, ensure you have the following in place:
- An Amazon Web Service (AWS) account. You may register a free-tier account if you don’t have one.
- A code editor. Even though you can use any text editor to work with Terraform configuration files, consider using Visual Studio (VS) Code, as it understands the HCL Terraform language.
- Terraform. This tutorial uses Terraform v1.1.5 running on Ubuntu 20.04 LTS, but any operating system with Terraform should work.
Building the Configuration for a Terraform IAM Role
Terraform is an infrastructure as code tool that allows you to build, change, and version infrastructure via a configuration. But first, you must build a Terraform configuration for the AWS IAM role.
This configuration uses the Terraform IAM module to create the AWS IAM role and attach policies. Follow the below steps to create the configuration.
1. Log in to the Ubuntu machine with your favorite SSH client.
2. Next, run the commands below to create a working directory called ~/terraform-iam-role-demo. This folder will contain all the configuration files you’ll be using in this tutorial.
mkdir ~/terraform-iam-role-demo
cd ~/terraform-iam-role-demo
Note: The Terraform configuration below is specific to this tutorial and the AWS subscription it uses. Make sure to customize the configuration as needed or if you encounter errors.
3. Open your preferred code editor and create a file called main.tf inside the ~/terraform-iam-role directory. This main.tf file is the Terraform configuration for the AWS IAM module.
Copy and paste the following configuration to the main.tf file and save the changes.
resource "aws_iam_role" "role" {
  name = "instance-role"

  assume_role_policy = <<EOF
{
  "Version": "2012-10-17",
  "Statement": [
    {
      "Action": "sts:AssumeRole",
      "Principal": {
        "Service": "ec2.amazonaws.com", "s3.amazonaws.com"
      },
      "Effect": "Allow",
      "Sid": ""
    }
  ]
}
EOF
}

resource "aws_iam_instance_profile" "test_profile" {
  name = "instance_profile"
  role = aws_iam_role.role.name
}

resource "aws_iam_policy" "policy" {
  name        = "iam-policy-for-instance-role"
  description = "iam-policy-for-instance-role"

  policy = <<EOF
{
  "Version": "2012-10-17",
  "Statement": [
    {
      "Action": [
        "ec2:Describe*","s3:Get*"
      ],
      "Effect": "Allow",
      "Resource": "*"
    },
    {
      "Effect": "Allow",
      "Action": "rds:*",
      "Resource": [
           "arn:aws:rds:*:063048070623:db:*",
           "arn:aws:rds:*:063048070623:cluster-endpoint:*",
           "arn:aws:rds:*:063048070623:cluster:*"
          ]
     }
  ]
}
EOF
}

resource "aws_iam_role_policy_attachment" "test-attach" {
  role       = aws_iam_role.role.name
  policy_arn = aws_iam_policy.policy.arn
}

resource "aws_s3_bucket" "b" {
  bucket = "my-s3-test-bucket"

  tags = {
    Name        = "My bucket"
    Environment = "Dev"
  }
}
4. Create another file in ~/terraform-iam-role-demo named provider.tf and populate the file with the content below. The provider.tf file contains Terraform providers as Terraform depends on the plugins to connect or interact with cloud providers or API services.
Including all configuration values in a single configuration file is possible. But to keep things clear for developers and admins, breaking the logic and variables into separate files is preferable.
# Declaring the AWS Provider
provider "aws" {
   region = "us-east-1"
 }
The tutorial creates resources in the us-east-1 region. But a list of regions that AWS support is also available.
5. Finally, run the tree command to verify all required files in the ~/terraform-cloudwatch-demo directory, as shown below.
tree
Creating the Terraform IAM Role and Role Policy
Now that you have set up the Terraform configuration file and variables files, it’s time to initiate Terraform and create the IAM role and role policy. In the end, you’ll attach the Policy with the IAM role.
To provision the AWS IAM role and role policy, like all other Terraform configurations, Terraform uses three commands in sequence (terraform init, terraform plan, and terraform apply).
If the Terraform configuration files you created are not correctly formatted, run the terraform fmt command to fix them.
1. Run the terraform init command in the ~/terraform-backend-demo directory. Doing so initializes the plugins and providers required to work with resources.
terraform initIf all goes well, you’ll see the message that says Terraform has been successfully initialized in the output, as shown below.

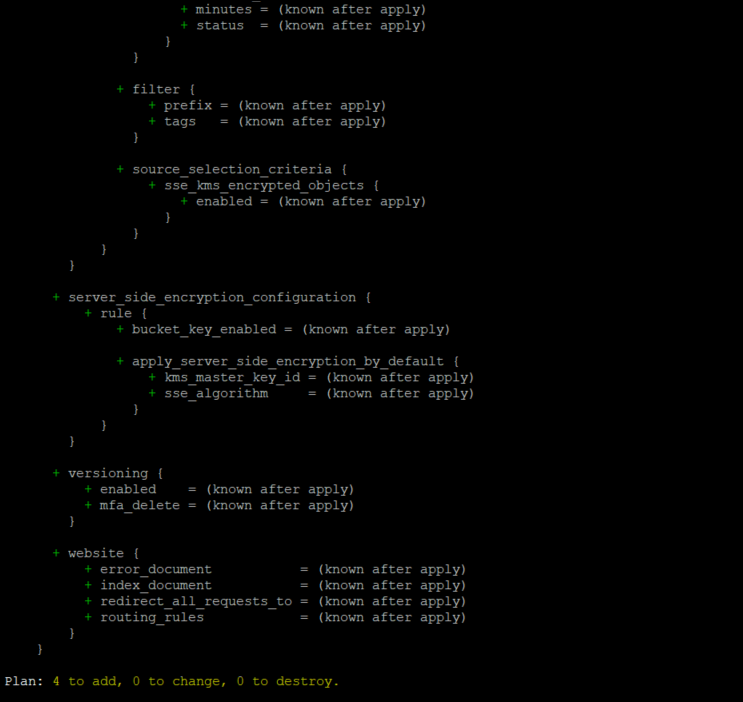
2. Next, run the terraform plan command to ensure your syntax of configuration files is correct and gives you a resource provisioning blueprint in your infrastructure.
terraform planOnce the command completes, you’ll see a message like Plan: “X” to add, “Y” to change, or “Z” to destroy in the output. Below, the Plan shows 4, which means adding four new resources.
3. Finally, run the terraform apply the command to provision the AWS IAM role and policy based on each configuration (*.tf) in the current directory.
The –auto-approve parameter automatically accepts all prompts while running the command.
terraform apply --auto-approve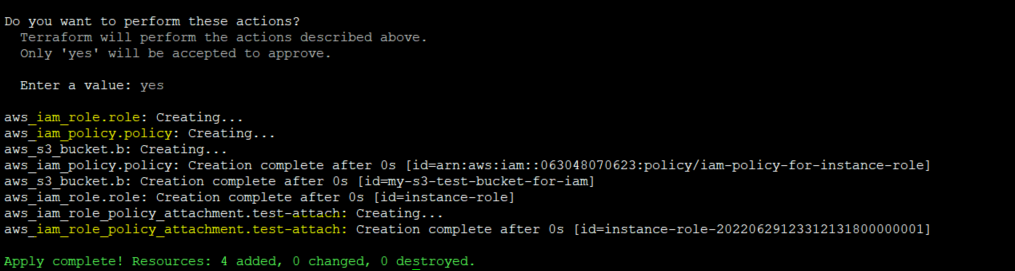
Verifying the Terraform IAM Role and Policy
You should have created the IAM role and IAM policy with Terraform. But how do you know they exist in your AWS cloud? Verify the AWS IAM role and Policy by manually checking the AWS Management Console.
1. Open your favorite web browser and log in to the AWS Management Console.
2. On the console’s home page, type IAM in the search box and click ‘IAM’ to open the Identity and Access Management page. Your browser automatically redirects the page to the IAM page.

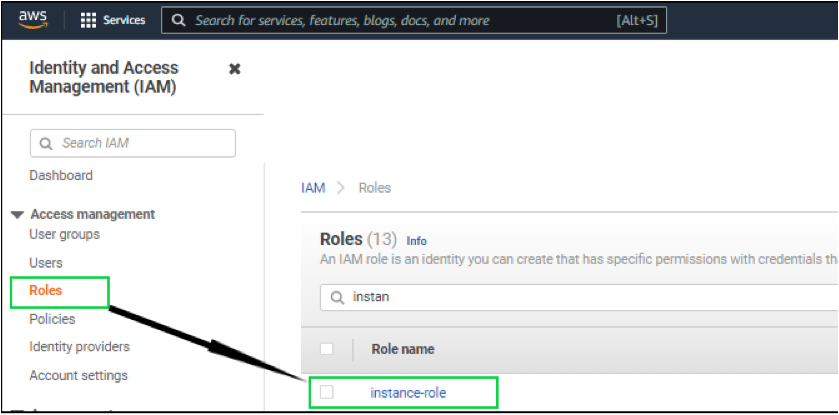
3. Once on the Identity and Access Management page, click Roles on the left navigation menu. You should see the instance role you created. Click on instance-role to view the details of the role.
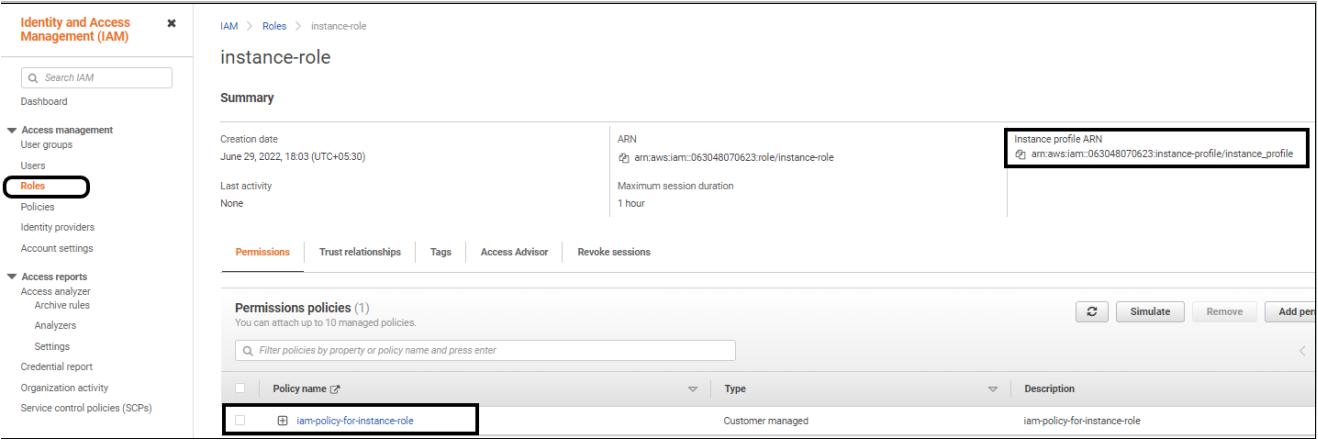
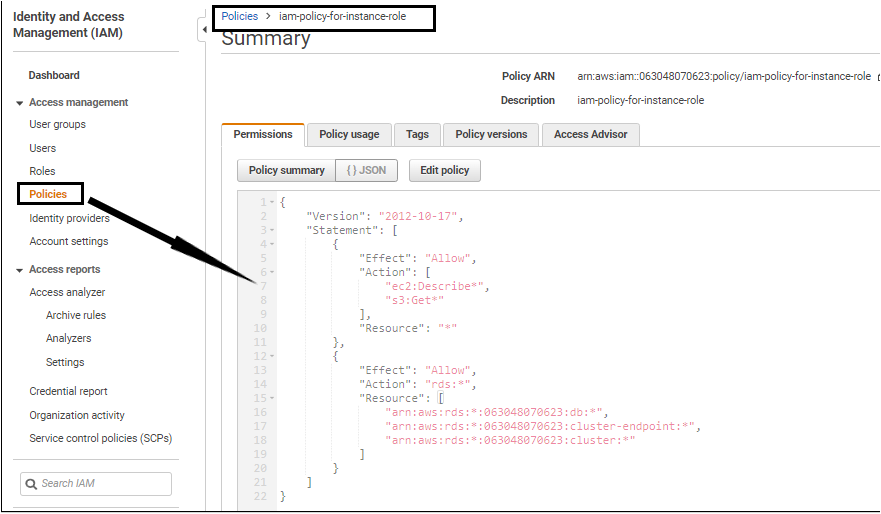
4. Further in the instance-role, you will see the Policy (iam-policy-for-instance-role) that you attached. Also, here you will notice that the instance profile is created as selected in the right box. Further click on the iam-policy-for-instance-role Policy.
5. After you click on the Policy you created, you will see all the permissions you defined in the terraform configuration file (main.tf).
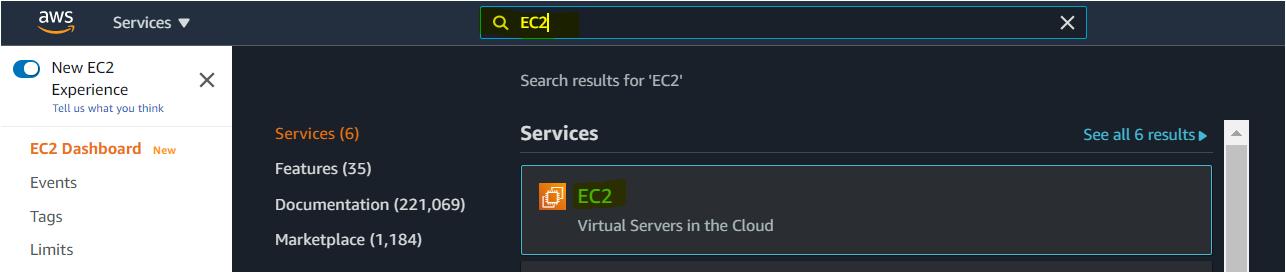
6. Finally, once you’ve verified the IAM role and policies, attach the IAM instance profile to your Ubuntu machine from the AWS EC2 console, as shown below. Navigate to AWS EC2 page and choose the EC2 result, as shown below.
7. Next, On the Instance page, click on the Instance state → Security → Modify IAM role.
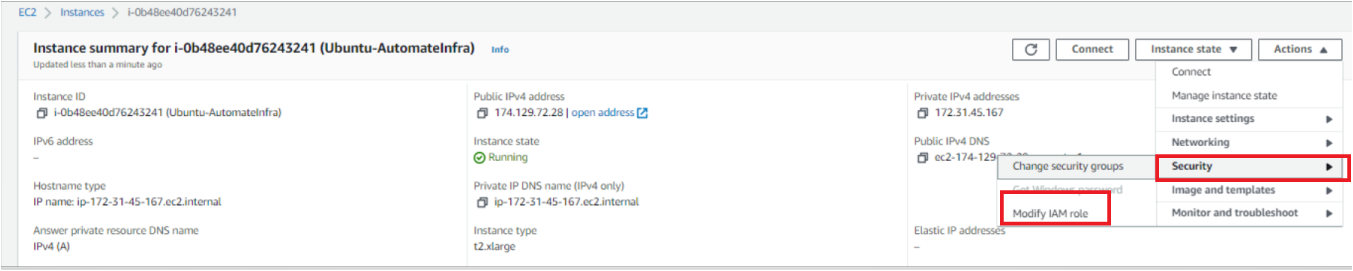
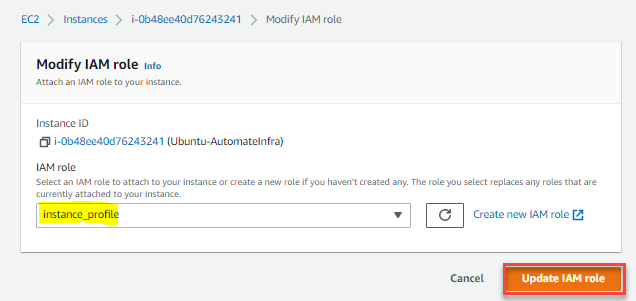
Select instance_profile from the IAM role drop-down box and click on Update IAM role.
Testing the Terraform IAM Role Access with AWS S3
In the previous two sections, you created the IAM role and IAM policy using Terraform and later verified them in the Amazon Management console. In this section, you will test the Terraform IAM role permissions.
Specifically, you’ll test the Terraform IAM role permission to access the AWS S3 bucket objects. Assuming you are still logged into your Ubuntu machine, follow these steps.
1. First, on the terminal, run the aws s3 ls command. By running this command, you will see the list of all the buckets. But if you specify the bucket name in the aws s3 ls command, you’ll only list the specified bucket’s content in your AWS account.
Here, the –recursive means the command will also list all the objects of subdirectories and –human-readable.
# Listing all the tickets in the AWS account
aws ls
# Listing all the objects of the bucket (my-s3-test-bucket-for-iam) in the AWS account
aws s3 ls s3://my-s3-test-bucket-for-iam --recursive --human-readable

2. After listing bucket objects (my-s3-test-bucket-for-iam), run the below command to copy the contents to your Ubuntu computer.
# Copying all the objects of the bucket (my-s3-test-bucket-for-iam) in the tmp directory
aws s3 cp s3://my-s3-test-bucket-for-iam/ATA.txt.txt /tmp
As you can see below, the IAM role attached to the Ubuntu machine can now perform actions on the AWS S3 service, such as copying objects to the Ubuntu machine. Best of all, you did not have to re-authenticate manually with credentials.

Testing the Terraform IAM Role Access with AWS RDS Database
Earlier in the previous section, you learned how to retrieve the objects of the AWS S3 bucket; this time, quickly dive in and know how you can read all the properties of the AWS RDS database using the IAM role attached to the Ubuntu machine.
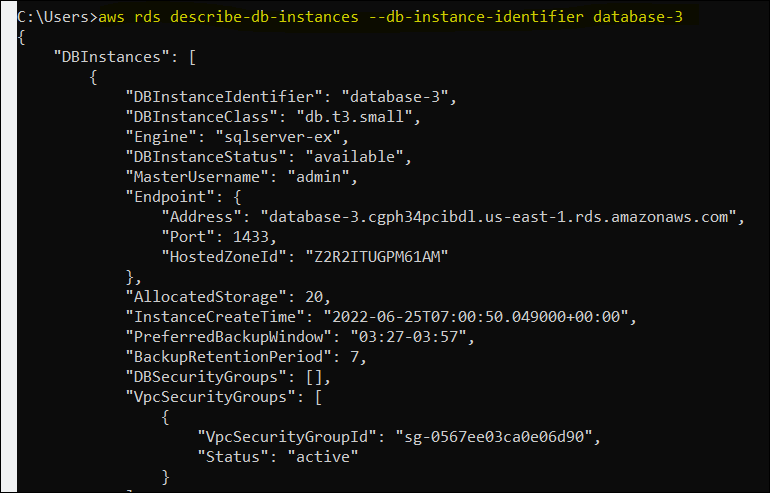
Assuming you are still logged into the Ubuntu machine, run the below aws rds describe command to describe the database instance. In the below example, the database name is database-3.
aws rds describe-db-instances --db-instance-identifier database-3
After you execute the command, you will see all the details of database-3 in the terminal output.
Conclusion
This tutorial taught you how to set up AWS IAM roles and policies using the Terraform cloud tool. You also learned to test the IAM role in examples, such as listing an AWS RDS database instance information and copying AWS S3 objects to the Ubuntu machine.
You now have a fully functional Terraform IAM role in your AWS account. What do you plan to secure in the AWS cloud using this IAM role and Policy?


