

As the name suggests, the Start-Transcript cmdlet creates a text transcript of a PowerShell session. This cmdlet comes in handy when you want to review or share the content of a previous session. You can also use this cmdlet to troubleshoot issues by sending the transcript to someone who can help.
In this tutorial, you will learn how to use PowerShell Start-Transcript. After going through this tutorial, you will know the different ways to start a transcript, how to stop a transcript, and how to view a transcript.
Ready to take your script-writing skills to the next level? Read on to get started!
Prerequisites
This tutorial will be a hands-on demonstration. If you’d like to follow along, be sure you have a computer with Windows PowerShell 5.1 or PowerShell 7+ on any supported platforms. This tutorial will use a Windows 10 PC with PowerShell 7.2.5.
Starting and Stopping a Transcript
You can run the Start-Transcript cmdlet without any parameters to start a transcript. This cmdlet starts a transcript of the current session and will save it in your user’s document directory with a timestamped name.
This cmdlet automatically generates a random name with random characters for the transcript file. This behavior avoids overwriting existing files and ensures that if you start multiple transcripts, each one will have a unique name.
1. First, open PowerShell as admin.
The Start-Transcript and Stop-Transcript cmdlets must run in an elevated PowerShell prompt for the transcript to include all of the commands executed during the session.
2. To start a transcript, run the following command.
Start-TranscriptYou will see an output similar to the following. The transcript file’s anatomy consists of the pattern below.
<%userprofile%\Documents>\PowerShell_transcript.<hostname>.<random string>.<timestamp>.txt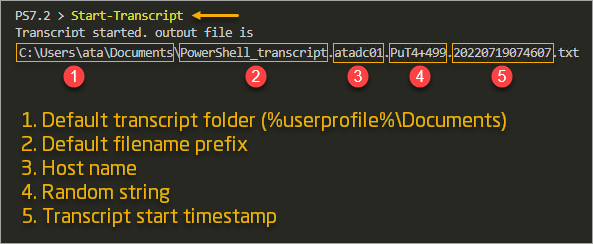
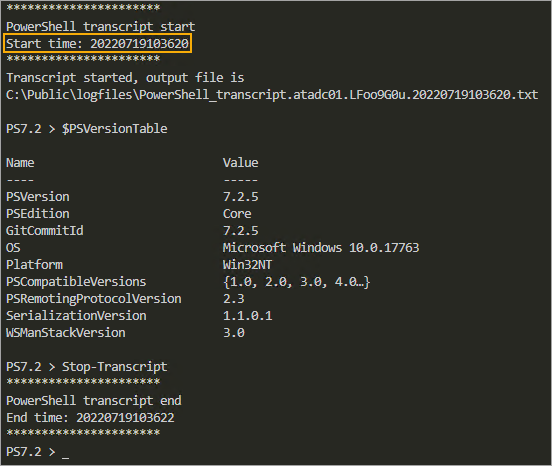
3. Run the command $PSVersionTable so that your PowerShell transcript has some content.
$PSVersionTable4. Stop the transcript by running the following command after you run your script or whatever you want to log. This cmdlet stops the current transcript and saves the file.
Stop-Transcript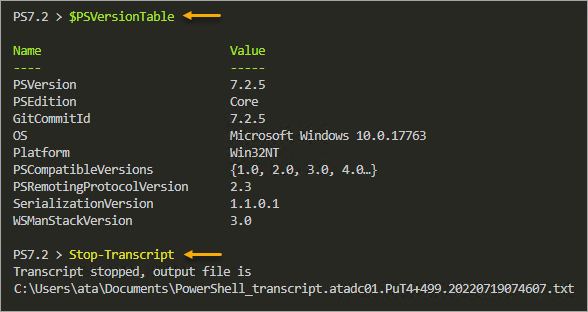
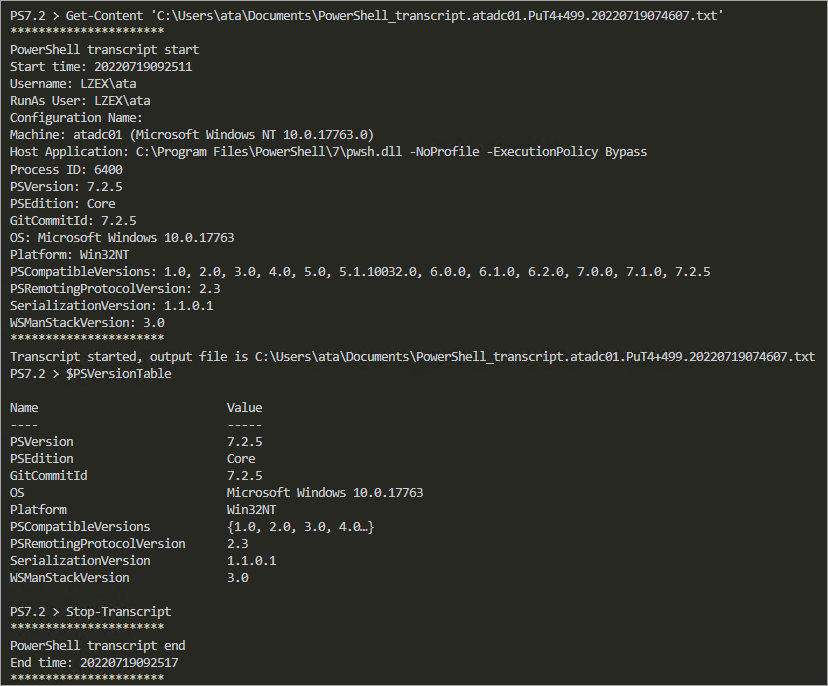
5. View the PowerShell transcript by opening it in a text editor or running the Get-Content cmdlet, as shown below.
Get-Content -Path '<%userprofile%\Documents>\PowerShell_transcript.<hostname>.<random string>.<timestamp>.txt'You will see an output similar to the one below. As you can see, the Start-Transcript cmdlet saves everything from the console to the transcript file, including the command you ran, the output, and even the errors.
This behavior can be useful when you want to share your session transcript with others, like vendor support, for troubleshooting purposes.
The Start-Transcript and Stop-Transcript cmdlets must be run in the same session for the transcript to be complete. If you start a transcript in one PowerShell session, try to view it in another PowerShell session; the commands you run will not appear in the transcript.
Specifying a Transcript Path
Now that you know how to start and stop a PowerShell transcript, you can look at some of the parameters you can use with this cmdlet.
What if you don’t want to save the transcript in your user’s document directory? Do you want to save it in a location other than the default?
Luckily, the Start-Transcript cmdlet has a Path parameter that allows you to specify a custom path for the transcript.
Why would you want to do this? There are a few reasons.
- You might want to save the transcript in a shared location so others can view it.
- You might want to save it in a location monitored by some other process like Azure Monitor Logs and Analytics.
Whatever the reason, the Start-Transcript cmdlet has you covered.
Output to a Custom Directory and Filename
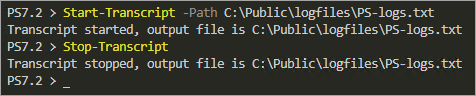
Run the following command to specify a custom path for the PowerShell transcript. As you can see, you are saving the transcript in the C:\Public folder. You can change this path to any valid path on your system.
Start-Transcript -Path C:\\Public\\logfiles\\PS-logs.txt
Stop-Transcript
If the directory does not exist, Start-Transcript will create the directory in your specific path.
Note that you must specify the full path, including the file name and extension. If you don’t specify a file name, Start-Transcript can not create the transcript file, and you will get an error, as shown below.

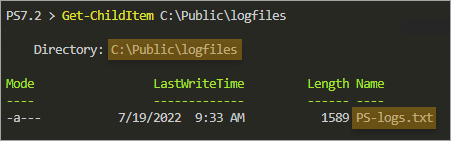
Now, confirm the transcript file exists in your specified location.
Get-ChildItem C:\\Public\\logfiles
You should see the transcript file in the result, as shown below.
Output to a Custom Directory with the Default Filename
Another way to output Start-Transcript is to specify the -OutputDirectory parameter followed by the custom directory path. This parameter allows you to set the path where you want to save the transcript file without specifying the file name.
As is, this parameter generates a random file name for the transcript in the path you specify. You might want to use this parameter if you are running multiple PowerShell transcripts and don’t want to specify every file name.
- To use this parameter, run the following command.
Start-Transcript -OutputDirectory C:\\Public\\logfiles\\
Stop-Transcript
As you can see below, PowerShell generates a random file name for the transcript and saves it in your specified path.

Removing Starting Header
By default, the Start-Transcript cmdlet includes header information in the output file. This information is rarely helpful, which is why you have the option to exclude the header.
For example, if you are going to share the transcript with someone for troubleshooting purposes, all they need to know is what PowerShell commands ran and the output.
When the additional information in the header is unnecessary, you can exclude it with the -UseMinimalHeader parameter of Start-Transcript.
Run the following commands to include a minimal header in your PowerShell transcript.
Start-Transcript -OutputDirectory C:\\Public\\logfiles\\ -UseMinimalHeader
$PSVersionTable
Stop-Transcript

Now, view the transcript file, and you will see that the header is much shorter. As you can see in the screenshot below, the header only includes the start times of the PowerShell transcript.
Get-Content C:\\Public\\logfiles\\PowerShell_transcript.atadc01.LFoo9G0u.20220719103620.txt
Preventing Overwriting Transcript Files
If you are running multiple PowerShell transcripts, you might want to prevent one from overwriting another.
For example, run the commands below to create a transcript file named C:\Public\logfiles\PS-log.txt.
Start-Transcript -Path C:\\Public\\logfiles\\PS-log.txt -UseMinimalHeader
Stop-Transcript
PowerShell will overwrite the PS-log.txt file without warning if you run the same command. This behavior would be a disaster, and you would have wasted time running the original transcript.
To prevent overwriting an existing transcript, specify the -NoClobber parameter of Start-Transcript. This parameter will cause PowerShell to generate an error if the transcript file already exists.
Start-Transcript -Path C:\\Public\\logfiles\\PS-log.txt -NoClobber
PowerShell will generate the below error if the PS-log.txt file exists in the path.

Appending to an Existing Transcript File
Instead of creating new transcript files, there are instances where you’d rather append new transcripts to existing transcript files.
For example, suppose you have a transcript file that contains the output of all of the users in your Active Directory domain. Later, you could run Start-Transcript with the -Append switch to append the new transcript to the same file while you add a new user to the Active Directory.
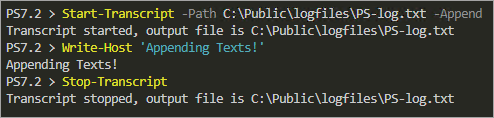
Run the below command to append new transcripts to the C:\Public\logfiles\PS-log.txt file.
Start-Transcript -Path C:\\Public\\logfiles\\PS-log.txt -Append -UseMinimalHeader
Write-Host 'Appending Texts!'
Stop-Transcript
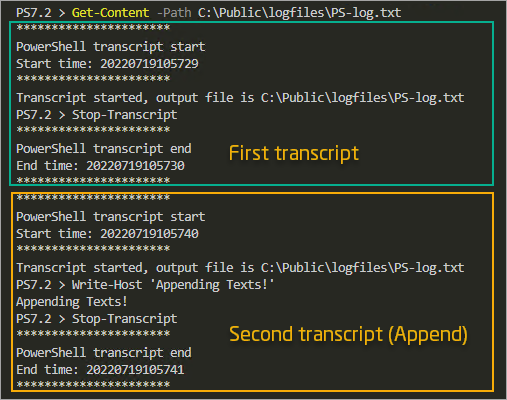
Verify that the command appended the transcript by running the Get-Content cmdlet.
Get-Content -Path C:\\Public\\logfiles\\PS-log.txt
Conclusion
In this article, you learned how to use the PowerShell Start-Transcript cmdlet to create transcripts of your PowerShell sessions.
You also learned how to customize those transcripts using some available parameters. Transcripts can be extremely useful for documenting what you have done in PowerShell and for sharing with others for troubleshooting purposes.
Now that you know how to use PowerShell Start-Transcript, start creating transcripts of your PowerShell sessions. Don’t forget to invoke the -NoClobber parameter, so you don’t accidentally overwrite an existing transcript file. Lastly, always ensure to stop your transcripts and don’t leave them running indefinitely!


