

When you hear SharePoint, you probably picture the website in your head. Whether as a user or admin, the web GUI is not the only way to interact with SharePoint—especially for automation or bulk transactions. What’s the other way? PowerShell! Specifically, interacting with SharePoint using PnP PowerShell module.
Not a reader? Watch this related video tutorial!Another great thing about the PnP PowerShell module is that it works cross-platform, so long as there’s PowerShell 7+.
So stay tuned and learn to leverage the PnP PowerShell module to perform common tasks in SharePoint Online. Using a real-world use case to get you started, you’ll also learn by example.
Prerequisites
This tutorial will be a hands-on demonstration. If you’d like to follow along, be sure you have the following.
- A Windows, macOS, or Linux computer – This tutorial uses a Windows 10 computer with PowerShell 7.2.3.
- You must have Global administrator (GA) access to your Microsoft 365 tenant. If you’re not a GA, you’ll need another GA’s help in providing the PnP PowerShell app consent in Azure AD.
- You must know your tenant’s directory ID and SharePoint Online portal, root, or admin URL. This tutorial uses the following SharePoint Online URLs.
| Portal/Root URL | https://lzex.sharepoint.com/ |
| Admin URL | https://lzex-admin.sharepoint.com/ |
- A code editor such as Visual Studio Code (VSCode).
Installing the SharePoint PnP PowerShell Module
What enables users and admins to interact with SharePoint Online via PowerShell is the PnP PowerShell module. The developers made this module available to install from PowerShell Gallery.
Open a PowerShell window and run the below Install-Module command to install the PnP PowerShell module (PnP.PowerShell).
Install-Module -Name "PnP.PowerShell"
Now, run the following Get-Module command to confirm the installation by displaying the PnP PowerShell module information.
Get-Module "PnP.PowerShell" -ListAvailable
As you can see below, the latest version as of this writing is 1.10.0.

Connecting to SharePoint PnP PowerShell (Interactive)
Since installing the PnP PowerShell module doesn’t connect you to SharePoint online automatically. But no worries, the cmdlet that lets you connect PowerShell to SharePoint Online is Connect-PnPOnline. This cmdlet gives you options on how to authenticate – interactive and non-interactive.
In interactive authentication, you have to input the credentials during authentication. You will typically use this method if you’re only running ad-hoc or manual tasks.
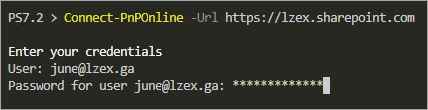
Connecting via Credential Prompt
If you’re looking for a quick way to connect to SharePoint PnP PowerShell, you can do so via credential prompt.
Run the below command to connect to PnP PowerShell using a credential prompt. This interactive method does not support MFA.
Connect-PnPOnline -Url https://<tenant_name>.sharepoint.com
Connecting via Web Browser Login
Another interactive authentication method is, appending either the -DeviceLogin or -Interactive switch. Both these switches allow you to log in with MFA-enabled accounts.
The -DeviceLogin switch generates a code you must enter into a web page to complete the OAuth device code flow. This authentication method is applicable when you’re using a client that does not have a web browser allowing you to continue the authentication on another machine device.
The -Interactive switch automatically launches a web browser where you must log in with your credentials.
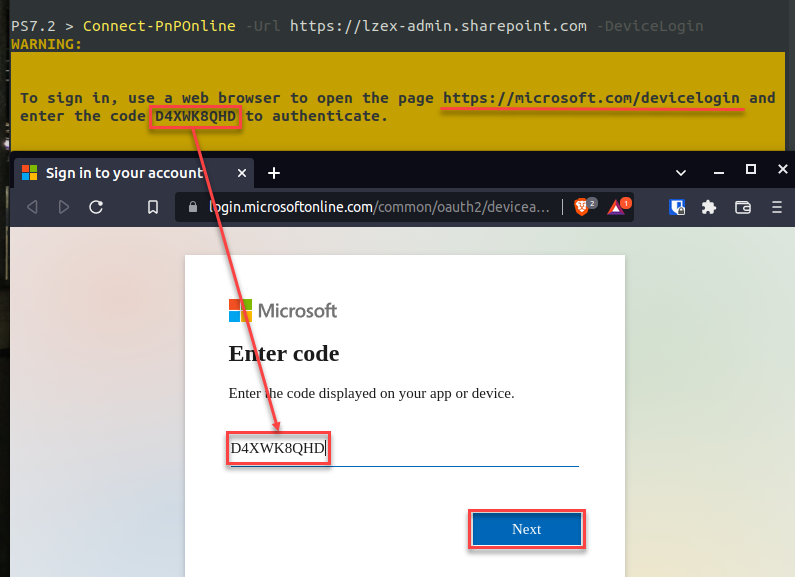
1. Run either of the below commands in PowerShell to begin interactive web browser authentication. Make sure to replace the URL with your tenant’s SharePoint URL.
# Generate a code to complete the OAuth device code flow.
Connect-PnPOnline -Url https://<tenant_name>.sharepoint.com -DeviceLogin
# Launches a web browser to log in with your credentials
Connect-PnPOnline -Url https://<tenant_name>.sharepoint.com -Interactive
2. If you executed the command with the -DeviceLogin switch, you’d see a result similar to the screenshot below. Make sure to note the generated code.
Launch your browser and open the https://microsoft.com/devicelogin URL. Paste the generated code into the browser, and click Next.
After submitting the code, your browser redirects to the Microsoft login page (step three).
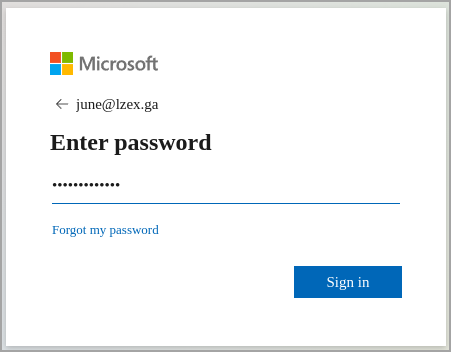
If you executed the -Interactive switch instead, PnP PowerShell automatically opens a new web browser and sends you straight to the Microsoft login page.
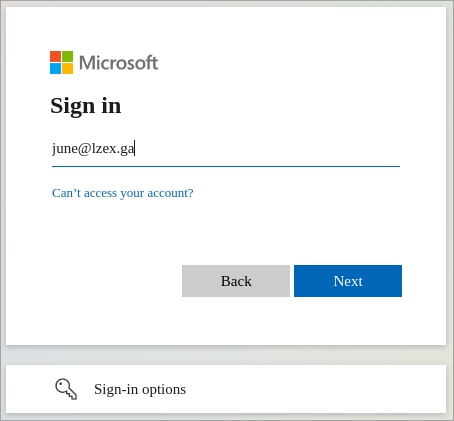
3. Now, log in to your Microsoft 365 account as you usually would. Complete the MFA challenge if your account requires it.
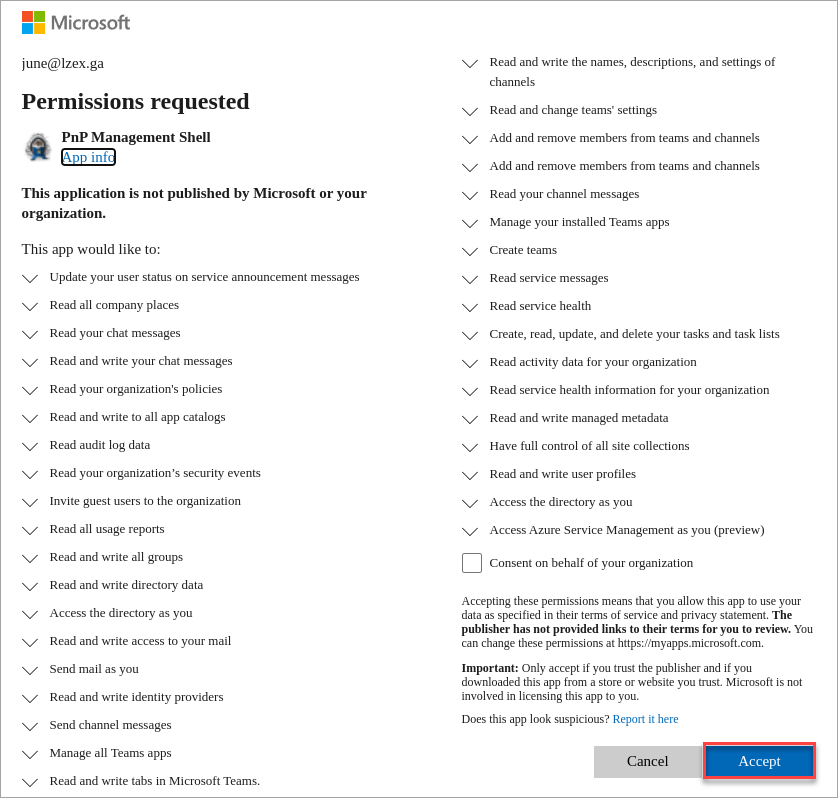
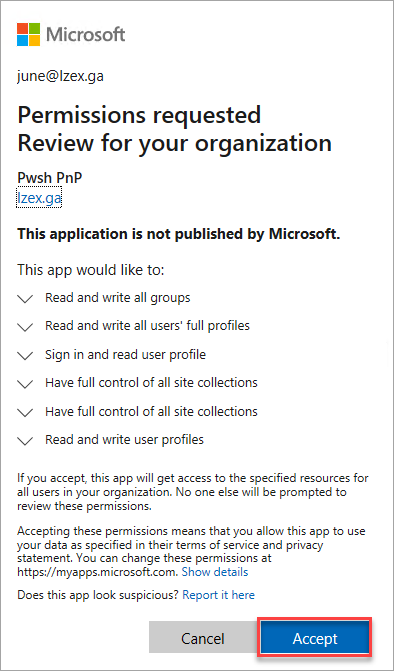
4. While on the Permissions requested page, click Accept (bottom-right) to continue.
You’ll see the below permissions list the first time you connect with PnP PowerShell.
The Consent on behalf of your organization box only appears if your account is a global administrator. Do not tick this box so that other users may still get the same prompt and accept the permissions requests themselves.
Once you’ve completed the authentication flow, you’ll see the below message in your browser confirming the authentication was successful.

Connecting to SharePoint PnP PowerShell (Non-Interactive)
The interactive mode is good enough to connect to SharePoint PnP PowerShell. But the non-interactive method is appropriate in automation scenarios where manually providing the credentials is impossible, such as in scripts and applications. This method leverages a registered Azure AD app with explicit permissions (default or custom) for OAuth authentication.
Registering Your PnP PowerShell App
Using a Microsoft 365 account without MFA is dangerous, especially if the account has admin privileges. On the other hand, you cannot use an MFA-enabled account for automation.
The solution is to register an Azure AD app with explicit permissions. The app must also include certificate-based authentication to make the application more secure.
To register the Azure AD app for PnP PowerShell if you’re on Windows:
Run the below code in PowerShell to create a new app registration in Azure AD.
Note that his app registration method works only on Windows systems. The Register-PnPAzureADApp cmdlet generates a CNG certificate, which isn’t supported on non-Windows computers. In which case, jump to step two.
Adding a certificate password is optional but recommended to protect the certificate. If you prefer not to have a certificate password, remove the CertificatePassword parameter.
<# What will this code do?
- Launch a browser window, and open the `Interactive` log-in page.
- Generate a certificate with the password `mycertpassword` and valid for one (1) year.
- Save the certificate files (*.cer, *.pfx) to `C:\\PnP\\certificates`.
- Register a new app with the name `Pwsh PnP`.
- Upload the certificate (*.cer) to the Azure app registration and assign the following default permissions: `Sites.FullControl.All`, `Group.ReadWrite.All`, `User.Read.All`.
- Store the app registration results to the `$pnpApp` variable.
#>
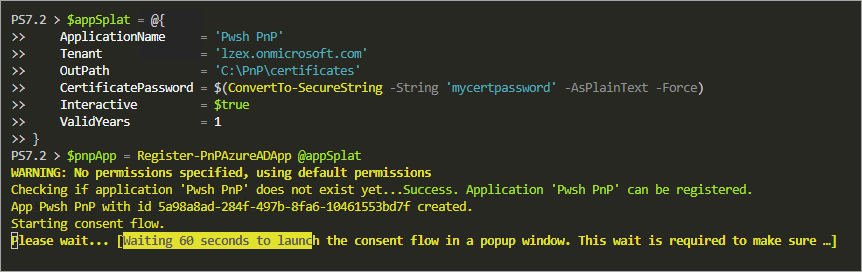
$appSplat = @{
ApplicationName = 'Pwsh PnP'
Tenant = 'lzex.onmicrosoft.com'
OutPath = 'C:\\PnP\\certificates'
CertificatePassword = $(ConvertTo-SecureString -String 'mycertpassword' -AsPlainText -Force)
Interactive = $true
ValidYears = 1
}
$pnpApp = Register-PnPAzureADApp @appSplat
But if you’re on Linux or macOS, follow these steps to create a new app registration in Azure AD:
1. First, run the below openssl command in PowerShell or Bash to generate a self-signed certificate.
This command creates a new certificate with the subject Pwsh PnP and is valid for 365 days. The final certificate filename will be pnp_certificate.pfx.
Disclaimer: This intricacy of the openssl command is beyond the scope of this tutorial. The example below does not claim to represent the best practice in creating self-signed certificates and is only provided for demonstration purposes.
# Create a new directory to store your certificate
mkdir ~/certs && cd ~/certs
# Generate the certificate (valid for 365 days)
openssl req -newkey rsa:2048 -nodes -keyout key.pem -x509 -days 365 -out pnp_certificate.pem -subj '/CN=Pwsh PnP'
# Convert the certificate to a PKCS12 format with .PFX extension
openssl pkcs12 -inkey key.pem -in pnp_certificate.pem -export -out pnp_certificate.pfx -passout pass:mycertpassword
2. Next, run the below code in PowerShell to register the new app.
<# What will this code do?
- Launch a browser instance for the `Interactive` login.
- Register a new Azure AD app named `Pwsh PnP` to the `lzex.onmicrosoft.com` tenant.
- Upload the existing `pnp_certificate.pfx` certificate to the Azure AD app registration.
- Assign the following default permissions: `Sites.FullControl.All`, `Group.ReadWrite.All`, `User.Read.All`.
- Store the app registration results to the `$pnpApp` variable.
#>
$appSplat = @{
    CertificatePath = "pnp_certificate.pfx"
    CertificatePassword = $(ConvertTo-SecureString -String 'mycertpassword' -AsPlainText -Force)
    ApplicationName = 'Pwsh PnP'
    Tenant          = 'lzex.onmicrosoft.com'
    Interactive     = $true
}
$pnpApp = Register-PnPAzureADApp @appSplat
3. On the pop-up window, log in with your credentials. This login instance is specifically for registering the application.
The command will wait 60 seconds before starting the consent flow, as shown below. Once started, the Microsoft login window shows up (step four).
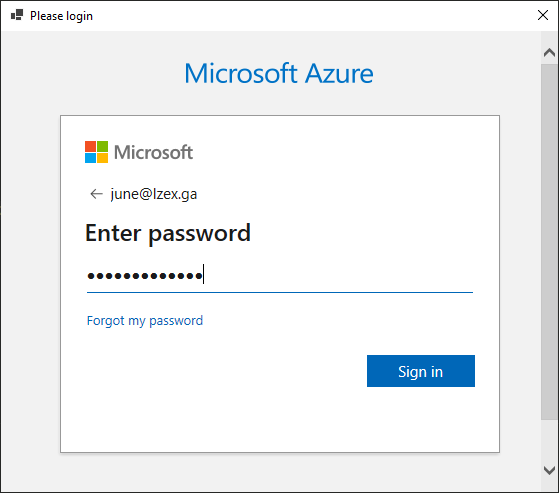
4. Now, log in with your global admin account and click Accept to give the app permissions. This login instance is specifically for granting consent to the app’s permissions.
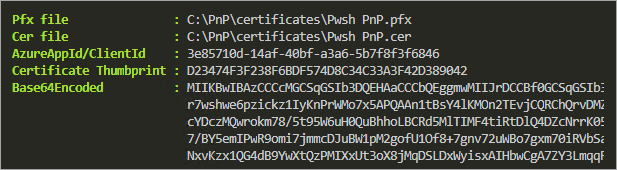
5. Lastly, run the below command to inspect the new app details by displaying the variable on the screen.
$pnpAppThe result shows you the certificate file (Pfx file) locations, the app’s client Id (AzureAppId/ClientId), the Certificate Thumbprint, and the Base 64 encoded value of the certificate (Base64Encoded).
Connecting to PnP PowerShell Using the Registered App and Certificate
You’ve registered the app and now have the details you need to connect to PnP PowerShell. You can now use either the PFX file or the base64-encoded certificate to connect to PnP PowerShell.
To connect using the PFX certificate file, run the below command making sure to replace the values with your own.
Connect-PnPOnline `
    -Url <https://lzex.sharepoint.com> `
    -Tenant lzex.onmicrosoft.com `
    -ClientId $pnpApp.'AzureAppId/ClientId' `
    -CertificatePath $pnpApp.'Pfx File' `
    -CertificatePassword $(ConvertTo-SecureString -String 'mycertpassword' -AsPlainText -Force)
To connect using the Base64 Encoded certificate string, run the below command instead. As you can see, you only need to replace the -CertificatePath parameter with the -CertificateBase64Encoded parameter.
Connect-PnPOnline `
    -Url <https://lzex.sharepoint.com> `
    -Tenant lzex.onmicrosoft.com `
    -ClientId $pnpApp.'AzureAppId/ClientId' `
    -CertificateBase64Encoded $pnpApp.Base64Encoded `
    -CertificatePassword $(ConvertTo-SecureString -String 'mycertpassword' -AsPlainText -Force)
Storing Credentials Securely
Hard-coding or passing credentials in plain text is not the best practice. One way to securely store and retrieve credentials in PowerShell is by using the Secret Management Module.
1. First, run the following command to install the required modules, namely Microsoft.PowerShell.SecretManagement and Microsoft.PowerShell.SecretStore.
Install-Module -Name Microsoft.PowerShell.SecretManagement, Microsoft.PowerShell.SecretStore2. Next, run the below Register-SecretVault command to create a new secret vault. Change the vault’s name (MySecretVault) as you wish.
Register-SecretVault -Name 'MySecretVault' -ModuleName "Microsoft.PowerShell.SecretStore"3. After creating a secret vault, run the Set-SecretStoreConfiguration command below to ensure the secret vault does not require a password for access.
Doing so allows you to retrieve the credentials using unattended scripts for automation. Don’t worry; only the user who created the vault (you) can access it.
Set-SecretStoreConfiguration -Authentication None -Confirm:$false4. Now, run each command below to add your PnP PowerShell application credentials to the vault. In this example, the only secret is the certificate password ($pnpCertificatePassword). All other values are non-secured metadata information.
# Convert the password to a secured string
$pnpCertificatePassword = $(ConvertTo-SecureString -String 'mycertpassword' -AsPlainText -Force)
# Add non-secret values as metadata
$pnpSecretMetaData = @{
ClientId = $pnpApp.'AzureAppId/ClientId'
CertificateBase64Encoded = $pnpApp.Base64Encoded
CertificatePath = $pnpApp.'Pfx file'
}
# Add the new secret to the vault
Set-Secret `
-Name 'Pwsh PnP' `
-SecureStringSecret $pnpCertificatePassword `
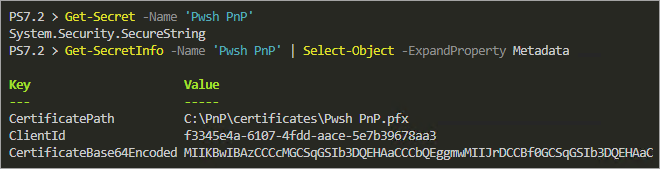
-Metadata $pnpSecretMetaData5. Next, execute the below commands (Get-Secret and Get-SecretInfo) to confirm that you can access the new secret and metadata from the vault.
Get-Secret -Name 'Pwsh PnP'
Get-SecretInfo -Name 'Pwsh PnP' | Select-Object -ExpandProperty Metadata
You’ll get a similar output to the screenshot below. As you can see, the secret returns as System.Security.SecureString object, while the metadata returns as a hashtable.
6. Finally, run the following commands to connect to PnP PowerShell.
$certificatePassword = Get-Secret -Name 'Pwsh PnP'
$metaData = Get-SecretInfo -Name 'Pwsh PnP' | Select-Object -ExpandProperty Metadata

Connect-PnPOnline `
    -Url https://lzex.sharepoint.com `
    -Tenant lzex.onmicrosoft.com `
    -ClientId $metaData['ClientId'] `
    -CertificateBase64Encoded $metaData['CertificateBase64Encoded'] `
    -CertificatePassword $certificatePassword

Get-PnpTenantInstance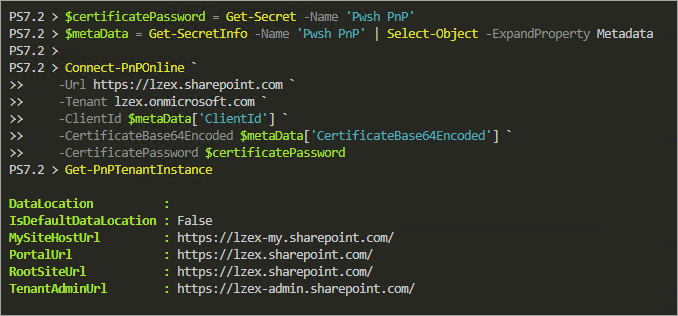
Creating a New SharePoint Online Site
Now that you’ve settled on the authentication method and credential management, it’s time to explore how to use SharePoint PnP PowerShell in a real-world use case.
In the succeeding example, you’ll be creating a new SharePoint site and document library where you’ll be uploading files. You’ll also set up the library notifications and perform housekeeping of old items.
Run the following command in PowerShell to create a new site.
# Create the new SPO site
## -Type = The type of site collection to create. Valid values are:
##  CommunicationSite, TeamSite, TeamSiteWithoutMicrosoft365Group
## -Title = The new site collection title.
## -Url = The new site collection URL.
## -Owner = The new site collection owner. Make sure that this user account exists.
New-PnPSite `
    -Type TeamSiteWithoutMicrosoft365Group `
    -Title 'LogsRepo' `
    -URL '<https://lzex.sharepoint.com/sites/LogsRepo>' `
    -Owner '[email protected]'
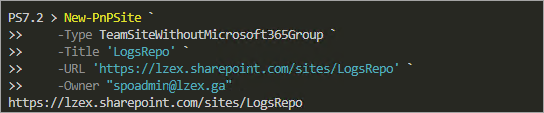
If a deleted site exists with the same URL, the new site creation fails. To fix the error, specify a different URL or permanently delete the deleted site first.
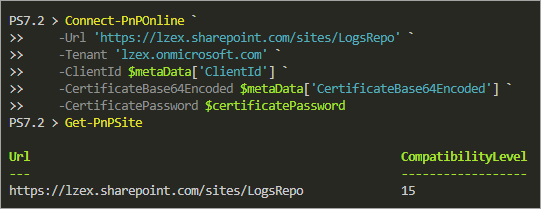
Now, run the below commands to connect to the new site.
# Connect to the new site
Connect-PnPOnline `
    -Url '<https://lzex.sharepoint.com/sites/LogsRepo>' `
    -Tenant 'lzex.onmicrosoft.com' `
    -ClientId $metaData['ClientId'] `
    -CertificateBase64Encoded $metaData['CertificateBase64Encoded'] `
    -CertificatePassword $certificatePassword

# Get the current site details
Get-PnPSite
Adding Site Permissions
New SharePoint sites have three default SharePoint groups with different permissions, namely <SiteName> Owners, <SiteName> Members, and <SiteName> Visitors. Instead of adding users directly to the site itself, you’d typically add members to these groups depending on the level of access you wish to assign.
1. Run the below Get-PnPSiteGroup command to get the names of the site groups and what roles they hold (Title,Roles) in a table (Format-Table).
Get-PnPSiteGroup | Format-Table Title,Roles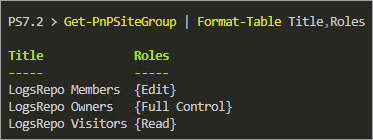
2. Next, run the Add-PnPGroupMember, in the below format to add the members (if any) to the groups. The below example adds one user to each site group.
# Add the site group members
Add-PnPGroupMember -Group "LogsRepo Owners" -LoginName "[email protected]"
Add-PnPGroupMember -Group "LogsRepo Visitors" -LoginName "[email protected]"
Add-PnPGroupMember -Group "LogsRepo Members" -LoginName "[email protected]"
3. Finally, run the following command to confirm the group members you added to the site in step two.
Get-PnPSiteGroup | Format-List Title,Users,Roles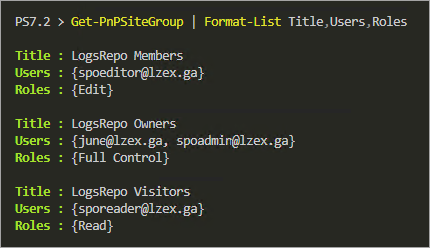
Creating a New Document Library
Now that you have an empty site, it’s time to create a new document library where you’ll be uploading files later.
Run the below command to create a new document library. Replace the library name (Logs) as you like.
# -Template DocumentLibrary = Create a new document library. Refer to the [New-PnPList#template](<https://pnp.github.io/powershell/cmdlets/New-PnPList.html#-template>) for the list of available templates.
# -Title = The new library name.
# -OnQuickLaunch = Add the library link to the quick launch.
New-PnPList -Template DocumentLibrary -Title Logs -OnQuickLaunch
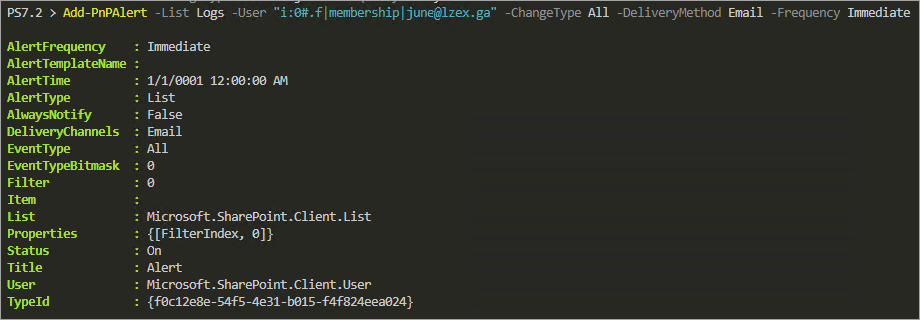
Optionally, run the below command to specify which user(s) should receive notification regarding the document library events.
Note that the SharePoint person type (user) ID always starts with i:0#.f|membership| before the username.
# -List = The name of the document library.
# -User = The notification user.
# -ChangeType = Which changes to monitor. Valid values are AddObject, ModifyObject, DeleteObject, Discussion, All.
# -DeliveryMethod = The notification delivery method. Valid values are Email and SMS.
# -Frequency = Specifies the interval for the notification. Value values are Immediate, Daily, Weekly.
## Note: Instead of -Frequency, you can use -Time to set specific/custom schedules for the notifications.
Add-PnPAlert `
    -List Logs `
    -User "i:0#.f|membership|[email protected]" `
    -ChangeType All `
    -DeliveryMethod Email `
    -Frequency Immediate
Uploading Files to the Document Library
You’ve just created your document library (Logs), and it is empty right now. If you don’t have any files yet for uploading, don’t worry, you’ll create the sample files for testing.
1. First, run the below command to create a directory that will hold your sample dummy files. This command creates a temp sub-folder on the current directory (./temp).
New-Item -ItemType Directory -Path ./temp -Force2. Next, run the below code to create your sample data files and upload them to your document library (Logs).
# Create dummy files and upload to the SharePoint library.
# Each file will be dated with 1 day increment to simulate files with different age.
# Modify $sampleSize value to increase or decrease the number of files to create.
$sampleSize = 30
for ($i = 0; $i -lt $sampleSize; $i++) {
    $dummyFile = "./temp/Log$('{0:d2}' -f ($sampleSize - $i)).log"
    $fileDate = $(Get-Date).AddDays(-$i)
    Get-Random | Out-File $dummyFile -Force

    ## -Path = The file to upload.
    ## -Folder = The Document Library name.
    ## -Values = Hashtable of additional values. This example sets the Created and Modified date properties of the uploaded file.
    Add-PnPFile -Path $dummyFile -Folder Logs -Values @{Created = $fileDate; Modified = $fileDate }
}

# Delete the uploaded files from the local directory.
Remove-Item ./temp/*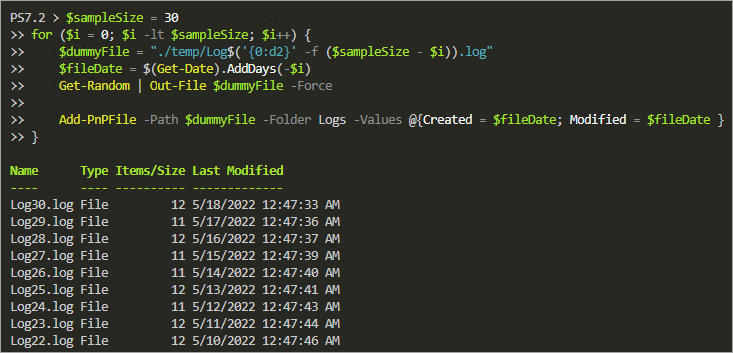
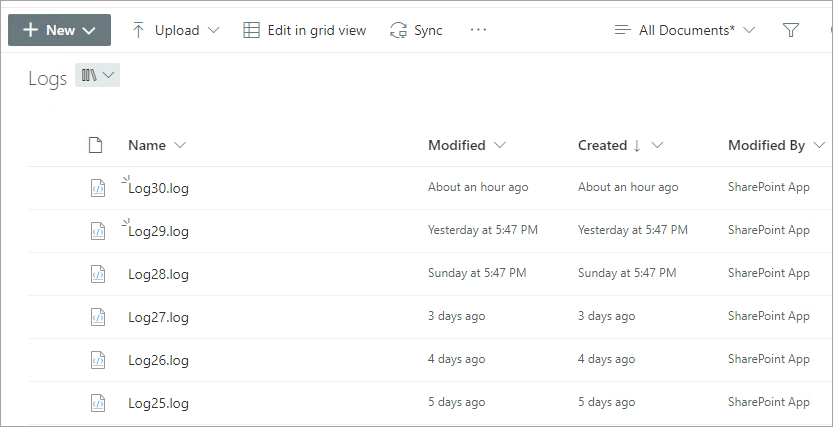
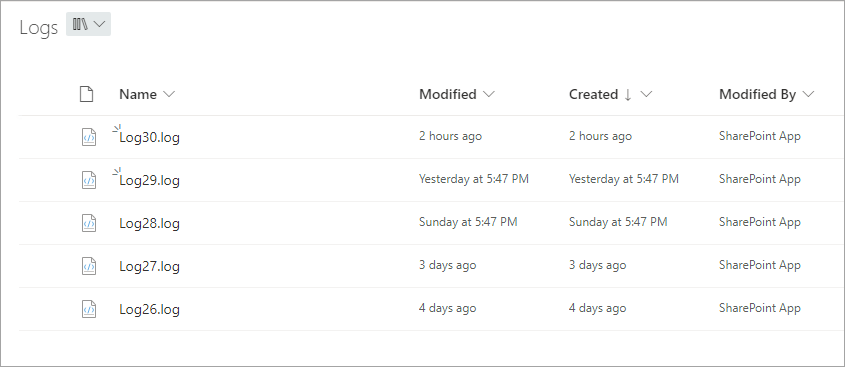
3. Lastly, open your web browser, access the SharePoint site URL, and navigate the Logs document library. You’ll see the uploaded files, like in the screenshot below, confirming your successful upload.
Alternatively, run the below Find-PnPFile command to list the files matching the *.log extension on the document library.
Find-PnPFile -Match *.log -List Log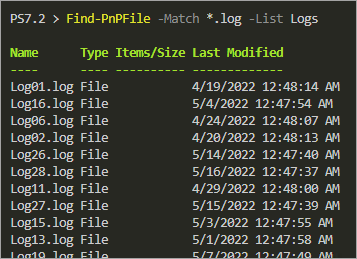
Deleting Old Files for Housekeeping
Keeping your document library organized and conserving storage, you must consider deleting files past their usable age — however long that may be.
For example, the log files you uploaded to the document library may only be relevant for five days. And every file that meets that age and older must be removed.
1. First, set the age of the files in days to keep. The below example sets the file age threshold to five days in the $fileAgeToKeepDays variable.
$fileAgeToKeepDays = 52. Next, run the below command to get all the files matching the *.log extension and filter the result to return only those older than five days.
$pnpFiles = (Find-PnPFile -Match *.log -List Logs).GetEnumerator() | `
Where-Object { $_.TimeCreated -lt $((Get-Date).AddDays(-$fileAgeToKeepDays)) }
3. After getting the files, run the following command to inspect the results and ensure that only files older than five days are in the $pnpFiles variable.
$pnpFiles | Sort-Object TimeCreated -Descending |
Format-Table Name,ServerRelativeUrl,TimeCreated
As you can see below, assuming that today is May 18th, the latest file in the collection is May 13th.

4. Now, run the below command after getting all files subject to deletion. This command doesn’t provide output but deletes each file collected in the $pnpFiles variable.
$pnpFiles |
ForEach-Object { Remove-PnPFile -ServerRelativeUrl $_.ServerRelativeUrl -Force }
5. Finally, run the following command to confirm that only newer files exist in the document library.
Find-PnPFile -Match *.log -List Logs | `
    Sort-Object TimeCreated -Descending | `
    Format-Table Name, TimeCreated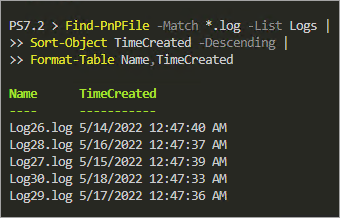
Alternatively, navigate to your document library (Logs) and see verify the remaining files.
Conclusion
You’ve reached the end of this tutorial, but your journey to PnP PowerShell does not end here. You learned different authentication methods, and you registered and authorized an Azure AD app with specific permissions for PnP PowerShell. At the same time, you also ran various cmdlets to interact with SharePoint Online.
In this tutorial, the techniques you learned cover PnP PowerShell basics and demonstrated the module using a real-world application. The examples you saw could be a starting point to creating scripts integrating with the PnP PowerShell cmdlets. Good luck!


