


Are you working with collections of data in your application? If you find yourself using arrays or linked lists to store data, you’ll need to use a Redis list.
In this tutorial, you’ll learn how to use Redis lists to build sophisticated applications.
Ready? Read on and never use an array the same way again!
Prerequisites
This tutorial will be a hands-on demonstration. If you’d like to follow along, be sure you have the following.
- A Linux machine – This tutorial uses Ubuntu 20.04.
- Redis installed and running on your machine.
Creating an Inventory Management Redis List
There are many ways to use Redis lists, but this tutorial covers examples you can use for real-world applications. You’ll create a list that can be used to manage your inventory.
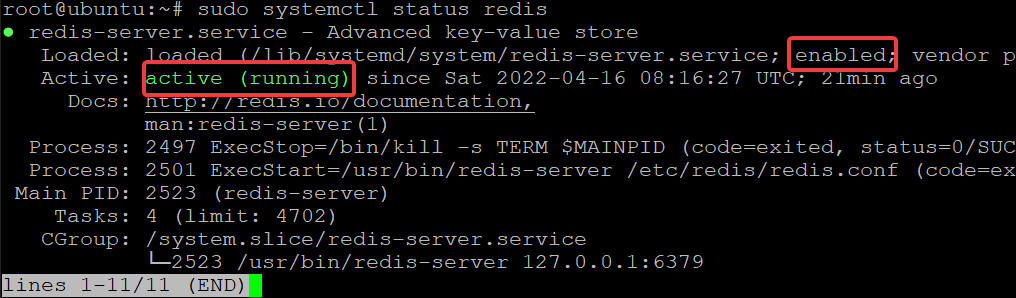
1. SSH to your server, open the terminal and run the following command to check the status of the Redis service.
sudo systemctl status redisYou can see in the output below that the Redis service is active (running).
If the Redis service is not running, run the systemctl command below to start the Redis service. sudo systemctl start redis
2. Next, run the following command to open the Redis CLI. The Redis CLI is a command-line tool used to send commands to a Redis server and read responses from the server.
redis-cliAs shown below, the prompt changes once you’re in the Redis CLI, indicating you’re now working in the Redis environment.

3. Now, run the following RPUSH command to add an element named ata1 to the list named my_member.
This command inserts all specified items at the tail of the list (my_member). If the list (my_member) does not exist, Redis creates it as an empty list just before the append operation.
Redis List supports both left and right pushes, which means you can add elements to the list’s head or tail. This behavior is helpful when you want to implement a queue or a stack.
RPUSH my_member ata1You can see below that the command returned an integer value of 1, which indicates that one element was added to the list. This value is the length of the list after the push operation.

Perhaps you need to add multiple elements in one go. If so, run the same RPUSH command and specify the members’ names separated by single spaces, as shown below:
RPUSH my_member ata1 ata2 ata3 ata4Note that members are added one after another to the tail of the list from left to right.
As you can see below, five elements were added to the list (one existing and four new members).

4. Lastly, run the LPUSH command below to add elements to the head of a list (my_member2), from left to right. Like the RPUSH command, if the specified list doesn’t exist, that list is created as an empty list just before the push operation.
Each member will be added to the list in the following order:
ata4as the first element.
ata3as the second element.
ata2as the third element.
- ata1 as the fourth element.
LPUSH my_member2 ata1 ata2 ata3 ata4You can see in the output that four elements (4) were added to the list since you added four new members.

Appending Elements Only if the Specified List Exists
You’ve created a list and added a couple of elements. But what if the specified list doesn’t exist? You can use the RPUSHX command to append an element to the tail of a list, but only if the list exists.
The RPUSHX command is similar to the RPUSH command. The only difference is that no operation is performed when the specified list doesn’t exist. The RPUSHX command can be helpful to avoid wasting memory by creating lists that will never be used.
Run the following RPUSHX command to append elements to a non-existent list named my_list_nonexisted.
RPUSHX my_list_nonexisted ata1 ata2 ata3
You can see in the following output that no elements (0) were added to the list since the list doesn’t exist.

Now, run the following command to add multiple members to the head of a non-existent list named my_list_not_existed.
Like RPUSHX, the LPUSHX command adds elements to the head of a list only if the specified list exists. If the specified list doesn’t exist, no operation is performed.
LPUSHX my_list_not_existed ata1 ata2 ata3 ata4
You can see in the output below that no elements were added (0) to the list since the specified list (my_list_not_existed) doesn’t exist.

Retrieving Elements from the Redis List
Adding data to your Redis list is not the only thing you need to build an application. Undoubtedly, your application needs to retrieve elements from your Redis list.
To retrieve elements from your Redis list, you’ll run the LINDEX command. This command returns elements at specified indices in a list.
The zero-based index is used to specify the position of an element in a list. The 0 index represents the first element in the list, 1 represents the next element/second, and so on.
1. Run the following LINDEX commands to retrieve the first, second, and third elements from the my_member2 list.
LINDEX my_member2 0
LINDEX my_member2 1
LINDEX my_member2 2
Below, only three elements were retrieved from the list by the corresponding indices:
- The ata4 element is at the first index (0).
- The ata3 element is at the second index (1).
- The ata2 element is at the third index (2).
As you remember, you added these elements to the my_member2 list using the LPUSH command. This output confirms that the elements were added to the list as expected.

2. Next, run the following LRANGE command to retrieve the first five elements (0 5) from the my_member list instead of a single element only.
LRANGE my_member 0 5You can see in the output below that Redis retrieved all elements from the my_member list.

3. Finally, run the command below to retrieve only the last five members from the my_member2 list. Specify the start (-5) and stop (-1) positions for the range of elements you’re retrieving.
You use negative indexes to retrieve data from the end of the list as follows:
- The -1 index represents the last element in a list.
- The -2 index represents the penultimate element.
LRANGE my_member2 -5 -1
Removing Old Elements
Adding elements to your list consumes memory, especially if you still keep unused ones. Good thing Redis lets you remove old elements with the LREM command. Make room for new ones, and save memory.
The LREM command takes the list (key), the number of items (count) to remove, and the element value as arguments in the syntax below.
The count argument can take the following values:
- count = 0: removes all elements that match the element value from a list.
- count > 0: removes the number of elements that match the element value from the head of a list.
- count < 0: removes the number of elements that match the element value from the tail of the list.
LREM key count element
To see how the LREM command removes old elements from your lists:
1. Run the following LREM command to remove the ata1 element in the my_member list.
Since you added two ata1 elements in the previous examples, this command removes the first old ata1 element from the head of the list.
LREM my_member 1 "ata1"
2. Next, run the LRANGE command below to retrieve the first four elements (0 4) from the my_member list.
LRANGE my_member 0 4Below, you can confirm that the ata1 item was removed from the head of the my_member list.

3. Run the below command to remove all elements with values as ata1 from the my_member list.
LREM my_member 0 "ata1"
4. Lastly, rerun the LRANGE command to retrieve the first four elements (0 3) from the my_member list.
LRANGE my_member 0 3Below, you can confirm all elements with the ata1 value were removed from the my_member list.

Moving Elements from One List to Another
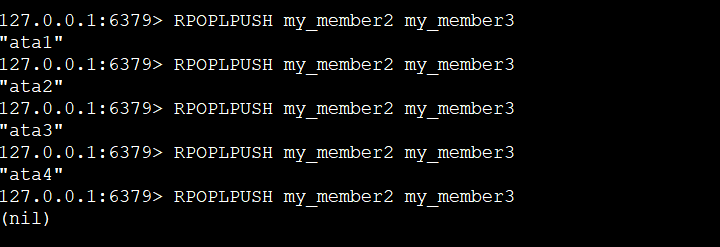
Suppose you migrated your website to a new hosting service, and you want to move all your users from the old list to the new one. If so, the Redis list is still up to the task with the RPOPLPUSH command. The RPOPLPUSH command lets you move elements from one list to another.
Run the following RPOPLPUSH command to move all elements from the my_member2 to my_member3 list.
RPOPLPUSH my_member2 my_member3
The RPOPLPUSH command moves one element at a time. So if you have like five elements in a list, you’ll run the same command five times, as shown below. And after moving all the elements, you’ll receive a (nil) output.
Running the same command to move elements one at a time can be tedious, especially if you’re moving tons of them. Of course, you might want to move all elements in one go by implementing a loop in your application code. Learning How To Manage Redis Sorted Set will also come in handy.
Now, run the following LRANGE command to retrieve all elements in the my_member3 list.
LRANGE my_member3 0 3
The output below confirms that all members are now in the destination list (my_member3).

Blocking Operations on a List
Blocking popup primitive (BLPOP) for lists is a Redis command that returns the first element in a list, if available. BLPOP also blocks the client for a specific time before executing any command.
Blocking commands, like BLPOP, are helpful in many situations. For instance, you may want to wait for a new job from a queue or for a new notification that arrives from some other system.
Note that blocking commands doesn’t block the server but just the connection calling the command.
When your application calls BLPOP, you provide one or more keys (i.e., list1, list2, and list3), as shown below.
Redis checks if any of the keys hold a non-empty list. If so, an element is popped from the head of this list. The element is then returned to your application together with the name of the key where it was taken.
BLPOP list1 list2 list3
To see how the BLPOP command works:
1. Run the following RPUSH command to insert some data into the list1.
RPUSH list1 ata1 ata2 ata3
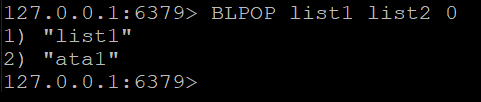
2. Now, run the BLPOP command below to block the client’s connection if at least one of the specified lists is not empty, and wait for (0) seconds for new data to arrive.
BLPOP list1 list2 0The time limit can also be specified as -1, which means no time limit. And Redis will block the connection indefinitely if the lists are empty.
If no new data arrives after the specified time limit, Redis returns two elements if at least one list is not empty, as shown below,
The first element is the list’s name from which the data was taken (from list1 since list2 doesn’t exist). The second element is the actual data from the list (list1).
When a new element is added to one of the lists, Redis wakes up your connection. Redis then returns the element together with the name of the key where it was taken.
Conclusion
In this tutorial, you’ve learned how to manage a Redis list. You’ve seen commands to dynamically add, remove and fetch data in a Redis list. Moreover, you learned about blocking commands and how they can be used with Redis lists.
Remember to practice all the different Redis commands to become confident using them. Why not try implementing Redis lists in your own projects? You can use Redis list with Node.js to store data like user sessions, message queues, etc. You can also use lists with other data types to create more complex data structures like graphs and trees.


