


Do you want to reduce the workloads and delivery times of your applications? Save yourself the headaches and set up a RabbitMQ cluster for your application!
In this tutorial, you’ll learn how to set up RabbitMQ Cluster and have a fully functional RabbitMQ cluster with high availability support.
Ready? Read on and start reducing workloads!
Prerequisites
To follow along with this tutorial, be sure you have the following requirements in place:
- Two or more Linux servers in the same network – This tutorial uses three Debian 11 servers named node01, node02, and node03.
- Sudo root privileges or access to the root/administrator account.
Setting up a Hosts File
The RabbitMQ cluster works with the hostname or local domain. You must ensure each hostname resolves to the server’s IP address by editing the /etc/hosts file.
Open the /etc/hosts file on all servers using your preferred text editor, and add the following lines to the file.
Remember that editing the /etc/hosts file requires a sudo privilege.
The format of the /etc/hosts configuration is IP-address hostname.
Replace the values below with your servers’ IP addresses and hostnames, save the changes, and exit from the editor.
# /etc/hosts file RabbitMQ Servers
172.16.1.20     node01
172.16.1.21     node02
172.16.1.22     node03
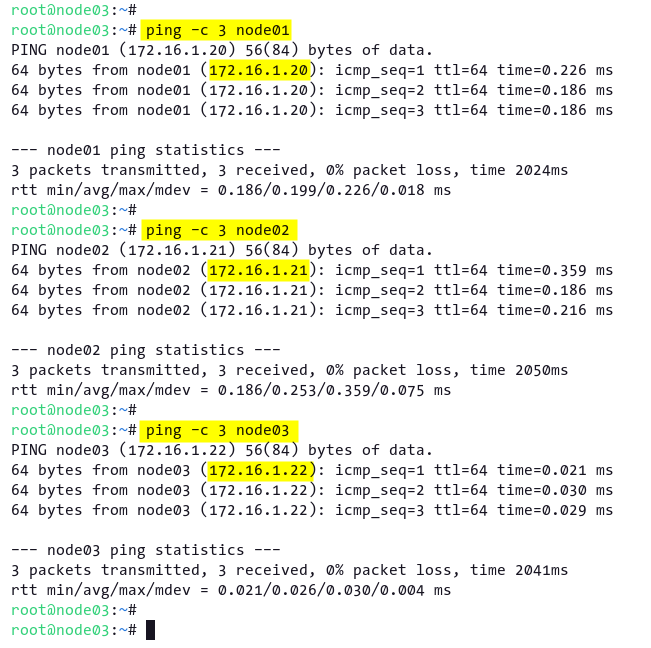
Now, run the ping command below to verify each hostname resolves to the correct IP address of the server. Each -c 3 option makes ping requests three times, then terminates the requests.
# ping node01 node02 and node03
ping -c 3 node01
ping -c 3 node02
ping -c 3 node03
If your configuration is correct, you’ll see each hostname is resolved to the correct IP address of the server, as shown below.
Installing RabbitMQ on All Servers
Now that you’ve configured the /etc/hosts file on all servers, it’s time to install RabbitMQ packages on all servers (node01, node02, and node03). You can install RabbitMQ from the official distribution repository for most Linux distributions.
At the time of writing, Debian and Ubuntu repository provides the latest stable RabbitMQ version 3.8.9.
1. Run the apt command below to refresh all your system’s package indexes.
sudo apt update2. Next, run the following apt install command to install RabbitMQ (rabbitmq-server) on your system.
Once installation completes, the rabbitmq-server service is automatically started and enabled on your system.
sudo apt install rabbitmq-server -y3. Lastly, run the following command to verify the rabbitmq-server service’s status.
sudo systemctl status rabbitmq-serverBelow, you can see the RabbitMQ server service is active (running) and enabled. As a result, the services start automatically at system boot/startup.

Additionally, you can also verify the version of RabbitMQ on your system using the following command.
sudo rabbitmq-diagnostics server_versionThe RabbitMQ version installed is 3.8.9, as shown below, but yours may be different.

Setting up the RabbitMQ Cluster
After you’ve installed RabbitMQ, it’s time to set up the RabbitMQ cluster. Using the RabbitMQ cluster prevents data loss and miss between your applications. The RabbitMQ cluster provides replication and high availability across all servers.
RabbitMQ is an application written in Erlang and by default, provides a .erlang.cookie file on the RabbitMQ data directory (/var/lib/rabbitmq).
To create a RabbitMQ cluster, you’ll set up a .erlang.cookie file in each server with the same content and must be owned by the rabbitmq user and group.
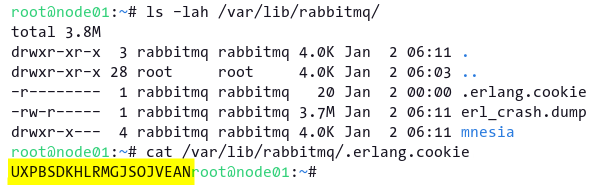
1. On the node01 server, execute the following command to check available files on the RabbitMQ data directory (/var/lib/rabbitmq). The command then prints the content of the .erlang.cookie file.
# List files and directories on /var/lib/rabbitmq
ls -lah /var/lib/rabbitmq

# Print content of the file .erlang.cookie
cat /var/lib/rabbitmq/.erlang.cookie
Copy the output (UXPBSDKHLRMGJSOJVEAN) to your note because you’ll add this output to the node02 and node03 servers in the following steps. Mind you that you may get a different output of the .erlang.cookie. file than what’s shown below.
2. Next, move to the node02 server, and run the following command to stop the rabbitmq service.
sudo systemctl stop rabbitmq-server3. Edit the /var/lib/rabbitmq/.erlang.cookie file in your preferred text editor. Replace the original content with the one you noted in step one, save the changes and exit the editor.
# content of .erlang.cookie from node01
UXPBSDKHLRMGJSOJVEAN
4. Now, run the below command to start the rabbitmq-server service.
sudo systemctl start rabbitmq-server5. Switch to node03 server and repeat the steps (two to four) to edit the /var/lib/rabbitmq/.erlang.cookie file.
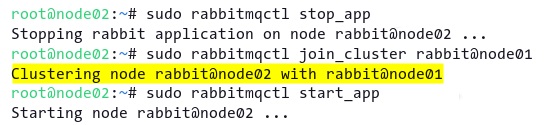
6. Run the following rabbitmqctl commands on node02 and node03 servers to add them to the RabbitMQ cluster (node01).
# Stop RabbitMQ application
sudo rabbitmqctl stop_app

# Join the RabbitMQ node01
sudo rabbitmqctl join_cluster rabbit@node01

# Start the RabbitMQ application again
sudo rabbitmqctl start_app
Below, you can see node02 server is clustering with the RabbitMQ cluster (node01), and the same goes for the node03 server.
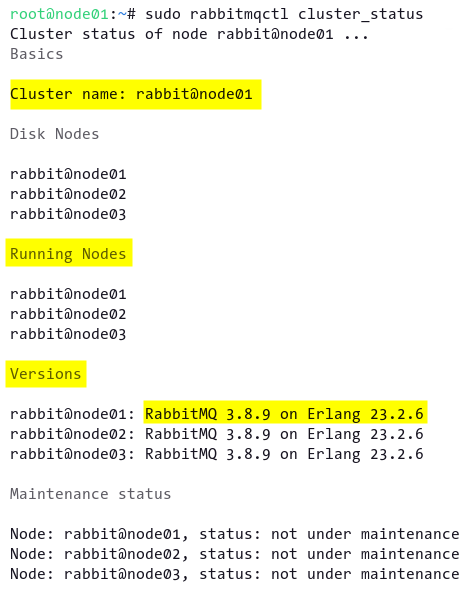
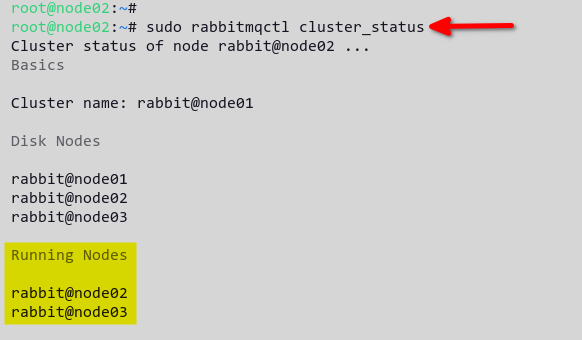
7. Finally, execute the rabbitmqctl command below to verify the RabbitMQ cluster status. You can run this from any server (node01, node02, or node03).
sudo rabbitmqctl cluster_statusYou can see in the output below the cluster name (rabbit@node01) and the running nodes.
Setting up an Admin User for RabbitMQ
After setting up the RabbitMQ cluster, you’ll create a new admin user for RabbitMQ and delete the default guest user. The RabbitMQ admin user has permission to configure, read, and write any entity available on the RabbitMQ cluster.
1. Switch to node01 server, and run the rabbitmqctl command below to create a new user called admin with the password set as AdminPassRabbitMQ. You can set your preferred username and password, but be sure to set a strong password.
sudo rabbitmqctl add_user admin AdminPassRabbitMQ
2. Next, run the following command to set (set_user_tags) the new user (admin) as administrator for the RabbitMQ cluster.
sudo rabbitmqctl set_user_tags admin administrator
3. Run the command below to set_permissions to the admin user with the following:
- Allows (
-p /)adminuser to access all vhosts on the RabbitMQ cluster. - First
".*"– Allows the user to configure permission for every entity and vhosts. - Second
".*"– Enables write-permission for the user to every entity and vhosts. - Third
".*"– Enables read-permission for the user to every entity and vhosts.
sudo rabbitmqctl set_permissions -p / admin ".*" ".*" ".*"
4. Now, run the following command to delete (delete_user) the default user (guest) from the RabbitMQ cluster.
sudo rabbitmqctl delete_user guest
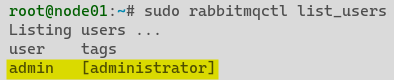
5. Finally, run the below command to list all available users (list_users) on the RabbitMQ cluster.
sudo rabbitmqctl list_usersBelow, you can see only one user (admin). You can also verify users from other servers (node02 and node03), and you’ll get the same output.
Creating a Virtual Host and a new Admin User on RabbitMQ
You’ve set up your RabbitMQ cluster and created an admin user on RabbitMQ. But now, you’ll create a virtual host (vhost) and users on RabbitMQ, so your application can connect to the RabbitMQ.
The basic concept of a virtual host (vhost) on RabbitMQ is similar to that on Apache or server blocks on NGINX. Each vhost has entities such as exchanges, queues, bindings, user permissions, authentication, etc.
1. Run the rabbitmqctl command below to create a new vhost (add_vhost) named app-qa1.
sudo rabbitmqctl add_vhost app-qa1
2. Next, run the following commands to create a new user (add_user) named alice with the password AlicePassRabbitMQ and tag the user as administrator. You can set the user name and password as you prefer.
# create new user alice
sudo rabbitmqctl add_user alice AlicePassRabbitMQ

# set a tag administrator for user alice
sudo rabbitmqctl set_user_tags alice administrator
3. Run the below command to set permissions to the user alice to manage vhost app-qa1. These permissions allow the user alice to configure, read, and write all entities under the vhost app-qa1.
# set up permission for user alice
sudo rabbitmqctl set_permissions alice --vhost app-qa1 ".*" ".*" ".*"
4. Finally, run each command below to list available vhosts (list_vhosts) on the RabbitMQ cluster and permissions (list_user_permissions) of the new admin user (alice).
# check available vhosts on RabbitMQ
sudo rabbitmqctl list_vhosts

# check permissions for user alice
sudo rabbitmqctl list_user_permissions alice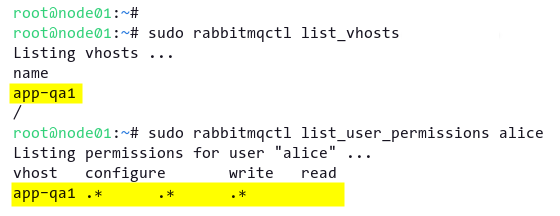
Creating Exchanges, Queues, and Bindings on RabbitMQ
Your virtual host and admin user are set up, but are those all you need for your application to work? You’ll still need to create entities, such as exchanges, queues, and bindings on RabbitMQ. Those entities are necessary to make your application work with RabbitMQ.
1. Run the following rabbitmqadmin command to create a new exchange on RabbitMQ called test_exchange under the app-qa1 vhost and the user alice. You can specify the type of exchanges with the type option, which is direct for this demo.
# Create new exchange test_exchange
sudo rabbitmqadmin -u alice -p AlicePassRabbitMQ -V app-qa1 declare exchange name=test_exchange type=direct
2. Next, run each command below to create new queues on RabbitMQ. In this demo, you’ll create the default classic (test_classic) and the quorum queue named test_quorum.
# create quorum queue with option queue_type=quorum
sudo rabbitmqadmin -u alice -p AlicePassRabbitMQ -V app-qa1 declare queue name=test_quorum durable=true queue_type=quorum

# create default classic queue
sudo rabbitmqadmin -u alice -p AlicePassRabbitMQ -V app-qa1 declare queue name=test_classic durable=true
3. Run the below commands to create binding for both test_classic and test_quorum queues. Each binding has different routing_key but still runs on the same exchange (test_exchange).
# create binding for test_quorum
sudo rabbitmqadmin -u alice -p AlicePassRabbitMQ -V app-qa1 declare binding source="test_exchange" destination_type="queue" destination="test_quorum" routing_key="test_routing_key_quorum"

# create binding for test_classic
sudo rabbitmqadmin -u alice -p AlicePassRabbitMQ -V app-qa1 declare binding source="test_exchange" destination_type="queue" destination="test_classic" routing_key="test_routing_key_classic"
4. Now, run the following commands to publish the hello, world message to the test_exchange. Be sure to set the correct routing_key.
# publish message for the test_quorum queue
sudo rabbitmqadmin -u alice -p AlicePassRabbitMQ -V app-qa1 publish exchange=test_exchange routing_key=test_routing_key_quorum payload="hello world, Quorum Queue"

# publish message for the test_classic queue
sudo rabbitmqadmin -u alice -p AlicePassRabbitMQ -V app-qa1 publish exchange=test_exchange routing_key=test_routing_key_classic payload="hello world, Classic Queue"
5. Finally, run the following command to get the hello, world message from test_quorum and test_classic queues.
# retrieve the message from test_quorum queue
sudo rabbitmqadmin -u alice -p AlicePassRabbitMQ -V app-qa1 get queue=test_quorum

# retrieve the message from test_classic queue
sudo rabbitmqadmin -u alice -p AlicePassRabbitMQ -V app-qa1 get queue=test_classic
As shown below, you’ll know that the queues work if you receive the hello, world message from the test_quorum and test_classic queues.

Enabling the RabbitMQ Management Plugin
You’ve managed to work on RabbitMQ via a command-line environment so far. But perhaps, you prefer a GUI to interact with RabbitMQ servers and clusters. If so, you’ll need to enable the RabbitMQ management plugin.
The RabbitMQ Management Plugin provides a web-based management UI running on default port 15672 and the command-line management tool [rabbitmqadmin]
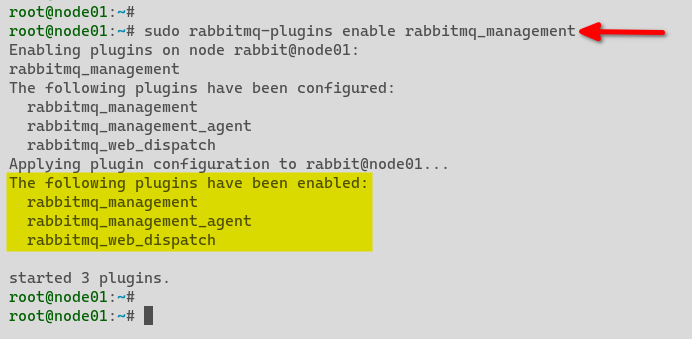
Run the rabbitmq-plugins command below on all servers (node01, node02, and node03) to enable the rabbitmq_management plugin. This command automatically enables other necessary plugins, such as rabbitmq_management_agent and rabbitmq_web_dispatch.
sudo rabbitmq-plugins enable rabbitmq_management
Below is the similar output you will see on your terminal screen.
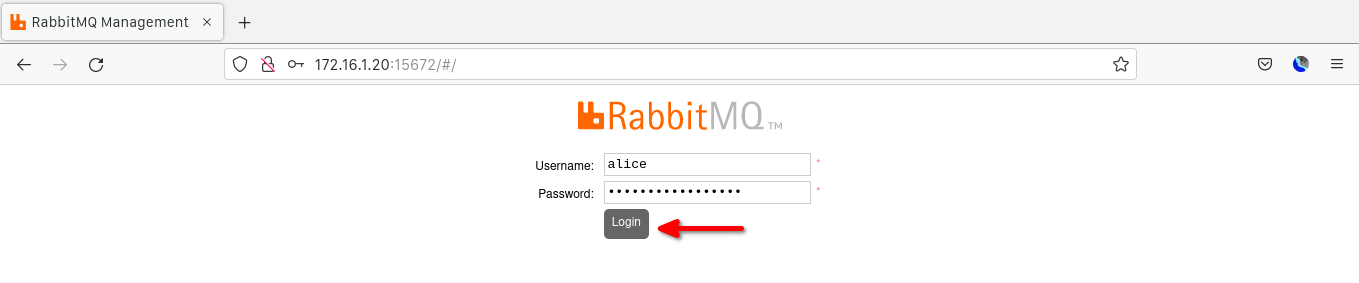
Now, open your web browser, and navigate to your server IP address followed by port 15672 (http://172.16.1.20:15672/) to access the RabbitMQ web-based management interface. Port 15672 is automatically opened when you enable the RabbitMQ management plugin.
Log in to the RabbitMQ management UI login page with user alice and password AlicePassRabbitMQ.
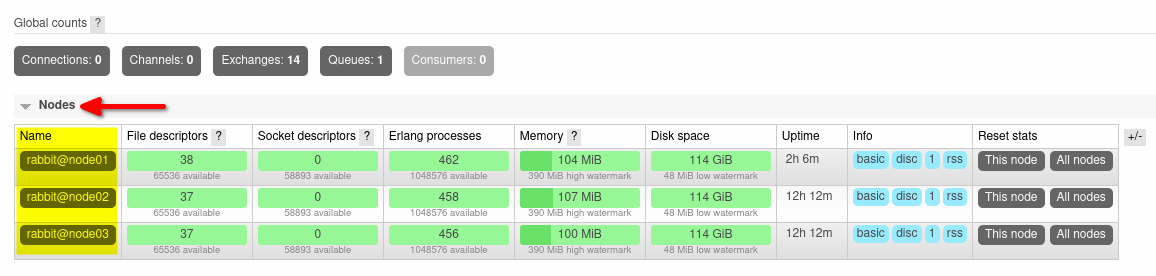
At the RabbitMQ dashboard, you’ll see all available nodes on the RabbitMQ cluster.
Below, you can see all nodes on the RabbitMQ cluster are running without any problems.
Verifying High-Availability of the Quorum Queue
You’ve previously verified that the nodes in the RabbitMQ cluster are running and the queues are working, and that’s great. But what if one of the nodes shuts down or fails? Verify the test_quorum queue provides high availability and replication across servers.
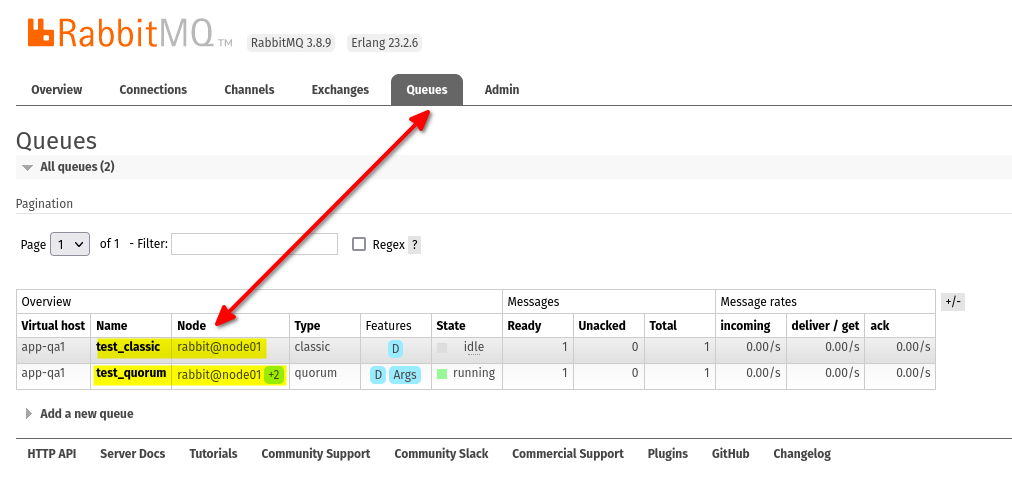
1. On the RabbitMQ dashboard, click the Queues tab to access the queues available in the RabbitMQ cluster.
Below, you can see the test_classic queue and test_quorum queue.
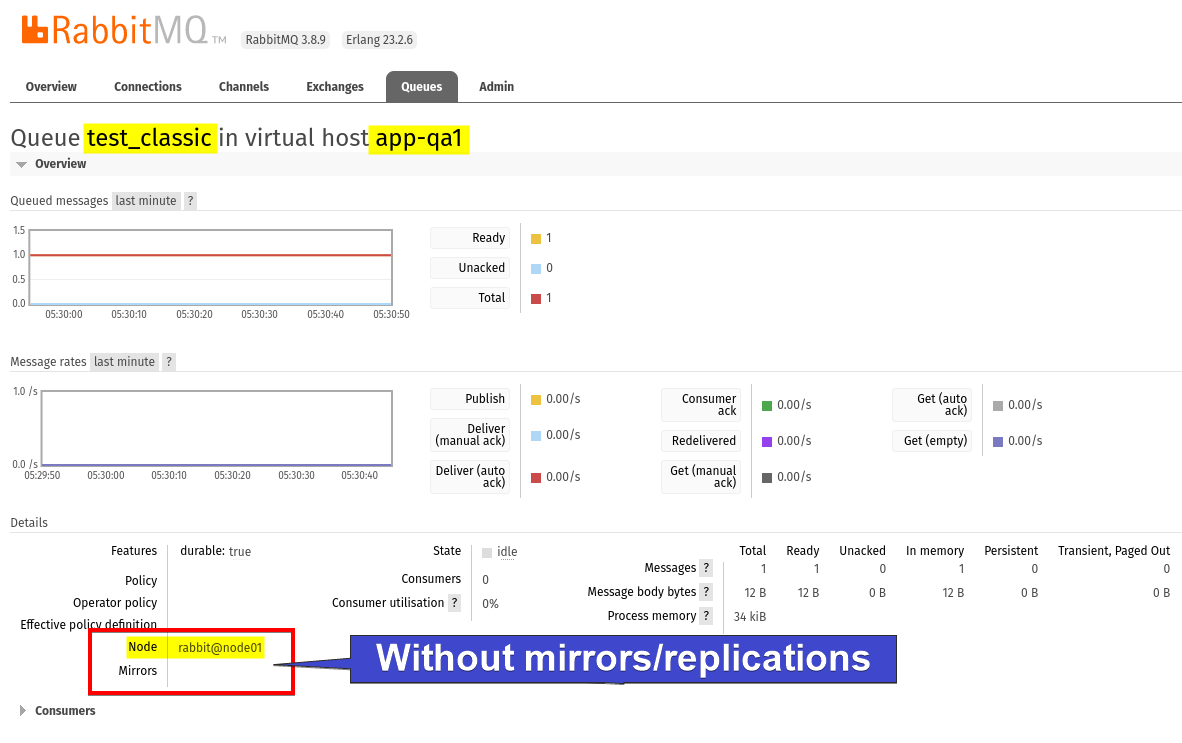
2. Next, click on the test_classic queue to get its detailed information.
As you see below, the test_classic queue is running on the rabbit@node01 without mirrors/replication. When the node rabbit@node01 is down, the test_classic queue becomes unavailable.
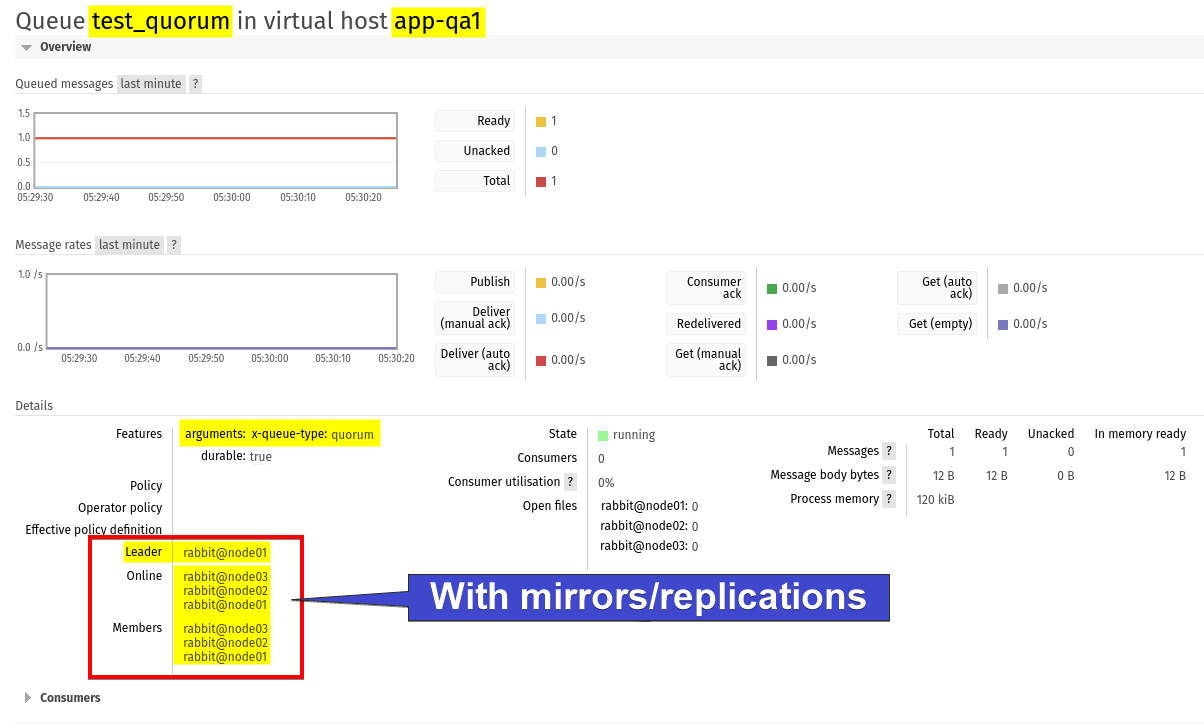
3. Switch back to the Queue menu, but click the test_quorum queue this time.
Below, you can see the test_quorum queue is available on the rabbit@node01 and also provides mirrors to other nodes on the cluster. This setup will keep the test_quorum queue running even when node01 is down.
4. Now, run the following command to turn off/shut down the node01 server. With the node01 server down.
# turnoff node01
sudo poweroff
5. Move to the node02 server and run the below command to check the RabbitMQ cluster_status
# checking RabbitMQ cluster status
sudo rabbitmqctl cluster_status
You’ll see the current Running Nodes on the RabbitMQ cluster are node02 and node03.
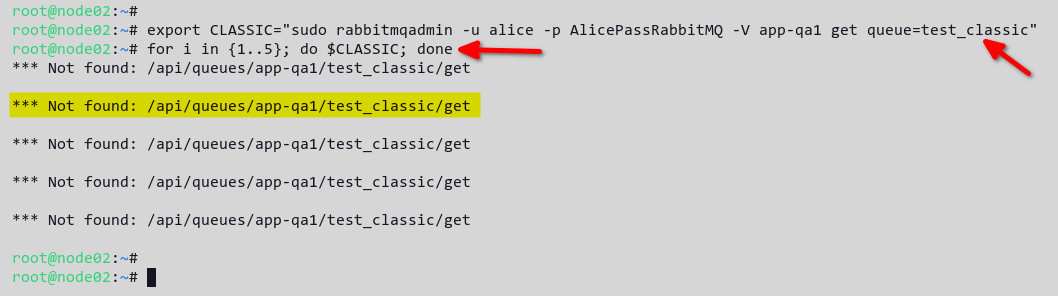
6. Next, run the following commands to get the “hello world” message from the test_classic queue. This command will make five requests to the test_classic queue using the Bash loop.
# setup temporary environment variable CLASSIC
export CLASSIC="sudo rabbitmqadmin -u alice -p AlicePassRabbitMQ -V app-qa1 get queue=test_classic"

# retrieve message from `test_classic` queue 5 times using bash loop
for i in {1..5}; do $CLASSIC; done
You’ll receive the Not found outputs, as shown below, because the node01 server is down.
7. Finally, run the following commands to retrieve the “hello world” message from the test_quorum queue.
Similar to testing the test_classic queue, this command makes five requests to the test_quorum queue, but this time, you’ll get the “hello world” message even the node01 is down. Why? The test_quorum queue is automatically replicated/mirrored to the node02 or node03 servers.
# setup temporary environment variable QUORUM
export QUORUM="sudo rabbitmqadmin -u alice -p AlicePassRabbitMQ -V app-qa1 get queue=test_quorum"

# retrieve message from `test_quorum` queue 5 times using bash loop
for i in {1..5}; do $QUORUM; done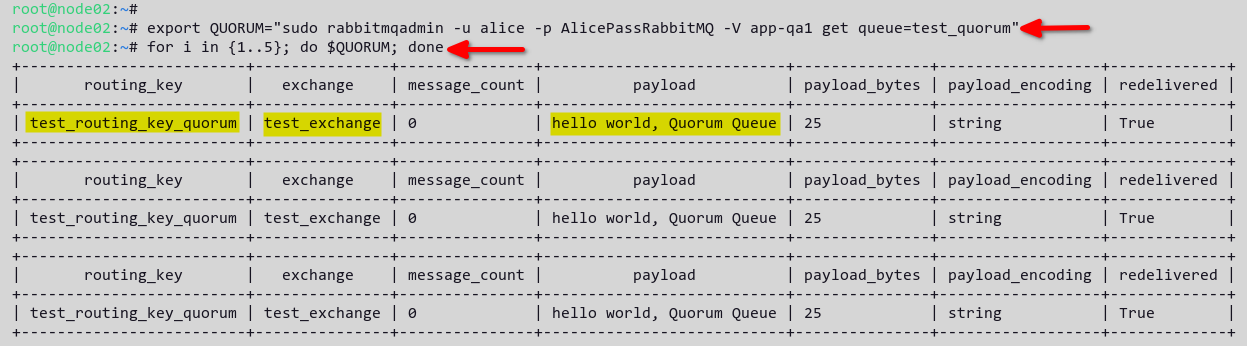
Conclusion
This tutorial aimed to help you through the process of setting up RabbitMQ cluster on Debian/Ubuntu Linux systems. You’ve also learned the basic administration of the RabbitMQ server and how to create queues that support high availability on RabbitMQ.
You’ve set up a fully RabbitMQ cluster at this point. So what’s next? Perhaps learn to implement the RabbitMQ to your application?


