


One of the great things about how PowerShell has changed over the last few years is that it is adopting many ways to interact with non-Windows machines. One of these changes was to support PSRemoting over SSH. PSRemoting over SSH also means having PSRemoting Linux!
Not a reader? Watch this related video tutorial!While setting up PSRemoting to work with SSH and Linux does take a little setup to get working, this allows you to use PowerShell to interact with Linux machines natively.
In this tutorial, you’re going to learn how to set up a Windows client to connect to a Linux computer (CentOS) using PSRemoting over SSH and vice versa. You’ll learn how to authenticate using both a password and using a certificate.
Related: PowerShell Remoting: The Ultimate Guide
Prerequisites
This tutorial will be walkthrough. If you’d like to follow along, please be sure you have the following ahead of time:
- A Windows 10 build 1809 or greater machine. The tutorial will use Windows Server 2019 Standard as the remote server.
- A Linux machine that supports PowerShell 7. The tutorial will use CentOS 8.
- Sudo rights on the Linux machine and local administrator rights on the Windows machine. After the initial setup, some of the rights can be revoked.
Setting up Windows (Client) for PSRemoting over SSH
First up, you need to configure the PSRemoting client (PowerShell) on your Windows client. To do that, you’ll need to set up and configure both PowerShell 7+ and OpenSSH.
Installing PowerShell 7+
First, install PowerShell 7+. This tutorial will not cover how to do this. To learn how, check out the link below.
Installing OpenSSH
You will also need to install OpenSSH. OpenSSH is the package that PSRemoting will use to connect to the remote Linux computer. You can install OpenSSH via PowerShell using the Get-WindowsCapability cmdlet as shown below.
Depending on if you’re intending your Windows host to be a client and/or a server depends on what Windows feature you should install. If you connecting from the Windows Server to Linux, you only need the OpenSSH client. If you are connecting from Linux to the Windows Server, you only need the OpenSSH server.
The command below finds all of the Windows features with a name starting with OpenSSH and installs them so it will install both the client and the server.
Get-WindowsCapability -Online | Where-Object {$_.Name -like 'OpenSSH*'} | Add-WindowsCapability -Online
If you want to only install the client, change the filter in the
Where-Objectscript block toOpenSSH.Client*and for the server the filter should beOpenSSH.Server*.
Related: Getting Started using SSH and PowerShell
Starting up the SSH Server
Once OpenSSH installs, it will open the Windows firewall on port 22, but it will not start the OpenSSH server service to listen on the port. To bring up the OpenSSH server on Windows Server, run the following PowerShell command to start the OpenSSH server and set the service to start on bootup.
Start-Service sshd
Set-Service sshd -StartupType Automatic
Configuring the OpenSSH Configuration
The next step is to modify the sshd_config daemon configuration file. Inside this file, you must first confirm password authentication is enabled and also add the PowerShell subsystem.
This part of the tutorial is setting up the easiest method using passwords. You’ll learn how to set up SSH authentication using certificates later on in this tutorial.
- Open up the configuration file in your favorite text editor at C:\ProgramData\ssh\sshd_config.
2. Confirm Password authentication is enabled where either the PasswordAuthentication line is commented out with a # at the beginning or it is set to yes.

3. Add the PowerShell subsystem. For PowerShell 7, add the line: Subsystem powershell c:/progra~1/powershell/7/pwsh.exe -sshs -NoLogo.
- The
-sshsoption is used to allow PowerShell 7 to run within SSH as a subsystem. - The
-NoLogooption makes PowerShell hide the copyright info when started which ensures there are not unexpected output when starting the SSH session.
4. Save and close the config file.
5. Restart the sshd Windows service. You can do so with PowerShell by running Restart-Service sshd.
You should now have everything you need configured to connect from (client) and to (server) this Windows Server using PSRemoting over SSH.
Setting up Linux (Server) for PSRemoting over SSH
Next up is Linux with a similar set up; installing PowerShell and configuring OpenSSH.
Note that since we are using CentOS, some of the commands may be different if you are using a different distribution.
Installing PowerShell 7+
First, install PowerShell 7. This tutorial will not cover how to do this. Instead, be sure to check out the following link.
Related: How to Download and Install PowerShell 7 on Windows, macOS and Linux
Configuring OpenSSH
Like Windows Server, you’ll need OpenSSH. Unlike Windows though, OpenSSH is probably already installed. For this tutorial running CentOS 8, the Linux machine already has both the client and server installed by default but you can check using the below command:
rpm -qa openssh*If the client and server are installed you should get something similar to the output below.

Configure the SSH configuration file by:
- Opening the sshd_config file by running
sudo vi /etc/ssh/sshd_config.
2. Adding the PowerShell subsystem just like on Windows Server adding the below line to the configuration file.
Subsystem powershell /usr/bin/pwsh -sshs -NoLogo3. Exiting vi and save the file.
4. Restarting the ssh daemon to apply the changes by running sudo systemctl restart sshd.
By default Password and PublicKey authentication will be enabled in most instances including CentOS 8. No need to add those here.
Connecting to/from Windows/Linux with Password Authentication
Once you’ve set up everything on both the Linux and Windows machines, it’s time to put that work you did to good use. Let’s now try to connect from Windows to Linux and vice versa using password authentication.
Password-based authentication looks and feels familiar to using SSH with a username and password.
Connection Commands
To test out connecting with PSRemoting over SSH from Windows to Linux or from Linux to Windows, let’s use both an “ad-hoc” session using the Invoke-Command cmdlet and also a persistent session using New-PSSession.
Related: Invoke-Command: The Best Way to Run Remote Code
Test out the PSRemoting connection using Invoke-Command by:
- Opening up your PowerShell 7 console.
2. Setting parameters for the Invoke-Command cmdlet. In this case, the parameters below will connect to a computer called SRV1 using a local user account on SRV1 called User.
$SessionParams = @{
     HostName = SRV1
     UserName = user
     SSHTransport = $true
 }
3. Running Invoke-Command by splatting the parameters above and running a command (in this case Get-Process inside of a scriptblock.
Related: PowerShell Splatting: What is it and How Does it Work?
Invoke-Command @SessionParams -ScriptBlock {Get-Process}You should then see a list of all running processes on the SRV1 computer.
You can also establish a persistent connection that allows you to connect to and from and interactively run commands by:
- Providing the parameters above and passing them to the
New-PSSessioncmdlet.
2. Connecting to that session interactively using the Enter-PSSession cmdlet.
Create a persistent session
 $session = New-PSSession @SessionParams
 Connect interactively
 Enter-PSSession -Session $session
3. After running the Enter-PSSession command from above you would be prompted for the password for the user. After you authenticated, you would be connected to the other machine within PowerShell.
Notice none of the commands above required the common Credential parameter to provide a username and password to connect. Instead, we used the SSHTransport parameter. SSH does not use the same authentication process that Windows uses to go from one Windows computer to another so it cannot interpret PSCredential objects.
Related: Using the PowerShell Get-Credential cmdlet and all things credentials.
Using this approach, you can also leverage disconnected sessions.
Setting up Public Key-Based Authentication
While password-based authentication is easy to set up and straightforward to use, it has two issues.
- There is no way to authenticate without someone manually running the commands securely.
- You are sending a password across the network.
While the password, in this case, is encrypted within the SSH connection, the server receives the password in plaintext. If the server is in some way compromised, it could become a security issue.
Generating Public/Private Keys
When using public-key authentication of any kind, you must first generate a public key from the client. This requirement applies to both Linux and Windows.
On either the Linux or Windows Server machine:
- Run
ssh-keygento generate the key pair.
If you’re running
ssh-keygenon Linux, know that it will generate an RSA key pair by default. Many new Linux operating systems will not allow RSA key pairs to be used for authentication by default. To correct this usessh-keygen -t ed25519.
2. You will be prompted for a path to store the private key and a passphrase to encrypt the private key will. In the case you want not to have to provide a password during authentication, you can leave the passphrase blank.
3. Windows Only: Run the below commands from PowerShell where <ProfilePath> is the path to your profile (probably C:\Users\UserName).
Set-Service ssh-agent -StartupType Automatic
 Start-Service ssh-agent
 ssh-add .ssh\id_ed25519
 Remove-Item ~.ssh\id_ed25519
Windows’ implementation of OpenSSH has an ssh-agent service that allows you to store private keys within the Windows Security Context of the user you are logged in. This will enable you to import your SSH private key to the ssh-agent and then delete the key from the file system to secure it further.
4. Now copy the public key generated (<user home directory>\.ssh\id_ed25519.pub) to the server you are going to connect to. Windows does not provide a tool to do this copy so it can be completed with SCP. Run the below command to copy the public key to the Linux machine.
scp C:\Users\Username.ssh\id_ed25519.pub username@ServerB:~/.ssh/authorized_keysTo copy from Linux to Windows:
scp ~/.ssh/id_ed25519.pub administrator@ServerA:.ssh/authorized_keys5. Enter the password of the logged-in user. Once entered, PowerShell/Bash will copy the key and you will be disconnected from the remote machine.
Connecting to/from Windows/Linux with Public Key Authentication
Once you’ve set up the public and private keys, connecting to/from both Windows and Linux should be easy. It’s nearly identical to password-based authentication.
To connect with a public key on Windows, use the identical commands as shown in Connection Commands above. You’ll only notice one difference; you will not get prompted for credentials.
Below is an example of connecting from Linux to Windows using the -v switch to see what’s happening during the connection.
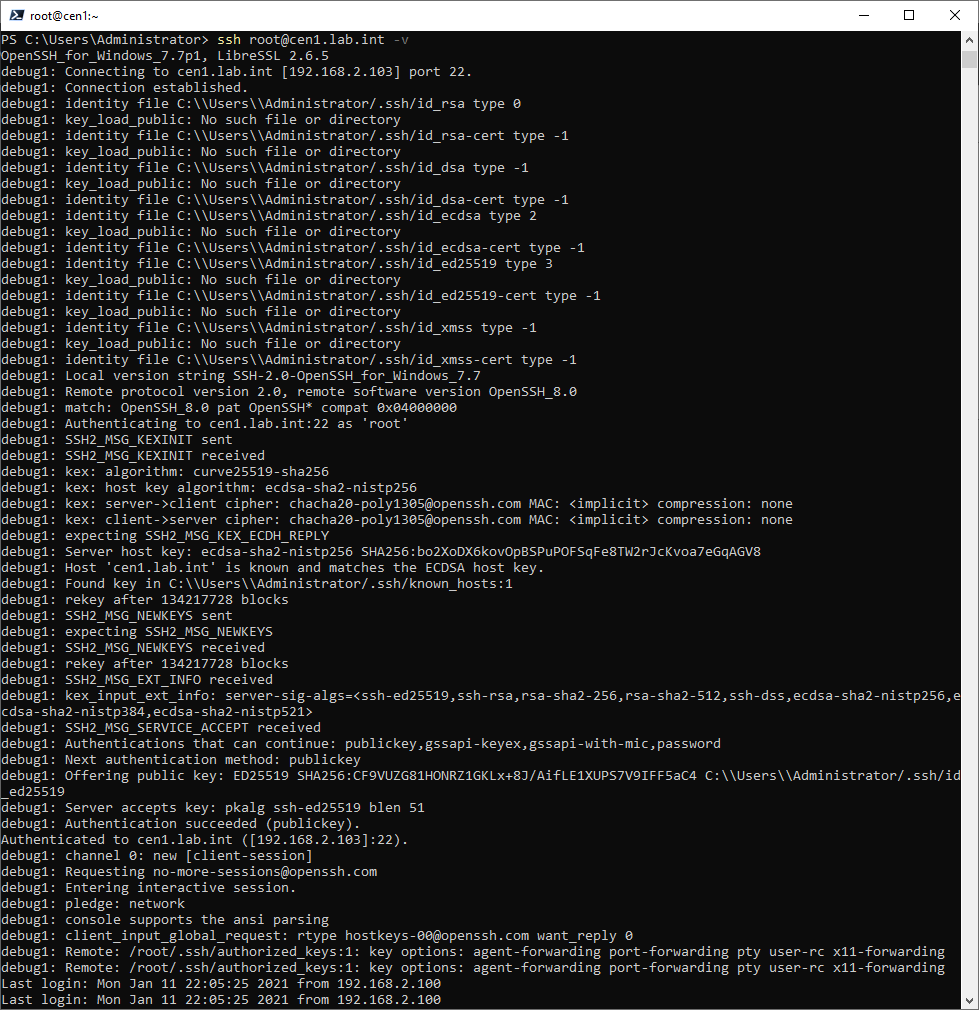
-v switch

