

You can build just about anything with PowerShell from teeny scripts to multi-hundred-line behemoths. But once you grow tired of creating PS1 script after PS1 script, you tend to start thinking of reusable tools via modules. Let’s see how to create an Azure DevOps pipeline for a PowerShell module in this step-by-step guide!
To create a PowerShell module, open up a text editor, and save it as a PSM1 file. Done. You’ve created a module! But only if it were that easy. Building a professional, reusable module you can use in production requires a software development approach. Brandon Olin provides a good example in his eBook Building PowerShell Modules.
Building a “professional” PowerShell module means treating the module like C#, Java, or Python code. You should apply all of the same disciplines to a module as a developer would to a production software application. How do you do that? One way is by building an Azure DevOps pipeline for a PowerShell module.
In this article, you’re going to learn how to create an Azure DevOps pipeline for a PowerShell module. You’ll see an example of how to squeeze a ton of value out of an automated build and test scenario (deployment to follow)!
But wait, there’s more! This article is the first part in a two-part series. In the next article, you will learn how to take your PowerShell module pipeline and integrate automated deployments to a NuGet feed.
The Azure DevOps Pipeline for a PowerShell Module Project Overview
This article is going to be broken down as a tutorial. You are meant to follow the article from top to bottom. By the time you’re done, you will have a complete Azure DevOps pipeline created based on an example PowerShell module.
This article will be broken down into four rough sections including:
- Setting up the demo environment – In this section, you will get the sample GitHub repo set up.
- Example PowerShell module overview – In this section, you will get an overview of a simple PowerShell module and associated artifacts stored in a GitHub repo. What the module does is unimportant. The module explained here will simply be a placeholder for you to learn how to insert your custom module.
- Creating an Azure DevOps project – In this brief section, you will see a series of commands that expedite setting up an Azure DevOps project for this tutorial.
- Building the pipeline – In this final section, you will learn an example of how to build a YAML-based Azure DevOps pipeline which versions the module and runs Pester tests.
You’ll be building the pipeline using the Multi-Stage Pipeline UI experience. As of this writing, this feature is in Preview.
Prerequisites
You’re going to learn a lot but you’re also expected to come to the table with a few things. If you plan to follow along, be sure you have the following:
- An Azure subscription
- A GitHub account
- An Azure DevOps organization – Check out the Microsoft QuickStart guide for instructions on how to do this. In this article, you’ll be working on a project called PowerShellModuleProject.
- Azure CLI installed – You will not need this if you already have an Azure DevOps project created.
- The Pester Azure DevOps extension installed
Warning: The actions you’re about to perform may cost real money unless you have some Azure credit. Refer to the Azure DevOps pricing page for more information.
Importing the Sample GitHub Repo
If you already have a PowerShell module in a GitHub repository, you can use that. But, if you don’t already have a repo created, you can use the one built for this tutorial. To use the included sample repo, you first need to make a copy of your own or clone it. One way to clone a GitHub repo is to “import” the code to a blank repo.
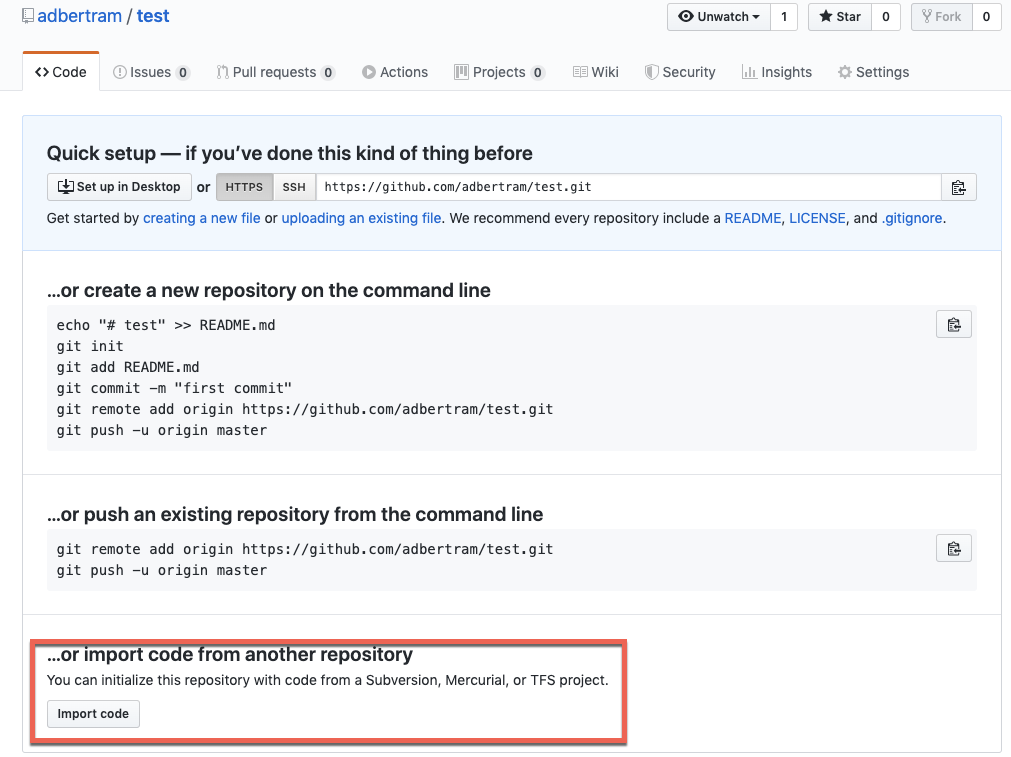
From your GitHub account, create a new repository. You should see a page like below. When you do, click on the Import code button.
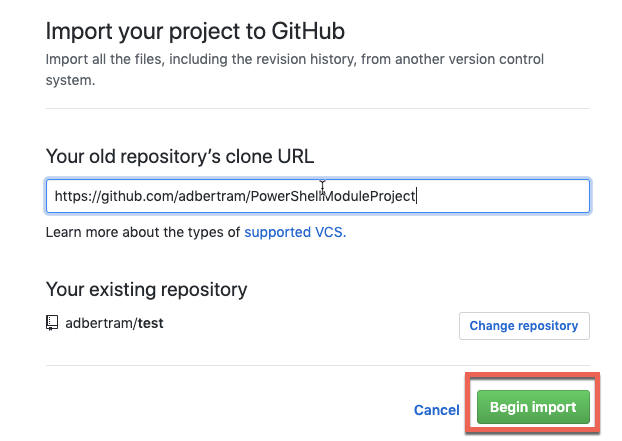
You will then be presented with the page below. In the Your old repository’s clone URL field, paste in this tutorial’s sample PowerShell module repo URL https://github.com/adbertram/PowerShellModuleProject and click on Begin Import as shown below.
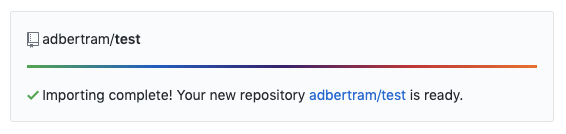
After a short period of time, you should soon then see all of the contents of the Azure DevOps pipeline for a PowerShell module tutorial available in your repo.
PowerShell Repo Overview
At this point, you should have your own copy of the sample GitHub repo with a file structure looking like the below. Some of these files may look familiar like a PSM1 or PSD1 file but some may not. If you going to talk PowerShell and DevOps, you better have a GitHub repo!
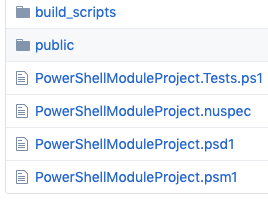
In this GitHub repo, you’ll find the following items:
- PowerShellModuleProject.psm1 – The PSM1 file containing code to export all functions in the module
- PowerShellModuleProject.psd1 – The module manifest
- PowerShellModuleProject.Tests.ps1 – A set of sample Pester tests
- A public folder containing PS1 scripts with a single function of the same name that will be exported
- A private folder containing PS1 script with a single function that will not be exported
- A build_scripts folder that contains the YAML pipeline and all of the PowerShell scripts that Azure Pipelines will be executing.
The PowerShell Module Script and Functions
Exporting functions in a module can be done a few different ways. A common way to expose functions is to include them all in the PSM1 file. This works for small modules but if you’ve ever found yourself wrangling dozens of functions, it becomes unwieldy.
To keep module functions more manageable, I like to create two folders called public and private containing one script per function in each folder. Then, use the PSM1 file as the script to dot source all of the functions and export all of the public functions in the public folder.
You can see what the PowerShellModuleProject.psm1 file looks like below.
Set-StrictMode -Version Latest
# Get public and private function definition files.

$Public = @(Get-ChildItem -Path $PSScriptRoot\Public\*.ps1 -ErrorAction SilentlyContinue)

$Private = @(Get-ChildItem -Path $PSScriptRoot\Private\*.ps1 -ErrorAction SilentlyContinue)

# Dot source the files.
foreach ($import in @($Public + $Private)) {
    try {
        Write-Verbose "Importing $($import.FullName)"        . $import.FullName
    } catch {
        Write-Error "Failed to import function $($import.FullName): $_"
    }
}

## Export all of the public functions making them available to the user
foreach ($file in $Public) {
    Export-ModuleMember -Function $file.BaseName
}
The Module Manifest
You should always include a module manifest with every PowerShell module project. Although the below example is not using all of the available attributes, it hits the main ones.
Notice the ModuleVersion and FunctionsToExport hashtable keys. These two keys both have placeholders while stored in GitHub. The placeholders exist because you’ll be managing an Azure DevOps build for this PowerShell module. The build will be running a build script to replace these values at build-time.
@{
    RootModule        = 'PowerShellModuleProject.psm1'
    ModuleVersion     = '<ModuleVersion>'
    GUID              = '73a14fd2-886e-43a6-a203-e53b2152cd5b'
    Author            = 'Adam Bertram'
    CompanyName       = 'Adam the Automator, LLC.'
    PowerShellVersion = '6.0'
    FunctionsToExport = @('<FunctionsToExport>')
}
Pester Tests
The Pester test script (PowerShellModuleProject.Tests.ps1) included with this tutorial is nothing fancy. Tests are a critical component to any Azure DevOps pipeline for a PowerShell module. This test script exists to include some sample tests for the build process. Do not just use these two tests and consider your module fully-tested! Read The Pester Book to learn how to write real tests.
The below test suites ensures that:
- the module will import successfully
- the module has an associated manifest
- the module passes all default code-linting rules defined by PSScriptAnalyzer
Install-Module -Name PSScriptAnalyzer -Force

describe 'Module-level tests' {
    it 'the module imports successfully' {
        { Import-Module "$PSScriptRoot\PowerShellModuleProject.psm1" -ErrorAction Stop } | should -not throw
    }

    it 'the module has an associated manifest' {
        Test-Path "$PSScriptRoot\PowerShellModuleProject.psd1" | should -Be $true
    }

    it 'passes all default PSScriptAnalyzer rules' {
        Invoke-ScriptAnalyzer -Path "$PSScriptRoot\PowerShellModuleProject.psm1" | should -BeNullOrEmpty
    }
}
Build Script
Finally, we have the build script. The PowerShell project you’ll be creating an automated build for is simple, a single build script below will do most of the heavy lifting.
You can read the comments with the code to understand what each step does. The build script is updating the module manifest’s version and dynamically adding all exportable functions.
$buildVersion = $env:BUILDVER
$moduleName = 'PowerShellModuleProject'
$manifestPath = Join-Path -Path $env:SYSTEM_DEFAULTWORKINGDIRECTORY -ChildPath "$moduleName.psd1"

## Update build version in manifest
$manifestContent = Get-Content -Path $manifestPath -Raw
$manifestContent = $manifestContent -replace '', $buildVersion

## Find all of the public functions
$publicFuncFolderPath = Join-Path -Path $PSScriptRoot -ChildPath 'public'
if ((Test-Path -Path $publicFuncFolderPath) -and ($publicFunctionNames = Get-ChildItem -Path $publicFuncFolderPath -Filter '*.ps1' | Select-Object -ExpandProperty BaseName)) {     $funcStrings = "'$($publicFunctionNames -join "','")'"
} else {
    $funcStrings = $null
}
## Add all public functions to FunctionsToExport attribute
$manifestContent = $manifestContent -replace "''", $funcStrings
$manifestContent | Set-Content -Path $manifestPath
Azure DevOps Project Quick Setup
You should already have an Azure DevOps organization. If so, you now need a project for your Azure DevOps pipeline for a PowerShell module. You can create a project in many different ways. My favorite is to use the Azure CLI. Below you’ll find the necessary commands to build a project from scratch.
Open up a PowerShell console and run the below commands replacing the variables with your own subscription (required).
$subscriptionName = '<your subscription name>'
$azDoOrgName = '<your Azure DevOps org name>'
$projectName = 'PowerShellModuleProject'
az login
az account set --subscription $subscriptionName
az extension add --name azure-devops
az devops configure --defaults organization=https://dev.azure.com/$azDoOrgName
az devops project create --name $projectName
az devops configure --defaults project=$projectName
If you’d like an explanation of each command, be sure to check out Building an Azure DevOps Pipeline [Soup to Nuts]. The first part of this article covers building an Azure DevOps project using the Azure CLI.
Pipeline Setup
Once the project is created, it’s time to create the pipeline. The pipeline contains all of the instructions necessary to run the build, testing and release processes. If you’re not familiar with creating a pipeline, be sure to check out the Azure DevOps documentation or the Creating a Pipeline section of the Building an Azure DevOps Pipeline [Soup to Nuts] article.
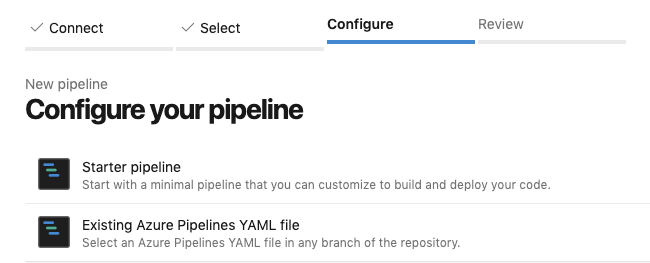
The sample PowerShellModuleProject GitHub repo already has a YAML pipeline created for you. When creating the pipeline in Azure DevOps and get to the Configure section, choose Existing Azure Pipelines YAML file as shown below.
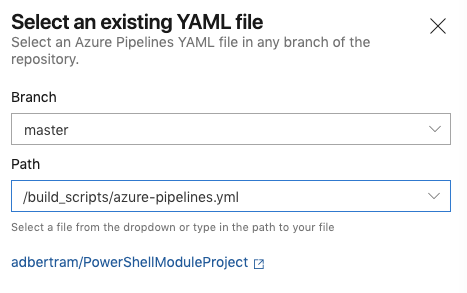
The YAML pipeline is located in the build_scripts folder. Azure Pipelines should already recognize this and provide you an option to choose the path in the Path dropdown as shown below. Once you’ve selected the path, click Continue to review the pipeline.
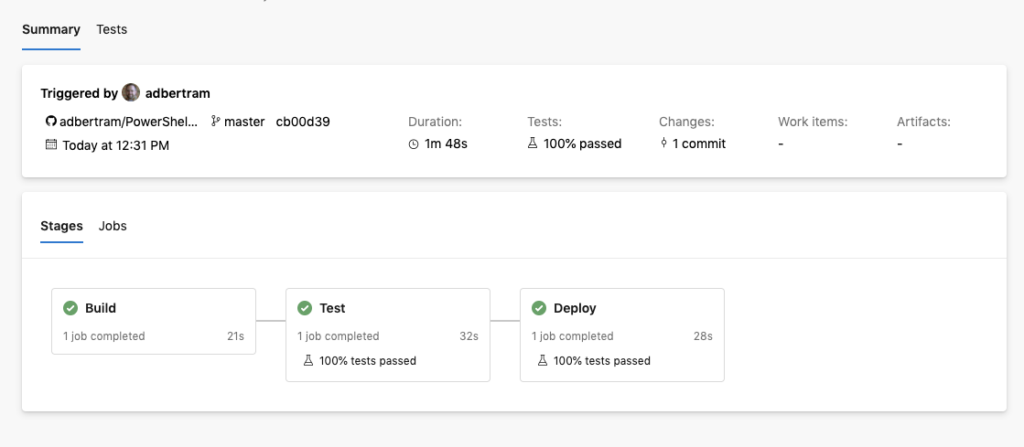
On the Review section, click on Run to start the pipeline. Clicking Run will create and then start the pipeline.

Once started, you should then see the pipeline jumping through each of the three stages it was built with.
You’ve now created an Azure Pipeline for a PowerShell project! But wait…what exactly did that do?
YAML Pipeline Explanation
Azure Pipelines uses YAML to define all steps in a pipeline (preview as of this writing). In this sample project, the pipeline was stored in the GitHub repo under the build_scripts folder and called azure-pipelines.yml.
The example pipeline in the GitHub repo isn’t the simplest yet definitely isn’t the most complicated pipeline you can build. The steps within are dependent on what your module does and what functions are within. However, it should provide an example of what’s possible when creating an Azure DevOps pipeline for a PowerShell module.
Rather than explaining each item individually, let’s cover what this pipeline does on an overview level. If you’d like more information on specific elements, be sure to start out with the Microsoft YAML reference. The YAML reference set of articles goes into detail about what purpose each element in the pipeline does.
The Trigger
The trigger is defined at the top. Choosing master here tells the pipeline to run as soon as a Git commit is detected. This trigger can be changed but is the default.
trigger:
  - master
The Name
The name is an optional attribute that dictates what you see when the pipeline runs among other places.
name: 'PowerShell Module Project'
Variables
Recall that ModuleVersion = '<ModuleVersion>' line in the module manifest. The module version is a placeholder to be defined at build time. You need to ensure this placeholder gets replaced by an actual version at build time.
One way to do that is to use semantic versioning. Semantic versioning is a common method to assign a version to a build artifact. In the YAML syntax below, you can see a major, minor, and patch number is defined. As-is, the major and minor numbers are static 0 numbers while the patch variable increments by one for every build that’s performed in this Azure DevOps pipeline for a PowerShell module.
All of these variables are then brought together in the form [major].[minor].[patch] via the buildVer variable. When the build runs, the buildVer variable will be 0.0.1, 0.0.2, 0.0.3 and so on.
variables:
  major: 0
  minor: 0
  patch: $(Build.BuildID)
  buildVer: $(major).$(minor).$(Build.BuildID)
The buildVer variable comes into play when the already-mentioned build script runs. You can see in the below snippet from the build script, the PowerShell script is reading the buildVer pipeline variable and inserting it into the module manifest.
$buildVersion = $env:BUILDVER
$manifestContent = $manifestContent -replace '<ModuleVersion>', $buildVersionThe Pool
Continuing down the Azure DevOps pipeline for a PowerShell module, you’ll then come across the pool. The pool is what defines the VM image the build agent will run on. Since you don’t need anything fancy here, the default Ubuntu build agent works just fine.
pool:
  vmImage: "ubuntu-latest"
Stages
We finally come to the stages. In this section is where the real magic happens. You have a lot of options here but for this tutorial, you have two common stages – Build, and Test . The Deploy stage will come in the next article.
Since the pipeline isn’t doing any fancy, each stage has an optional job with the same name.
Build
The Build stage is where the PowerShell script is executed. You can see that the PowerShell task is executed finding the build.ps1 script in the build_scripts folder.
- stage: Build
  jobs:
  - job: Build
    steps:
    - task: PowerShell@2
      inputs:
        filePath: '$(System.DefaultWorkingDirectory)/build_scripts/build.ps1'
Test
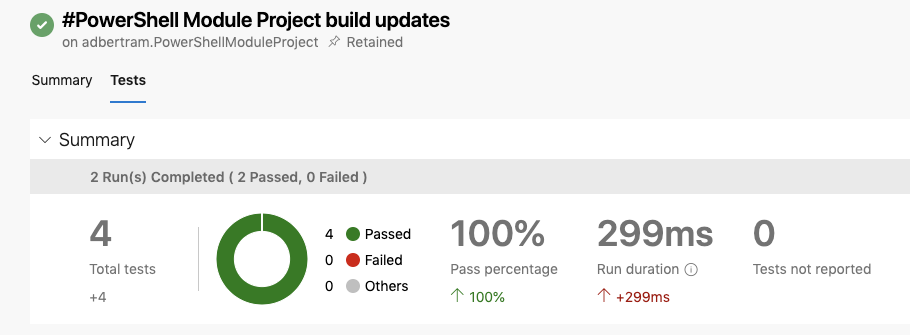
Next, you have the Test stage that’s executing the Pester Test Runner task which is running all tests in the PowerShellModuleProject.Tests.ps1 script and returns all test results to the PowerShellModuleProject.Tests.xml file. Once complete, the pipeline is publishing the test results which will show up on the pipeline’s test result page.
Almost done with your Azure DevOps pipeline for a PowerShell module!
Install-Module -Name PSScriptAnalyzer -Force

describe 'Module-level tests' {

    it 'the module imports successfully' {
        { Import-Module -Name "$PSScriptRoot\PowerShellModuleProject.psm1" -ErrorAction Stop } | should not throw
    }

    it 'the module has an associated manifest' {
        Test-Path "$PSScriptRoot\PowerShellModuleProject.psd1" | should -Be $true
    }

    it 'passes all default PSScriptAnalyzer rules' {
        Invoke-ScriptAnalyzer -Path "$PSScriptRoot\PowerShellModuleProject.psm1" | should -BeNullOrEmpty
    }

}
Deploy
Once the test stage is over, it’s onto the deploy stage. To learn how you can deploy this project to a NuGet feed using Azure Artifacts, check out Publishing NuGet Packages to Azure Artifacts Automatically!
Summary
In this tutorial, you learned one example of how to build an automated Azure DevOps pipeline for a PowerShell module. You should now have the basic knowledge to get more professional with your PowerShell modules and treat them as real code!


