


Do you need to create lots of scheduled tasks or automate scheduled tasks creation? If so, you’re in luck. In this article, you’re going to learn how to manage scheduled tasks using PowerShell.
Scheduled tasks that perform simple actions are quick to make and comfortable enough to repeat using the Task Scheduler app interface (GUI). But, system admins or developers may need to deploy more complicated tasks with multiple schedules, triggers, or arguments.
Luckily, you can use PowerShell to create and manage scheduled tasks. Managing scheduled tasks with PowerShell is made possible with the use of the ScheduledTasks module that’s built-in to Windows.
Prerequisites
Since this is a learning-by-doing type of article, there are some prerequisites so you can follow along. Below are the requirements to create PowerShell scheduled tasks using PowerShell.
- The examples in this article use Windows 10. But Windows Server 2012 and newer can do the same.
- Windows PowerShell 5.1 or PowerShell 7.
- It would help if you had a script editor such as Visual Studio Code, Notepad++, or Windows PowerShell ISE.
Creating a New Scheduled Task
A scheduled task requires a minimum of two components to work; action and trigger. Adding a security context and a set of related settings is optional. For better understanding, refer to the brief explanation for each scheduled task component below:
- Action – the action that is executed by the scheduled task. An action is typically to run a program or a script. A scheduled task can have more than one actions.
- Trigger – controls when the scheduled task runs. Triggers can be time-based, like, setting a schedule for daily or hourly recurrence. Triggers can also be activity-based, which runs a task based on detected activities like computer startup, a user logs in, or logged events.
- Principal – controls the security context used to run the scheduled task. Among other things, a principal includes the user account and the required privilege used by the scheduled task.
- Settings – is a set of options and conditions that controls how the scheduled task behavior. As an example, you can customize a task to get removed after a consecutive number of days that the task is unused.
During a scheduled task creation, the principal and settings are not explicitly required. The default values get used instead.
Creating a Task Action
When you want a scheduled task to do something, create new task action. In this example, you will create a task that will call the PowerShell.exe and run a script. Make sure to have your script editor ready.
Note that the script below is only a random example and you are not required to use it. You may use any script that you want. However, using the script below creates an easily verifiable result that can confirm whether the scheduled task worked.
The example script below, when executed, gets the top ten latest events from the application event log. Then, export the events to a new XML file in the c:\temp folder. Copy the code below, paste it into your script editor and save with the file name Get-LatestAppLog.ps1 in any folder you want.
# Get-LatestAppLog.ps1
## Define the log file
$logDir = 'c:\temp'
$logFile = "$logDir\AppLog_$(Get-Date -format 'yyyy-mm-dd_hh-mm-ss-tt').xml"
## Get the ten latest application log events
Get-WinEvent -LogName application -MaxEvents 10 |
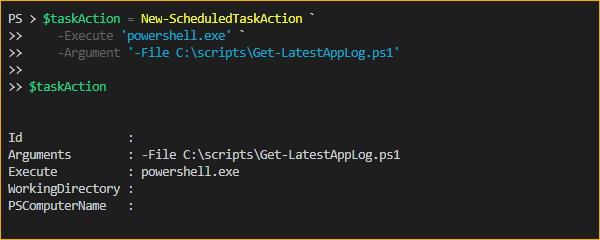
Export-CliXml $logFile -ForceThe code below uses the New-ScheduledTaskAction to create a new scheduled-task action object stored in the $taskAction variable. This action will call the powershell.exe executable and pass the argument to run the C:\scripts\Get-LatestAppLog.ps1.
# Create a new task action
$taskAction = New-ScheduledTaskAction `
    -Execute 'powershell.exe' `
    -Argument '-File C:\scripts\Get-LatestAppLog.ps1'
$taskAction
Copy the command above and run it in PowerShell. The resulting object in the $taskAction variable should look like the screenshot below.
Adding a Trigger
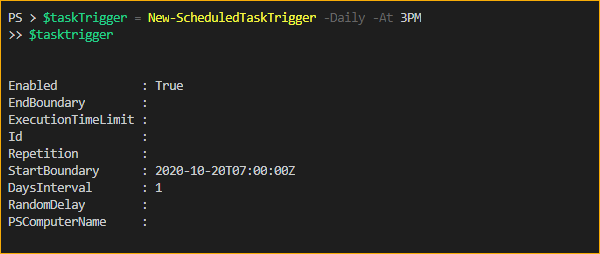
Now that you have a task action created, the next step is to define when the task must run. The cmdlet to use for creating a trigger is the New-ScheduledTaskTrigger cmdlet. The command below creates a trigger to run daily at 3 PM. Copy and run the code in PowerShell.
# Create a new trigger (Daily at 3 AM)
$taskTrigger = New-ScheduledTaskTrigger -Daily -At 3PM
$tasktrigger
The resulting object in the $tasktrigger variable should look the same as the image below.
Registering the Task
So far, you’ve created the base requirements to create a new scheduled task. The next step is to create the scheduled task and register it in the system.
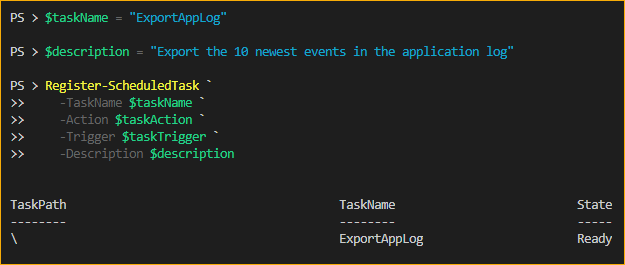
The code below uses the Register-ScheduledTask cmdlet to register the scheduled task. The -Action parameter is s needed to pass the task action object stored in the variable named $taskAction. The -Trigger parameter is needed to pass the $taskTrigger variable contents.
# Register the new PowerShell scheduled task

# The name of your scheduled task.
$taskName = "ExportAppLog"

# Describe the scheduled task.
$description = "Export the 10 newest events in the application log"

# Register the scheduled task
Register-ScheduledTask `
    -TaskName $taskName `
    -Action $taskAction `
    -Trigger $taskTrigger `
    -Description $description
Copy the code above and run it in PowerShell. As a result, the new scheduled task is registered, as shown below.
Running the Task
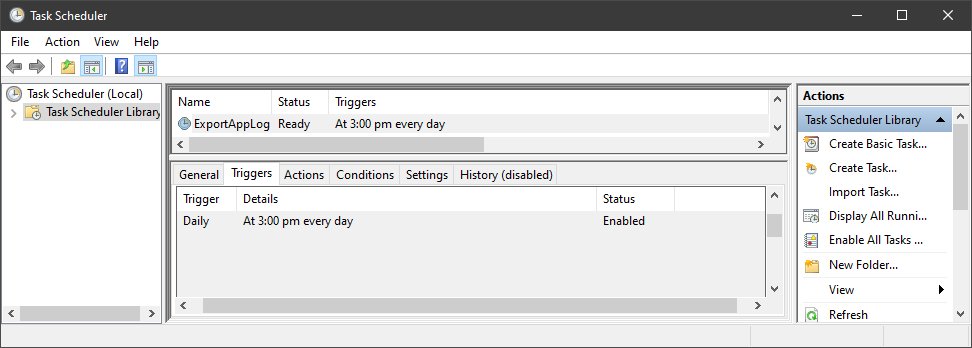
After creating a scheduled task, you should confirm that the scheduled task now exists in the system. Open the Task Scheduler and find the scheduled task from the list. You should see the registered task on the list.
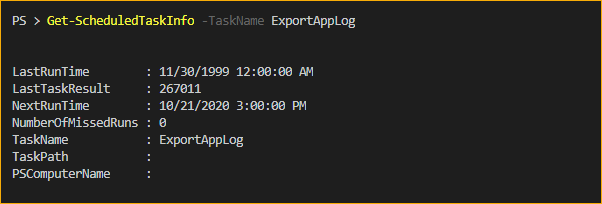
You can also confirm the registered scheduled task exists by running the PowerShell command below.
Get-ScheduledTaskInfo -TaskName ExportAppLog
You should then see a similar output, as the screenshot of the result below.
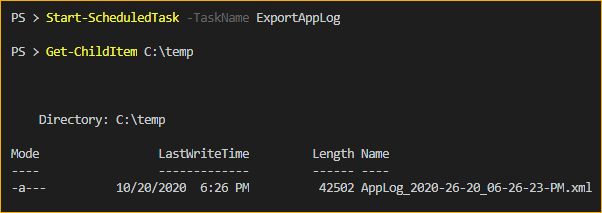
And finally, your new scheduled task should be working to determine whether what you did so far was successful. To test the scheduled task, you can either wait for the next run schedule or use the command below to manually trigger.
Start-ScheduledTask -TaskName ExportAppLog
After running the code, you should see a similar result to the one shown below. As you can see, running the code created an XML file, which indicates that the scheduled task worked as expected.
Updating an Existing Scheduled Task
After creating a scheduled task, some aspects of it may need updating at some point. Perhaps you want to make it run an hour earlier or change the location of the script file. Those are some of the changes to the scheduled task that may be required.
In the next sections, you will learn how to make changes to existing registered scheduled tasks using PowerShell.
Changing the User Account, Security Options, and Compatibility Settings
In the previous section, the scheduled task runs under the same user account context that created it. What if the task needs to run using another user account, like a service account, for example.
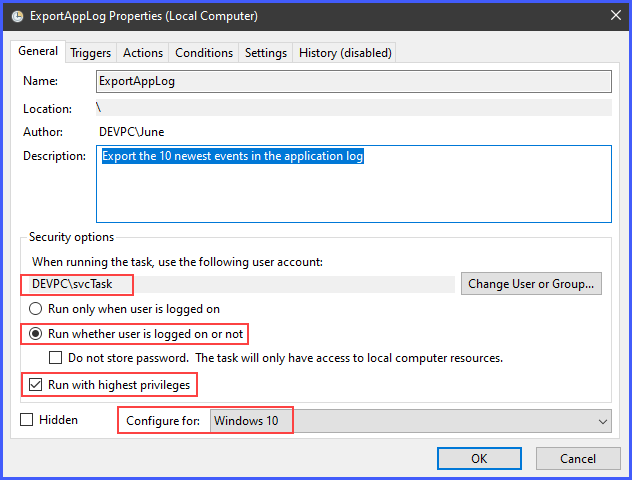
In this example, you will modify the scheduled task’s security options to the settings below.
- You must change the user account to run the scheduled task.
- Allow the task to run whether the user logged in or not.
- Run the with the highest levels of privileges.
- Set the task’s compatibility to Windows 10.
The first line in the code below will create a principal object with the new user account and set the task to run with the highest privileges. Make sure to change the value of the -UserID parameter as required. The second line configures the task’s compatibility with Windows 10.
Finally, the third line updates the ExportAppLog **scheduled task using the values stored in the $taskPrincipal and $taskSettings variables. Copy the code below and run it in PowerShell.
# Set the task principal's user ID and run level.
$taskPrincipal = New-ScheduledTaskPrincipal -UserId 'DEVPC\svcTask' -RunLevel Highest
# Set the task compatibility value to Windows 10.
$taskSettings = New-ScheduledTaskSettingsSet -Compatibility Win8
# Update the task principal settings
Set-ScheduledTask -TaskName 'ExportAppLog' -Principal $taskPrincipal -Settings $taskSettings
You’ll notice that the
-Compatibilityparameter value isWin8. Don’t get confused. It seems that Microsoft has not updated the “latest” version selection since Windows 8. Nevertheless, specifying theWin8value will result in Windows 10 compatibility.
Next, the command below uses the Set-ScheduledTask cmdlet to update the existing ExportAppLog **scheduled task. Make sure to change the password value in the -Password parameter to use the user account’s correct password.
# Update the task user account and password
Set-ScheduledTask -TaskName 'ExportAppLog' -User $taskPrincipal.UserID -Password 'PASSWORD'
After running the above command, the scheduled task gets updated. If you check the scheduled task, you can confirm that the security options have changed.
Changing the Trigger
Sometimes the trigger schedule needs to be changed. Maybe because of some operational adjustments or resource optimization. In any case, you can also use PowerShell to replace or add triggers to a scheduled task.
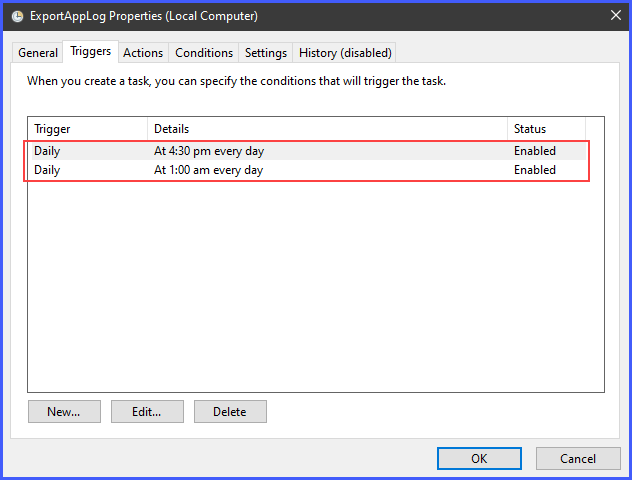
Currently, the scheduled task ExportAppLog is triggered every day at 3 PM. Suppose you need to change the trigger schedule to daily at 4:30 PM and 1:00 AM. You first need to create two new task trigger objects for the two schedules.
$taskTrigger1 = New-ScheduledTaskTrigger -Daily -At 4:30PM
$taskTrigger2 = New-ScheduledTaskTrigger -Daily -At 1:00AM
Then, to update the scheduled task’s trigger, use the command below. You’ll notice the -Trigger parameter accepts the two task trigger objects, namely $taskTrigger1 and $taskTrigger2.
Additionally, since you are updating a scheduled task with a password saved for the user account, you will need to provide the -User and -Password values again.
Set-ScheduledTask -TaskName 'ExportAppLog' -Trigger $taskTrigger1,$taskTrigger2 -User 'DEVPC\svcTask' -Password 'PASSWORD'
Below is the expected result after running the code.

And as you can see below, there are now two triggers in the ExportAppLog scheduled task.
Deleting and Restoring a Scheduled Task
Scheduled Tasks may become obsolete over time. At some point, you may need to perform housekeeping for scheduled tasks. In this section, you will learn how to manage scheduled task deletion in PowerShell.
Backing Up a Scheduled Task
Before you go on deleting scheduled tasks, it is good practice to make a backup first. Backing up scheduled tasks gives you a restore point for when things go wrong.
There’s no built-in cmdlet to make a scheduled task backup. But, everything in PowerShell is an object, and exporting objects to file is possible. When you need to backup an object to a file, use the Export-Clixml cmdlet.
The example code below exports the scheduled task with the name ExportAppLog to a file. You can change the filename and location per your preference.
# Export the scheduled task object to XML
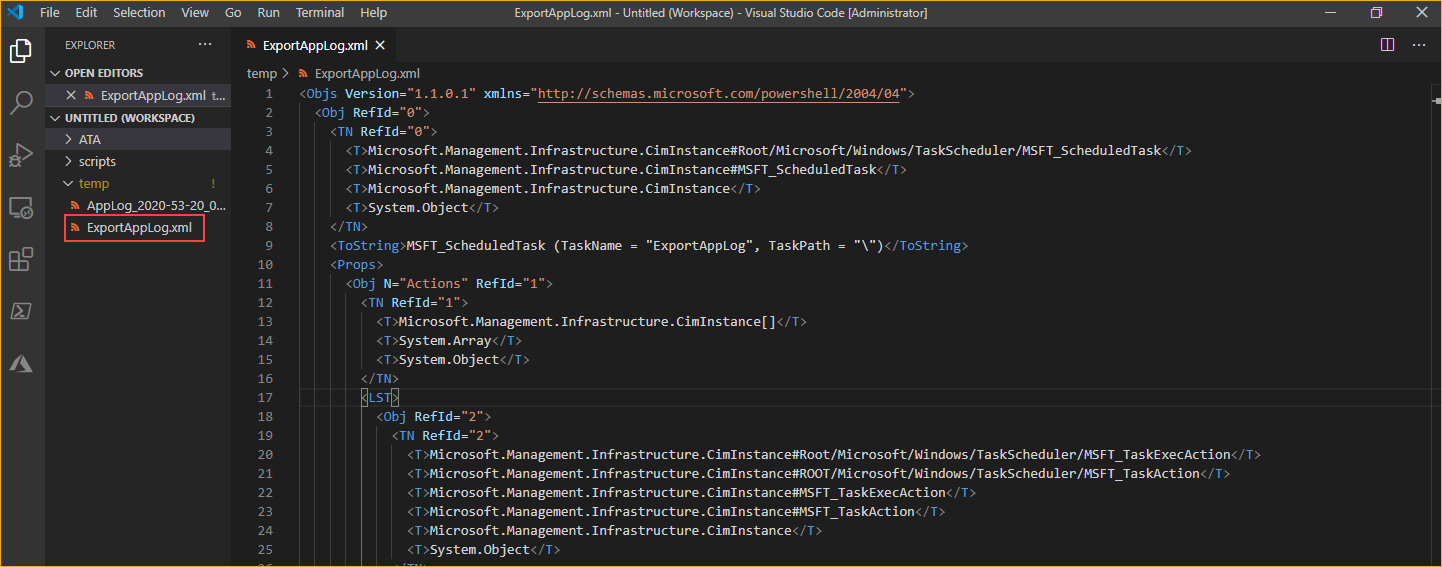
Get-ScheduledTask -TaskName 'ExportAppLog' | Export-Clixml c:\temp\ExportAppLog.xml
The image below displays the expected output XML file.
Deleting a Scheduled Task
Once you’ve secured a backup of the scheduled task, you can now remove that scheduled task. The code below deletes the scheduled task with the name ExportAppLog. Copy the code below and run in PowerShell.
# Unregister the scheduled task
Unregister-ScheduledTask -TaskName 'ExportAppLog' -Confirm:$false
Although not required, it is always good to confirm the result of the scheduled task deletion. Use the command below to verify that the scheduled task no longer exists.
Get-ScheduledTask -TaskName 'ExportAppLog'If the scheduled task no longer exists, you should get an output like the one shown below.

Note that the scheduled task backup does not include passwords.
Restoring a Scheduled Task
So you’ve deleted the scheduled task, and then it turns out that you weren’t supposed to! What now? This kind of situation makes you appreciate the concept of backups even more.
You can recreate the scheduled task using the XML backup file with PowerShell. And here’s how you can do the restore.
First, import the XML backup into your PowerShell session. The code below imports the file c:\temp\ExportAppLog.xml. As a result, the $stBackup variable will hold the imported data.
# Import the Schedule Task backup
$stBackup = Import-Clixml -Path c:\temp\ExportAppLog.xml
Next, use the code below to reset the task principal’s LogOnType value to Interactive. Resetting the LogonType value is critical to ensure successful scheduled task restoration.
# Reset the logon type to "Run only when the user is logged on."
$stBackup.Principal.LogonType = 'Interactive'
The next step is to create a new Scheduled Task object. The code below creates a new scheduled task. The $restoreTask variable stores the resulting scheduled task object.
You’ll notice that the values passed to the parameters are the ones imported from backup. The imported values are in the $restoreTask variable. The parameters are Action, Trigger, Settings, and Principal.
# Create a new Scheduled Task object using the imported values
$restoreTask = New-ScheduledTask `
    -Action $stBackup.Actions `
    -Trigger $stBackup.Triggers `
    -Settings $stBackup.Settings `
    -Principal $stBackup.Principal
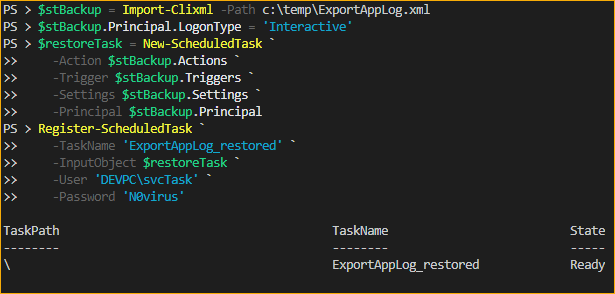
After creating the scheduled task object, it’s time to register the scheduled task. Use the code below to register the restored scheduled task.
In this example, the task name is ‘ExportAppLog_restored.’ The InputObject parameter accepts the scheduled task object in the $restoreTask variable. Make sure to use the correct user and password values.
Register-ScheduledTask `
    -TaskName 'ExportAppLog_restored' `
    -InputObject $restoreTask `
    -User 'DEVPC\svcTask' `
    -Password 'PASSWORD'
The code is now complete. Copy and run the code in PowerShell to restore the deleted scheduled task. The screenshot below shows the expected output after running the code.
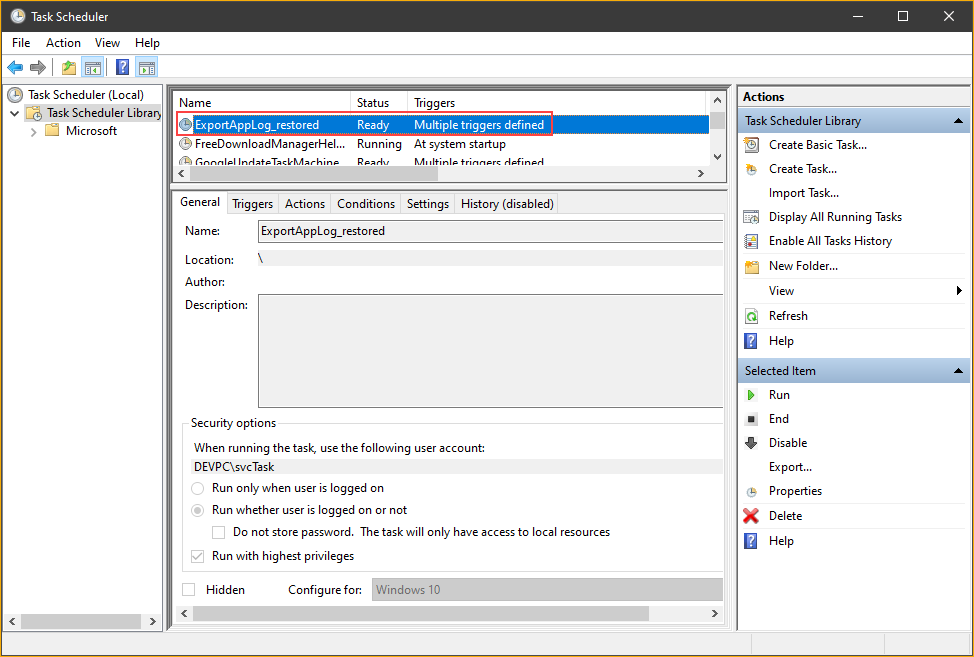
Now the scheduled task is registered in the system. The screenshot below shows the restored scheduled task.
Summary
The Scheduled Tasks feature in Windows is an excellent tool for setting up tasks or jobs. You can create the most basic to more complex tasks. The settings and options are flexible.
With the PowerShell Scheduled Tasks module, setting up scheduled tasks using PowerShell commands is made possible. This module provides the opportunity and means to create and deploy scheduled tasks programmatically on the local and remote computers.
Microsoft hasn’t updated the ScheduledTasks module, and some advanced settings are not yet easily exposed as PowerShell cmdlets. One example is creating a trigger for “On workstation unlock.” But, you can achieve these advanced settings by using the existing task scheduler CIM class.
Nevertheless, the PowerShell Scheduled Tasks module still is an excellent and capable tool that you can add to your PowerShell arsenal.


