


An indispensable tool for network administration is the Ping command in Linux. You may have used ping before for basic troubleshooting—but what does this command do?
The ping command sends Internet Control Message Protocol (ICMP) requests to remote or local hosts and waits for a reply. No reply could indicate a problem with the connection or the hosts themselves.
Read on and explore the practical ways of using the ping command in Linux!
Prerequisites
This tutorial will be a hands-on demonstration. If you’d like to follow along, be sure you have a Linux computer with an internet connection. This tutorial uses an Ubuntu 20.04 computer.
Also, make sure that you have already opened a terminal session on your Linux computer.
Checking the Local Network Connectivity
Imagine you’re developing a web application. The test fails when you try to access the application through the host’s loopback address (127.0.0.1). Before pulling your hair out troubleshooting the application, ensure that the TCP/IP protocol works internally using the ping command.
The default loopback addresses are 127.0.0.1 and 0:0:0:0:0:0:0:1 (or ::1) for IPv4 and IPv6, respectively.
To check the connectivity of the loopback address, run the below ping command followed by the loopback address on the terminal. This command demonstrates the most basic usage of the ping command in Linux.
ping 127.0.0.1
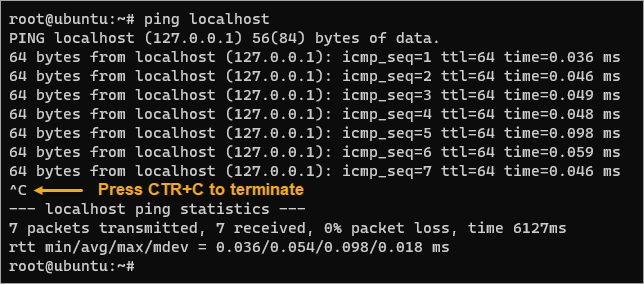
And if the loopback works fine, you should see a similar output to the screenshot below.

Alternatively, pinging the localhost hostname should give the same result because it resolves to the loopback address by default.

To terminate the ping command, press CTRL+C on the terminal. Otherwise, the ping command will run continuously.
Note: Do not press CTRL+Z to stop the ping command. Doing so will stop the command, but the process will remain running in the background.
Understanding the Ping Command Linux Output
Before going any further, you would benefit from understanding the output explicitly instead of only interpreting it as “it works.” Refer to the image below and the breakdown of values that follows.
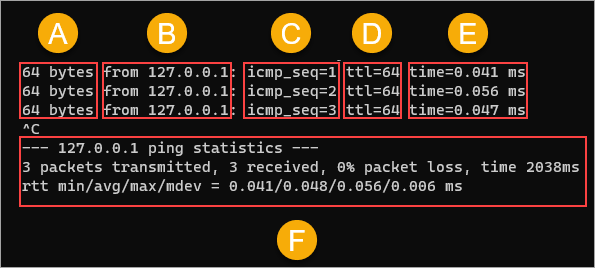
- A (
bytes) – Shows the ICMP echo request (packet) size in bytes. - B (
from) – Shows the target host’s IP addressfromwhere thepingcommand receives the response. - C (
icmp_seq) – Indicates the order of packet transmission. As you can see, ping sends the ICMP requests in sequence. The value showsicmp_seq=N, whereNis the order number. - D (
TTL) – Shows the ICMP request’s Time-To-Live (TTL) value. The default value is 64, which means that the request can only live up to a maximum of 64 hops and will expire after. The maximum value possible is 255. - E (
time) – The total time (milliseconds) elapsed the request reached the destination and circled back to the source. This value is also known as the Round Trip Time (RTT). Notice that thetimevalues are less than 0.1 milliseconds in this example since the target is the same machine. Thetimevalue increases naturally when thepingdestinations are remote or have an internet address. - F (
statistics) – Shows the summary and statistics of thepingcommand results. The summary shows the number of packets transmitted and received, packet loss percentage, and the total time. The bottom line shows the minimum, average (mean value), maximum, and standard deviation of the total RTT.
Forcing the Internet Protocol Version
The ping command uses the IPv4 by default. But what if you’re testing your application’s compatibility with IPv6? To force the ping command to use IPv6, you must specify the -6 option to your ping command in Linux, as you can see in the code below.
ping -6 localhost
As you can see below, the from reply shows that the response came from the IPv6 loopback address (::1).

Instead of the -6 option, the -4 option forces ping to use IPv4. But since ping defaults to IPv4, you typically do not need to specify the -4 option.
Limiting the Number of Replies
In the previous examples, you had to press CTRL+C to terminate the ping command because it would run continuously otherwise.
The -c option lets you specify the number of replies the ping command receives before it stops. Why use this option? In some cases, you might want to test how your system responds to 10, 100, 1000 ICMP packets, and so on.
Run the following command to send five ICMP packets to the target host. Replace 5 with the number of ICMP responses to receive before stopping.
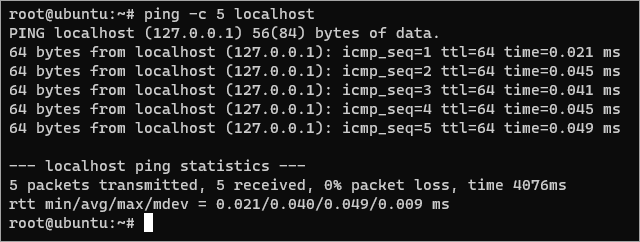
ping -c 5 localhost
As you can see below, the ping command stopped after the fifth request (icmd_seq=5), and you didn’t need to press CTRL+C to terminate it.
Adjusting the Request Interval
Suppose you want to test the network connection between two devices, and one of them has low bandwidth. In this case, you may increase the interval between each request so that the second device has enough time to process the current ICMP packet.
The ping command sends the subsequent ICMP request one second after completing the previous one by default. To adjust the delay, you must specify the -i option followed by the delay value in seconds.
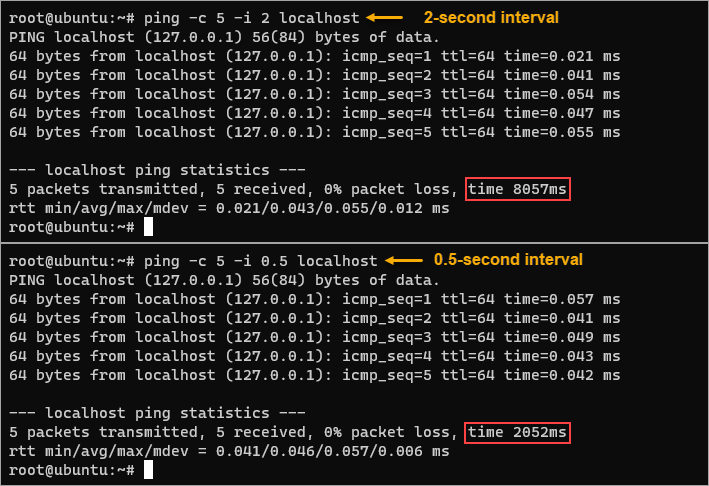
For example, run the below ping command to send five ICMP requests with a two-second interval between requests.
ping -c 5 -i 2 localhost
Another example, run the below ping command to send five ICMP requests with a half a second interval between each request.
ping -c 5 -i 0.5 localhost
Comparing the results of both commands having different intervals shows the difference between the total time values.
Simulating a Flooding Attack
A ping flood is a type of Denial of Service (DoS) attack in which the attacker attempts to overwhelm a targeted device with ICMP packets. The attack aims to overwhelm the targeted machine to respond to so many requests that it becomes overloaded and unavailable to legitimate users.
You can simulate a flood attack to test how your system responds to an attack. Don’t worry, though. The ping flood simulation is controlled, and you can stop it anytime by pressing CTRL+C.
Run the following command on your local machine to see how many requests your device can handle per second. The -f option means to send several ping packets rapidly and with no arbitrary limit.
Replace localhost with the IP address or hostname of the app you want to test. This example simulates the ping flood on the local host only. Let the ping command run for about five seconds, and then press CTRL+C to terminate.
The ping -f command requires you to be the root user or have sudo privileges.
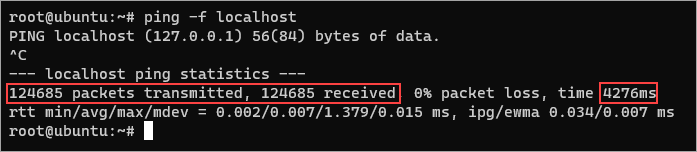
ping -f localhost
As you can see below, the ping command managed to send and receive 124,685 ICMP packets within 4276 milliseconds with 0% packet loss. Pretty good, huh? But, in a real-life use case, you will see some packet loss. Packet loss is inevitable because the network is not perfect.
Checking Internet Connectivity
Everyone uses the internet in some way, right? Suppose you try to load a website using your browser, but the page load time feels sluggish. The symptom would indicate that the DNS resolution is working, but something affects the network speed.
Diagnosing the issue without third-party tools would include the ping command. The command usage is the same as when you test the local network connectivity. But instead of targeting the loopback address, you would specify a public IP or web address.
Run the below command to ping an external public website. Replace adamtheautomator.com with another web address as you wish.
ping -c 5 adamtheautomator.com
Right off the bat, you’ll notice that the time value is relatively higher than when you ping the localhost. This increase in time spent is due to the target address adamtheautomator.com is not within the same host and not even on the same network.
In the previous steps, your ping command is successful, but in real-world usage, there are times when the ping command will fail for many possible reasons.
The following are some common errors and how to troubleshoot them.
- Destination host unreachable – This error means that there is no route to the destination host. This error can happen if the host or domain is down.
- Request timed out – This error means that the request to the destination host took too long(taken over 4 seconds or 4000 milliseconds), and the connection timed out. This error can happen if the destination host is too busy to respond, a firewall blocking the connection, or defective networking hardware (cable, router, etc.).
- Unknown host – This error means that the DNS can not resolve the hostname to an IP address. Check that you enter the correct hostname. If you suspect that your router might not be working correctly, try restarting your router.
- TTL Expired in Transit – This error means that the ICMP request had expired before it reached its destination. Your ping packet reduces to zero (0) before reaching the destination host. In most cases, a misconfiguration in your routing table can cause this error. Consider checking your route table to see if there is a problem.
In Case You Didn’t Know: Players refer to ping as their connection to the game server in the gaming community. A low ping means a more responsive connection, especially in fast-paced games. A high ping indicates a less responsive connection and can make the game feel sluggish.
Some Internet Service Providers (ISPs) return a search page instead of an error message when you try to connect to a website that doesn’t exist. You may get a false-positive result because you’re getting a response instead of an error.
Saving Ping Output to a File
Most commands, if not all, only return the results on the screen, and the ping command in Linux is no different. The Linux terminal has built-in output redirection operators that let you redirect the output to a file.
These redirect operators are the following:
(>) character, which will overwrite the file’s contents, and the;
(>>) character, which will append the output to the existing content.
But why would you want to save the ping results to a file? Primarily for record-keeping and later analysis using a text editor or a log parser.
You can also use a spreadsheet program to create a graph that shows how the ping time changes over time.
Run the following command to save the ping output to a file. This command writes all standard output from the ping command to a file named log.txt on disk.
ping -c 10 localhost > log.txt
While the ping command is running, you’ll notice that there’s no output on the screen.
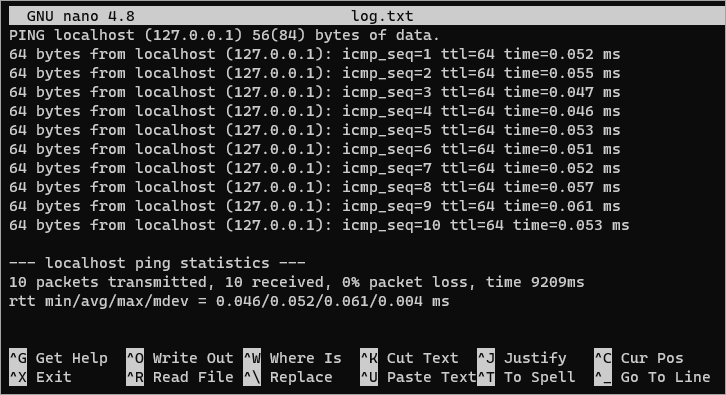
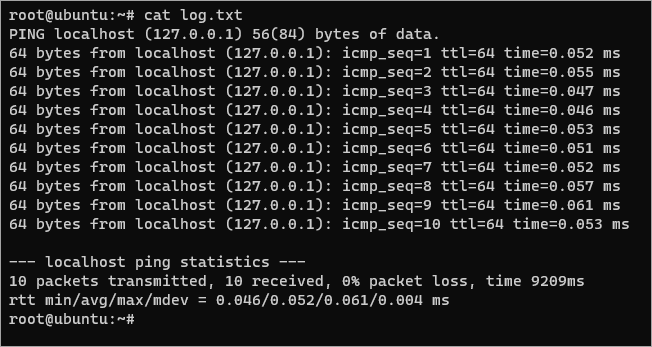
Now, open the log.txt file in a text editor, such as nano. Or display the file’s contents by running the cat command.
# Open in a text editor
nano log.txt
# OR
# Display the contents on the screen
cat log.txt
Conclusion
In this tutorial, you’ve learned how to use the ping command Linux with various practical examples. You’ve also learned how to save the ping output to a file on disk so that you can analyze it later.
At this point, you should have a good understanding of how the ping command works and how it can be helpful. But before you go off and start pinging everything in sight, there are a few rules you must enable in your security groups to allow ICMP traffic.
Thank you for reading, and happy learning!


