

Are you worried about how you can freely access the internet without many involved restrictions and data insecurities? Worry no more! Start hosting your VPN server using OpenVPN in Docker.
With Docker and OpenVPN technologies, you can set up and run your VPN server in no time. And in this tutorial, you’ll learn the basic fundamentals of running an OpenVPN server hosted in a Docker container.
Stay tuned and keep your VPN server secure with OpenVPN Docker!
Running OpenVPN in Docker secures a network path, but it does not reduce personal records listed by data brokers. If that is part of the privacy work, compare MyDataRemoval privacy monitoring and data broker removal workflows before choosing a paid data removal service.
Prerequisites
This tutorial will be a hands-on demonstration. If you follow along, you’ll need the following:
- A Linux-based operating system (OS) – This tutorial uses Ubuntu v22.04, but other Linux distributions will work.
- Docker installed and running – This tutorial uses Docker v20.10.17.
- An Android device with the OpenVPN Connect app installed – This tutorial uses Android v11 and OpenVPN Connect v3.2.7.
Creating a Docker Container for OpenVPN
Containerizing is like packaging up code and all its dependencies as a standard software unit to quickly and reliably run your application. There are several ways of creating an OpenVPN Docker container. You can either build the container from scratch or pull a ready-made container from the Docker Hub.
But in this tutorial, you’ll use an existing OpenVPN Docker image file. Ready-made containers offer several benefits as they are thoroughly tested against various vulnerabilities with a backing of a vast community of developers. Furthermore, these containers help you save time and eliminate the need to reinvent the wheel.
To create an OpenVPN Docker container:
1. Open your terminal and run the below OVPN_DATA command, which doesn’t provide output but sets a data volume name to ovpn-data-test to the OVPN_DATA variable.
OVPN_DATA="ovpn-data-test"2. Next, run the following docker volume create command to create a data volume with the –name you set in the $OVPN_DATA variable.
This command doesn’t provide output but creates a data volume container for OpenVPN where all data, configuration files, and certificates are stored.
docker volume create --name $OVPN_DATA3. Lastly, run the following docker run command to download and install the OpenVPN Docker image with the following:
- Specify the storage space (
-v) inside the container that is separate from the rest of the container file system. In this case, the OpenVPN Docker image is stored in the/etc/openvpndirectory.
- Specify the logging mechanism (
--log-driver) that keeps the running containers and services information (none).
- Instructs Docker to automatically remove (–rm) the container when it already exists.
Be sure to replace (YourPublicIP.com) with your server’s (host) public IP or domain name (if you have one) via UDP protocol. But note that you can also use TCP protocol.
TCP is a connection-oriented protocol, whereas UDP is a connectionless protocol
docker run -v $OVPN_DATA:/etc/openvpn --log-driver=none --rm kylemanna/openvpn ovpn_genconfig -u udp://YourPublicIP.com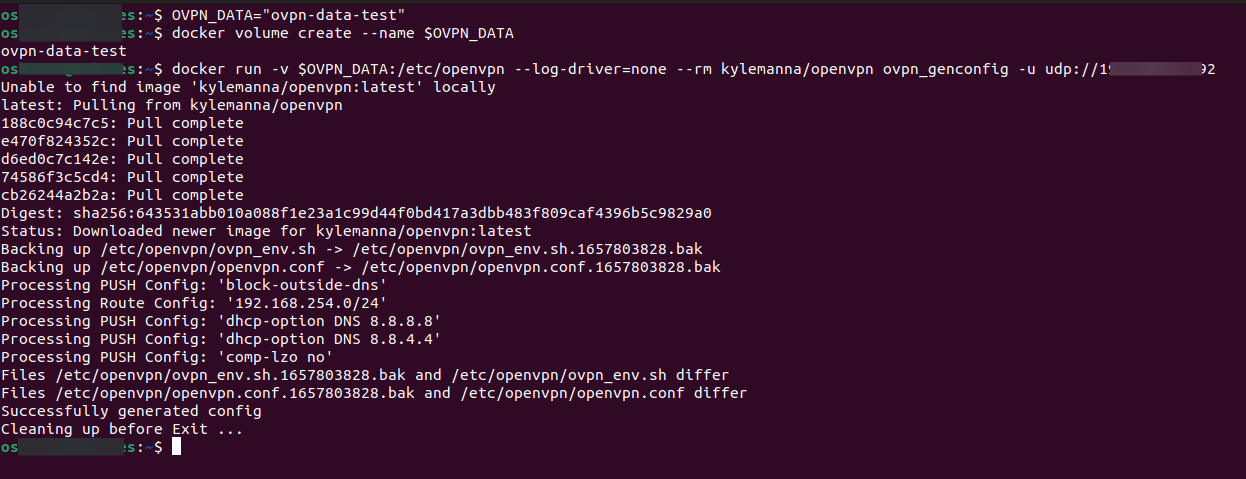
Note that if you intend to use self-hosting or public IP, you must do port forwarding on your router/modem.
Securing OpenVPN Client with Certificates
You’ve successfully installed the OpenVPN Docker client on your machine, so yay! But before using OpenVPN, you must first set up the OpenVPN client’s configuration.
Just because you’re working on OpenVPN doesn’t mean you must open your VPN server to the world. You’ll need certificates to secure your OpenVPN client:
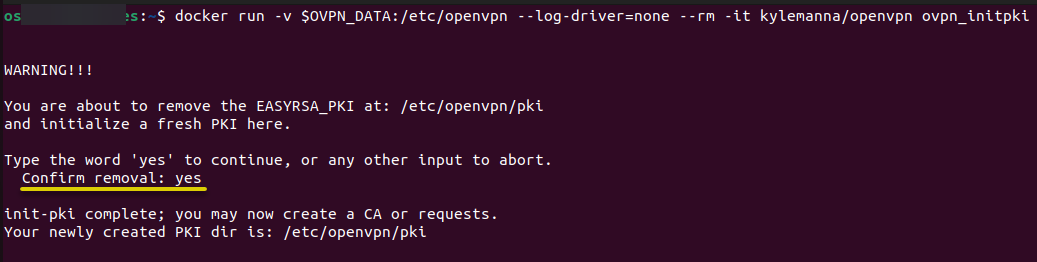
1. Run the below docker run command to generate and retrieve the CA and client certificates. This command creates running OpenVPN containers (–it) from the image specified inside the main container.
In most cases, generating CA server certificates takes time, depending on the resources of the machine you are using.
docker run -v $OVPN_DATA:/etc/openvpn --log-driver=none --rm -it kylemanna/openvpn ovpn_initpkiType yes, and press Enter, as shown below, to initiate the OpenVPN PKI system.
2. Next, provide and confirm a new CA certificate password, and press Enter. Note the password somewhere safe as you need it later while setting up and generating a client certificate.
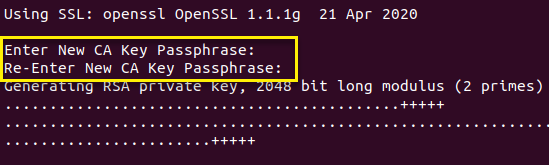
3. Set a unique name for your CA certificate, and press Enter.
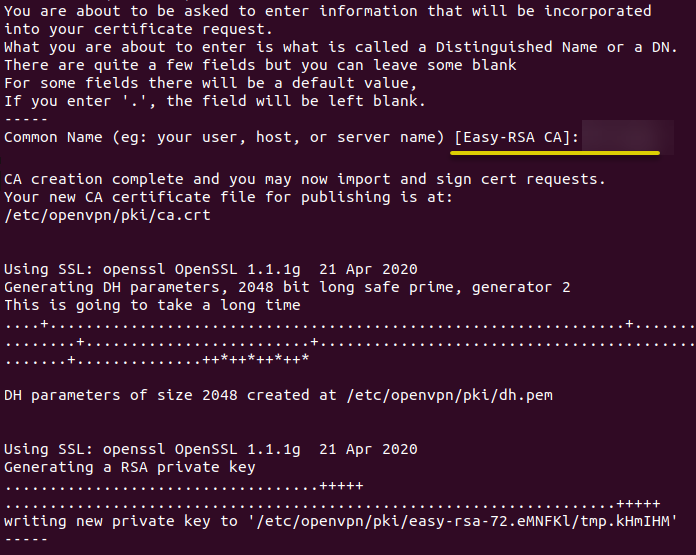
4. Now, enter the CA passphrase you set in step two to check that the request matches the signature.

5. Enter your passphrase again to generate a private key.

6. Next, run the below command to start the OpenVPN server service on Docker to set up an OpenVPN client, where:
- The -p option sets the port (1194) that listens and initiates the connection between the server and the client.
You can change port 1194 to fit your preferences if you’re not comfortable using the default OpenVPN port.
- The –cap-add=NET_ADMIN argument applies the additional Linux capabilities by modifying the network interfaces that Docker does not grant by default.
docker run -v $OVPN_DATA:/etc/openvpn -d -p 1194:1194/udp --cap-add=NET_ADMIN kylemanna/openvpn
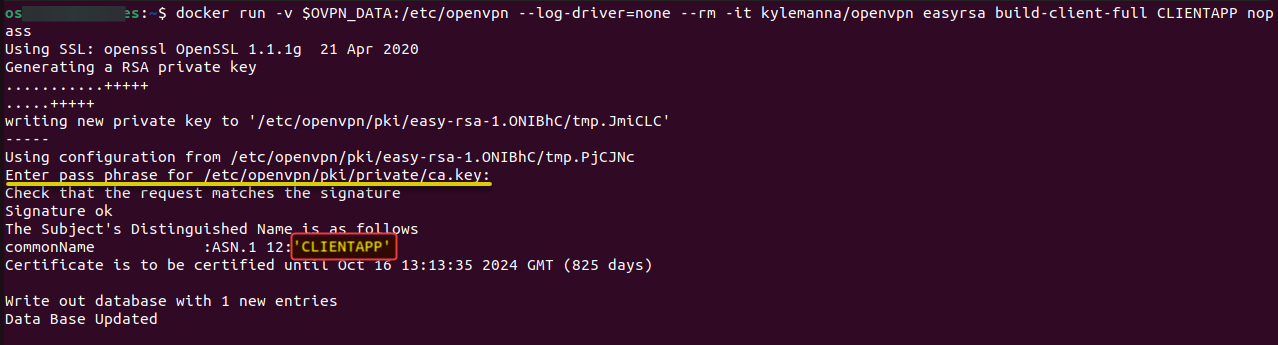
7. Once the port is set, run the below docker run command to perform the following:
- Generate the client certificate and download the client configuration file (.ovpn) from the Docker container to the host server. The generated certificate is password-less, as specified in the no-pass argument in the command.
- Set the name of the file of the OpenVPN certificate and client identification to CLIENTAPP. The certificate is stored in the host’s user directory, not the Docker container.
docker run -v $OVPN_DATA:/etc/openvpn --log-driver=none --rm -it kylemanna/openvpn easyrsa build-client-full CLIENTAPP nopassEnter your passphrase, as shown below, to complete generating the certificate.
8. Next, run the command below to generate and download the OpenVPN connection (ovpn_getclient) config file from the container to the host server.
docker run -v $OVPN_DATA:/etc/openvpn --log-driver=none --rm kylemanna/openvpn ovpn_getclient CLIENTAPP > CLIENTAPP.ovpn9. Navigate to the user/home directory in your host server (Linux machine), and transfer the .ovpn file (CLIENTAPP.ovpn) to your Android device.
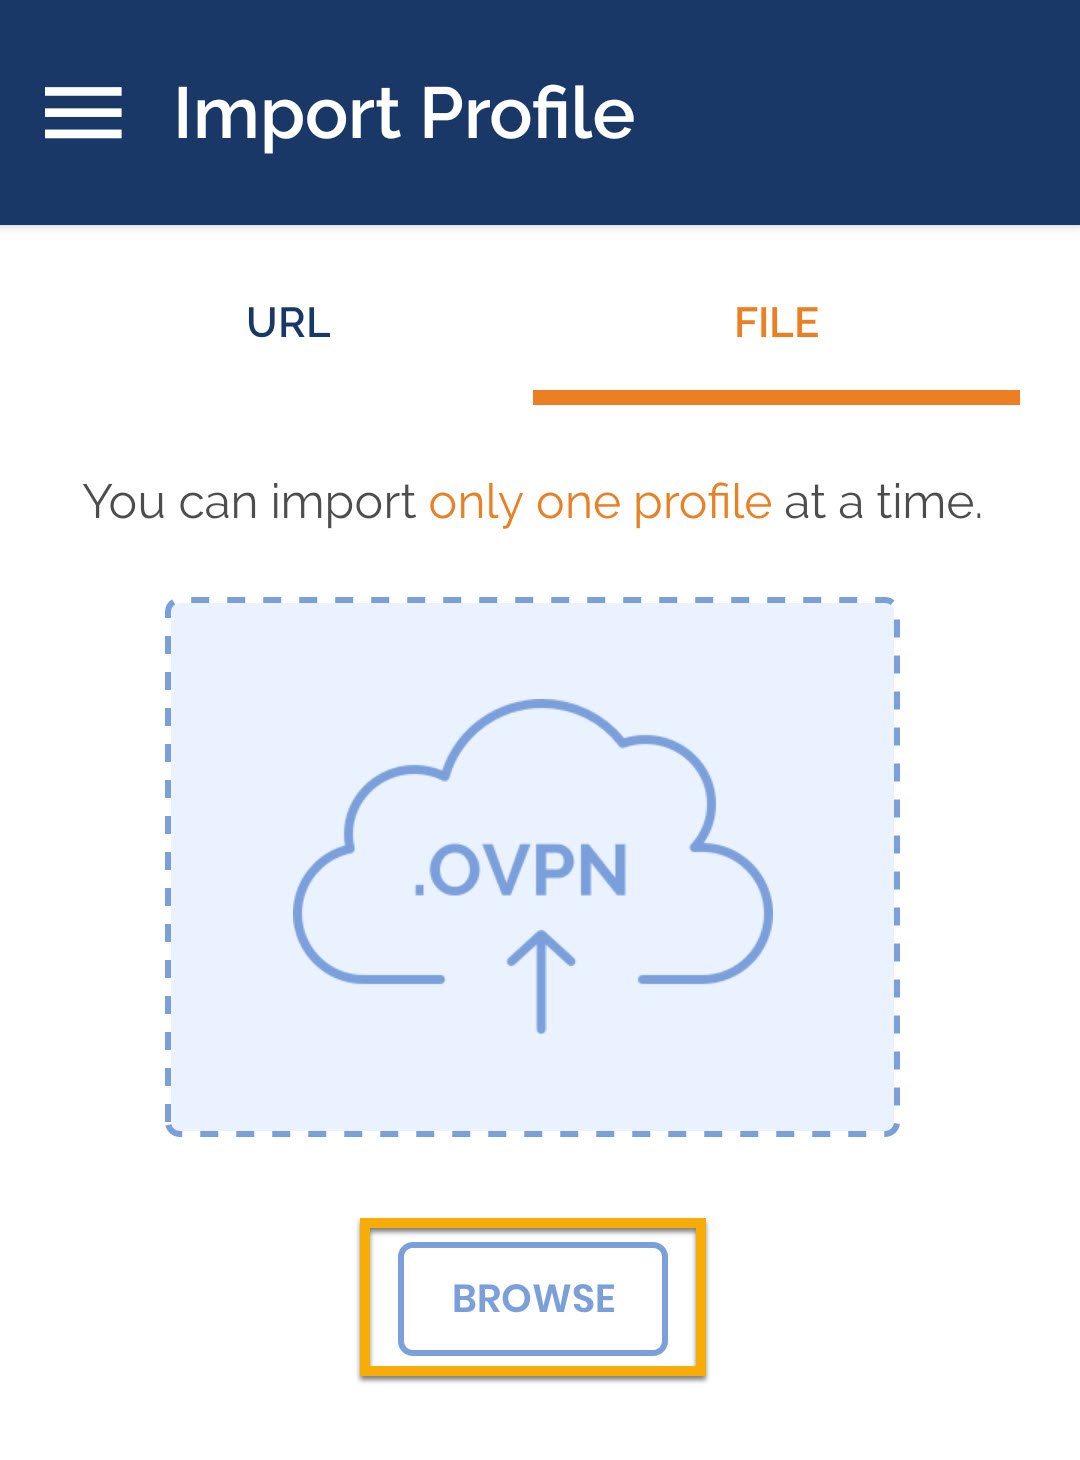
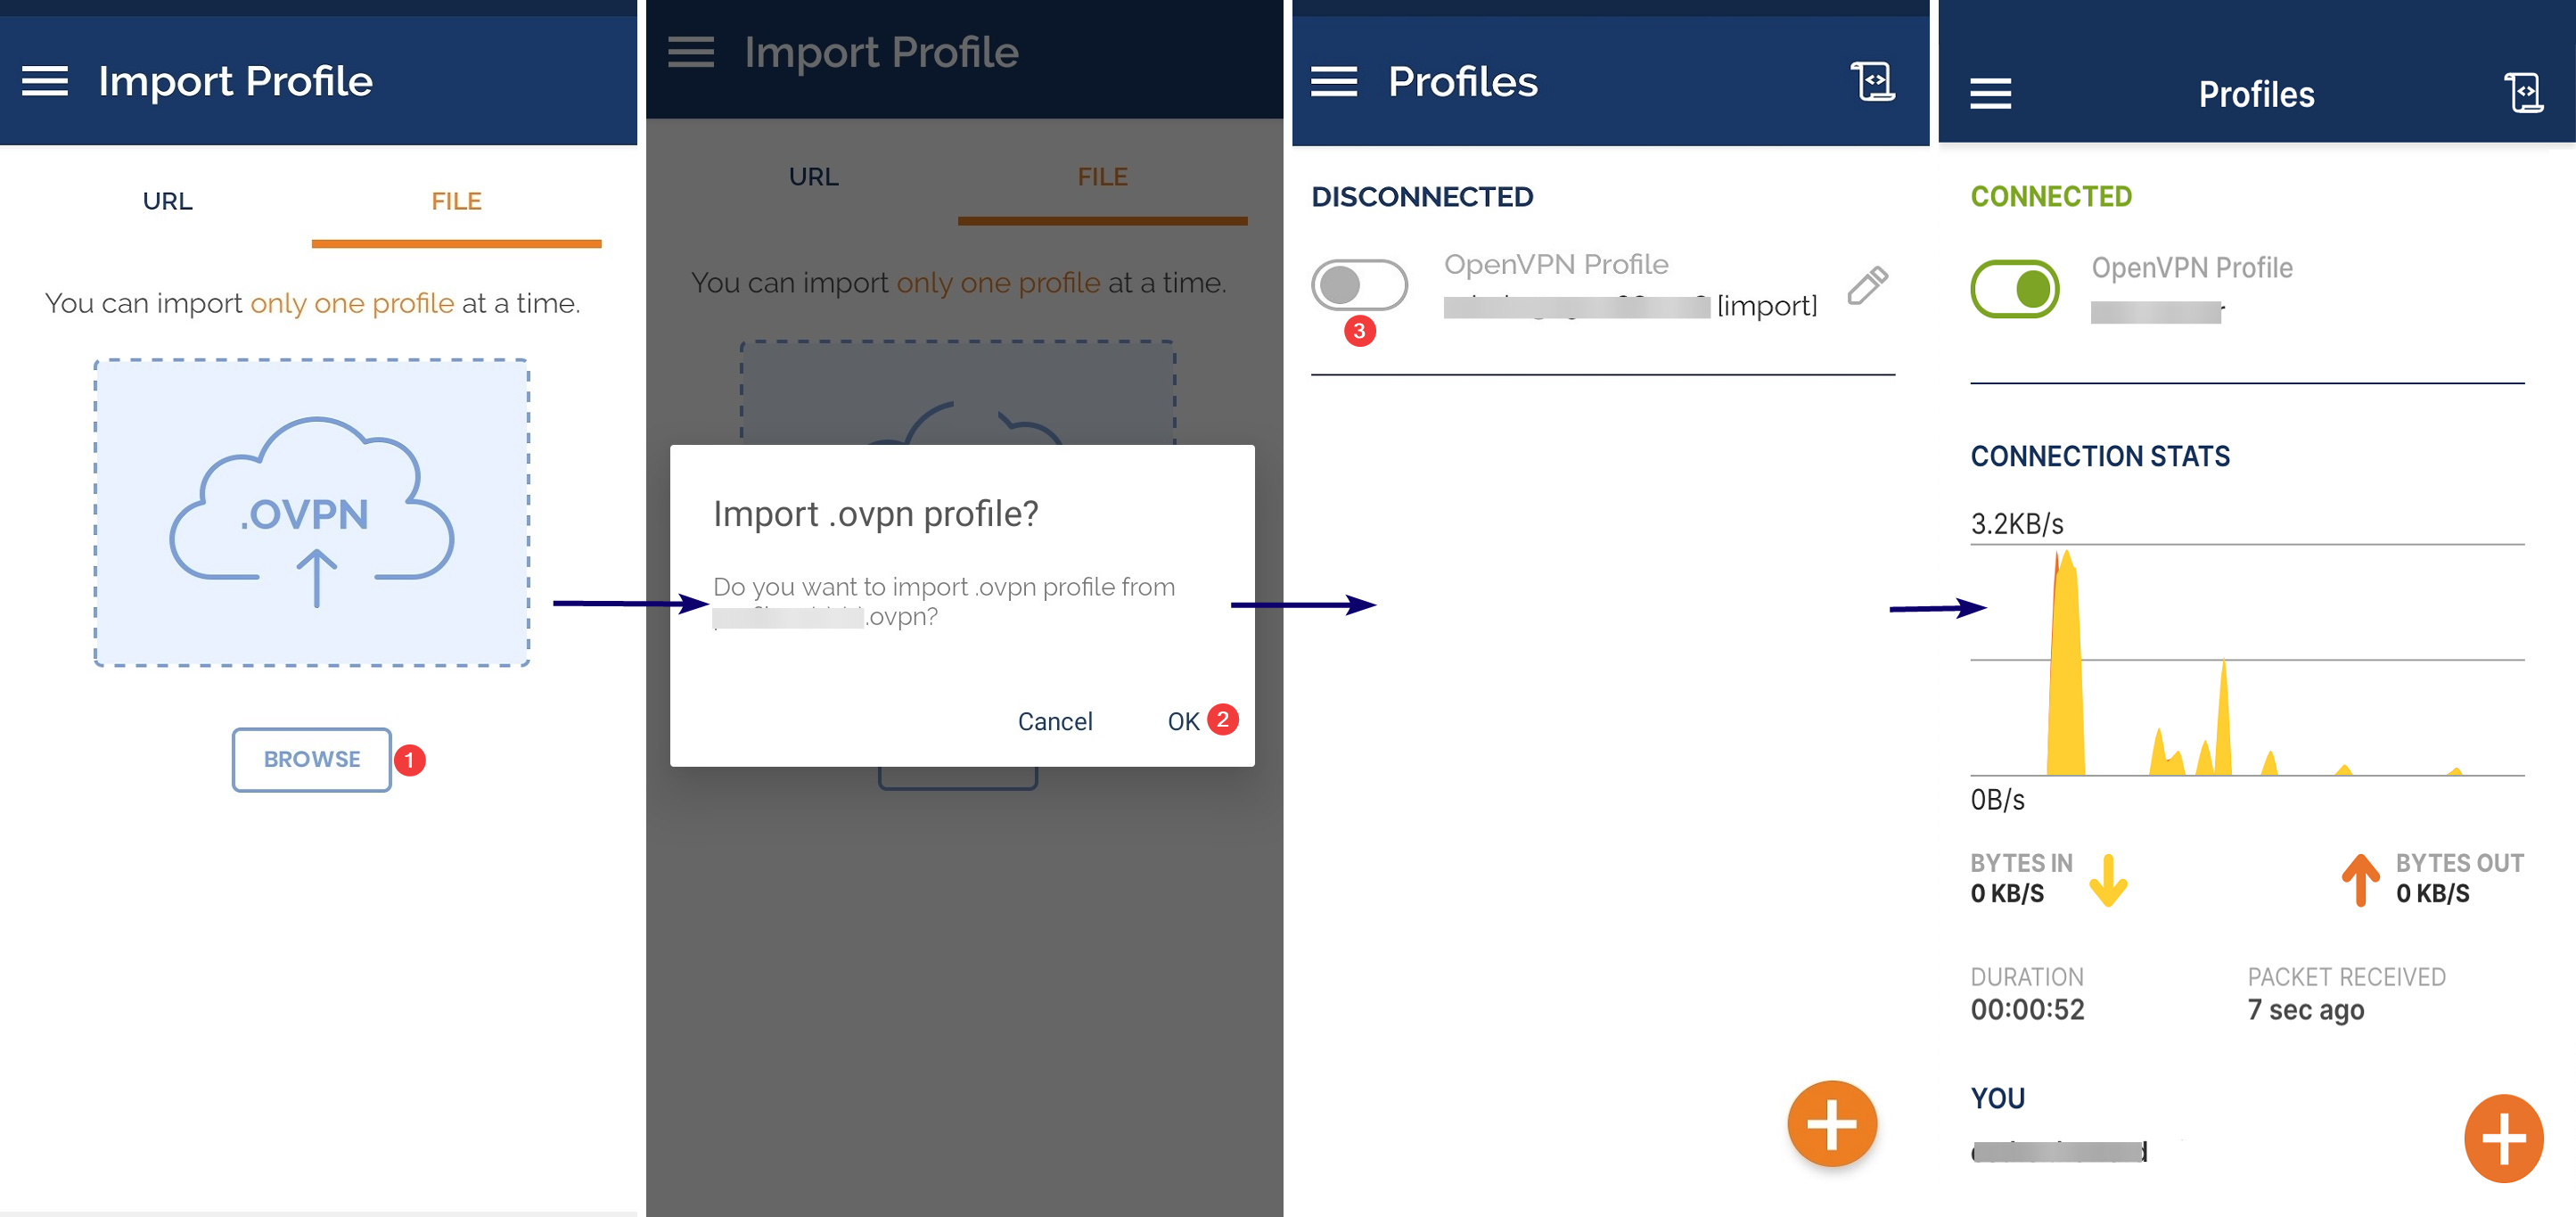
10. Finally, launch your OpenVPN Connect client app on your Android device.
Tap on BROWSE under the FILE tab, and select the .ovpn file (CLIENTAPP.ovpn) you transferred to your Android device. Doing so adds a new profile to the OpenVPN Connect client.
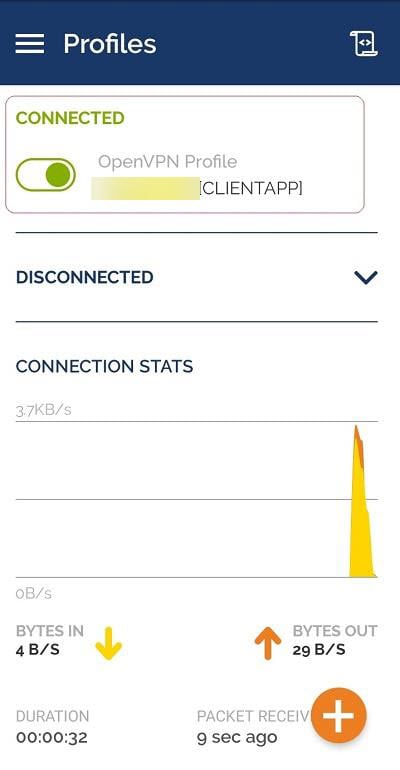
Upon successful connection, you’ll see the result below.
Accessing the OpenVPN Web UI
Are you worried about the number of commands you had to cover to access your VPN server? Why not try a simple web-based UI?
OpenVPN offers a web-based installation and configuration toolset that enables fast VPN remote access solutions deployment. The tool kit comes in a single package called the OpenVPN access server.
To access the OpenVPN web UI, you must install the package:
1. Run the following docker pull command to download and install the latest OpenVPN Docker container (openvpn-as) from the Linux Server Docker Hub (linuxserver).
docker pull linuxserver/openvpn-as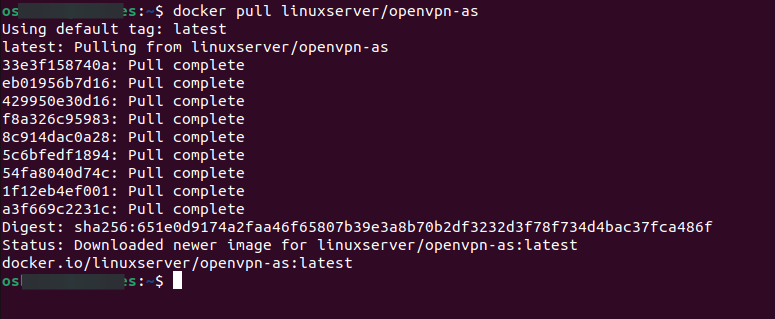
2. Once downloaded, run the docker create command below to create a new Docker container named openvpn-as with the following:
-v /home/docker/openvpn-as/config: /config– Sets the directory to store the config files.
--restart=always– Ensures the container always starts on system boot. You can opt not to add this argument if you don’t want the container to restart.
-e PGID=1001 -e PUID=1001– Sets the user ID to eliminate permission issues between the host server and the container.
-e TZ=Africa/Nairobi– Specifies the time zone information.
- –net=host –privileged – Dictates how OpenVPN Access Server runs in the container.
docker create --name=openvpn-as --restart=always -v /home/docker/openvpn-as/config:/config -e INTERFACE=eth0 -e PGID=1001 -e PUID=1001 -e TZ=Africa/Nairobi --net=host --privileged linuxserver/openvpn-as
3. Next, run the below docker start command to access the OpenVPN web UI via the OpenVPN Access Server Docker container you created in step two.
docker start openvpn-as
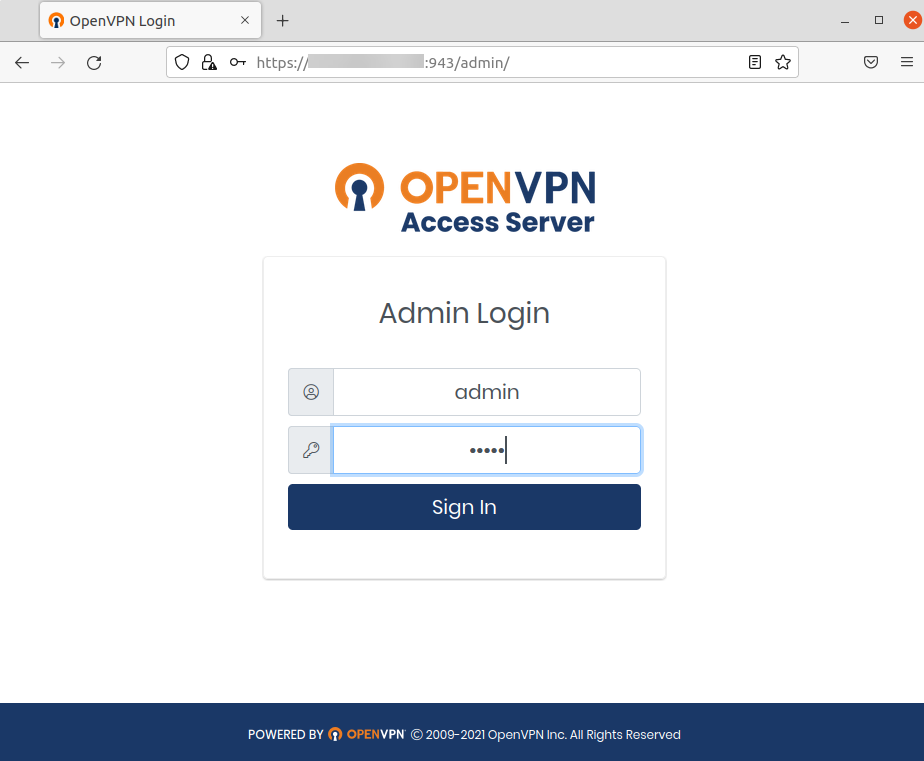
4. Lastly, open your favorite web browser and navigate to the OpenVPN web UI with your local IP address (e.g., https://YourIP:943/admin). Replace YourIP with your actual server’s IP address.
You’ll be greeted with OpenVPN Access Server’s login page if all goes well, as shown below.
Input admin and password for the Username and Password, and click Sign in to access the OpenVPN Access Server dashboard.
Note that the default username and password are admin and password, respectively. You can change the credentials as per your preferences.
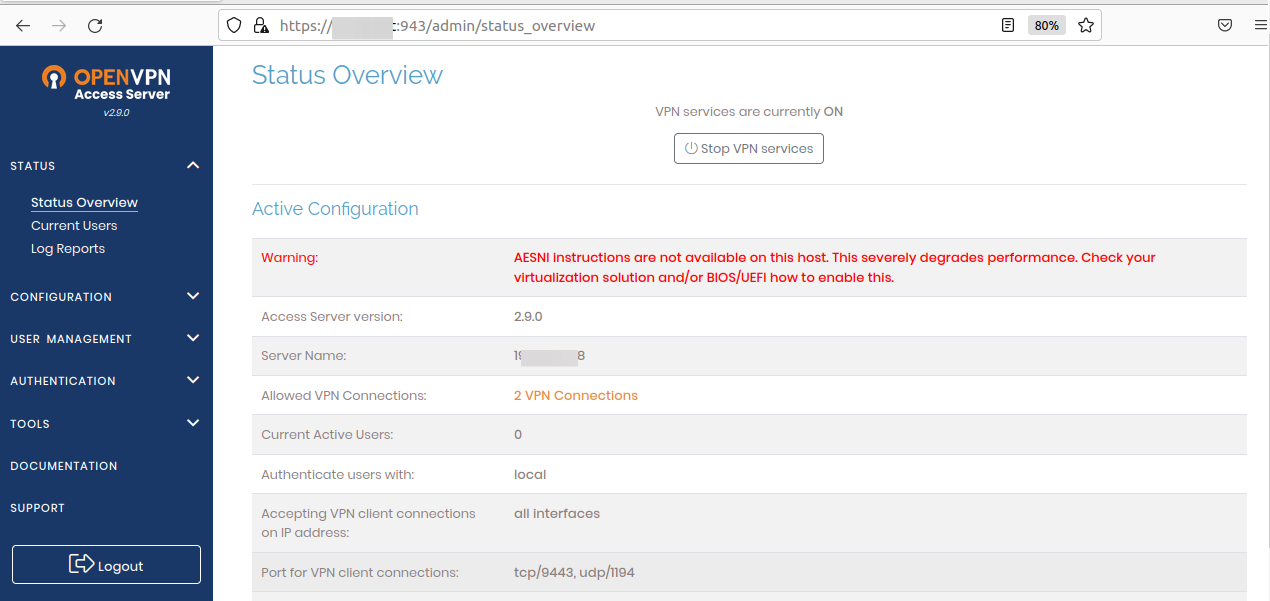
After logging in, you’ll see the OpenVPN Access Server dashboard below.
Configuring DNS For Faster and Secure Connection
At this point, you’re OpenVPN Access Server is working correctly. But to improve your VPN server’s performance, you must configure the DNS.
To configure DNS, you must access the OpenVPN server web UI and update the DNS settings with Google or your preferred DNS addresses. Google offers the fastest DNS servers available, which you’ll use in your OpenVPN Access Server.
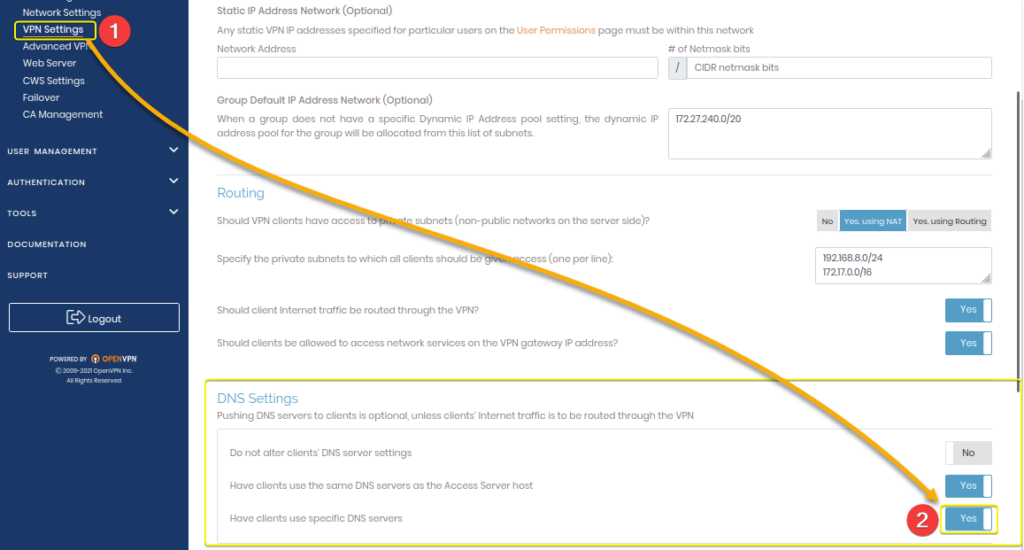
1. Click VPN Settings (left panel) under the CONFIGURATION tab on your OpenVPN Access Server dashboard.
Scroll down to the DNS Settings section, and enable the Have clients use Specific DNS servers option, as shown below.
2. Next, update the Primary (8.8.8.8) and Secondary DNS Server (8.8.8.4) with Google DNS addresses as below, and click on Save Settings to save the changes.
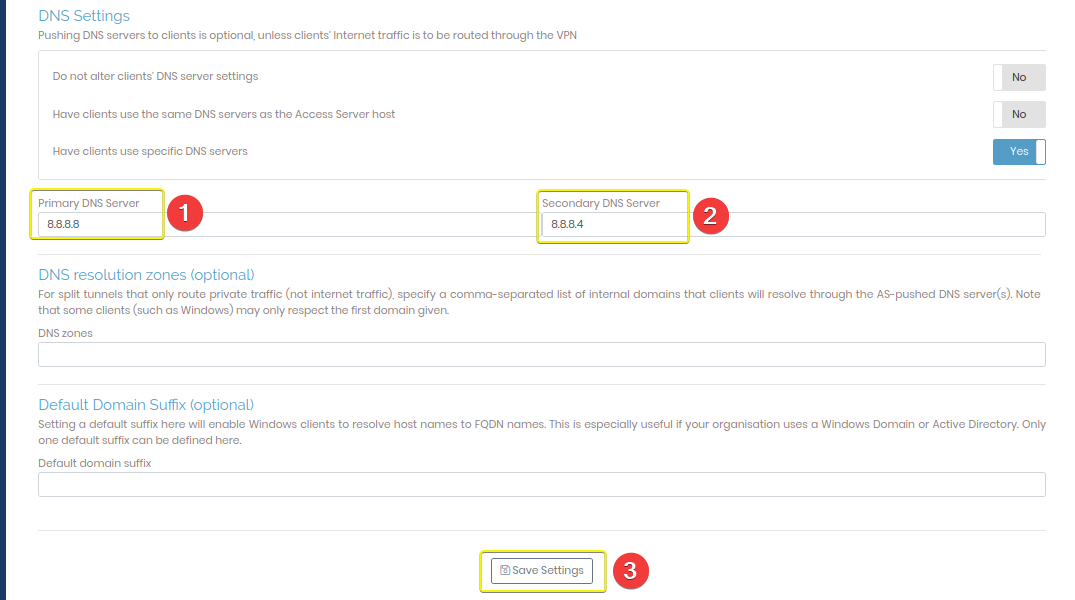
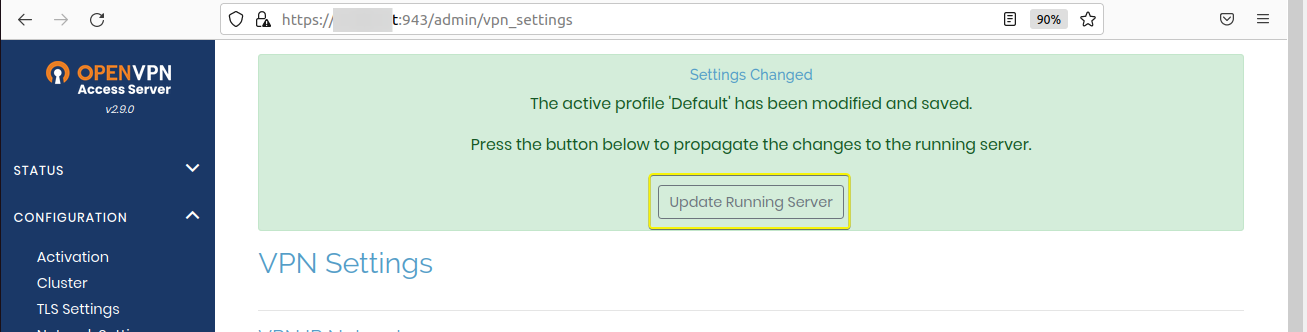
3. After saving the changes, click on Update Running Server to restart the server for the changes to take effect.
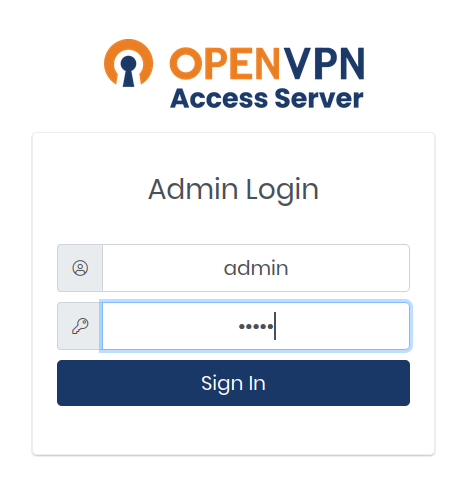
4. Now, navigate to the OpenVPN Access Server (e.g., https://YourIP:943/admin) on your Linux machine. Replace YourIP with your server’s IP address. If the configuration works correctly, you’ll see the same page below.
Login with the default credentials (admin and password) for username and password.
5. Click on any platform icons to download the client application and click Yourself (user-locked profile) to download the client .ovpn file.
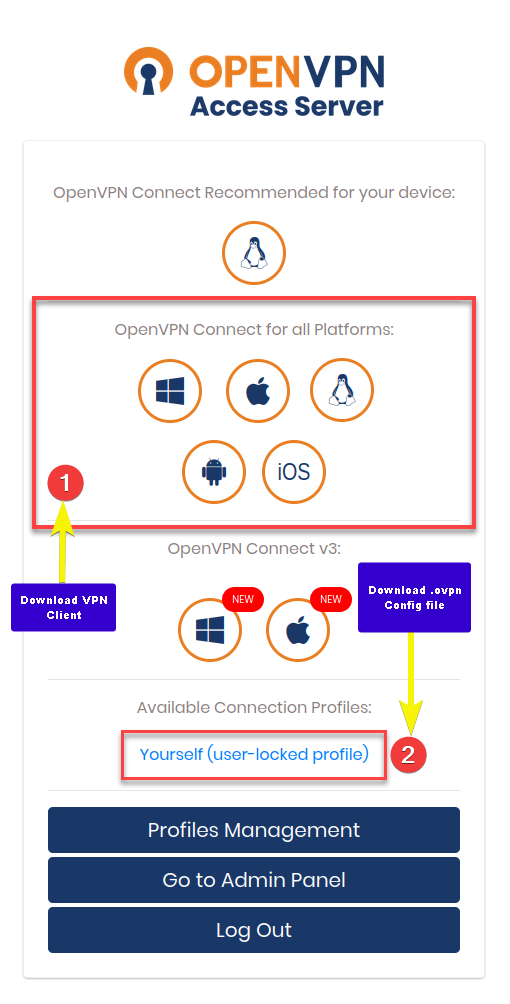
6. Finally, launch the OpenVPN Client you downloaded and import the .ovpn file as you did in the last step of the “Securing OpenVPN Client with Certificates,” as shown below.
Conclusion
Hosting your VPN server should never be a complex task, let alone securing your server connection. Luckily, OpenVPN Docker is just around the corner to save the day. And in this tutorial, you’ve learned to install, set up, and configure OpenVPN using Docker in Ubuntu. You’ve also touched on securing access to OpenVPN in a Docker container with OpenVPN CA and client certificates.
Apart from accessing your OpenVPN server via a command-line interface, you now have a visual way to do so via the OpenVPN Access Server web UI. You’ve realized a rapid VPN deployment by generating client configuration files for the OpenVPN client apps.
Why not build upon this newfound knowledge by creating VPN tunnel services for your applications using WireGuard VPN? Explore the world of unlimited possibilities using self-hosted VPN services!


