


When you manage an Office 365 tenant, being able to get an Office 365 mailbox size and monitoring that size is crucial.
Knowing the mailbox size, either by demand or by schedule, helps admins to avoid a “mailbox full” situation. The admins can decide to adjust the mailbox size limit by:
- Assigning a different Office 365 license
- Changing the values of the IssueWarningQuota, ProhibitSendQuota, and ProhibitSendReceiveQuota properties of the mailbox.
Mailbox size notification is already a built-in feature in Exchange Online. Users are sent an email about the configured mailbox storage limits. However, admins do not receive these notifications, only the mailbox users.
Once you know mailbox statistics, you can then make the decision to move data over to an archive mailbox, increase the mailbox size, notify the user, etc.
In this article, you will learn how to pull statistics from Office 365 mailboxes that have breached a specified threshold using PowerShell and the Exchange Online PowerShell V2 Module.
Prerequisites
This article is a how-to guide, and to be able to follow along with the examples, the following requirements must be met.
- An Office 365 Tenant with Exchange Online Mailboxes
- Windows PowerShell 5.1
- The Exchange Online PowerShell V2 Module must be installed
- A script editor, like Notepad++ or an Integrated Scripting Environment (ISE) like Windows PowerShell ISE and Visual Studio Code
Related: How to use the Exchange Online PowerShell V2 Module
Deliverables
By the end of this article, the goal is to produce a script that can perform the following actions:
- Get a list of all mailboxes with Get-Mailbox and other cmdlets.
- Get the user mailbox size of each mailbox.
- If the mailbox size exceeds a set threshold, add to a mailbox usage report.
- (Optional) Export report and send by email.
Fire up your favorite script editor, and let’s get started!
Getting Office 365 Mailbox Sizes
Before you go on with creating the script, let us discuss a little bit of context first.
There are two usual ways of checking the size of a mailbox. Using the Microsoft 365 Admin Center (EAC) and using Exchange Online PowerShell.
The EAC is useful for checking one mailbox at a time while. And its nature makes it not ideal for monitoring in bulk. On the other hand, with PowerShell, you can script your way into getting the properties of multiple mailboxes in one go.
The next sections show how to see the mailbox sizes using EAC and PowerShell.
Using the Exchange Admin Center to Check Mailbox Size
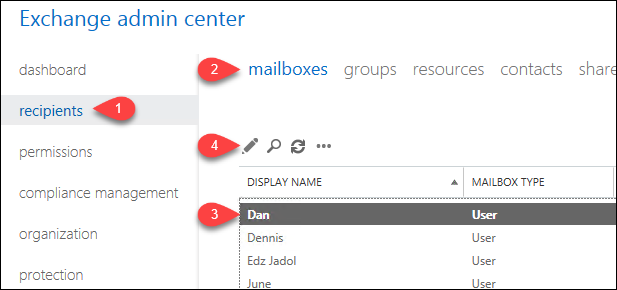
Login to EAC and go to (1) recipients —> (2) mailboxes. Then from the list of mailboxes, (3) select a (3) mailbox —> click the (4) edit button.
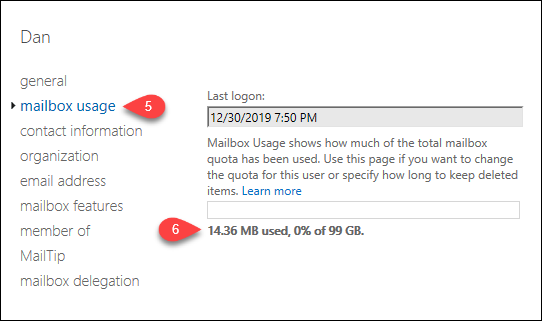
Once the mailbox property page is shown, click on (5) mailbox usage. Then, you should be able to see the (6) mailbox size.
Using Exchange Online PowerShell to Check Mailbox Size
As opposed to using the EAC, where you can only check the size one mailbox at a time, using PowerShell allows for listing the size of multiple mailboxes. The command to use for getting the mailbox size is the Get-EXOMailboxStatistics cmdlet.
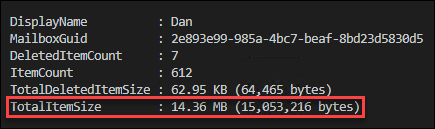
The example below gets the mailbox size of the user with UPN [email protected].
Get-EXOMailboxStatistics -Identity [email protected]The screenshot below shows the output of the command above. The TotalItemSize property represents the size of the mailbox.
The script that you will create in this article will be based on the use of the Get-EXOMailboxStatistics and Get-EXOMailbox cmdlets.
Building the Mailbox Usage Report
In this section, the script will be introduced in parts leading to the finished, completed version. The script will not only check the large Office 365 mailbox size but can also serve as your Office 365 mailbox usage report that you can run at an interval or by demand.
Setting a Threshold and Getting a List of All Mailboxes
When talking about large mailboxes, it is essential to define what a “large” mailbox size is. It is subjective, to say the least. A 50 GB mailbox may be just right for one organization but considered large for another. It is your role as an admin to study and define this value. And once you’ve decided on it, copy the next code and paste it into your script.
The line of code below sets the threshold of the user mailbox size in GB that is considered large. Make sure to change the value to your preferred threshold.
# Set the threshold size. Change this to your preferred value.
$size_Threshold_GB = 0.03
This next code snippet gets a list of all mailboxes in Exchange Online and saves the results to the $mailbox_List variable. Only a subset of mailbox properties that are relevant to the script is retrieved using Select-Object, to limit the amount of memory usage.
# Get a list of all mailboxes
$mailbox_List = Get-EXOMailbox -ResultSize Unlimited | Select-Object DisplayName, PrimarySMTPAddress, UserPrincipalName
NOTE: You can use the
Get-EXOMailbox -RecipientFilterparameter to limit the results to specific types of mailboxes only. The previous example code above gets all types of mailboxes.Visit the
Get-EXOMailboxpage to learn more about cmdlet and its parameters.*
Getting Each Mailbox Size and Add to the Result
First, define an empty array variable named $finalResult. This variable is where the final report output will be stored.
# Create an empty array to hold the report
$finalResult = @()
This next block of code is at the center of your script. The code will perform the following actions:
- Loop through each mailbox objects stored inside the
$mailbox_Listvariable. - Get the size of each mailbox. The size quantifier is in GB.
- Compare the mailbox size with the threshold and;
- If the mailbox size is bigger than the threshold, it will be processed to be added to the final report.
- Else, the mailbox will be skipped.
- Finally, return the final result.
You can learn more about what each part will do by referring to the comments above each line.
# Loop through each of the mailbox object inside the $mailbox_List variable.
foreach ($mailbox in $mailbox_List) {
    # Get the Mailbox Size in GB, rounded with two-decimal places
    $mailbox_size_GB = [math]::Round(((Get-EXOMailboxStatistics -Identity $mailbox.UserPrincipalName).TotalItemSize.Value.toBytes() / 1GB),2)

    <#
    Compare the mailbox size with the configured threshold.
    If the mailbox size is bigger than the threshold, add the result to the report.
    #>
    if ($mailbox_size_GB -gt $size_Threshold_GB) {

        <#
        Create the object with properties 'Display Name', 'Email Address' and 'Mailbox Size (GB)'
				to be included in the final report.
        #>
        $finalResult += (
            New-Object psobject -Property @{
                'Display Name'      = $mailbox.DisplayName
                'Email Address'     = $mailbox.PrimarySMTPAddress
                'Mailbox Size (GB)' = $mailbox_size_GB
            }
        )
    }
}
And finally, at the very end of the script, add the code to return the final result stored in the $finalResult variable as you can see below.
# return the final result
return $finalResult
The Completed Mailbox Usage Report
The code snippet below shows the completed script. Copy it and save it as Get-LargeMailbox.ps1. Now you can call this script in PowerShell.
# Set the threshold size. Change this to your preferred value.
$size_Threshold_GB = 0.03

# Get a list of all mailboxes
$mailbox_List = Get-EXOMailbox -ResultSize Unlimited | Select-Object DisplayName, PrimarySMTPAddress, UserPrincipalName

# Create an empty array to hold the report
$finalResult = @()

# Loop through each of the mailbox object inside the $mailbox_List variable.
foreach ($mailbox in $mailbox_List) {
    # Get the Mailbox Size in GB, rounded with two-decimal places
    $mailbox_size_GB = [math]::Round(((Get-EXOMailboxStatistics -Identity $mailbox.UserPrincipalName).TotalItemSize.Value.toBytes() / 1GB),2)

    <#
    Compare the mailbox size with the configured threshold.
    If the mailbox size is bigger than the threshold, add the result to the report.
    #>
    if ($mailbox_size_GB -gt $size_Threshold_GB) {

        <#
        Create the object with properties 'Display Name', 'Email Address' and 'Mailbox Size (GB)'
        Then add it to the final report.
        #>
        $finalResult += (
            New-Object psobject -Property @{
                'Display Name'      = $mailbox.DisplayName
                'Email Address'     = $mailbox.PrimarySMTPAddress
                'Mailbox Size (GB)' = $mailbox_size_GB
            }
        )
    }
}

# return the final result
return $finalResult
Testing the Usage Report Script
Now that you have the completed script to report on large mailboxes, it is time to put it to the test. Remember, before you can run the script, you must connect to Exchange Online using the EXO V2 module first.
For comparison, the example below lists all the mailboxes in my Office 365 tenant showing their sizes.
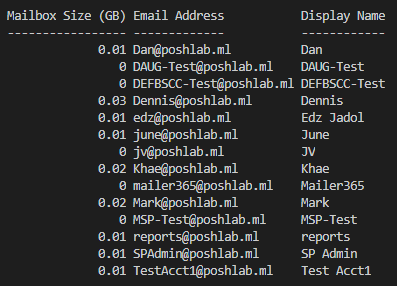
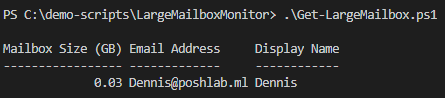
In this example, the threshold is set to 0.03 using the $size_Threshold_GB variable at the beginning of the script. When the script runs, it should only return the user mailbox whose size is equal to or greater than 0.03. See the example below.
Sending the Report as Email Attachment (Optional)
Depending on your requirements, the report can be sent by email, too!
Since the script returns the result as an object, it can be exported to file and then sent as an attachment to nominated recipients. This can be be done by using the Send-MailMessage cmdlet.
To learn more about the Send-MailMessage cmdlet, please go to Send-MailMessage: The PowerShell Way to Send Email article.
First, run the script and pipe it to export the results to a CSV file. The code below exports the result to the .\LargeMailbox.csv file. Change the filename as needed.
.\Get-LargeMailbox.ps1 | Export-Csv -NoTypeInformation -Path .\LargeMailbox.csvThen, once you’ve confirmed that the CSV file is created, send the message with the CSV file as an attachment. The code below uses the Office 365 SMTP relay to send the message. Make sure to change the sender and recipient addresses and the SMTP relay server properties as needed.
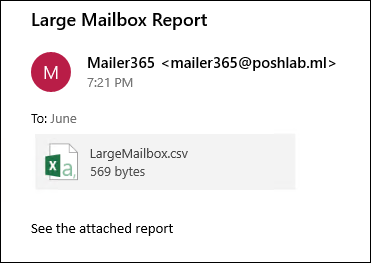
Send-MailMessage -SmtpServer smtp.office365.com -Port 587 -UseSSL -Credential $credential -From [email protected] -To [email protected] -Subject 'Large Mailbox Report' -Body 'See the attached report' -Attachments .\LargeMailbox.csvIf all goes well, the email should be delivered and received. See the sample email report below.
Summary
You have learned the basics of how to create a script to report on large mailboxes in Office 365. You’ve also learned about the components that go into the script and its requirements.
Sending the report by email as a CSV attachment is only one of the many possible ways to receive the report. With your PowerShell scripting skills, it is possible to design beautiful HTML reports to be sent as an email or submitted to a reporting website for monitoring.


