

The Microsoft Graph API is a service that allows you to read, modify and manage almost every aspect of Azure AD and Office 365 under a single REST API endpoint. In this article, learn how to transform your API to PowerShell Graph API.
Prerequisites
If you’d like to follow along with me in this article, be sure you first meet the following criteria:
- Running Windows PowerShell 5.1 (This is the version I tested with. Others version may work but are not guaranteed)
- An Azure tenant
- Authenticated to Azure with an account with global admin permissions or app registration permissions on the subscription and a global admin to accept your app registration requests.
Creating an Application Identity for Microsoft Graph API
To access the Microsoft Graph API you first need an identity to get an OAuth token. This is primarily done with an application identity that you can create in the Azure Portal. You can create an application identity via the Azure portal. To do so:
- Head over to the Azure Portal and go to Azure Active Directory.
- Click on App Registrations under Manage on the left menu and click on the New registration button.
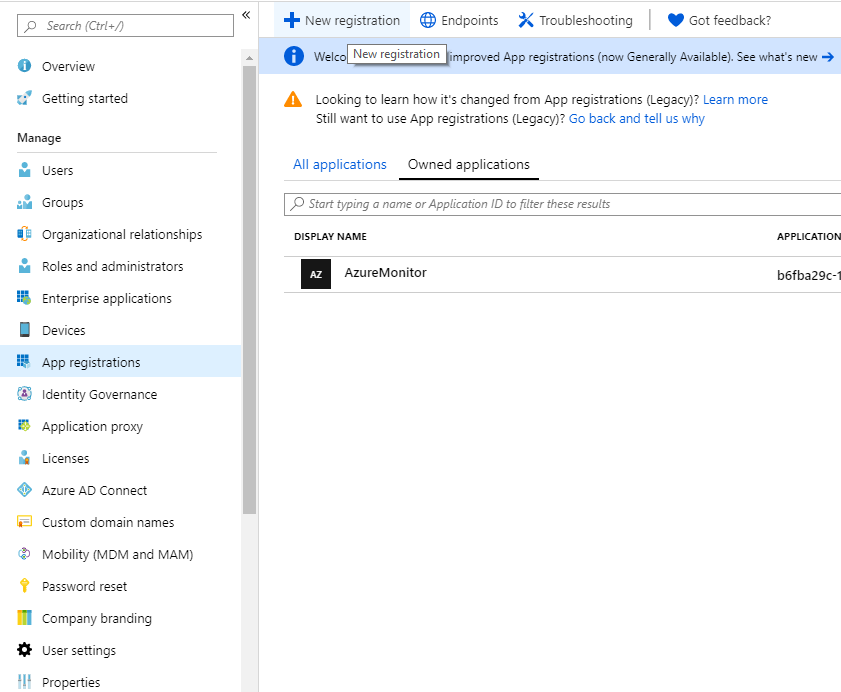
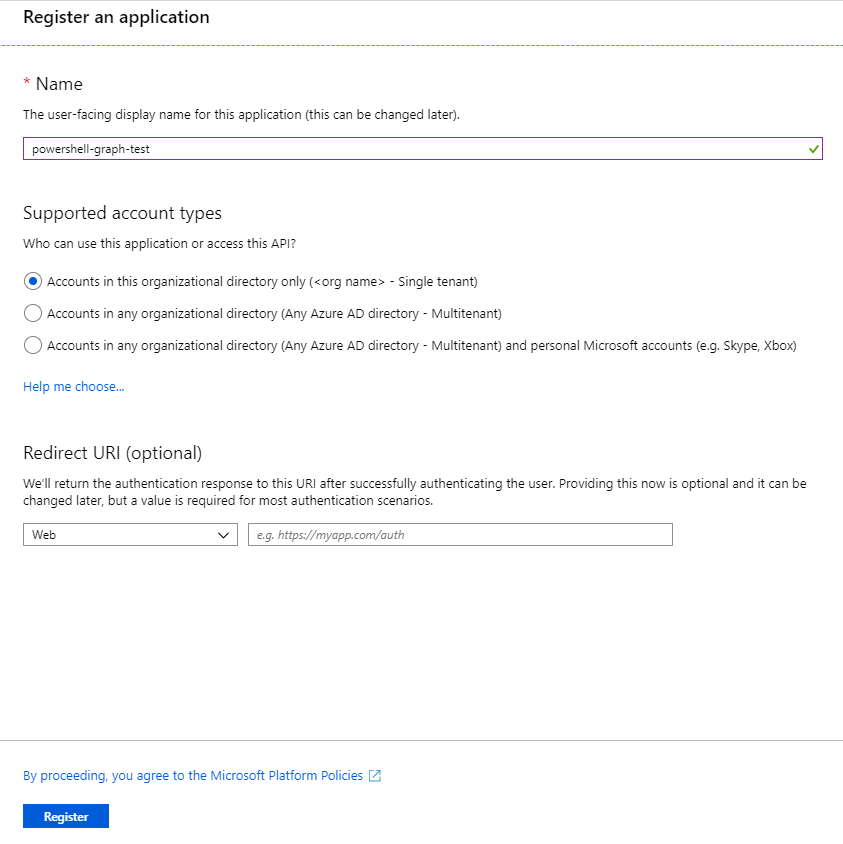
- Enter a name for your application and click Register.
- Copy the Application Id guid for later use.
Creating Secrets for Microsoft Graph API
You can authenticate to the Graph API with two primary methods: AppId/Secret and certificate-based authentication. You’ll need to authenticate when connecting to the graph API with PowerShell.
Let’s cover how to authenticate with both methods.
AppId/Secret
An application ID/secret is just like a regular username/password. The application id consists of a GUID instead of a username and the password is just a randomized string.
To create a secret – click on Certificates & secrets in the left menu and press on New client secret.
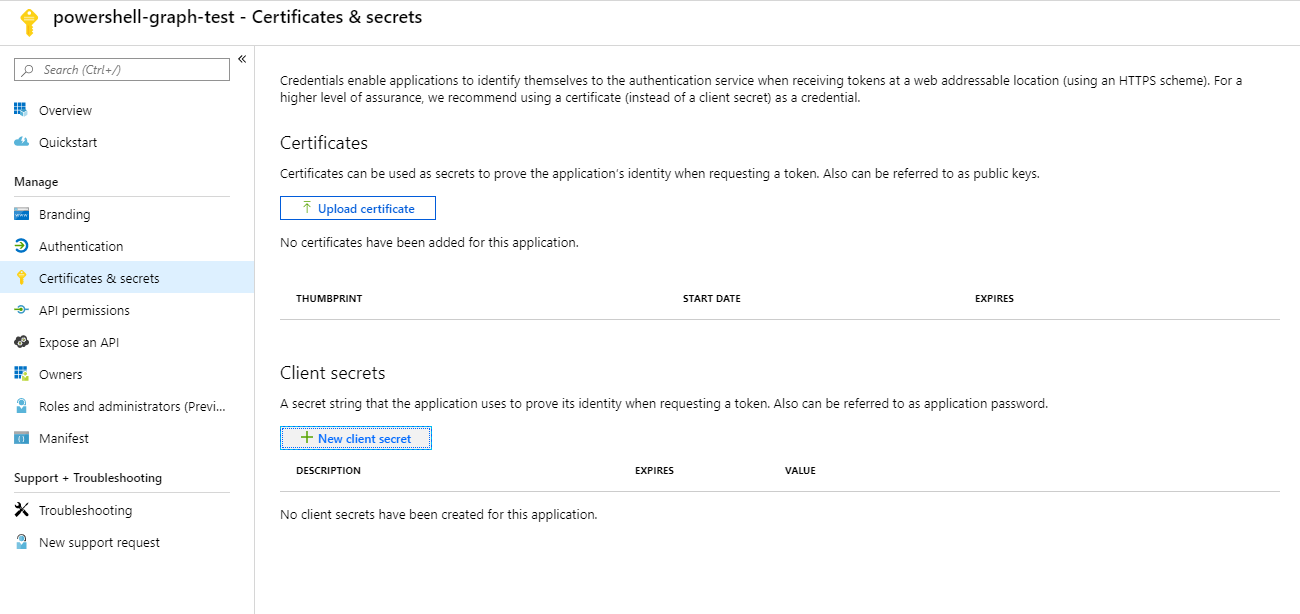
Enter a description for the secret and select when you want it to expire. Now it’s just a matter of asking for permission so that you can access the data that you want.
Certificate
There’s the possibility to create a self-signed certificate and upload it’s public key to Azure. This is the preferred and more secure way of authenticating.
You’ll first need to generate a self-signed certificate. Luckily, this done easily with PowerShell.
# Your tenant name (can something more descriptive as well)
$TenantName        = "contoso.onmicrosoft.com"

# Where to export the certificate without the private key
$CerOutputPath     = "C:\Temp\PowerShellGraphCert.cer"

# What cert store you want it to be in
$StoreLocation     = "Cert:\CurrentUser\My"

# Expiration date of the new certificate
$ExpirationDate    = (Get-Date).AddYears(2)


# Splat for readability
$CreateCertificateSplat = @{
    FriendlyName      = "AzureApp"
    DnsName           = $TenantName
    CertStoreLocation = $StoreLocation
    NotAfter          = $ExpirationDate
    KeyExportPolicy   = "Exportable"
    KeySpec           = "Signature"
    Provider          = "Microsoft Enhanced RSA and AES Cryptographic Provider"
    HashAlgorithm     = "SHA256"
}

# Create certificate
$Certificate = New-SelfSignedCertificate @CreateCertificateSplat

# Get certificate path
$CertificatePath = Join-Path -Path $StoreLocation -ChildPath $Certificate.Thumbprint

# Export certificate without private key
Export-Certificate -Cert $CertificatePath -FilePath $CerOutputPath | Out-Null
Now, upload the self-signed certificate that you exported to $CerOutputPath to your Azure Application by clicking on Certificates & secrets in the left menu and pressing on Upload certificate.

Adding permissions to the application
Giving the application proper permissions is important – not only for the functionality of your app but also for the security. Knowledge of this and (almost) everything else in the Microsoft Graph API can be found in the documentation.
Once I get this set up, I’m going to gather all the security events from my tenant. To be allowed do that I need SecurityEvents.Read.All as a minimum permission. With this I can gather and take action on Impossible Travel events, users connecting via VPN/TOR and such.
To add the SecurityEvents.Read.All to your application – click on API Permissions and then Add Permission. This will present you with not just the Graph API but a ton of other applications in the Azure as well. Most of these applications are easy to connect to once you know how to connect to the Microsoft Graph API.
Click on Microsoft Graph > Application Permissions > Security Events and check the SecurityEvents.Read.All. After that press the Add Permission button.
Did you see that the Admin consent required column was set to Yes on that permission? This means that a tenant admin needs to approve before the permission is added to the application.

If you’re a global admin, press the Grant admin consent for or ask a Global Admin to approve it. Asking for permission from the user instead of an admin just setting read/write permission is a big part of OAuth authentication. But this allows us to bypass it for most permissions in Microsoft Graph.
You’ve probably seen this on Facebook or Google already: “Do you allow application X to access your profile?”
Now you’re all set – let’s log in get some data!
Acquire an Access Token (Application Id and Secret)
For this we will need to post a request to get an access token from a Microsoft Graph OAuth endpoint. And in the body of that request we need to supply:
client_id– Your Application Id – url encodedclient_secret– Your application secret – url encodedscope– A url-encoded url specifying what you want to accessgrant_type– What authentication method you are using
The URL for the endpoint is https://login.microsoftonline.com/<tenantname>/oauth2/v2.0/token. You can request an access token with PowerShell and the Graph API using the code snippet below.
# Define AppId, secret and scope, your tenant name and endpoint URL
$AppId = '2d10909e-0396-49f2-ba2f-854b77c1e45b'
$AppSecret = 'abcdefghijklmnopqrstuv12345'
$Scope = "https://graph.microsoft.com/.default"
$TenantName = "contoso.onmicrosoft.com"

$Url = "https://login.microsoftonline.com/$TenantName/oauth2/v2.0/token"

# Add System.Web for urlencode
Add-Type -AssemblyName System.Web

# Create body
$Body = @{
    client_id = $AppId
	client_secret = $AppSecret
	scope = $Scope
	grant_type = 'client_credentials'
}

# Splat the parameters for Invoke-Restmethod for cleaner code
$PostSplat = @{
    ContentType = 'application/x-www-form-urlencoded'
    Method = 'POST'
    # Create string by joining bodylist with '&'
    Body = $Body
    Uri = $Url
}

# Request the token!
$Request = Invoke-RestMethod @PostSplat
Acquire an Access Token (Using a Certificate)
The authenticate to the Microsoft Graph API with a certificate is a bit different from the normal AppId/Secret flow. To get an access token using a certificate you have to:
- Create a Java Web Token (JWT) header.
- Create a JWT payload.
- Sign the JWT header AND payload with the previously created self-signed certificate. This will create a self made access token used for requesting a Microsoft Graph access token.
- Create a request body containing:
client_id=<application id>client_assertion=<the JWT>client_assertion_type=urn:ietf:params:oauth:client-assertion-type:jwt-bearerscope=<URLEncoded scope>grant_type=client_credentials
- Make a post request with body to the oauth endpoint with
Authorization=<JWT>in it’s header.
How to do this wasn’t obvious in Microsoft’s documentation but here’s the PowerShell script for making this happen:
$TenantName = "<your tenant name>.onmicrosoft.com"
$AppId = "<your application id"
$Certificate = Get-Item Cert:\CurrentUser\My\<self signed and uploaded cert thumbprint>
$Scope = "https://graph.microsoft.com/.default"

# Create base64 hash of certificate
$CertificateBase64Hash = [System.Convert]::ToBase64String($Certificate.GetCertHash())

# Create JWT timestamp for expiration
$StartDate = (Get-Date "1970-01-01T00:00:00Z" ).ToUniversalTime()
$JWTExpirationTimeSpan = (New-TimeSpan -Start $StartDate -End (Get-Date).ToUniversalTime().AddMinutes(2)).TotalSeconds
$JWTExpiration = [math]::Round($JWTExpirationTimeSpan,0)

# Create JWT validity start timestamp
$NotBeforeExpirationTimeSpan = (New-TimeSpan -Start $StartDate -End ((Get-Date).ToUniversalTime())).TotalSeconds
$NotBefore = [math]::Round($NotBeforeExpirationTimeSpan,0)

# Create JWT header
$JWTHeader = @{
    alg = "RS256"
    typ = "JWT"
    # Use the CertificateBase64Hash and replace/strip to match web encoding of base64
    x5t = $CertificateBase64Hash -replace '\+','-' -replace '/','_' -replace '='
}

# Create JWT payload
$JWTPayLoad = @{
    # What endpoint is allowed to use this JWT
    aud = "https://login.microsoftonline.com/$TenantName/oauth2/token"

    # Expiration timestamp
    exp = $JWTExpiration

    # Issuer = your application
    iss = $AppId

    # JWT ID: random guid
    jti = [guid]::NewGuid()

    # Not to be used before
    nbf = $NotBefore

    # JWT Subject
    sub = $AppId
}

# Convert header and payload to base64
$JWTHeaderToByte = [System.Text.Encoding]::UTF8.GetBytes(($JWTHeader | ConvertTo-Json))
$EncodedHeader = [System.Convert]::ToBase64String($JWTHeaderToByte)

$JWTPayLoadToByte =  [System.Text.Encoding]::UTF8.GetBytes(($JWTPayload | ConvertTo-Json))
$EncodedPayload = [System.Convert]::ToBase64String($JWTPayLoadToByte)

# Join header and Payload with "." to create a valid (unsigned) JWT
$JWT = $EncodedHeader + "." + $EncodedPayload

# Get the private key object of your certificate
$PrivateKey = $Certificate.PrivateKey

# Define RSA signature and hashing algorithm
$RSAPadding = [Security.Cryptography.RSASignaturePadding]::Pkcs1
$HashAlgorithm = [Security.Cryptography.HashAlgorithmName]::SHA256

# Create a signature of the JWT
$Signature = [Convert]::ToBase64String(
    $PrivateKey.SignData([System.Text.Encoding]::UTF8.GetBytes($JWT),$HashAlgorithm,$RSAPadding)
) -replace '\+','-' -replace '/','_' -replace '='

# Join the signature to the JWT with "."
$JWT = $JWT + "." + $Signature

# Create a hash with body parameters
$Body = @{
    client_id = $AppId
    client_assertion = $JWT
    client_assertion_type = "urn:ietf:params:oauth:client-assertion-type:jwt-bearer"
    scope = $Scope
    grant_type = "client_credentials"

}

$Url = "https://login.microsoftonline.com/$TenantName/oauth2/v2.0/token"

# Use the self-generated JWT as Authorization
$Header = @{
    Authorization = "Bearer $JWT"
}

# Splat the parameters for Invoke-Restmethod for cleaner code
$PostSplat = @{
    ContentType = 'application/x-www-form-urlencoded'
    Method = 'POST'
    Body = $Body
    Uri = $Url
    Headers = $Header
}

$Request = Invoke-RestMethod @PostSplat
Understanding the Request Access Token Output
Once you’ve obtained an access token either via the application ID/secret or via certificate, should see an object with four properties.
token_type– What kind of token it isexpires_in– Time in seconds that the access token is validext_expires_in– Likeexpires_inbut for resiliency in case of a token service outageaccess_token– What we came for
Next up you will create a header using token_type and access_token and start making requests with PowerShell to the Microsoft Graph API.
Making Requests to the Microsoft Powershell Graph API
Now start making some requests to the API.
Going with our example, you’ll first need the URL for listing security alerts. Remember to use the Microsoft Graph API documentation to see what’s needed.
In this case, you need a header with Authorization=Bearer <access_token> and a GET request towards the Graph API Alerts endpoint. Here’s how to do that with PowerShell.
# Create header
$Header = @{
    Authorization = "$($Request.token_type) $($Request.access_token)"
}

$Uri = "https://graph.microsoft.com/v1.0/security/alerts"

# Fetch all security alerts
$SecurityAlertsRequest = Invoke-RestMethod -Uri $Uri -Headers $Header -Method Get -ContentType "application/json"

$SecurityAlerts = $SecurityAlertsRequest.Value
Now if you have any security alerts in the $SecurityAlerts variable, it should look something like this:
$SecurityAlerts | select eventDateTime,Title

eventDateTime                title
-------------                -----
2019-08-05T17:59:47.6271981Z Atypical travel
2019-08-05T08:23:01.7325708Z Anonymous IP address
2019-08-05T08:23:55.5000456Z Anonymous IP address
2019-08-04T22:06:51.063797Z  Anonymous IP address
2019-08-04T21:56:10.981437Z  Anonymous IP address
2019-08-08T09:30:00Z         Creation of forwarding/redirect rule
2019-07-19T13:30:00Z         eDiscovery search started or exported
2019-07-19T08:00:00Z         eDiscovery search started or exported
Inspecting a single security alert as JSON will look like this:
"id":  "censored",
    "azureTenantId":  "censored",
    "azureSubscriptionId":  "censored",
    "riskScore":  null,
    "tags":  [

             ],
    "activityGroupName":  null,
    "assignedTo":  null,
    "category":  "AnonymousLogin",
    "closedDateTime":  null,
    "comments":  [

                 ],
    "confidence":  null,
    "createdDateTime":  "2019-08-08T09:46:59.65722253Z",
    "description":  "Sign-in from an anonymous IP address (e.g. Tor browser, anonymizer VPNs)",
    "detectionIds":  [

                     ],
    "eventDateTime":  "2019-08-08T09:46:59.65722253Z",
    "feedback":  null,
    "lastModifiedDateTime":  "2019-08-08T09:54:30.7256251Z",
    "recommendedActions":  [

                           ],
    "severity":  "medium",
    "sourceMaterials":  [

                        ],
    "status":  "newAlert",
    "title":  "Anonymous IP address",
    "vendorInformation":  {
                              "provider":  "IPC",
                              "providerVersion":  null,
                              "subProvider":  null,
                              "vendor":  "Microsoft"
                          },
    "cloudAppStates":  [

                       ],
    "fileStates":  [

                   ],
    "hostStates":  [

                   ],
    "historyStates":  [

                      ],
    "malwareStates":  [

                      ],
    "networkConnections":  [

                           ],
    "processes":  [

                  ],
    "registryKeyStates":  [

                          ],
    "triggers":  [

                 ],
    "userStates":  [
                       {
                           "aadUserId":  "censored",
                           "accountName":  "john.doe",
                           "domainName":  "contoso.com",
                           "emailRole":  "unknown",
                           "isVpn":  null,
                           "logonDateTime":  "2019-08-08T09:45:59.6174156Z",
                           "logonId":  null,
                           "logonIp":  "censored",
                           "logonLocation":  "Denver, Colorado, US",
                           "logonType":  null,
                           "onPremisesSecurityIdentifier":  null,
                           "riskScore":  null,
                           "userAccountType":  null,
                           "userPrincipalName":  "[email protected]"
                       }
                   ],
    "vulnerabilityStates":  [

                            ]
}
Understanding and Managing API Output Paging
The Microsoft Graph API has a limit per function on how many items it will return. This limit is per function but let’s say it’s 1000 items. That means that you can only get a max of 1000 items in your request.
When this limit is reached it will use paging to deliver the rest of the items. It does this by adding the @odata.nextLink property to the answer of your request. @odata.nextLink contains a URL that you can call to get the next page of your request.
You can read through all the items by checking for this property and using a loop:
$Uri = "https://graph.microsoft.com/v1.0/auditLogs/signIns"

# Fetch all security alerts
$AuditLogRequest = Invoke-RestMethod -Uri $Uri -Headers $Header -Method Get -ContentType "application/json"

$AuditLogs = @()
$AuditLogs+=$AuditLogRequest.value

while($AuditLogRequest.'@odata.nextLink' -ne $null) {
    $AuditLogRequest += Invoke-RestMethod -Uri $AuditLogRequest.'@odata.nextLink' -Headers $Header -Method Get -ContentType "application/json"
}
Conclusion
After you learn how to authenticate to the Graph API it’s pretty easy to gather data from it. It’s a powerful service that’s used way less than it should.
Luckily there are many modules out there already to utilize the Microsoft Graph API but to meet your own needs you might need to create your own module for it. Using the skills you’ve learned in this article, you should be well on your way.
For more information about controlling guest access in Office 365, I wrote an in-depth article on my blog I encourage you to check it out.


