---
title: "Utilize Docker with this MERN Stack Tutorial Solution"
description: "Learn how to leverage Docker and make your application compatible with different services in this MERN stack tutorial!"
canonical: "https://adamtheautomator.com/mern-stack-tutorial/"
---
# Utilize Docker with this MERN Stack Tutorial Solution
> Learn how to leverage Docker and make your application compatible with different services in this MERN stack tutorial!
Source: https://adamtheautomator.com/mern-stack-tutorial/
---
ATA Learning
Tap to hide
[
ATA Learning
](/)
* [Home](/)
* [Tutorials](/tutorials/)
* [Instructors](/author/)
* [Advertising](/advertising/)
* [Recommended Resources](/resources/)
* [About Adam](/about-adam/)
Search for:
* [](https://twitter.com/adbertram)
* [](https://github.com/Adam-the-Automator)
* [](https://www.linkedin.com/company/adam-the-automator-llc)
* [](/feed/)

# Utilize Docker with this MERN Stack Tutorial Solution
[Fredrick Emmanuel](https://adamtheautomator.com/author/fredrick-emmanuel/)26 April 202213 min. read
Categories: [IT Ops](/category/it-ops/)
Tags:[Docker](/tag/docker/)[MongDB](/tag/mongdb/)[NodeJS](/tag/nodejs/)[Redis](/tag/redis/)
Table of Contents
* [Prerequisites](#prerequisites)
* [Setting up Docker](#setting-up-docker)
* [Setting up an Express Server](#setting-up-an-express-server)
* [Creating and Building a Custom Image in this Mern Stack Tutorial](#creating-and-building-a-custom-image-in-this-mern-stack-tutorial)
* [Setting up nodemon](#setting-up-nodemon)
* [Speeding up Docker Creations by Excluding Files and Folders](#speeding-up-docker-creations-by-excluding-files-and-folders)
* [Creating the node-image with Docker-compose](#creating-the-node-image-with-docker-compose)
* [Configuring Volumes for Persisting Data in Docker Container](#configuring-volumes-for-persisting-data-in-docker-container)
* [Configuring Bind Mount to Sync Local Directory to Docker Container](#configuring-bind-mount-to-sync-local-directory-to-docker-container)
* [Connecting MongoDB to the MERN Application](#connecting-mongodb-to-the-mern-application)
* [Linking NodeJS to MongoDB](#linking-nodejs-to-mongodb)
* [Adding Redis to the MERN Application](#adding-redis-to-the-mern-application)
* [Setting up the Client-side of the MERN application](#setting-up-the-client-side-of-the-mern-application)
* [Building a Production React Image](#building-a-production-react-image)
* [Conclusion](#conclusion)
Are you searching for a way to make your MERN application compatible with all computers while developing the application? You’ve come to the right place! Dockerize your application, and this MERN stack tutorial is just what you need.
In this tutorial, you’ll learn the basics of Dockerizing a MERN stack, how it works, and how to implement it in various applications.
Read on and solve compatibility problems by Dockerizing your application!
## Prerequisites
This tutorial will be a hands-on demonstration. If you’d like to follow along, be sure you have:
* [Docker Desktop 4.5.0+ installed.](https://docs.docker.com/desktop/)
Related:[How to Install and Use Docker on Ubuntu (In the Real World)](https://adamtheautomator.com/docker-ubuntu/)
* [Node 16.0+ installed.](https://nodejs.org/en/download/)
* An operating system supported by Docker – This tutorial uses Windows 10.
* [Virtualization enabled](https://support.bluestacks.com/hc/en-us/articles/360058371832-How-to-check-if-Virtualization-is-supported-and-or-enabled-on-your-PC-for-BlueStacks-5) and [Linux kernel installed](https://wslstorestorage.blob.core.windows.net/wslblob/wsl_update_x64.msi) (for windows).
* API testing service ([Postman](https://www.postman.com/)).
## Setting up Docker
Docker is a software platform that fastens the building, testing, deploying, and managing applications. Docker uses a container to store all dependencies and operating system configurations necessary for applications to run in any environment.
Before Dockerizing a MERN stack, you’ll first need to create a custom node image using a Docker file.
1\. Open the Docker application to check if Docker started successfully. Below, you can tell the Docker engine is running since the status bar (bottom-left) is green.
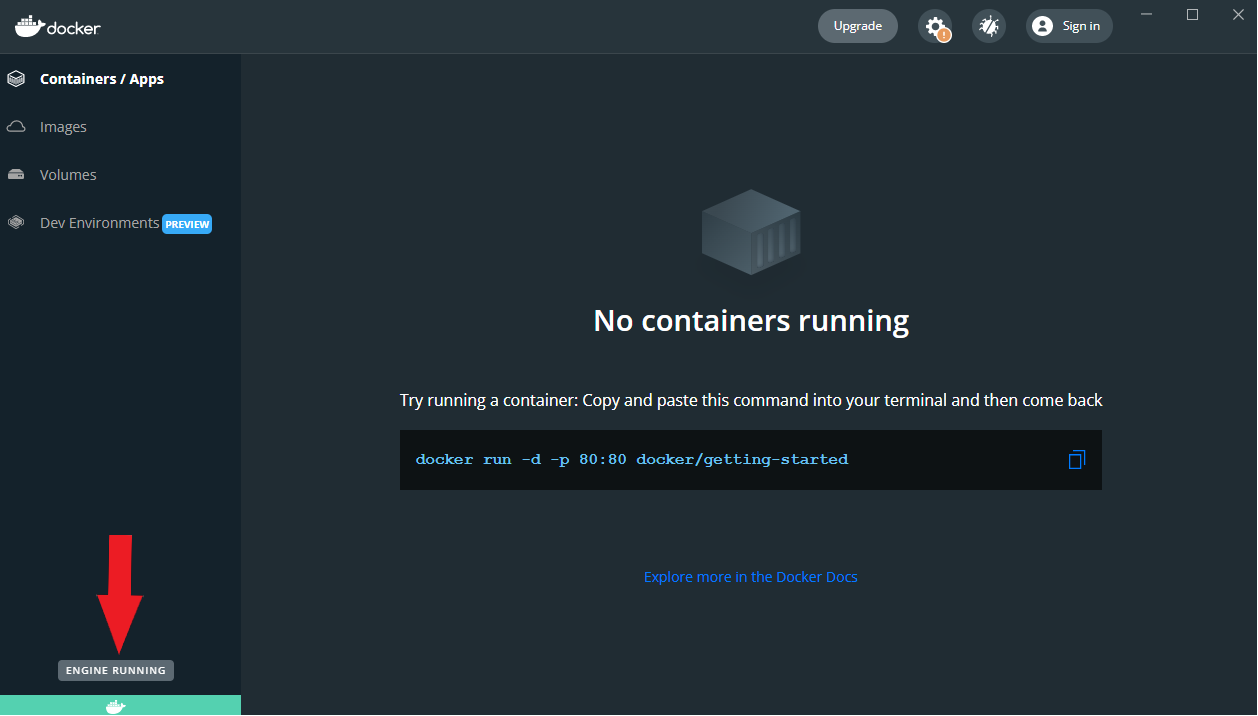
Verifying Docker Engine is Running
2\. Next, create a project folder named _MERN-Docker_. This folder will hold all resources for this tutorial.
3\. Create a _.js_ file with your preferred code editor in your project folder (_MERN-Docker_). You can name the file as you like, but the file is named _server.js_ in this tutorial. The _server.js_ file will contain all codes for the node application.
4\. Open your terminal and run the following [npm](https://www.freecodecamp.org/news/npm-cheat-sheet-most-common-commands-and-nvm/) command to initialize the application (init –y) and create a _package.json_ file.
```bash
npm init --y
```
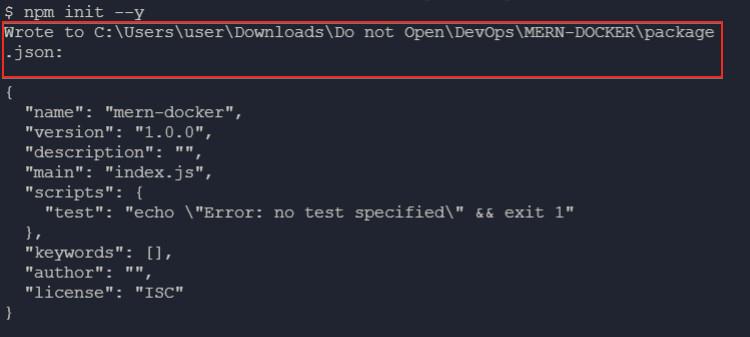
Initializing the MERN Application
5\. Finally, run the below command to install the `express` dependency, allowing you to create APIs for your node application.
```bash
npm i express
```
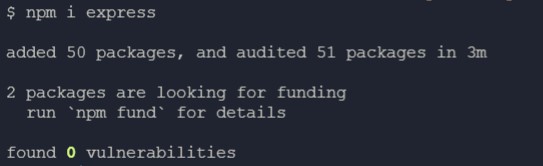
Installing the express Dependency
## Setting up an Express Server
After initializing the MERN application and installing the express dependency, you’ll set up a simple express server. This tutorial uses a simple express server to demonstrate how Express and Node applications can be dockerized.
1\. Open the _server.js_ file and create an express `GET` route to `/`.
The code below sends a welcome message when a GET request is sent to _http://localhost:5000_.
```javascript
//Importing and creating an instance of express
const express = require("express");
const app = express();
//Setting PORT to 5000 if PORT is not listed in environmental variables.
const PORT = process.env.PORT || 5000;
// Creating the `GET` route
app.get("/", (req, res) => {
res.send("Welcome Friends
");
});
//Starting the express server
app.listen(PORT, () =>
console.log(`Server running at http://localhost:${PORT}`)
);
```
2\. Now, run the node command below to start the express application.
```bash
node server.js
```
If the application is running correctly, you’ll see the output below.

Running the Express Server
3\. Finally, [make a GET request](https://learning.postman.com/docs/getting-started/sending-the-first-request/) to _http://localhost:5000_ using an API testing service, like [Postman](https://www.postman.com/), to test the express route.
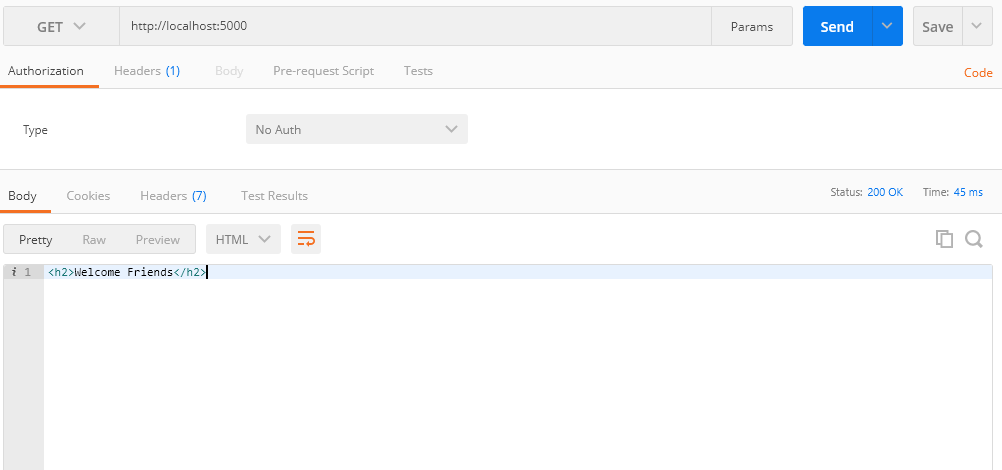
Making a GET Request via Postman
## Creating and Building a Custom Image in this Mern Stack Tutorial
After setting up the route, the next step is to integrate the express application into a Docker container using a base image. In this tutorial, you’ll use the [node’s official base image](https://hub.docker.com/_/node) to set up the container.
Related:[How to Update Docker Images to the Latest Version](https://adamtheautomator.com/update-docker/)
1\. Create a file named _Dockerfile_ and populate the following code, which creates a custom node image for your application. A customized image allows you to add your source code to the image and the configurations for your image.
```docker
# Sets the base image of the application to the node’s official image.
FROM node:17
# Sets the Working Directory as "/server"
WORKDIR /server
# Copies the package.json file into "/server" and runs npm i
COPY package.json /server
RUN npm i
# Copies the entire source code into "/server"
COPY . /server
# Specifies the port the node app will be running on
EXPOSE 5000
# Runs "node server.js" after the above step is completed
CMD ["node", "server.js"]
```
2\. Run the [docker build](https://docs.docker.com/engine/reference/commandline/build/) command below to create a customized image called (-t) node-image in the working directory (.).
```bash
docker build -t node-image .
```
The output below shows how Docker uses the _Dockerfile_ to build the image.
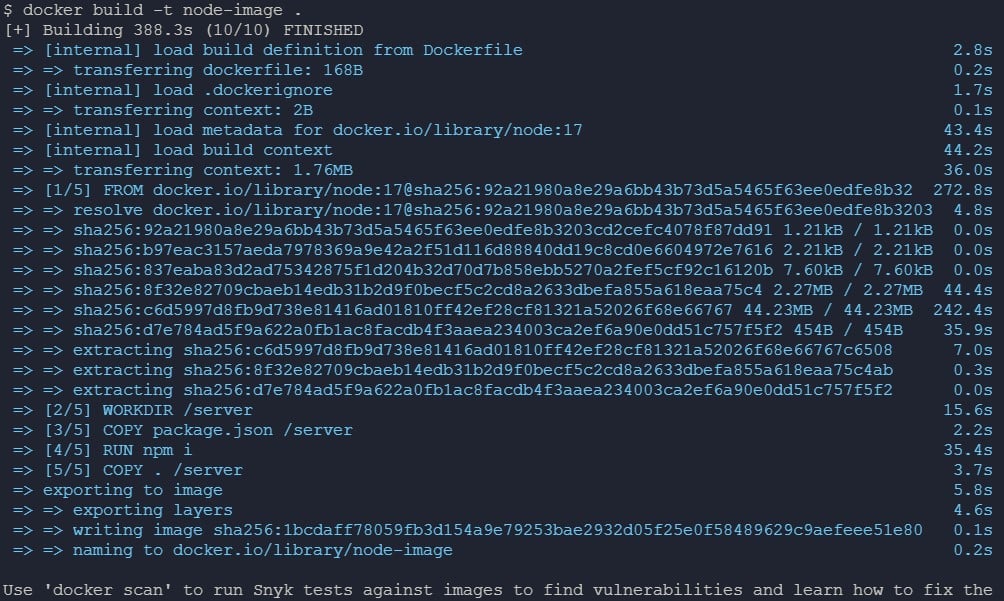
Building the Custom node-image
3\. Lastly, run the [docker image](https://docs.docker.com/engine/reference/commandline/image/) command below to list (ls) all built images.
```bash
docker image ls
```
Below, you can see all available images, including the node image you created.
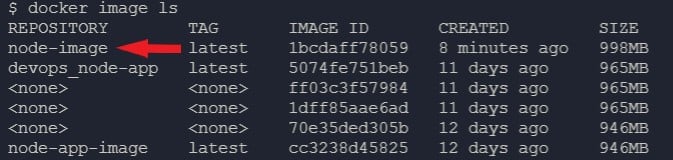
Listing All Available Images
## Setting up nodemon
You’ve successfully built a custom node image, and that’s great. But you’ll need help to develop your application when there are changes, and that’s where adding [nodemon](https://www.npmjs.com/package/nodemon) comes in.
nodemon automatically restarts the application when file changes are detected. But first, you’ll have to install it.
1\. Run the `npm` command below to install `nodemon` as a dev dependency (`--save-dev`).
```bash
npm i nodemon --save-dev
```
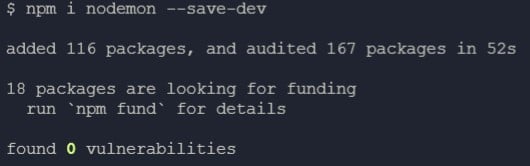
Installing nodemon
2\. Next, open the _package.json_ file in your preferred code editor to add the configuration below.
```json
"scripts": {
"start": "node server.js",
"dev": "nodemon -L server.js"
},
```
3\. Open the _Dockerfile_ and change the `CMD` command to the one below.
```docker
CMD ["npm", "run", "dev"]
```
4\. Lastly, run the below `docker build` command to rebuild the image (`node-image`).
```bash
docker build -t node-image .
```
You can see below that Docker only loaded the cached data in the second step and ran the command from the third to the last step. This behavior results from the changes you made to the _package.json_ file ([Docker caching](https://medium.com/swlh/docker-caching-introduction-to-docker-layers-84f20c48060a)).
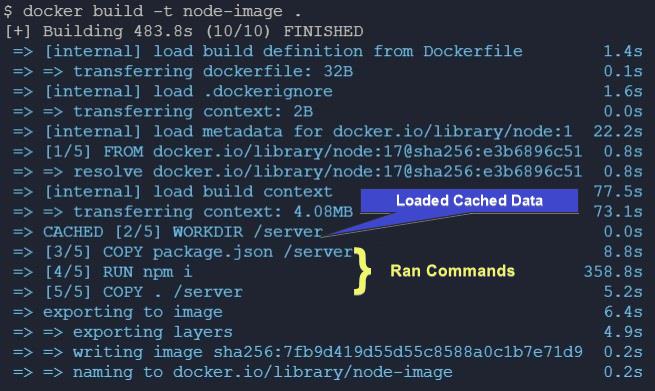
Building the node-image
## Speeding up Docker Creations by Excluding Files and Folders
Perhaps you want to speed up the Docker creation and protect sensitive content. If so, create a ._dockerignore_ file where you’ll specify the files and folders to ignore from being copied into your Docker container.
Related:[How to Copy Files with Docker cp to your Docker Container](https://adamtheautomator.com/docker-cp/)
1\. Create a file named _.dockerignore_ with your text editor and list the files, as shown below, to exclude from copying into your Docker container.
```powershell
node_modules
Dockerfile
.dockerignore
```
2\. Now, run the following `docker build` command to rebuild the image (`node-image`).
```bash
docker build -t node-image .
```
3\. After building the image, execute the [docker run](https://docs.docker.com/engine/reference/commandline/run/) command below to start a node-app container using the node-image on port 5000 (-p 5000:5000). This command also makes the container accessible through _http://localhost:5000_.
> _By default, Docker has a security mechanism that prevents other machines from accessing the Docker container. The only way to access the Docker container is by specifying an access port._
```bash
docker run --name node-app -d -p 5000:5000 node-image
```

Running the node-app
> _To stop the container, run docker rm node-app -f._
4\. Now, run the [docker ps](https://docs.docker.com/engine/reference/commandline/ps/) command below to view all active containers (-a).
```bash
docker ps -a
```
Below, you can see your Docker container (node-app) is active.

All containers
5\. Run the [docker exec](https://docs.docker.com/engine/reference/commandline/exec/) command below to start an interactive (-it) shell (bash) inside the node-app container.
```bash
docker exec -it node-app bash
```

Interactive shell
6\. Finally, run the below `dir` command to check if the files in the _.dockerignore_ file were added to the container (`node-app`).
```javascript
dir
```
You can tell in the output below that the files you listed in the _.dockerignore_ file are not included in the note-app Docker container.

Files and Folders in the Server directory
> _The node\_modules folder in the container was generated by the npm i command from the Dockerfile._
## Creating the node-image with Docker-compose
You’ve learned a container’s basic life cycle: building, starting, and stopping a container. But can the lifecycle still be improved? [Docker-compose](https://docs.docker.com/compose/) lets you simplify the lifecycle of not just one but numerous containers.
Related:[Everything You Need to Know about Using Docker Compose](https://adamtheautomator.com/docker-compose-tutorial/)
With Docker-compose, you only need to run one Docker command to start up all containers and one command to shut down all containers instead of running a series of commands. These Docker commands follow the instructions listed in the _docker-compose_ file.
To get started with Docker-compose, you need a YAML file that will contain all services and the configurations for these services. Some of these configurations include.
* Build Configuration: This contains the location of the Dockerfile you want to use to build the service and other build options.
* Images: You can use images in [hub.docker.com](https://hub.docker.com/) instead of building your custom image.
* Environment variables: It stores configurations to variables in your code.
* Ports: This option specifies what port the application will run on.
* Network: This option enables one container to communicate with another container.
Create a YAML file named _docker-compose.yml_ file and populate the configuration below, which creates a custom node image.
> _YAML is indentation sensitive, so ensure you use the appropriate indexing._
```docker
# Version of Docker-compose
version: '3.8'
services:
# Service name
node:
# Creating a custom image
build:
# Location to the Dockerfile
context: .
# Name of the Dockerfile
dockerfile: Dockerfile
ports:
# External port:Internal port
- 5000:5000
```
Run the command below to build up and start the node service.
```docker
docker-compose up --build
```
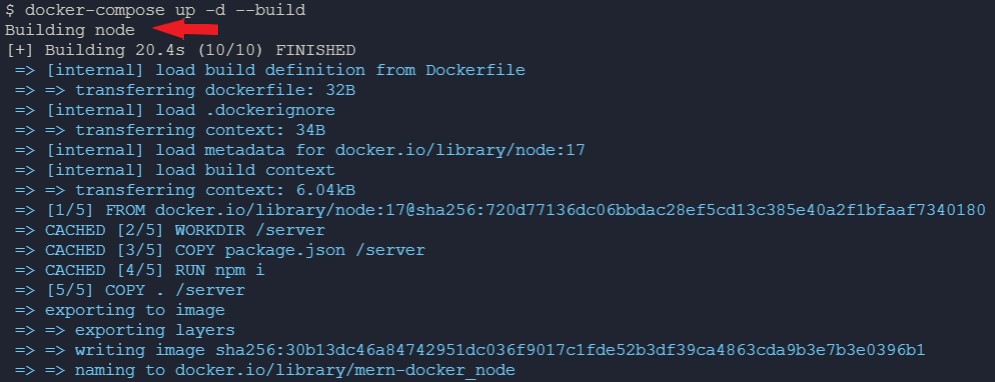
Docker-compose build command
## Configuring Volumes for Persisting Data in Docker Container
After creating the node image, you’ll need to store static data and sync your source code to the source code in the container. How? By configuring volumes and bind mounts for Docker container.
In this tutorial, you’ll start configuring volumes first. Volumes in Docker are directories outside the Docker container that contain the data for that container. Volumes are primarily used to store persisting data, such as source codes, log files, etc.
1\. Open your _docker-compose_ file in your code editor.
2\. Add the volume configurations below under the `node` service of the _docker-compose_ file.
The configuration below creates a volume named nodeVolume and stores the volume in a folder named server. But feel free to change the name of the volume and the folder.
```docker
---
node:
---
# ADD THE CONFIGURATION FROM THIS POINT to create a volume named nodeVolume
volumes:
# Syntax :
- nodeVolume:/server
# Making the node service volume accessible to other services.
volumes:
# Declaring the node service volume.
nodeVolume:
```
3\. Lastly, run the command below to rebuild the image (node-image).
```bash
docker-compose up -d --build
```
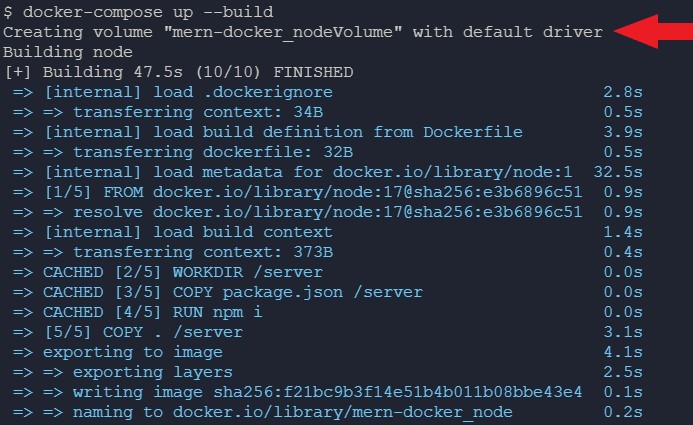
Building the node image with Volume Configured
## Configuring Bind Mount to Sync Local Directory to Docker Container
Bind mount is a mechanism that syncs a folder in your local machine to a folder in the Docker container. A bind mount stores data in the container, but the data goes too when the container gets deleted.
Bind mounts are primarily used in the development stage where data are dynamic (information frequently changes). With a bind mount, you don’t have to rebuild the application every time a change is made to the application’s source code.
To configure a bind mount:
1\. Open your _docker-compose_ file and add the code below in the `node` service under `volumes`.
The code below syncs the working directory for the application to the /app directory in the container. At the same time, the code prevents your source code from making changes to the node\_modules file in the app directory.
```docker
---
node:
volumes:
---
# ADD THE CONFIGURATION FROM THIS POINT to sync the working directory
# for the application to the /app directory in the container
- .:/server
- /server/node_modules
```
2\. Run the command below to rebuild the node image.
```bash
docker-compose up -d --build
```
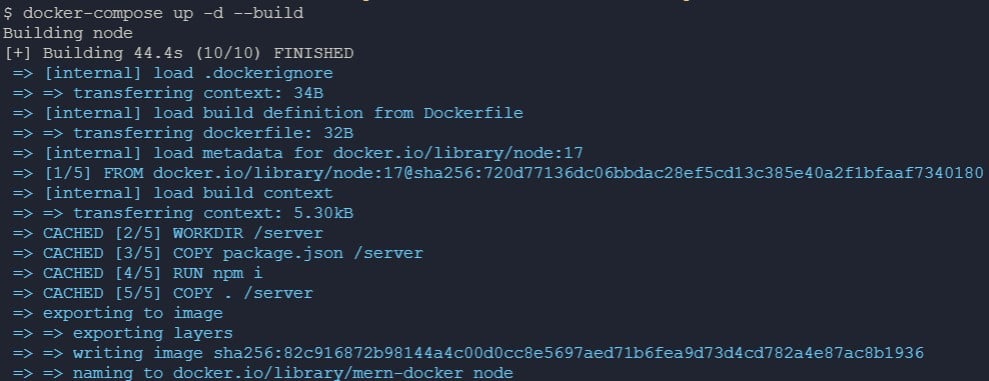
Building the node-image with bind-mounts configured
> _Modifying files from the /app directory of the application in Docker will affect the files in your local machine since the folders are synced. To restrict Docker from making changes to your application’s source code, add the read-only option (:ro) to your bind mount config, as shown below._
```docker
node:
volumes:
- ./:./server:ro # Adding the read-only option
- - /server/node_modules
```
3\. Open the _server.js_ file in your code editor, replace `h1` header to `h5`, as demonstrated below, and save the changes. These changes in the _server.js_ file lets you test if the bind mount config works.
```javascript
app.get("/", (req, res) => {
res.send("Welcome Friends
");
});
```
4\. Now, run the command below to view all running containers.
```bash
docker ps
```

Viewing all Running Containers
5\. Now, run the `docker exec` command below to run an interactive shell (`-it`) of your running node container (`mern-docker_node_1`).
```bash
docker exec -it mern-docker_node_1 bash
```
6\. Finally, run the `cat` command below to display the changed content inside the `server.js` file in your node container.
```bash
cat server.js
```
As you can see below, the header changed to h5.
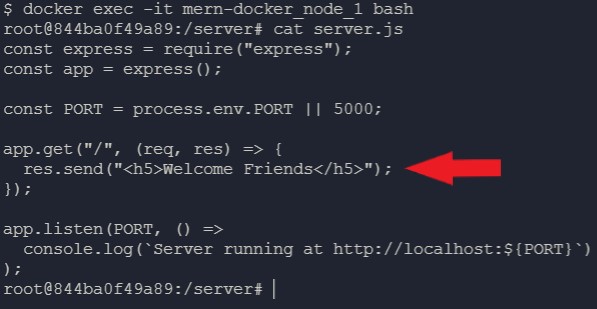
Verifying the Change in the server.js file
## Connecting MongoDB to the MERN Application
MongoDB is a [NoSQL](https://www.mongodb.com/nosql-explained), [free, open-source, cross-platform document-oriented database](https://en.wikipedia.org/wiki/Document-oriented_database) program. In this tutorial, you’ll set up MongoDB and see how the node service from the previous section can communicate with MongoDB.
Open the _docker-compose_ file on your code editor, and add the configuration specified below under the `node` service.
This configuration uses [Mongo’s official Docker image](https://hub.docker.com/_/mongo) to build the MongoDB service (container).[](https://hub.docker.com/_/mongo?tab=description)
```docker
version: '3.8'
services:
node:
...
# ADD THE CONFIGURATION FROM THIS POINT to build the MongoDB service
environment:
- PORT=5000
# For security, specify a username and password as environmental variables
# Username for the mongo database
- MONGO_INITDB_ROOT_USERNAME=mern
# Password for the mongo database
- MONGO_INITDB_ROOT_PASSWORD=merndocker
# Enables the mongo service to start before the node service
depends_on:
- mongo
# Name of mongo service
mongo:
# Official mongo image from docker.hub
image: mongo
environment:
# Username for the mongo database
- MONGO_INITDB_ROOT_USERNAME=mern
# Password for the mongo database
- MONGO_INITDB_ROOT_PASSWORD=merndocker
volumes:
# :
- mongoDB:/data/db
volumes:
# Making the volume accessible by other containers
mongoDB:
```
Now, run the `docker-compose` command below to `--build` and start the mongo service.
```bash
docker-compose up -d --build
```
As you can see below, Docker is creating a volume for the mongo service.

Creating the Volume for the mongo Service in this Mern Stack Tutorial
## Linking NodeJS to MongoDB
After building the mongo service, you can now link the NodeJS service to MongoDB. Linking Nodejs to MongoDB enables you to store data in the MongoDB database.
Using the name of a service is one of the common ways to communicate with different containers. And this tutorial uses the [mongoose](https://www.npmjs.com/package/mongoose) dependency to Link the node service to MongoDB. But you’ll first have to install mongoose.
1\. Run the command below to install `mongoose`.
```bash
npm i mongoose
```
2\. Next, open the _server.js_ file and add the code below, which imports the mongoose dependency and uses it to link NodeJS with MongoDB.
The code below uses the username and password you stored as environment variables in the _docker-compose_ file to connect the node service with MongoDB.
```javascript
const mongoose = require('mongoose');
// Gets the Username and Password
const MONGO_URI = `mongodb://${process.env.MONGO_INITDB_ROOT_USERNAME}:${process.env.MONGO_INITDB_ROOT_PASSWORD}@mongo:27017`;
// Creating the connect function
const connectDB = async () => {
await mongoose
.connect(MONGO_URI, {
useNewUrlParser: true,
useUnifiedTopology: true,
})
.then(() => console.log("Mongo connected successfully"))// Logs out successful when MongoDB connects.
.catch((e) => {
console.log(e.message);// Logs out the error message if it encounters any.
});
};
// Calling the Connect Function
connectDB();
...
```
3\. Now, run the docker-compose command below to rebuild the node image.
```bash
docker-compose up -d --build
```
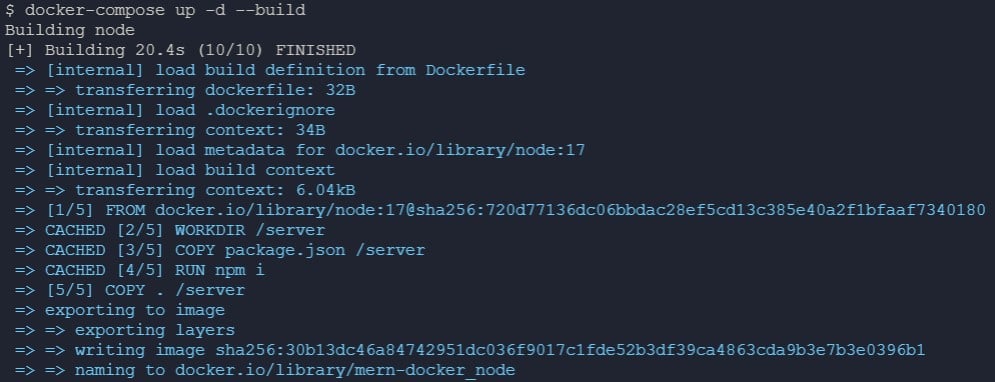
Re-building node-image
4\. Finally, run the following command to open the logs for the application and check if MongoDB connected successfully.
```bash
docker-compose logs
```
Below, you can see MongoDB connected successfully.
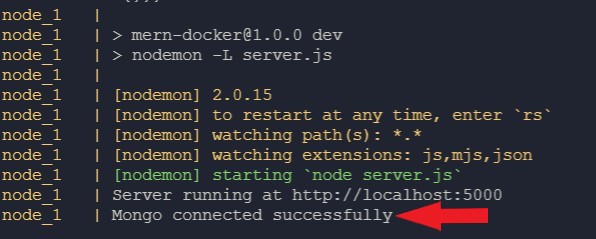
Viewing Logs for the Node Service
## Adding Redis to the MERN Application
You’ve just added MongoDB as a second service to the MERN application, and now you’ll be adding Redis as the third. [Redis](https://en.wikipedia.org/wiki/Redis) is a NoSQL database commonly used to store cached data and tokens.
Open the _docker-compose_ file, and add the following configuration below the `mongo` service under `services`, as shown below.
This configuration sets up [Redis’ official Docker image](https://hub.docker.com/_/redis)
```docker
services:
---
mongo:
---
# ADD THE CONFIGURATION FROM THIS POINT to set up the Redis service
redis:
image: redis
```
## Setting up the Client-side of the MERN application
From setting up your application on the server side, delve into setting up a [React](https://reactjs.org/) app as the client-side of the MERN application. React is a JavaScript library for building user interfaces.
1\. Run the command below to create a simple React application. This command automatically creates a directory named _client_ in the root directory of the MERN application.
```bash
npx create-react-app client
```
The create-react-app command starts installing all the required dependencies on the output below.

Installing React
2\. Once installation completes, open the _client_ directory in the root directory of the MERN application, and create a Dockerfile inside it. You can name the Dockerfile differently, but the Dockerfile is named _react.dockerfile_ in this tutorial.
3\. Add the code below into the Dockerfile (_react.dockerfile)_, which creates a custom React image.
```docker
# Official node image
FROM node:17
# Setting the working directory to "/client"
WORKDIR /client
# Copies the package.json file into "/client" and run npm i
COPY package.json /client
RUN npm install
# Copies the entire react source code into "/client"
COPY . /client
EXPOSE 3000
# Starting the react app
CMD [ "npm", "start"]
```
> _This _react.dockerfile_ builds a **development** image. The `npm start` command starts the Create React App development server. That server sends an unminified bundle and enables hot reload. Do not deploy this image to production._
### Building a Production React Image
For production, use a multi-stage build. The first stage runs `npm run build` to compile the static files. The second stage copies those files into an [nginx](https://hub.docker.com/_/nginx) image that serves them. The final image contains no Node.js runtime and no _node\_modules_ folder.
Save the code below as _react.prod.dockerfile_ in the _client_ directory. This example uses a current Node.js LTS image, because Node.js 17 reached its end of life.
```docker
# Stage 1 - compile the static files
FROM node:20 AS build
WORKDIR /client
COPY package.json /client
RUN npm install
COPY . /client
RUN npm run build
# Stage 2 - serve the static files with nginx
FROM nginx:stable-alpine
COPY --from=build /client/build /usr/share/nginx/html
EXPOSE 80
CMD ["nginx", "-g", "daemon off;"]
```
If your application uses React Router, add a `try_files $uri $uri/ /index.html;` fallback to your nginx configuration. Without that fallback, nginx returns a 404 for every client-side route. Read the [Create React App deployment documentation](https://create-react-app.dev/docs/deployment/) for more options.
4\. Now, open your _docker-compose_ file and replace the content with the code below.
The following code adds a react service under services with the Dockerfile’s location and Dockerfile’s name.
> _You’ll add portions of the code you’ll add in the docker-compose file, and you’ll see the entire code in the last part of these steps._
```docker
# Version of Docker-compose
version: '3.8'
services:
# Add the react service
react:
# Location to the dockerfile
context: ./client
# Name of the dockerfile
dockerfile: react.dockerfile
```
5\. Configure the `volumes`, `ports`, and `depends_on` options, as demonstrated below.
```docker
volumes:
# Bind-mounts configuration
- ./client:/client
# Ignoring any changes made in "node_modules" folder
- /client/node_modules
ports:
# External port:Internal port
- 3000:3000
depends_on:
# Starts up the node service before starting up the react service
- node
```
6\. Finally, add the configuration below to add an environment variable to enable [hot reload](https://gaearon.github.io/react-hot-loader/getstarted/) in the Docker container. Hot reload refreshes a react page and re-renders its components.
```docker
environment:
# Enabling hot reload
- CHOKIDAR_USEPOLLING=true
```
Following the steps above will bring you to the configuration below.
```docker
version: '3.8'
services:
react:
build:
context: ./client
dockerfile: react.dockerfile
volumes:
- ./client:/client
- /client/node_modules
ports:
- 3000:3000
environment:
- CHOKIDAR_USEPOLLING=true
depends_on:
- node
node:
---
mongo:
---
redis:
---
```
## Conclusion
This tutorial aimed to teach you how to set up your application using Docker and make it compatible with other devices. Do you feel that’s the case? At this point, you’ve learned the basics of bosting your MERN stack application’s development.
As a next step, why not learn to use NGINX to set up a proxy for your application and deploy it to Docker?
Share this article
[Share on X](https://twitter.com/intent/tweet?url=https%3A%2F%2Fadamtheautomator.com%2Fmern-stack-tutorial%2F&text=Utilize%20Docker%20with%20this%20MERN%20Stack%20Tutorial%20Solution)[Share on Facebook](https://www.facebook.com/sharer/sharer.php?u=https%3A%2F%2Fadamtheautomator.com%2Fmern-stack-tutorial%2F)[Share on LinkedIn](https://www.linkedin.com/sharing/share-offsite/?url=https%3A%2F%2Fadamtheautomator.com%2Fmern-stack-tutorial%2F)
## Related Posts

### [Redis List for Dynamic Data: A Comprehensive Guide](/redis-list/)
Need a powerful and flexible solution for dynamic data management? Explore Redis List and unlock new possibilities for your applications with this tutorial.

### [Building OCI Images with Buildah](/buildah/)
Master the art of crafting OCI images with buildah for seamless containerization—flexible, efficient, and tailored to your container needs.
### [How to Install Redis on Windows](/redis-on-windows/)
Digg into how to install and use Redis on Windows via the official installer or WSL in this ATA Learning tutorial!
## Categories
* [IT Ops](/category/it-ops/)
* [Cloud](/category/cloud/)
* [DevOps](/category/devops/)
* [Home Ops](/category/home-ops/)
* [Information Security](/category/infosec/)
* [Software Development](/category/software-development/)
## Site
* [Home](/)
* [Tutorials](/tutorials/)
* [Instructors](/author/)
* [Advertising](/advertising/)
* [Recommended Resources](/resources/)
* [About Adam](/about-adam/)
Copyright 2026© ATA Learning | [Privacy Policy](/privacy/)