

Are your Kubernetes workloads truly as healthy as they seem? Imagine a bustling Kubernetes cluster where Pods appear to be running yet encountering stability failures. With this concern, why not take advantage of the Kubernetes liveness probes?
In this tutorial, you will explore Kubernetes liveness probe through examples to let Kubernetes know if a Pod is alive. Probes are the stability guardians of showing when containers are not functioning correctly in the Kubernetes cluster.
Embark on this journey to probing Kubernetes and master validating workloads’ health status in Kubernetes!
Prerequisites
Before diving into this tutorial, ensure you have a running Kubernetes deployment and its YML syntax to follow along with the hands-on demonstrations.
Creating Kubernetes Liveness Probes
Picture this: You have a critical service running and want to be sure it is always up and responsive. If, for any reason, your application crashes or gets stuck in a loop, a Kubernetes liveness probe steps in and says, “Hey, something’s not right here; fix it ASAP!”
A liveness probe is like the pulse check for your pods, ensuring that your applications are not just running but healthy and doing their job.
To set up a Kubernetes liveness probe into action, you create it at the containers level of any Kubernetes deployment YAML files as follows:
1. Create a deployment.yml file with your preferred editor, and add the following configuration to spin up a minimal Kubernetes cluster using NGINX.
In the configuration below, the container uses livenessProbe to determine whether it is live in the following deployment manifest.
apiVersion: apps/v1
kind: Deployment
metadata:
  # Deployment name
  name: nginx-dep
  labels:
    app: nginx-dep
spec:
  # Replicas to deploy
  replicas: 1
  selector:
    matchLabels:
      app: nginx-dep
  template:
    metadata:
      labels:
        app: nginx-dep
    spec:
      # Container deployment level
      containers:
        # Container name
        - name: nginx-dep
        # Container Docker image
          image: nginx:latest
          imagePullPolicy: Always
          ports:
          # Container traffic port
          - containerPort: 80
          # Configure the liveness probe
          livenessProbe:
          # Use an HTTP endpoint to check container health
            httpGet:
              path: /
              # Port liveness probe should check within the container
              port: 80
              # Seconds between when the next probe should be fired.
            periodSeconds: 5
            # Delay between first liveness probe
            initialDelaySeconds: 5
2. Next, run the following kubectl command to apply the changes and deploy your manifest file (deployment.yml).
kubectl apply -f deployment.yml
3. Once deployed, execute the below kubectl command to get all pods available so you can confirm your NGINX deployment is running.
kubectl get podsNote down your Pod’s name for later use.

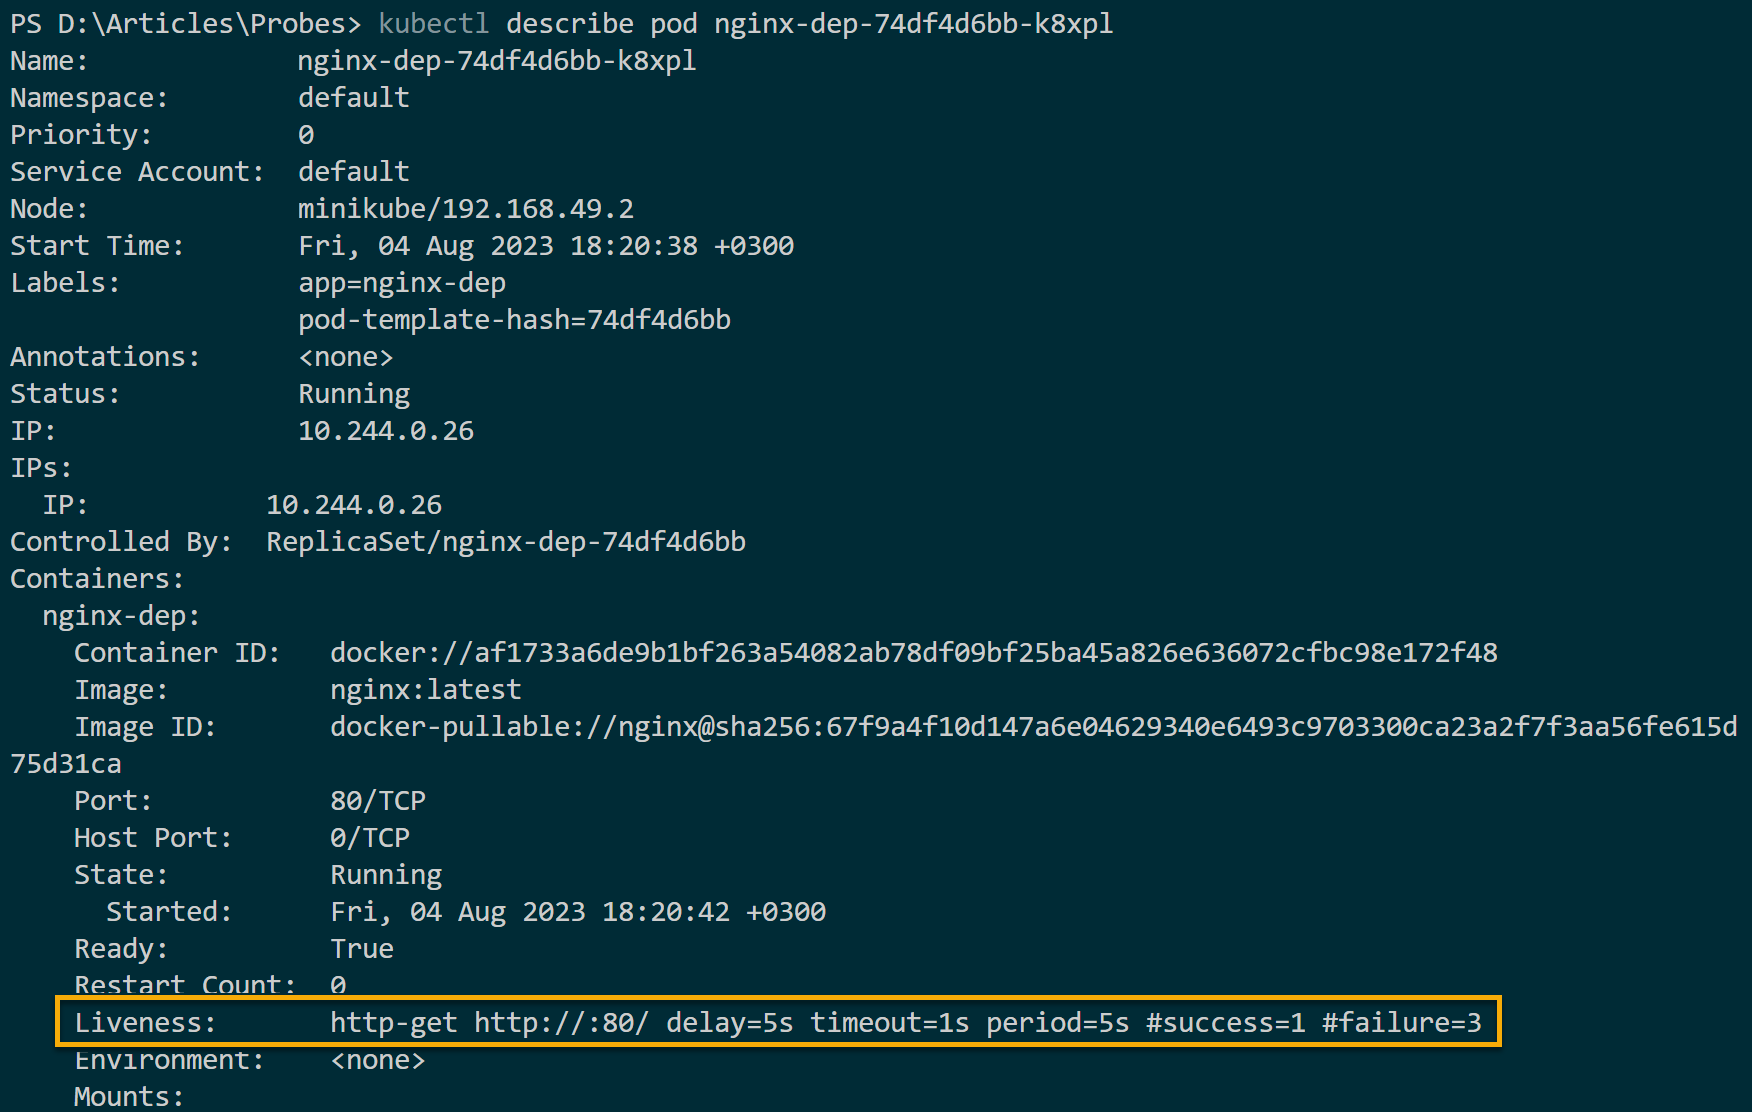
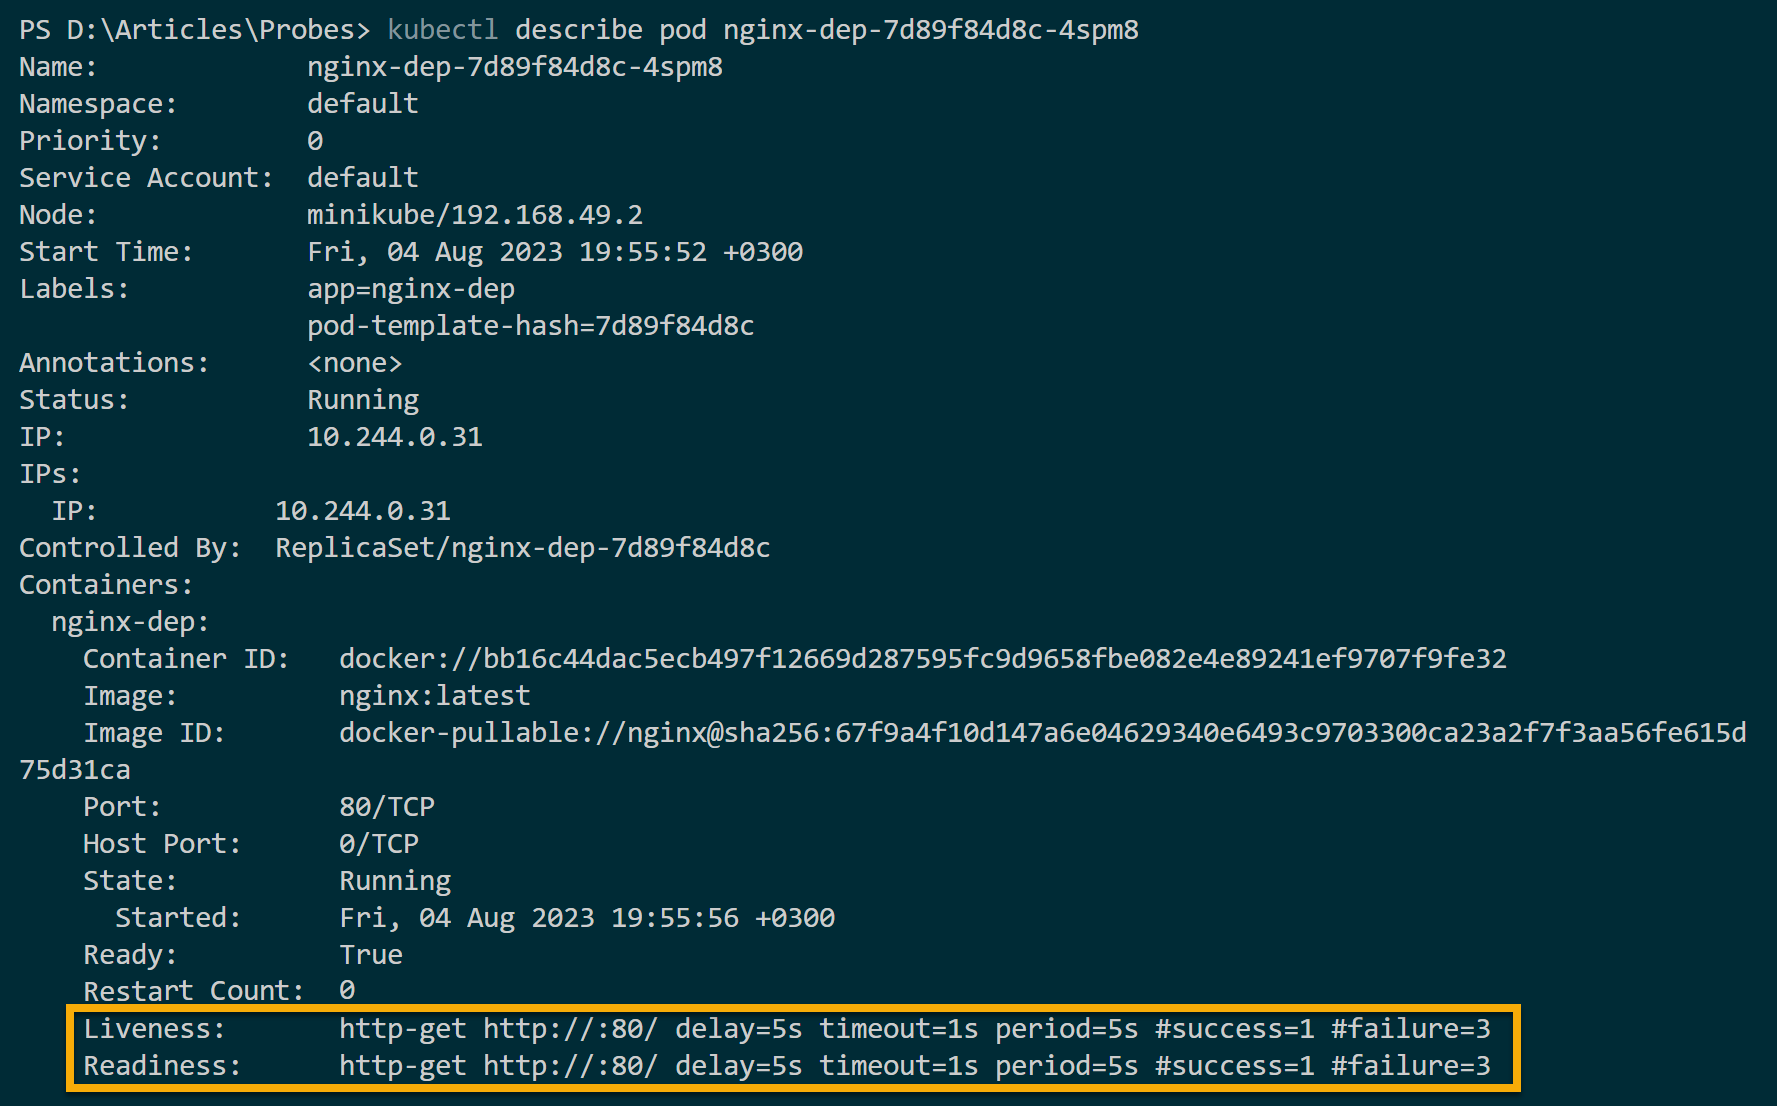
4. Now, run the describe command below to check if the pod in your liveness probe is running.
Ensure you replace pod_name with the Pod name you noted in step three.
kubectl describe pod pod_nameIf all goes well, you will see the deployed liveness probe properties. The Kubernetes liveness probe is fine at this level, and the container is considered live. Liveness probes return the following outcomes:
- The success status for alive and healthy containers as shown in the screenshot below.
- A fail code such as HTTP 500 (often called “Internal Server Error”) tells Kubernetes that the container is unhealthy and should be restarted (demonstrated in step seven).
When a container fails to run, a Kubernetes liveness probe checks and confirms if that container is alive. These checks are periodically sent to the Kubernetes control plane to assess the health of the containers running in a Pod.
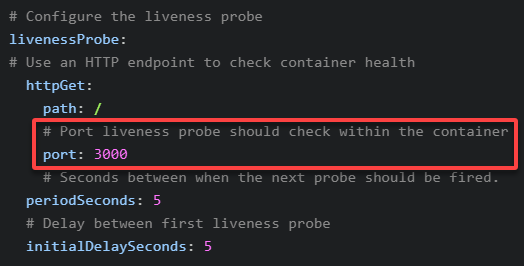
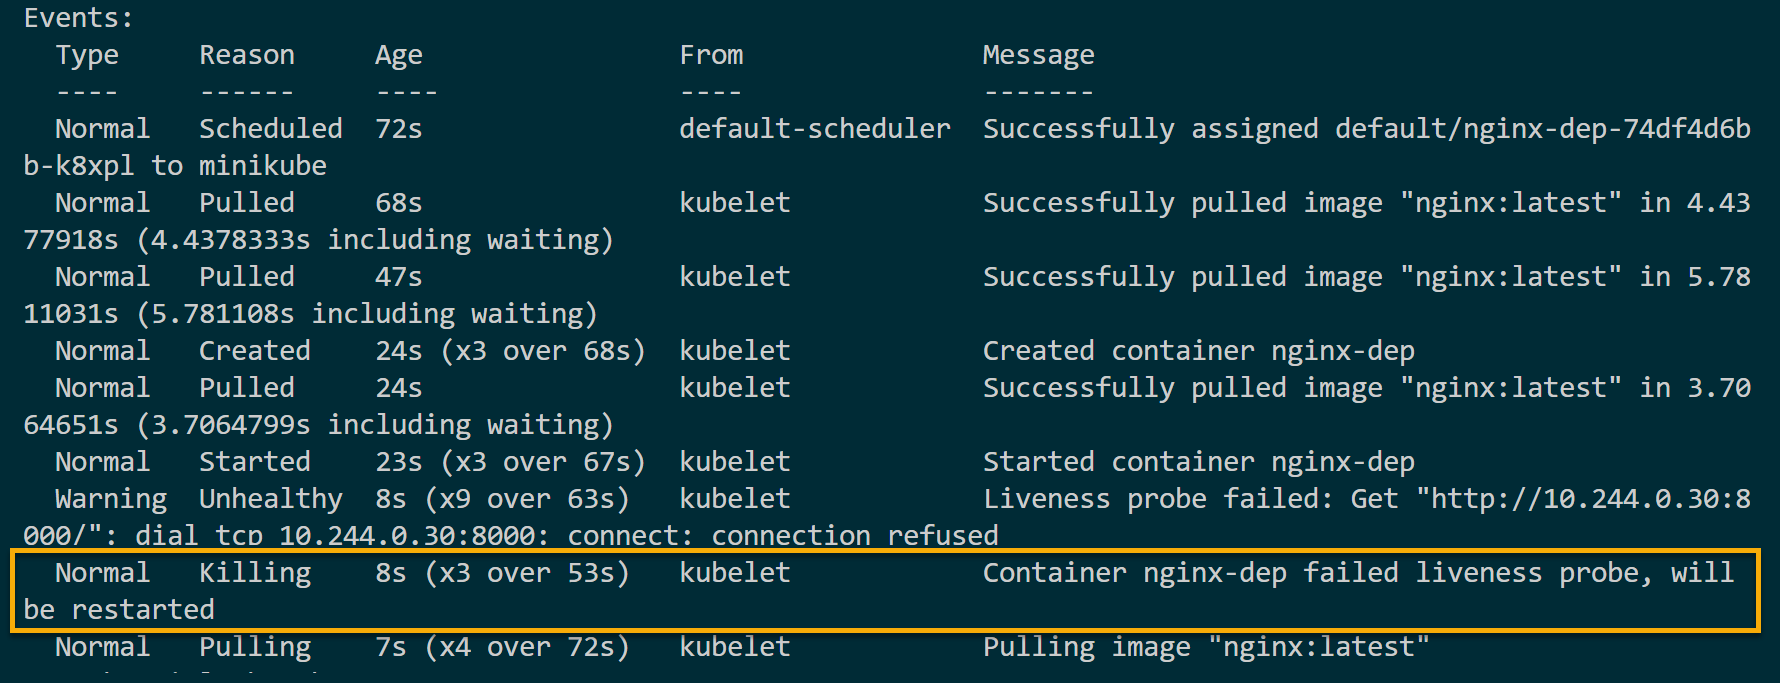
5. Now, change the liveness probe port to 3000 in your deployment.yml file, as shown below, to check how a failed liveness probe detects unhealthy pods.
The container directs traffic to port 80. Using other ports like 3000 will change the container port to a non-exciting port. The Kubernetes liveness probe should fail to check a valid traffic connection.
6. Rerun the commands below to execute (apply) your deployment.yml manifest changes, and check if the pod is running.
# Apply the changes to deployment
kubectl apply -f deployment.yml
# Get all pods
kubectl get pods
Take note of the newly-created Pod’s name.

7. Ultimately, execute the kubectl command below to describe the new pod. Replace pod_name with the name assigned to the one you noted in step six.
kubectl describe pod pod_nameThis container does not expose port 3000 in this example because the containerPort is set to port 80. Since the port is not open, the container is considered unhealthy even if the Pod runs, and you get the following results.
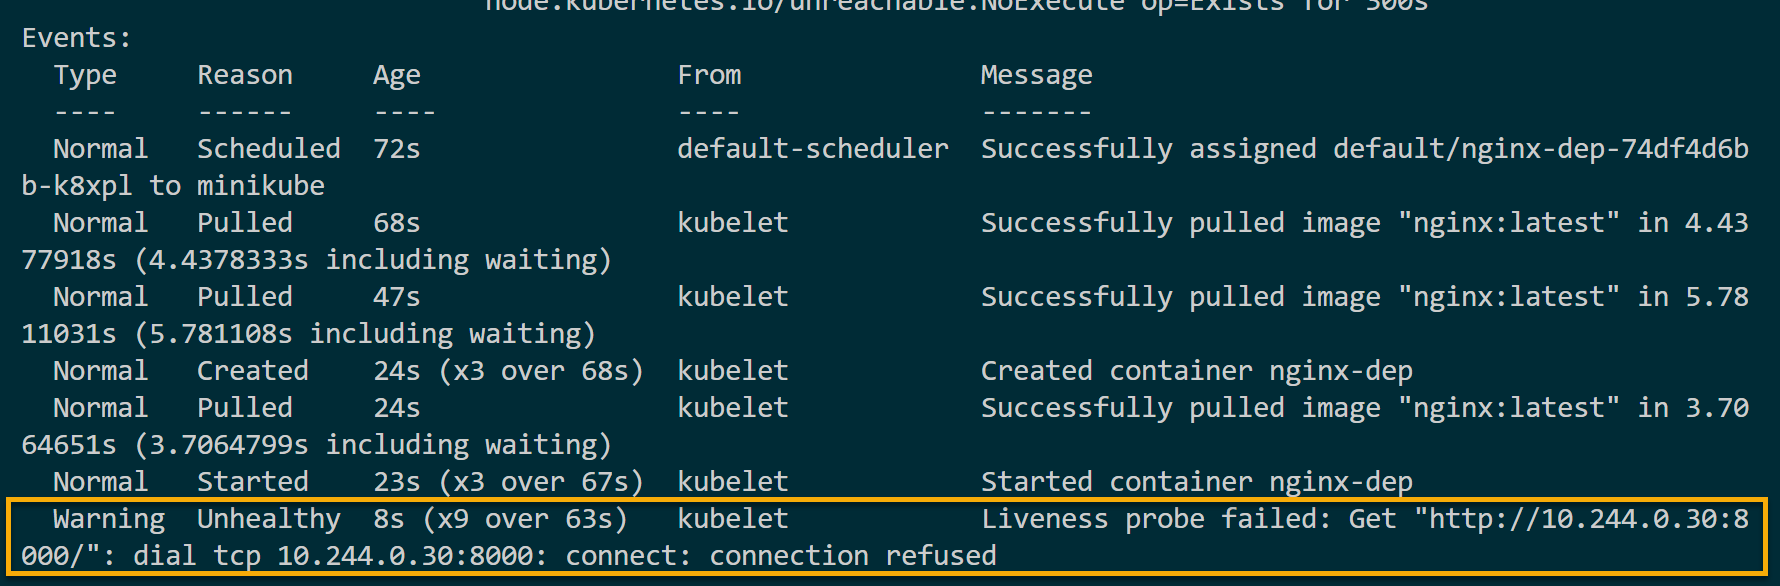
Remember that confirming a container is running does not guarantee an application is running. Your Pod can be ready but fail to serve requests.
But no worries! kubelet will record failure as Liveness probe failed. At the same, the livenessProbe kills and restarts this container automatically.
Presiding Incoming Traffic with the Readiness Probes
Think of your application like a café that just opened its doors, which might look open, but the barista is still setting up everything. In such cases, the cafe manager (your readiness probe) ensures everything is in order before customers (or users, in this case) start pouring in.
While liveness probes ensure a Pod is live, Kubernetes also offers the readiness probe, which decides if the container can serve incoming traffic. Assuming you are running a web app, it is only a readiness probe that tells if your web app can accept requests and handle external traffic.
To see how the readiness probes work in presiding incoming traffic:
1. Add the following configuration, as is, at the bottom of the deployment.yml file to create a readiness probe, which uses the same properties as the Kubernetes liveness probe.
# Configure the readiness probe
readinessProbe:
  # An HTTP endpoint to check container health
  httpGet:
	  path: /
    # The port readiness probe should check within the container
    port: 80
  periodSeconds: 5
  initialDelaySeconds: 5
2. Next, rerun the following commands to execute (apply) your manifest changes in the deployment.yml file and check (get) all running pods.
# Apply the changes to the deployment
kubectl apply -f deployment.yml
# Get all pods
kubectl get pods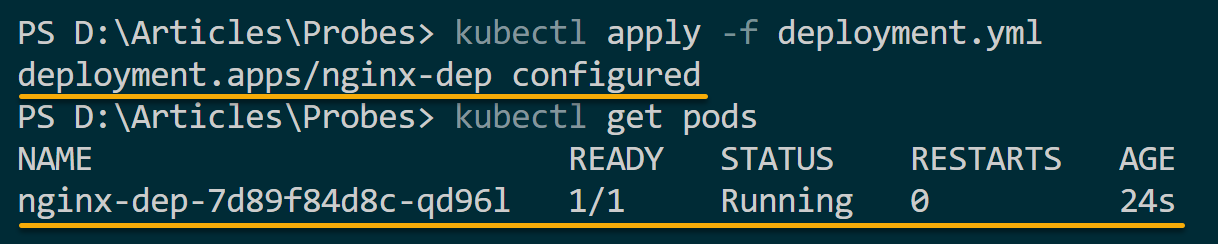
3. Run the below kubectl describe command to check the deployed readinessProbe properties. Ensure you change pod_name to the one you noted in step two.
kubectl describe pod pod_nameThe readiness probe guarantees the application running within its container is 100% ready to accept network requests and be used to serve them.
If the readiness probe fails, kubelet removes the IP address of the Pod from the endpoints of all services it belongs to. This way, the Pod is not part of the service and will not get any traffic.
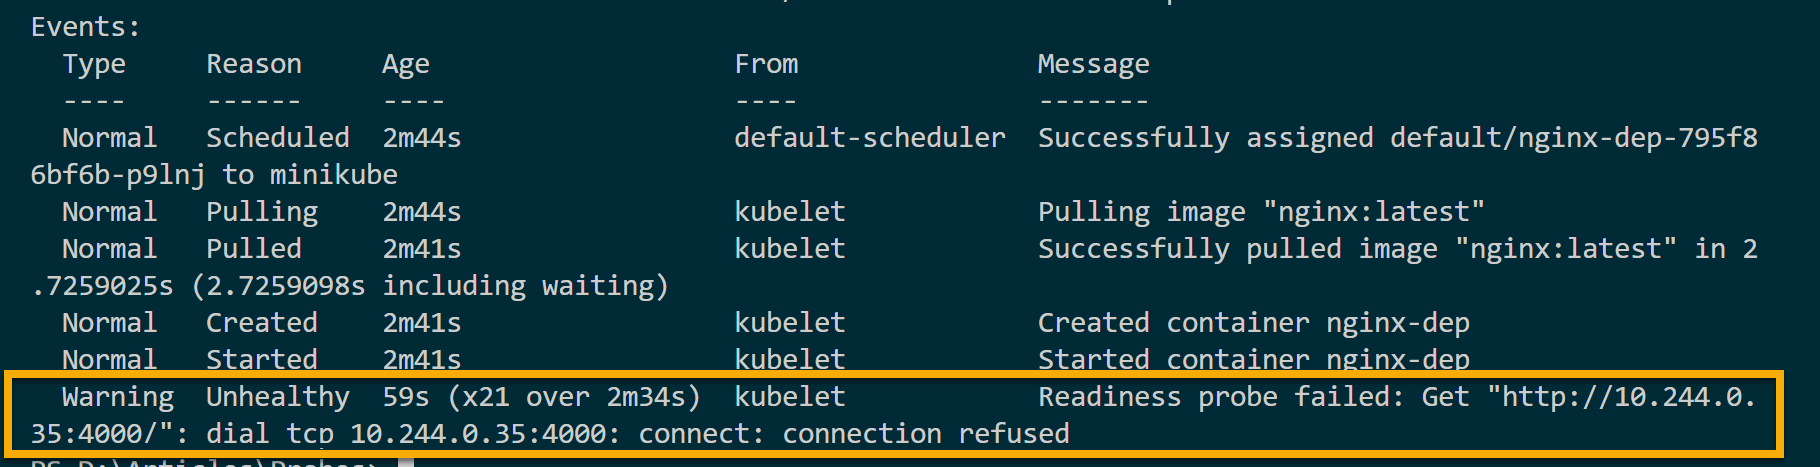
4. Now, change the readinessProbe port in your deployment.yml file to a different port, like 4000. Doing so lets you test what could happen if you change the port properties and redeploy to test unhealthy readinessProbe.
# Configure the readiness probe
readinessProbe:
# Use an HTTP endpoint to check container health
  httpGet:
    path: /
    # Diffrent port from the container port
    port: 4000
  # Seconds between when the next probe should be fired.
  periodSeconds: 5
  # Delay between first readiness probe
  initialDelaySeconds: 5
5. Finally, rerun the below kubectl describe command to check the newly deployed readinessProbe properties.
kubectl describe pod_nameBelow, you can see the Readiness probe failed event. Note that this time, unlike livenessProbe, the readinessProbe did not kill the container and try to restart it.
This behavior is expected since the readiness probe only controls the traffic flow to the pod based on the container’s readiness to handle requests.
Conclusion
Throughout this tutorial, you have learned about Kubernetes liveness probes to improve the health of your applications. With this newfound knowledge, you can confidently deploy your containers and be assured of their availability in your Kubernetes cluster.
Now, why not explore Kubernetes monitoring and observability? Prometheus and Grafana have valuable insights into everything happening within your cluster!


