


If you have been managing Windows servers for any length of time, you no doubt have a lot of PowerShell scripts to perform those mundane but necessary tasks you do regularly like resetting passwords, gathering log data, or archiving backup files. Did you know PowerShell in Jenkins is a thing?
You may have scripts that you run on a regular basis, maybe even set up a task scheduler event in an attempt to automate your PowerShell scripts.
There is a better way.
In this article, you’re going to learn how to install Jenkins on Windows and run a simple PowerShell script. You will learn how to install Jenkins, set up basic security, enable the PowerShell plugin, and run a job to create a simple text file with parameters that we will input.
This article is intended to be a basic introduction to Jenkins. The configuration you’ll be learning isn’t necessarily intended for production environments.
Prerequisites
Most of this article is going to be a walkthrough. If you intend to follow along, be sure you have a few prerequisites in place.
The requirements to run Jenkins are so minimal, any modern computer could do it. The examples in this article will all be based on Jenkins running on:
- Windows 10 Enterprise v.1903
- PowerShell Core v6
Although Jenkins can run on just about any platform, I will be focusing on Windows 10 enterprise to keep things simple.
Installing Jenkins
With the prerequisites taken care of, lets install Jenkins.
Installing Jenkins is simple and straight forward. Navigate to https://www.jenkins.io/download/ and download the Long-term support (LTS) version. There are two versions available, the LTS version and the “Weekly” version. The “Weekly” version is regularly updated and can be unstable. For this article we are using the LTS version. This is the most stable version.
As you can see from the screenshot below, there are several options to choose from. Select the Windows version to begin the download.

Once you have the installer downloaded, extract the zip archive and run the installer accepting all of the defaults. Installation is simple.
Once the installation is complete, Jenkins will open a browser with the Getting Started page. This page has the initial administrator password to unlock Jenkins to continue the configuration. You can see below Jenkins is telling me to read a text file at C:\Program Files (x86)\Jenkins\secrets\initialAdminPassword.
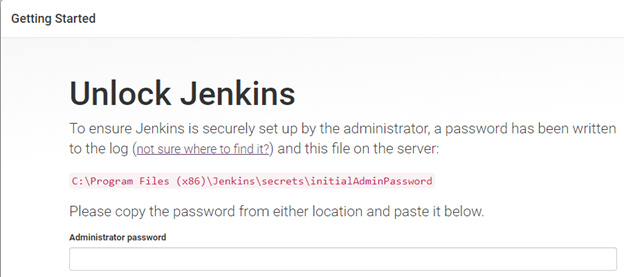
Navigate to the file shown open it up, copy the password shown and use it as the administrator password on the Getting Started page.
Installing Plugins
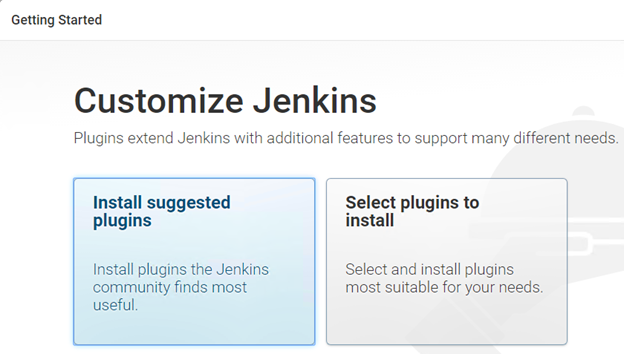
Once you log in for the first time, Jenkins will finish the final setup and then ask which plugins to install. There are a couple of choices as you can see below in the screenshot.
Selecting Install suggested plugins will install the recommended set of plugins based on the most common use scenarios. These include plugins for Authentication providers, GitHub interactions, and Java extensions. Select plugin to install allows you to install just the ones needed from a list of all available plugins.
Highlight Install suggested plugins and click OK. This process will take a few minutes to get the initial plugins installed so now is a good time to get yourself some coffee.
Creating the Admin User
Once the plugins are installed, the next step is to create our first user. This first user is the administrator for Jenkins and will have global permissions, much like the Enterprise Administrator for Windows Server. You can see below what the Create First Admin User page will look like.
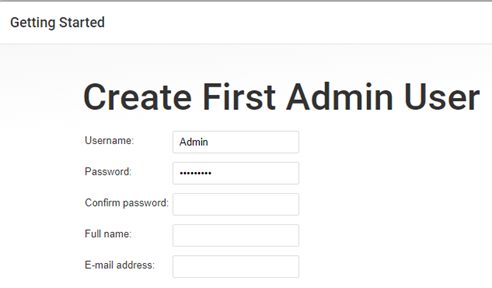
From this point on, the Jenkins interface is only accessible by entering a valid username and password.
Setting the Jenkins Admin URL
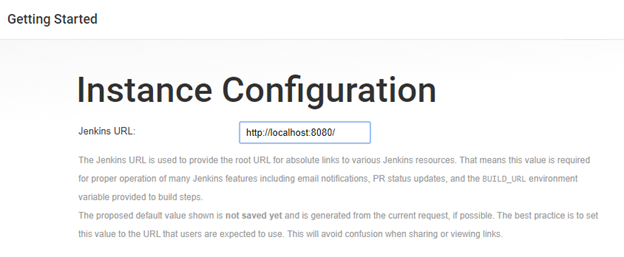
The last step is to set up the URL for Jenkins service to run on. This URL is the interface for managing the Jenkins program and ideally should be set to a Fully Qualified Domain Name (FQDN). Setting it to an FQDN will allow remote access much like a website. For this article and to keep things simple, accept the default URL.
Setting Up Security
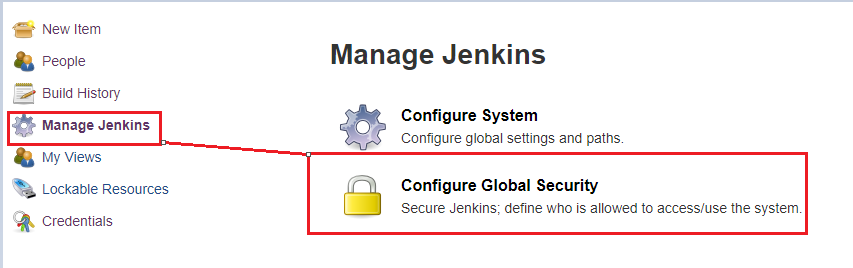
With installation complete, let’s configure authentication. Navigate to the main dashboard if it is not already open. From the main dashboard, click on Manage Jenkins then click on Configure Global Security to open up the security settings as shown below.
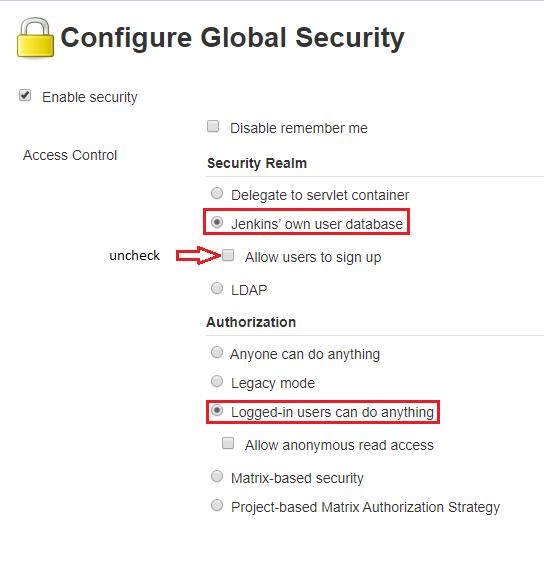
In the Configure Global Security page, you’ll see a few options to choose from. For this article, we are going to use Jenkins’ own user database to keep things simple. It also a good idea untick Allow user to sign up as shown below. Having it checked will allow any user to create an account and give themselves access to Jenkins. .
Looking at the screenshot below, there are other options for authentication.
- Delegate to servlet container – This is used if you have Docker containers already setup with Jenkins and allows authentication through the container.
- LDAP – This option is used when you already have Active Directory that you want to use for authentication
Next, choose the Logged-in users can do anything option. In this mode, every logged-in user will have full control of Jenkins. This may not be a good idea for production as this allows any user to make changes to the settings.
Enabling the PowerShell in Jenkins plugin
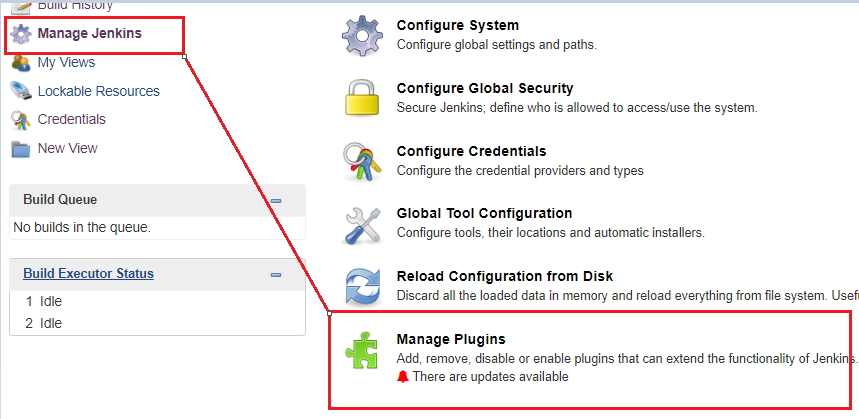
With basic security setup, it is time to configure the PowerShell in Jenkins plugin. To install the PowerShell, plugin, navigate to the main dashboard, click Manage Jenkins, then Manage Plugins as shown below.
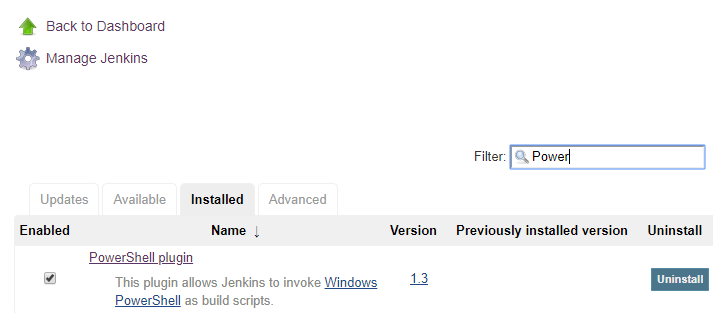
There are hundreds of plug-ins so the best way to find the PowerShell plugin is to search for it. In the filter bar, enter “PowerShell” and select it from the list. Check the bo, as shown below, to enable it. This will allow Jenkins to directly write PowerShell commands and scripts directly into the text boxes within Jenkins and allow Jenkins to invoke PowerShell without having to start a seperate PowerShell conole.
You can see below what this might look like.
With the plugin enabled, Jenkins is ready to run PowerShell jobs.
Creating a PowerShell in Jenkins Job
The installation of the PowerShell in Jenkins plugin is complete. Here comes the fun stuff. Let’s create a job.
In Jenkins, a job is defined as a series of tasks to complete. A common scenario is a job that will start compiling a program when a developer check-ins code. Very similar to Task Manager in Windows server.
The job we are going to set up will be to check for the c:\temp directory and insert a text file in that directory with a custom message.
Jenkins has different project types, sometimes called Pipelines, that focus on specific objectives. The different types of projects will have different settings, options and parameters depending on the type of project you choose. You can find more information about the types of projects and when to use them on the Jenkins site.
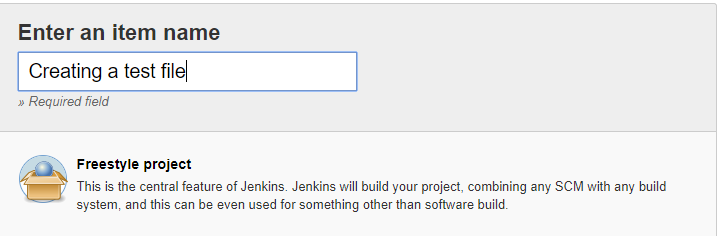
From the main dashboard, click New item. For the job name, enter creating a text file. This is arbitrary but it is a good idea to label it something that makes sense.
For this article we are going to use the Freestyle project. This offers the most flexibility to create our job. Highlight the Freestyle project and scroll to the bottom and click OK.
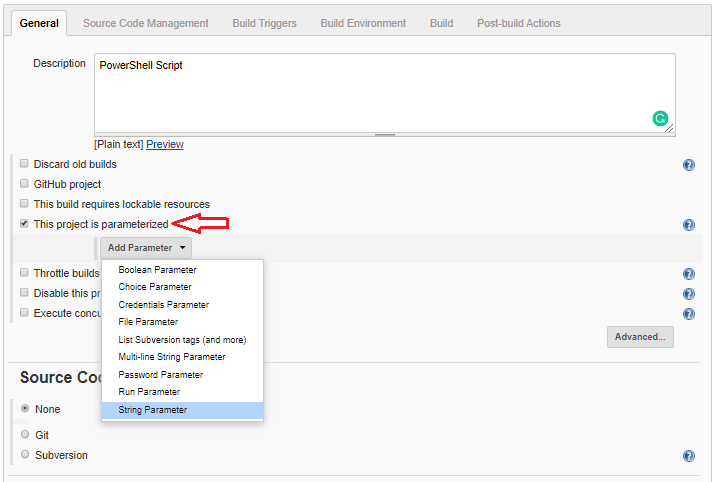
This job is going to be a parameterized project. This means that we can prompt users for input and that input will be passed to the job. For example, let’s say we have a job PowerShell in Jenkins job that copies log files to a specific directory. We can add a prompt to the job that will ask for a filename to include in the build when we run the job.
Check the This project is a parameterized item from the drop-down list. Click the Add Parameter drop-down and choose String Parameter. The string parameter is where you enter the message you want to include in the text file.
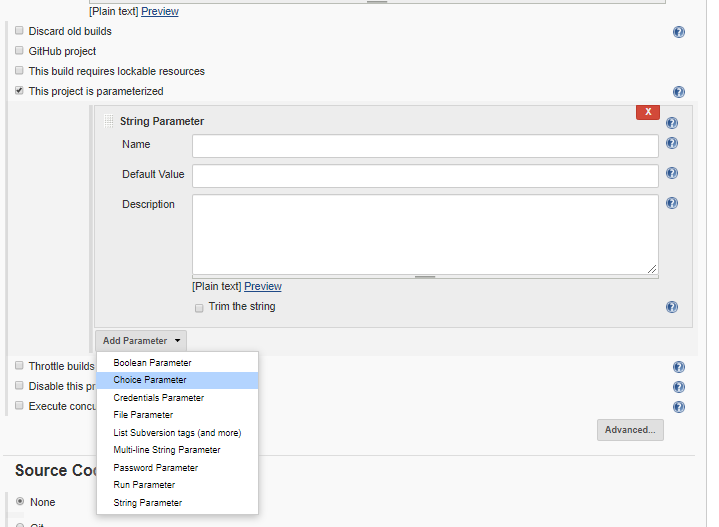
Then add a second Choice Parameter. It should look like the screen capture below. This option will give the user options to select a an item from the drop-down list.
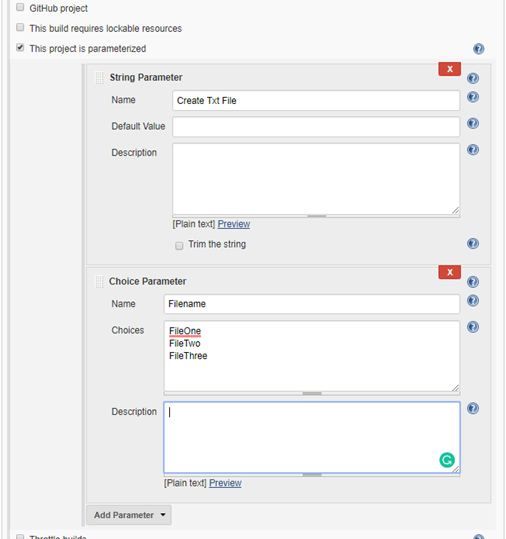
The job settings should now look something like the screenshot below.
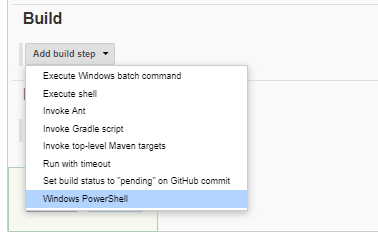
Scroll down to the Build section. Click on the small arrow and select Windows PowerShell. This lets Jenkins know we are running a PowerShell script. This is also where we enter the PowerShell script. This job is now ready. Click Save.
For a sample script for our PowerShell in Jenkins job, let’s create a file in the temp directory and add a simple message.
This is a simple script that will create temp directory under the root, if it is not already there and create a text file in that directory.
# Create Temp Directory
if (-not(Test-Path -Path 'C:\temp'))
{
    New-Item -Path 'C:\temp' -ItemType directory
}

# Using the environment variables exposed by the Jenkins job
Set-Content -Path "C:\temp\$($env:Filename).txt" -Value $env:Message
TIP: Write your script in VSCode or another editor first then and then paste it into the box.
Running the PowerShell in Jenkins Job
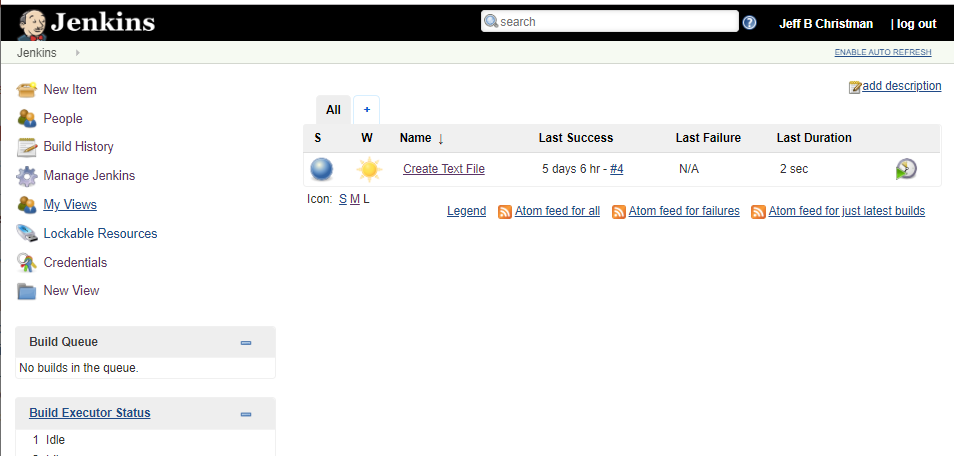
Finally, you are ready to run your first job. Let’s head back to the main dashboard and you will see the Create Text File job listed in the main dashboard. See below.
Click on the clock icon on the far right and bring up the job form.
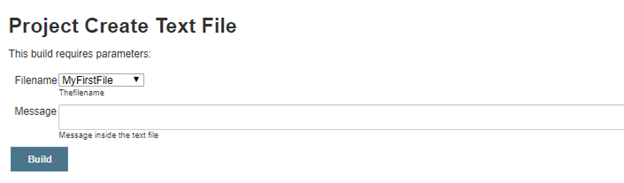
In the message box, enter the text you want to insert into the text file. and click build. Once the build is done, click on the console output. The console output shows the status of the job and if the job run was successful.

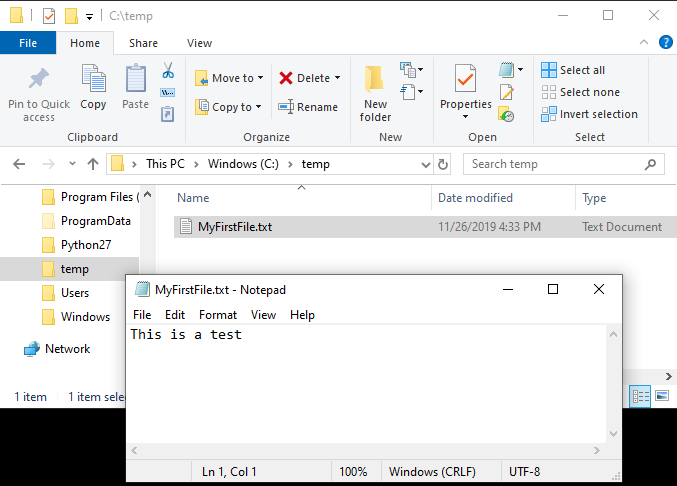
Now all that is left to do is open file manager and check out the file. Navigate to the temp directory and open the text file. It will have the same text as you entered in the build message box.
Summary
You now have a basic understanding of PowerShell in Jenkins. It is a powerful tool that can be used to manage your PowerShell scripts and automate all the things!


