

Do you often access application programming interfaces (APIs) using PowerShell? Maybe you want to but don’t know where to start? Whether you’re a PowerShell pro or just starting, this tutorial has you covered with a built-in PowerShell cmdlet that interacts with APIs called Invoke-RestMethod.
In this article, you’ll learn many different ways to work with representational state transfer (REST) APIs from using GET and POST requests, covering authentication, how to download files, and more!
Invoke-RestMethod in a Nutshell
When you need to retrieve or send data to a REST API, you need a client. In the PowerShell world, that client is the Invoke-RestMethod cmdlet. This cmdlet sends HTTP requests using various HTTP methods to REST API endpoints.
HTTP methods then instruct REST APIs to carry out various actions to be performed on a resource.
The official HTTP methods are GET, HEAD, POST, PUT, DELETE, CONNECT, OPTIONS, TRACE, and PATCH, although some APIs may implement custom methods.
The Invoke-RestMethod cmdlet supports all HTTP methods, including authentication, sending different HTTP headers, HTTP bodies, and also automatically translates JSON and XML responses to PowerShell objects. The Invoke-RestMethod cmdlet is the PowerShell cmdlet to interact with REST APIs!
Prerequisites
If you’d like to follow along with the many demos in this tutorial, be sure that you have:
- PowerShell 7.0 or later installed. This tutorial uses a Windows 10 machine and PowerShell 7.1.
Without further ado, open your PowerShell console and/or code editor and let’s get started!
Retrieving Data via a Simple GET request
Let’s start things off with the simplest example out there; querying a REST API with a GET request. Invoke-RestMethod can do a lot, but you need to understand the basics first.
To send a simple GET request to a REST API endpoint, you’ll only need one parameter, Uri. The Uri parameter is what tells Invoke-RestMethod where the endpoint is.
For example, run the command below. This command queries the JSONPlaceholder APIs posts endpoint and returns a list of post resources.
The JSONPlaceholder site offers a free fake API for testing, which is used to demonstrate real examples of queries with the
Invoke-RestMethodcommand.
Invoke-RestMethod -Uri "https://jsonplaceholder.typicode.com/posts"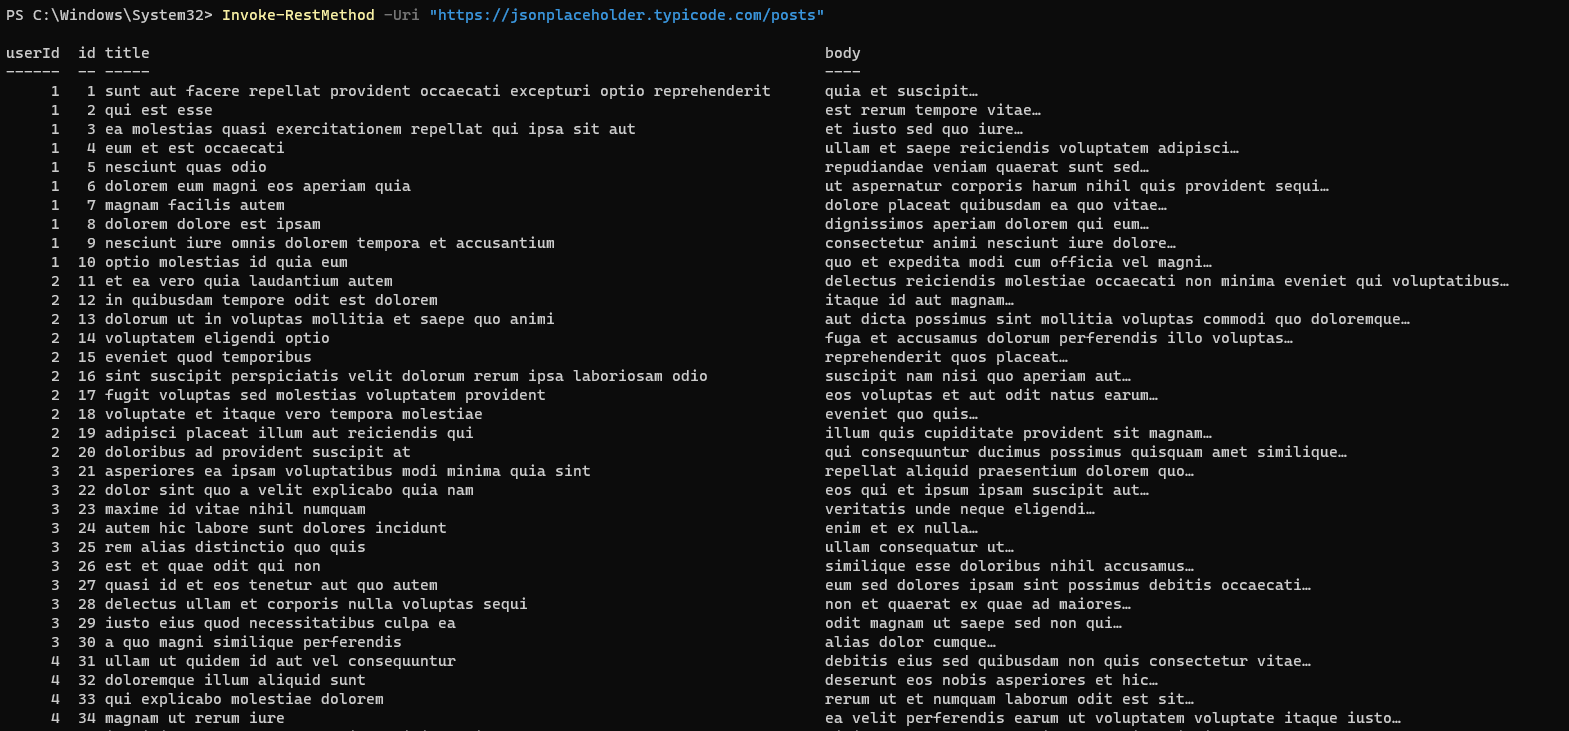
When the REST endpoint https://jsonplaceholder.typicode.com/posts returns data, it doesn’t return it in nice PowerShell objects, as you see above. Instead, it returns data in JSON. Invoke-RestMethod automatically converted the JSON to PowerShell objects for you.
You can see below that PowerShell converted the output to the PSCustomObject type by looking at a single item in the PowerShell array and running the GetType() method on it.
# Store the API GET response in a variable ($Posts).
$Posts = Invoke-RestMethod -Uri "https://jsonplaceholder.typicode.com/posts"

# Run the GetType() method against the first item in the array, identified by its index of 0.
$Posts[0].GetType()
Authenticating to an API
In the previous section, you queried a public REST API using the GET method. The API didn’t require any authentication. Much of the time, though, you must authenticate to a REST API somehow.
Two of the most common ways to authenticate to a REST API is using Basic (username/password) or Bearer (token) authentication. To differentiate between these two wildly different authentication schemes requires using an Authorization HTTP header when sending the request.
Let’s now cover how you can use Invoke-RestMethod to send HTTP headers (especially the Authorization HTTP header) to REST endpoints.
The
Invoke-RestMethodabstracts away a lot of the tedium to sending HTTP requests. Even though you must provide an Authorization header in an HTTP request, you’ll see no references to “headers” in this example. Abstracting away concepts like this is common with theInvoke-RestMethodcmdlet.
Using a Username and Password with Basic Authentication
The simplest way to authenticate to a REST endpoint is using a username and password. To capture that username and password, you must pass a PSCredential object to the endpoint that contains the username and password.
First, create the PSCredential object containing the username and password.
# This will prompt for credentials and store them in a PSCredential object.
$Cred = Get-Credential
Once you have a PSCredential object stored in a variable, pass the required URI to the command but this time add the Authentication and Credential parameter.
Setting the Authentication parameter sends an authorization HTTP header containing the word Basic, followed by a base64 encoded username:password string like Authorization: Basic ZGVtbzpwQDU1dzByZA==.
The Credential parameter accepts the PSCredential you created earlier.
The below example and many more in this tutorial use a concept called PowerShell splatting that allows you to define parameters in a hashtable and then pass to the command. Learn more about splatting in the ATA post PowerShell Splatting: What is it and how does it work?
# Send a GET request including Basic authentication.
$Params = @{
	Uri = "https://jsonplaceholder.typicode.com/posts"
	Authentication = "Basic"
	Credential = $Cred
}

Invoke-RestMethod @Params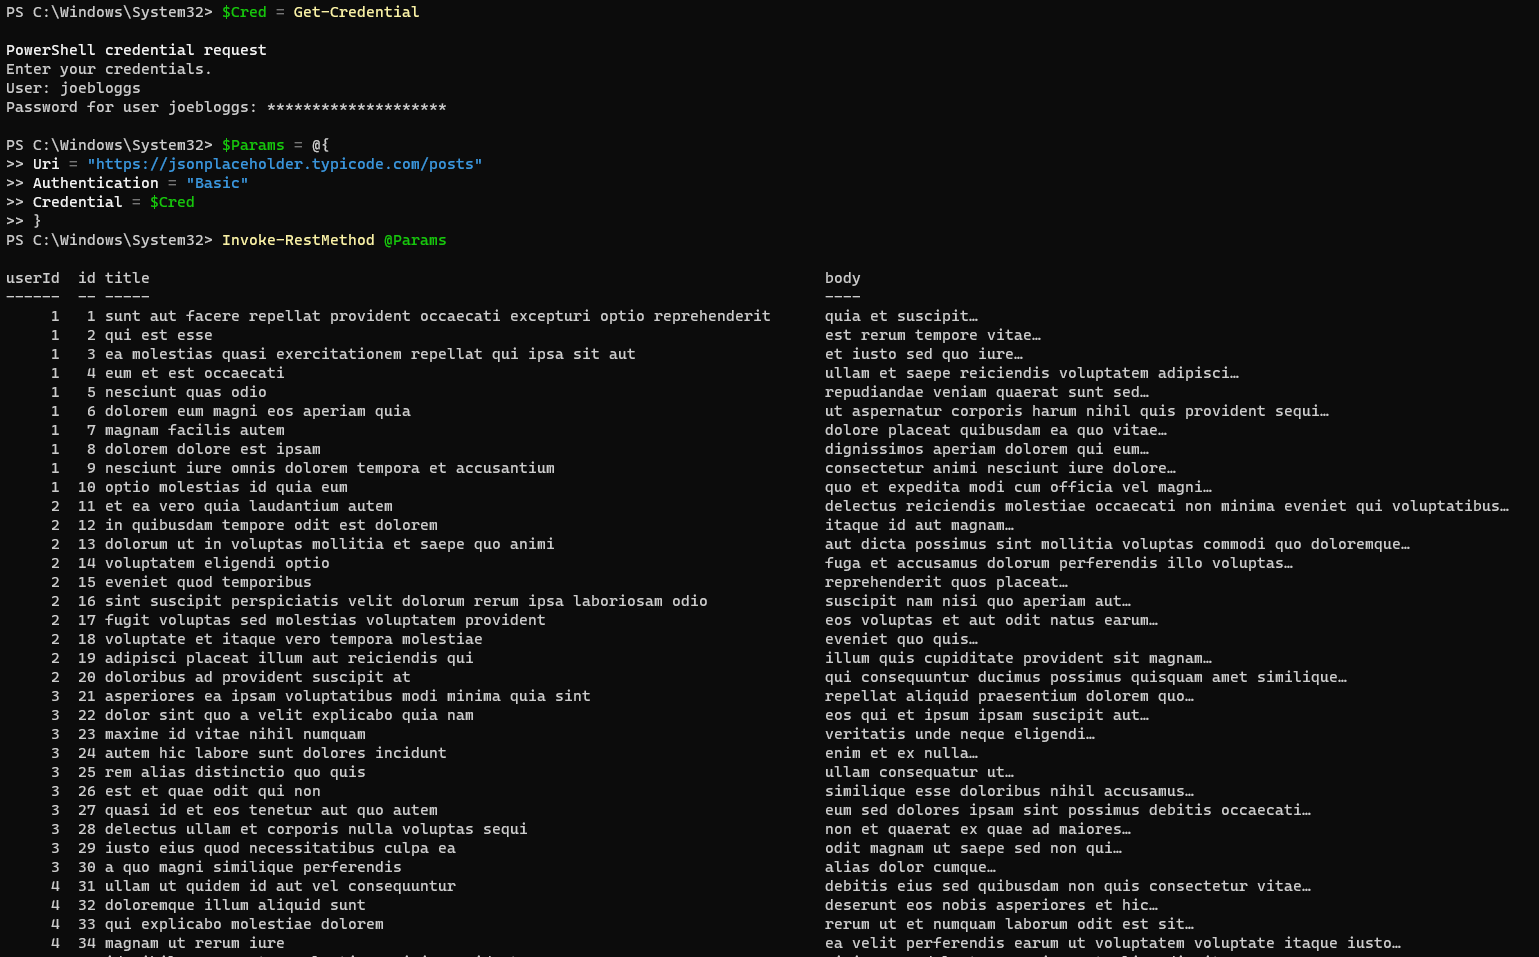
If you use the
CredentialorAuthenticationparameter option with aUrithat does not begin with https://,Invoke-RestMethodwill return an error for security reasons. The override this default behavior, use theAllowUnencryptedAuthenticationparameter at your own risk.
Using an API/OAuth Token with Bearer Authentication
Basic username and password authentication are OK, but it’s not great. Credentials are simply encoded as base64 (not encrypted) which opens up security issues. To address this, APIs usually implement a token authentication system or Bearer/OAuth authentication.
To authenticate to a REST API with an OAuth token:
1. Obtain the OAuth token from your API. How this token is obtained will depend on your API provider.
2. Next, convert your token string into a secure string with the ConvertTo-SecureString cmdlet, as shown below. The Invoke-RestMethod requires the token to be a secure string.
$Token = "123h1v23yt2egv1e1e1b2ei1ube2iu12be" | ConvertTo-SecureString -AsPlainText -Force3. Finally, define and pass the Uri, Authentication type, and Token to the Invoke-RestMethod cmdlet. Invoke-RestMethod will then call the URI provided and add the token to the Authorization HTTP header.
The
Authenticationparameter argumentOAuthis an alias forBearer. You can use both of these parameter values interchangeably.
# Send a GET request including bearer authentication.
 $Params = @{
     Uri = "https://jsonplaceholder.typicode.com/posts"
     Authentication = "Bearer"
     Token = $Token
 }
 Invoke-RestMethod @Params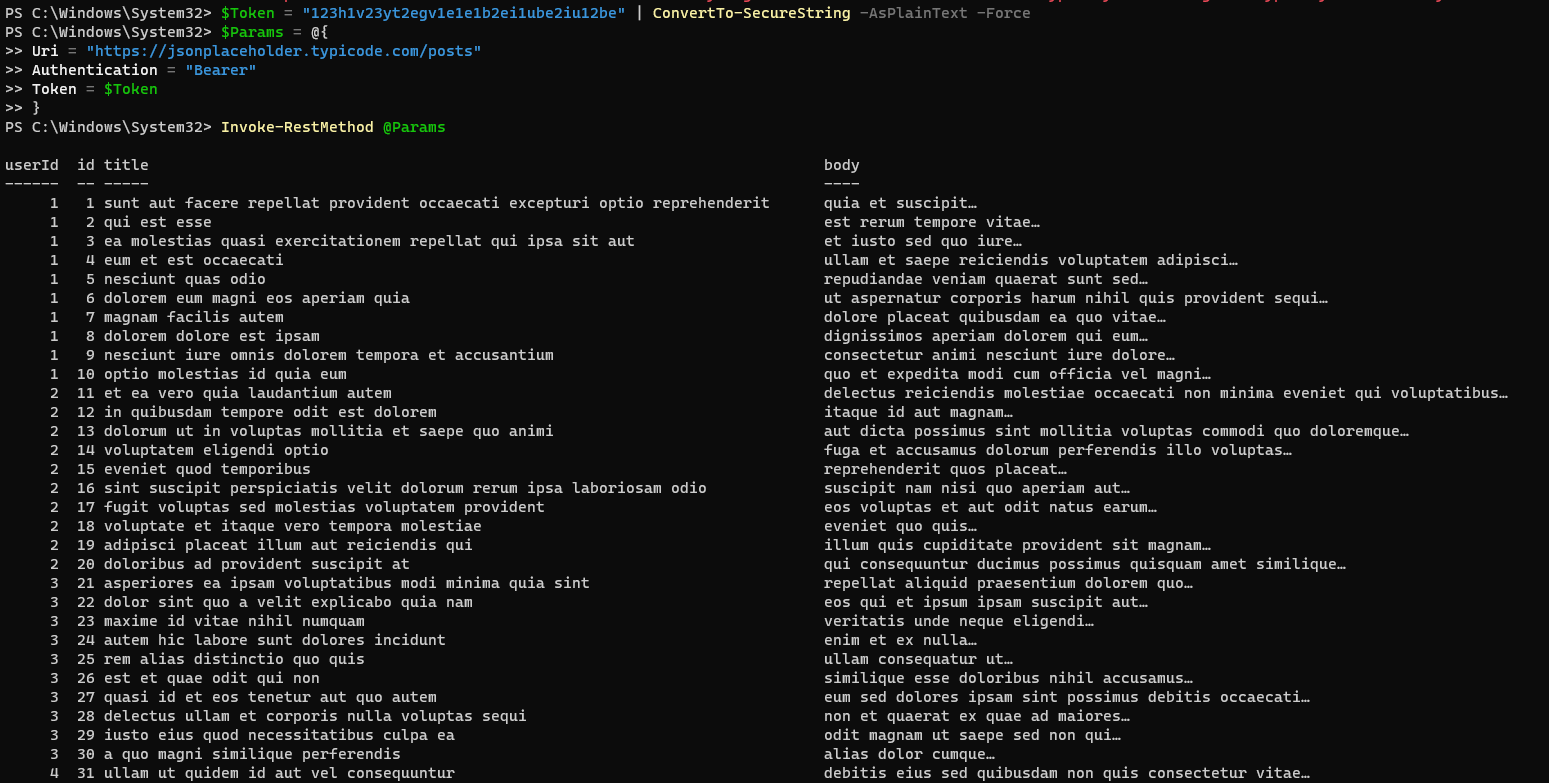
Retrieving Data with Using Query Parameters
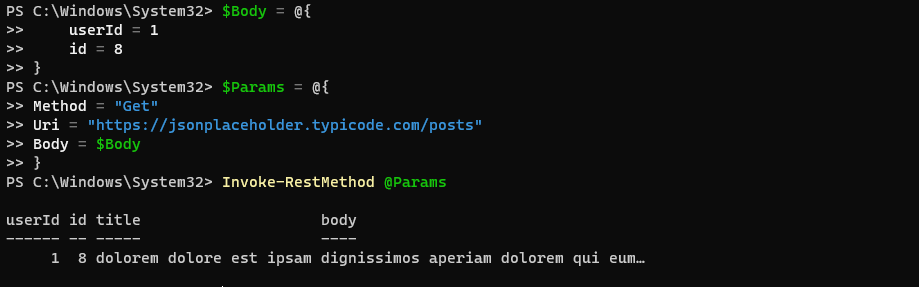
Typically, sending a GET request to a REST API is more involved than just a simple, generic request to an endpoint. Instead, you need to pass parameters to specify exactly what you need from the API; you need to pass HTTP query parameters.
To send query parameters with Invoke-RestMethod, you have two options. You can either directly append the parameters to the URI, as shown below, which passes a userId of 1 and an id of 8.
https://jsonplaceholder.typicode.com/posts?userId=1&id=8Or, you could define the parameters in the HTTP body using the Body parameter as a hashtable. Let’s cover how to pass parameters to an endpoint using the Body parameter.
Create a hashtable containing the query parameter key/value pairs, as follows.
$Body = @{
    userId = 1
    id = 8
}
Finally, provide the $Body variable to the Body parameter, as shown below.
You can specify the
Methodparameter using a value ofGETor exclude theMethodparameter orInvoke-RestMethodto default to the value.
$Params = @{
	Method = "Get"
	Uri = "https://jsonplaceholder.typicode.com/posts"
	Body = $Body
}

Invoke-RestMethod @Params
You can now see below that the endpoint only returns the post item you’re looking for.
Sending Data to an API with the POST HTTP Method
In the previous examples, you were querying data from a REST API or using HTTP GET requests. You were reading the data it sent back, but reading is only half the story with many REST APIs. REST APIs must support a full CRUD model so you can interact with the service.
When you need to make changes to a service providing an API, you won’t use a GET HTTP request; you’ll use a “writable” request like POST.
You’ll also typically need to pass an HTTP body with requests when using any “writable” HTTP method like PUT or PATCH.
Sending JSON Data in a POST Request
Using the previous REST API endpoint, let’s now create a new post item rather than just reading them.
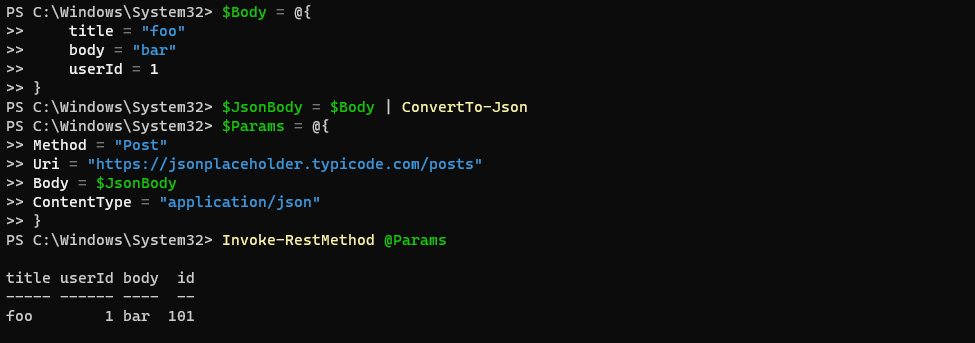
1. First, create a hashtable including all of the attributes for the posts API endpoint. You’ll see below that the tutorial’s specific endpoint allows you to create a new post item with a title, body and userId.
$Body = @{
     title = "foo"
     body = "bar"
     userId = 1
 }
2. Next, convert the hashtable represented in the $Body variable to a JSON string storing it in a new variable $JsonBody.
REST endpoints don’t know what a PowerShell hashtable is, and you must convert the object into a language that the REST API understands. Creating a hashtable first is optional. You could type up the JSON directly and skip this step if you wanted to.
$JsonBody = $Body | ConvertTo-Json3. Finally, craft the required parameters and run Invoke-RestMethod. Notice below that you must now use the Method parameter with a value of Post. Without using the Method parameter, Invoke-RestMethod defaults to sending a GET request.
Also, many REST APIs require you to specify the ContentType indicating the HTTP Content-Type header the Body is stored in. In this example, you must use application/json.
# The ContentType will automatically be set to application/x-www-form-urlencoded for
# all POST requests, unless specified otherwise.
 $Params = @{
     Method = "Post"
     Uri = "https://jsonplaceholder.typicode.com/posts"
     Body = $JsonBody
     ContentType = "application/json"
 }
 Invoke-RestMethod @Params
Notice below that the API returns a post item along with an id for that new post.
Sending Form Data with Invoke-RestMethod
Some REST API endpoints may require you to submit data via the multipart/form-data HTTP content type. To send a different content type with Invoke-RestMethod is a bit easier than using JSON. Since PowerShell 6.1.0, you can now use the Form parameter.
The Form parameter provides a convenient way to add multipart/form-data objects to a request without the need to use the .NET System.Net.Http.MultipartFormDataContent class directly.
To send form data with Invoke-RestMethod, first, create a hashtable with each item as before.
$Form = @{
    title = "foo"
    body = "bar"
    userId = 1
}
Notice using the
Formparameter; you don’t need to use theBodyparameter. Also, if you attempt to specify theContentTypeand theFormparameter together,Invoke-RestMethodwill ignore theContentTypeparameter.
Finally, simply pass the hashtable to the Form parameter, as shown below.
$Params = @{
	Method = "Post"
	Uri = "https://jsonplaceholder.typicode.com/posts"
	Form = $Form
}

Invoke-RestMethod @Params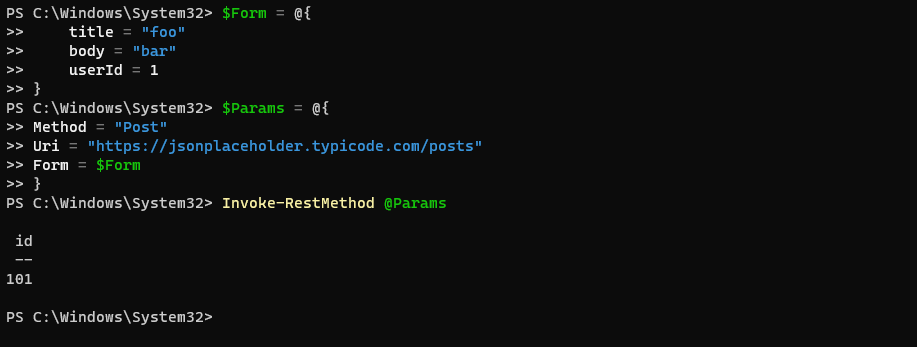
Following Relation Links
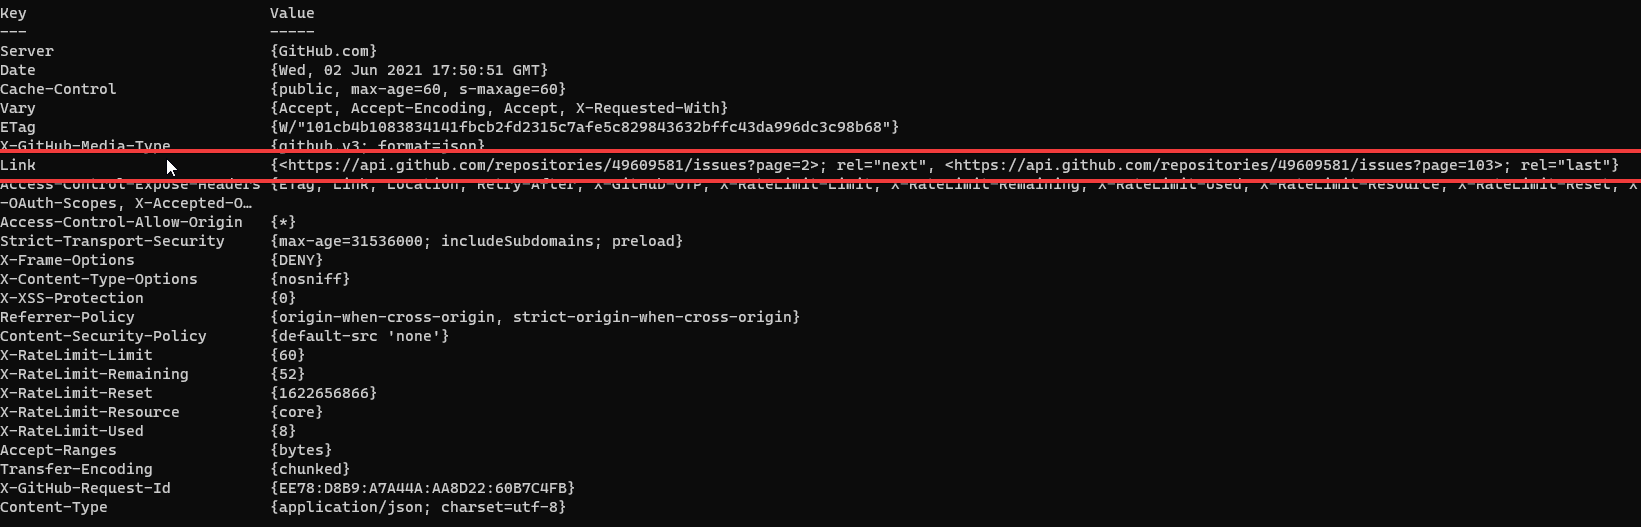
Rather than returning massive datasets in one go, APIs often return “pages” of data. For example, the GitHub Issues API returns 30 issues per page by default. Some APIs include links to the next (or previous, last, etc.) page of data the response to help navigate the dataset known as relation links.
To find relation links an API returns, you must inspect the HTTP response headers. One easy way to do that is to use the ResponseHeadersVariable parameter. This parameter automatically creates a variable and stores the headers in a hashtable.
Let’s use the PowerShell GitHub repo’s issues as an example.
1. Make a GET request to the PowerShell GitHub repo’s issues endpoint, as shown below. Be sure to use the ResponseHeadersVariable to create a variable. The below example uses the $Headers variable.
# Issue GET request to GitHub issues API for the PowerShell project repo and store
# the response headers in a variable ($Headers).
 Invoke-RestMethod -Uri "https://api.github.com/repos/powershell/powershell/issues" -ResponseHeadersVariable "Headers"
# Print the $Headers variable to the console.
 $Headers
Notice below that the hashtable inside of the $Headers variable has a key called Links. This key contains the relation links for the response that indicates the data set is bigger than just this one response.
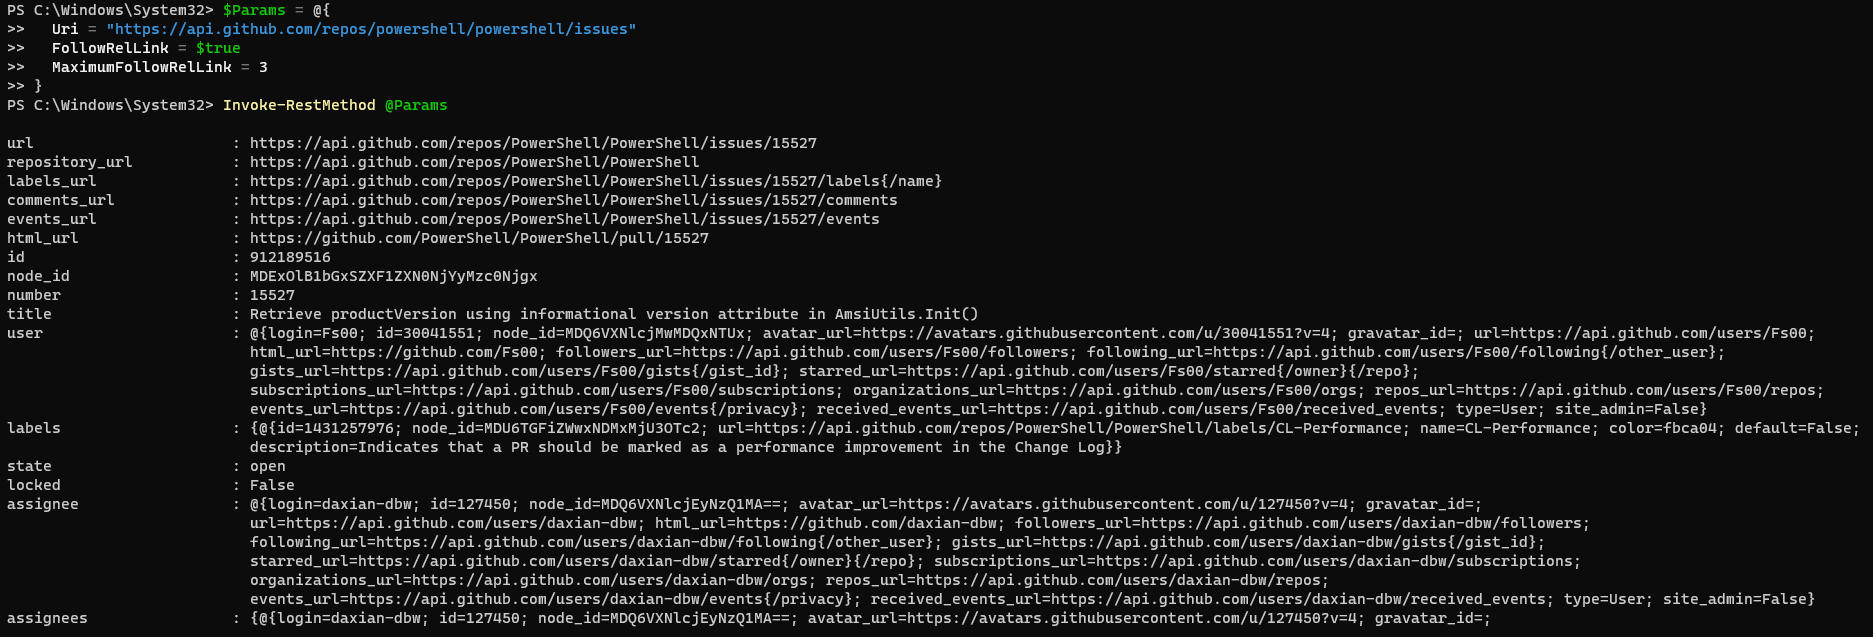
2. Next, follow the relation links using the FollowRelLink parameter. This parameter automatically reads each of the relation links and issues a GET request for each of them.
The below code snippet is following each relation link up to three. In this example, the Invoke-RestMethod cmdlet will stop querying for issues once it hits 90 (30 items per request) using the
$Params = @{
   Uri = "https://api.github.com/repos/powershell/powershell/issues"
     FollowRelLink = $true
     MaximumFollowRelLink = 3
 }
 Invoke-RestMethod @Params
When using the FollowRelLink parameter, Invoke-RestMethod returns an array of objects (Object[]). Each item in the array contains the response from one of the relation links, which could be another array of objects itself!
3. Re-run the previous example but this time check on the returned results from the initial query. You’ll see a count of only 3, meaning three “pages.” But you’ll see that the first page of items ($Results[0]) contains 30 items.
$Params = @{
   Uri = "https://api.github.com/repos/powershell/powershell/issues"
     FollowRelLink = $true
     MaximumFollowRelLink = 3
 }
 # Store the three pages of results in the $Results variable.
 $Results = Invoke-RestMethod @Params
 # Check that $Results contains three items (pages of issues from the GitHub issues API).
 $Results.Count
 # Check that the first item in the $Results array contains the first page of thirty issues.
 $Results[0].Count
4. Finally, iterate over each item in the $Results variable using a foreach loop. You’ll see below you’ll have to iterate over each page with a foreach loop. Then, for each page, iterate over all of the items in that page requiring a nested loop.
# This might be different depending on the data structure of the API you are using.
# 1) $Results.ForEach({}) - this loops through each page in the $Results array.
# 2) $_.ForEach({}) - this loops through each item in the current page.
# 3) $_ - this simply returns each item to the pipeline.
 $AllResults = @( $Results.ForEach({ $_.ForEach({ $_ }) }) )
# Check that the $AllResults variable contains all ninety items.
 $AllResults.Count
$AllResults).Maintaining Session Information
When working with APIs, it’s often useful to store information related to a previous request such as headers, credentials, proxy details, and cookies, to re-use in subsequent requests. All of this information is stored in a session.
The Invoke-RestMethod can leverage sessions by storing the session using the SessionVariable parameter and then referencing that session using the WebSession parameter.
To demonstrate, call the posts endpoint again and this time use the SessionVariable parameter, as shown below. In this example, Invoke-RestMethod will create a variable called MySession.
Remember, the session object isn’t a persistent connection. A session is simply an object that contains information about the request.
# Invoke the request storing the session as MySession.
# The SessionVariable value shouldn't include a dollar sign ($).
Invoke-RestMethod -Uri "https://jsonplaceholder.typicode.com/posts" -SessionVariable "MySession"

# Print the session object to the console.
$MySession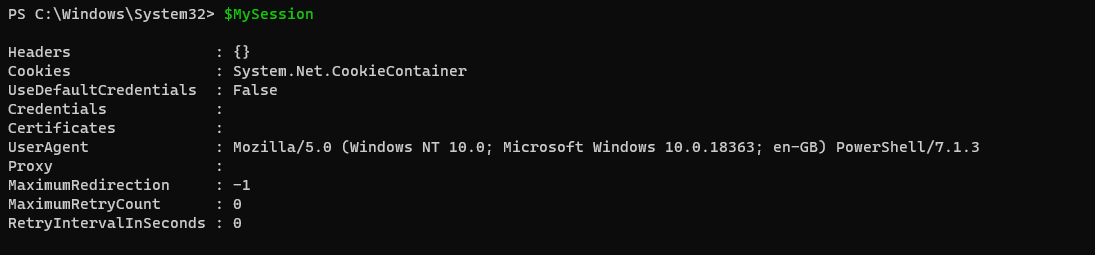
Now, re-use the session information by calling Invoke-RestMethod with the WebSession parameter. As you can see in the following example, all previous session values are passed via the $MySession variable in the new request.
# Invoke the request using the session information stored in the $MySession variable.
Invoke-RestMethod -Uri "https://jsonplaceholder.typicode.com/posts" -WebSession $MySession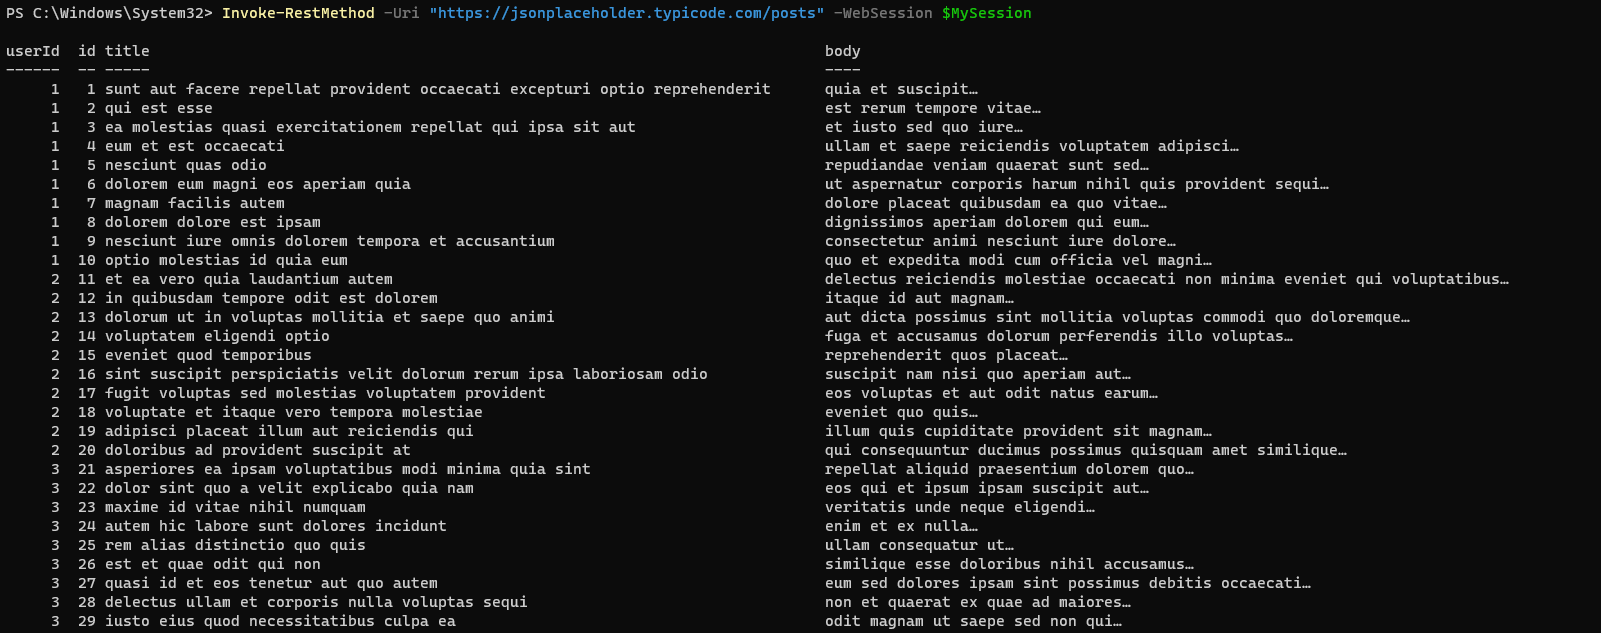
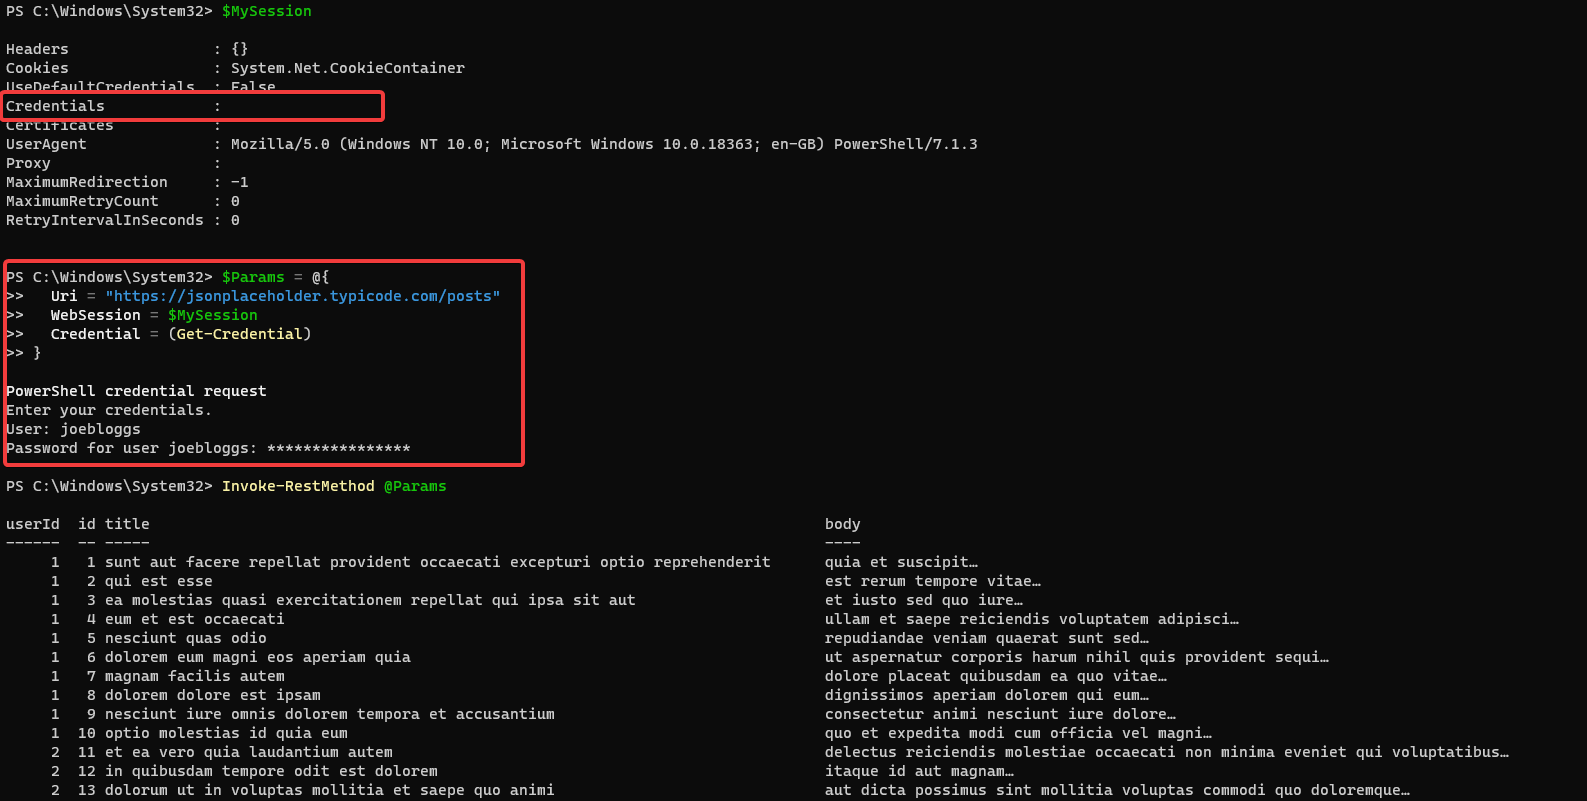
Overriding Session Values
A session contains various information about the request. If you want to re-use the session but change a value, you can override it.
Perhaps, you’d like to re-use the session previously created but now authenticate with a username and password. Let’s first see what the before situation looks like.
Notice below that the $MySession object does not contain any value for the Credentials property. But, after invoking Invoke-RestMethod again using the Credential parameter, the REST endpoint receives the credential even though it wasn’t in the session.
# Print the $MySession variable to the console to demonstrate that the Credentials
# property is empty.
$MySession

# Override the session value by specifying the Credential parameter.
# In this example you will be prompted for the username and password.
$Params = @{
	Uri = "https://jsonplaceholder.typicode.com/posts"
	WebSession = $MySession
	Credential = (Get-Credential)
}

Invoke-RestMethod @Params
The property in the saved session is named
Credentials, but the parameter name isCredential. The names will not always match.
Saving the Response Body to a File
Sometimes it will be necessary to save the response from a request to a file. To do that, use the OutFile parameter.
Run Invoke-RestMethod again to query the tutorial’s testing endpoint but this time use the OutFile parameter and provide a file path.
You’ll see below that Invoke-RestMethod queries the endpoint, returns the response in JSON format, and then saves the raw JSON into the .\my-posts.json file.
You can also use the
PassThruparameter to return the response to the console and save a file with the response at once.
# Save post items to my-posts.json in the current directory.
Invoke-RestMethod -Uri "https://jsonplaceholder.typicode.com/posts" -OutFile "my-posts.json"

# Print the contents of the JSON file to the console.
# ".\" in this command refers to the current working directory in your terminal session.
Get-Content -Path ".\my-posts.json"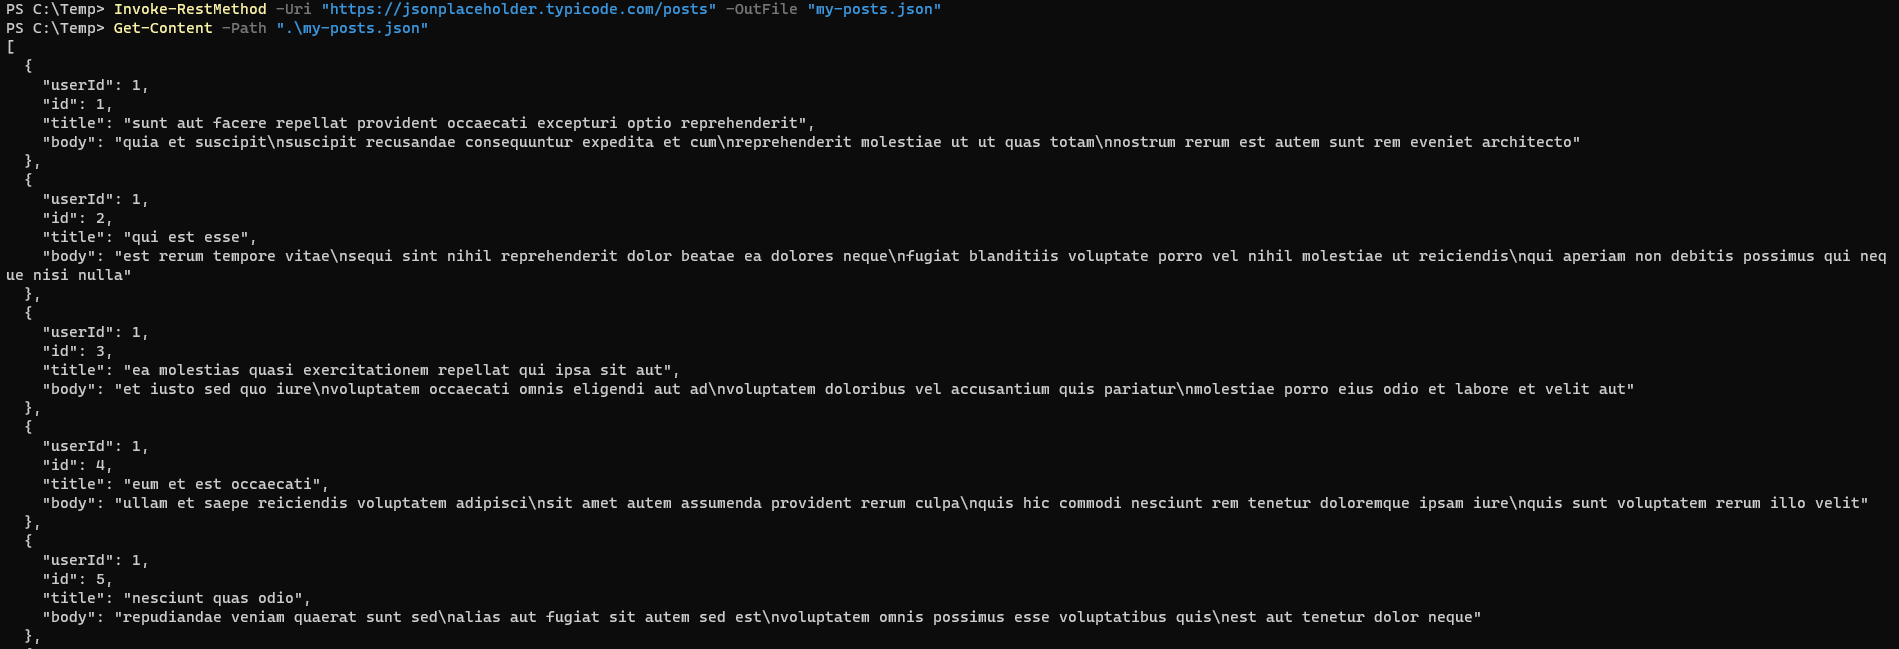
Once you have the response saved as JSON in a file, you can parse it for information as you’d like. Below you’ll find a good example of finding a post with a specific ID.
# Save the response to "my-posts.json" and also in the $Posts variable using PassThru.
$Posts = Invoke-RestMethod -Uri "https://jsonplaceholder.typicode.com/posts" -OutFile "my-posts.json" -PassThru

# Filter posts with 1 as the userId into a new variable ($User1Posts).
$User1Posts = $Posts.Where({$_.userId -eq 1})

# Import all posts from the "my-posts.json" file and store them in the $AllUserPosts variable.
$AllUserPosts = Get-Content -Path ".\my-posts.json" | ConvertFrom-Json

# Print the count of both variables to the console to demonstrate that they are different.
$User1Posts.Count
$AllUserPosts.Count
Working with SSL and Certificates
Throughout this tutorial, you’ve only been working with HTTP. HTTPS and SSL haven’t come into the picture. But that doesn’t mean Invoke-RestMethod won’t work with SSL. In fact, it can manage just about anything you need.
Skipping Certificate Validation
By default, Invoke-RestMethod validates any SSL site’s certificate to ensure it’s not expired, revoked, or the trust chain is intact. Although this behavior is a security feature you should leave on, there are times, like when testing, you need to disable it.
To skip certificate validation, use the SkipCertificateCheck parameter. This parameter removes all certificate validation Invoke-RestMethod typically runs.
Specifying a Client Certificate for a Request
If you need to specify a client certificate for a particular request, use Invoke-RestMethod‘s Certificate parameter. This parameter takes an X509Certificate object as its value which you can retrieve using the Get-PfxCertificate command or the Get-ChildItem command from within the Cert: PSDrive.
For example, the following command uses a certificate from the Cert: drive to make a request to the JSONPlaceholder APIs posts endpoint.
# Change location into your personal certificate store.
Set-Location "Cert:\CurrentUser\My\"

# Store the certificate with the thumbprint DDE2EC6DBFF56EE9C375A6073C97188ABAA4F5E4 in a variable ($Cert).
$Cert = Get-ChildItem | Where-Object {$_.Thumbprint -eq "DDE2EC6DBFF56EE9C375A6073C97188ABAA4F5E4"}

# Invoke the command using the client certificate.
Invoke-RestMethod -Uri "https://jsonplaceholder.typicode.com/posts" -Certificate $Cert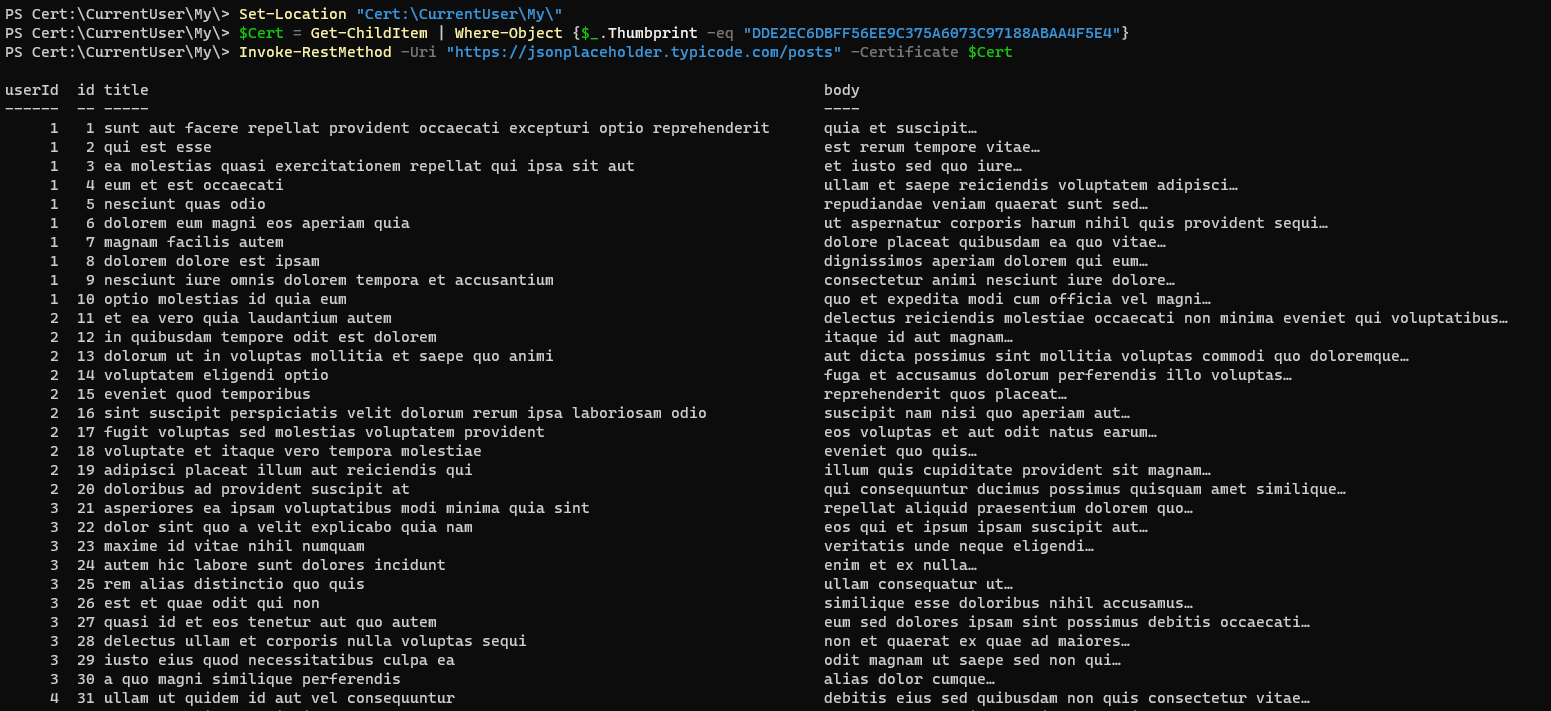
Restricting SSL/TLS Protocols
By default, all SSL/TLS protocols supported by your system are allowed. But, if you need to restrict a request to a specific protocol version(s), use the SslProtocol parameter.
Using the SslProtocol, you can specifically call a URI with a version of TLS from v1, 1.1, 1.2 and 1.3 as an array.
# Restrict the request to only allow SSL/TLS 1.2 and 1.3 protocol versions.
Invoke-RestMethod -Uri "https://jsonplaceholder.typicode.com/posts" -SslProtocol @("Tls12", "Tls13")
On non-Windows platforms, you may not have
TlsorTls12as an option. Support forTls13is not available on all operating systems and will need to be verified on a per operating system basis.Tls13is only available in PowerShell 7.1+.
Other Interesting Features
To wrap up this tutorial, let’s finish off with some useful parameters but don’t necessarily need an instruction section.
Using a Proxy Server
Corporate environments often use proxy servers to manage internet access. To force Invoke-RestMethod to proxy its request through a proxy, use the Proxy parameter.
If you need to authenticate to the proxy, either supply a PSCredential object to the ProxyCredential parameter or use the switch parameter ProxyUseDefaultCredentials to use the currently logged-on user’s credentials.
# Invoke request using proxy server <http://10.0.10.1:8080> and the current user's credentials.
Invoke-RestMethod -Uri "https://jsonplaceholder.typicode.com/posts" -Proxy "http://10.0.10.1:8080" -ProxyUseDefaultCredentials
Skipping Checks and Validation
Using these parameters can expose you to potential security risks. You’ve been warned!
The Invoke-RestMethod cmdlet has many different checks it does under the hood. If you’d prefer to disable these checks for some reason, you can do with with a few parameters.
- SkipHeaderValidation – Disable validation for values passed to the
ContentType,Headers, andUserAgentparameters. - SkipHttpErrorCheck – Any errors will be ignored. The error will be written to the pipeline before processing continues.
- StatusCodeVariable – When using
SkipHttpErrorCheck, you might need to check the HTTP response status code to identify success or failure messages. TheStatusCodeVariableparameter will assign the status code integer value to a variable for this purpose.
Disabling Keep Alive
TCP Keep Alive is a handy network-level feature that allows you to create a persistent connection to a remote server (if the server supports it). By default, Invoke-RestMethod does not use Keep Alive.
If you’d like to use Keep Alive, potentially reducing the CPU and memory usage of the remote server, set the DisableKeepAlive parameter to $false.
Invoke-RestMethod -Uri "https://jsonplaceholder.typicode.com/posts" -DisableKeepAlive $falseChanging the Encoding Type
Whenever Invoke-RestMethod sends a request to a remote endpoint, it encodes the request using a transfer-encoding header. By default, Invoke-RestMethod and the server negotiate this encoding method, but you can explicitly define an encoding type with the TransferEncoding parameter.
If you’d like to change the encoding type, you may do using:
- Chunked
- Compress
- Deflate
- GZip
- Identity
Conclusion
In this tutorial, you’ve learned how Invoke-RestMethod makes interacting with REST APIs much easier than with standard web requests. You’ve looked at parameters for authentication, sending data in the body of a request, maintaining session state, downloading files, and much more.
Now that you’re up to speed on Invoke-RestMethod and working with REST APIs, what REST API will you try this handy cmdlet on?


